


This Verified Node Spotlight is a guest post written by Nicolas Fry, CEO of TurboDocx.
The deal is closed and the contract is ready. It's been sitting in someone's inbox for three days, waiting for an "OK, send it." Once it's finally signed, the PDF ends up in a Downloads folder instead of the shared drive.
n8n can already handle most of that. It can pull the deal data, generate the document, route it for approval, and file it wherever you like. But there hasn't been a native node for the one step that makes a contract a contract: the signature. So the workflow stops there, and someone finishes the job by hand.
In this post, you'll build a workflow that closes that gap. A row in Excel marked Ready to send becomes a generated contract. A manager approves it in Slack. It goes out for signature. When the client signs, the executed PDF is filed in SharePoint and the row updates itself. The signature step runs on the verified TurboDocx node.
What you'll build
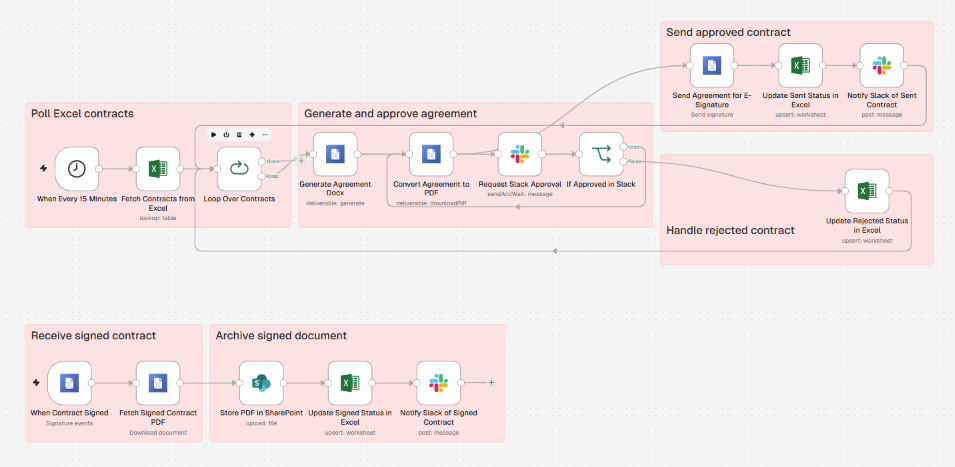
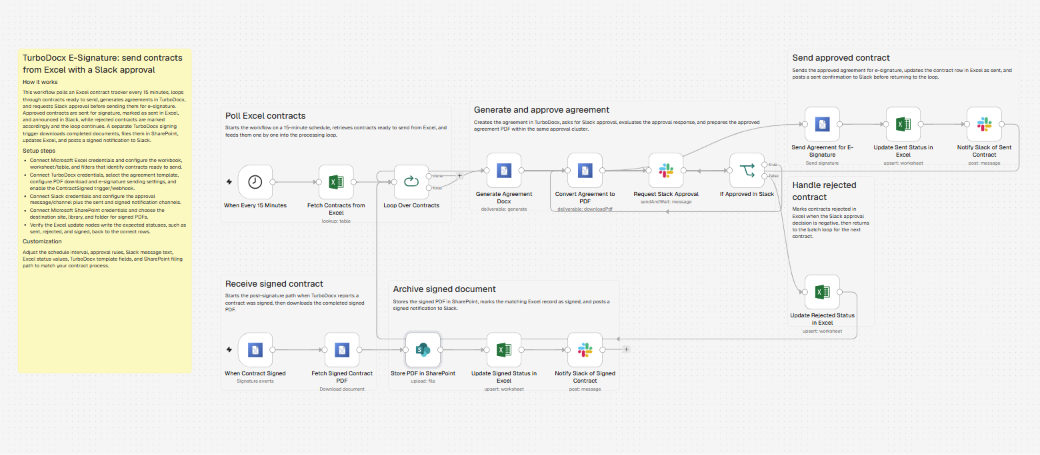
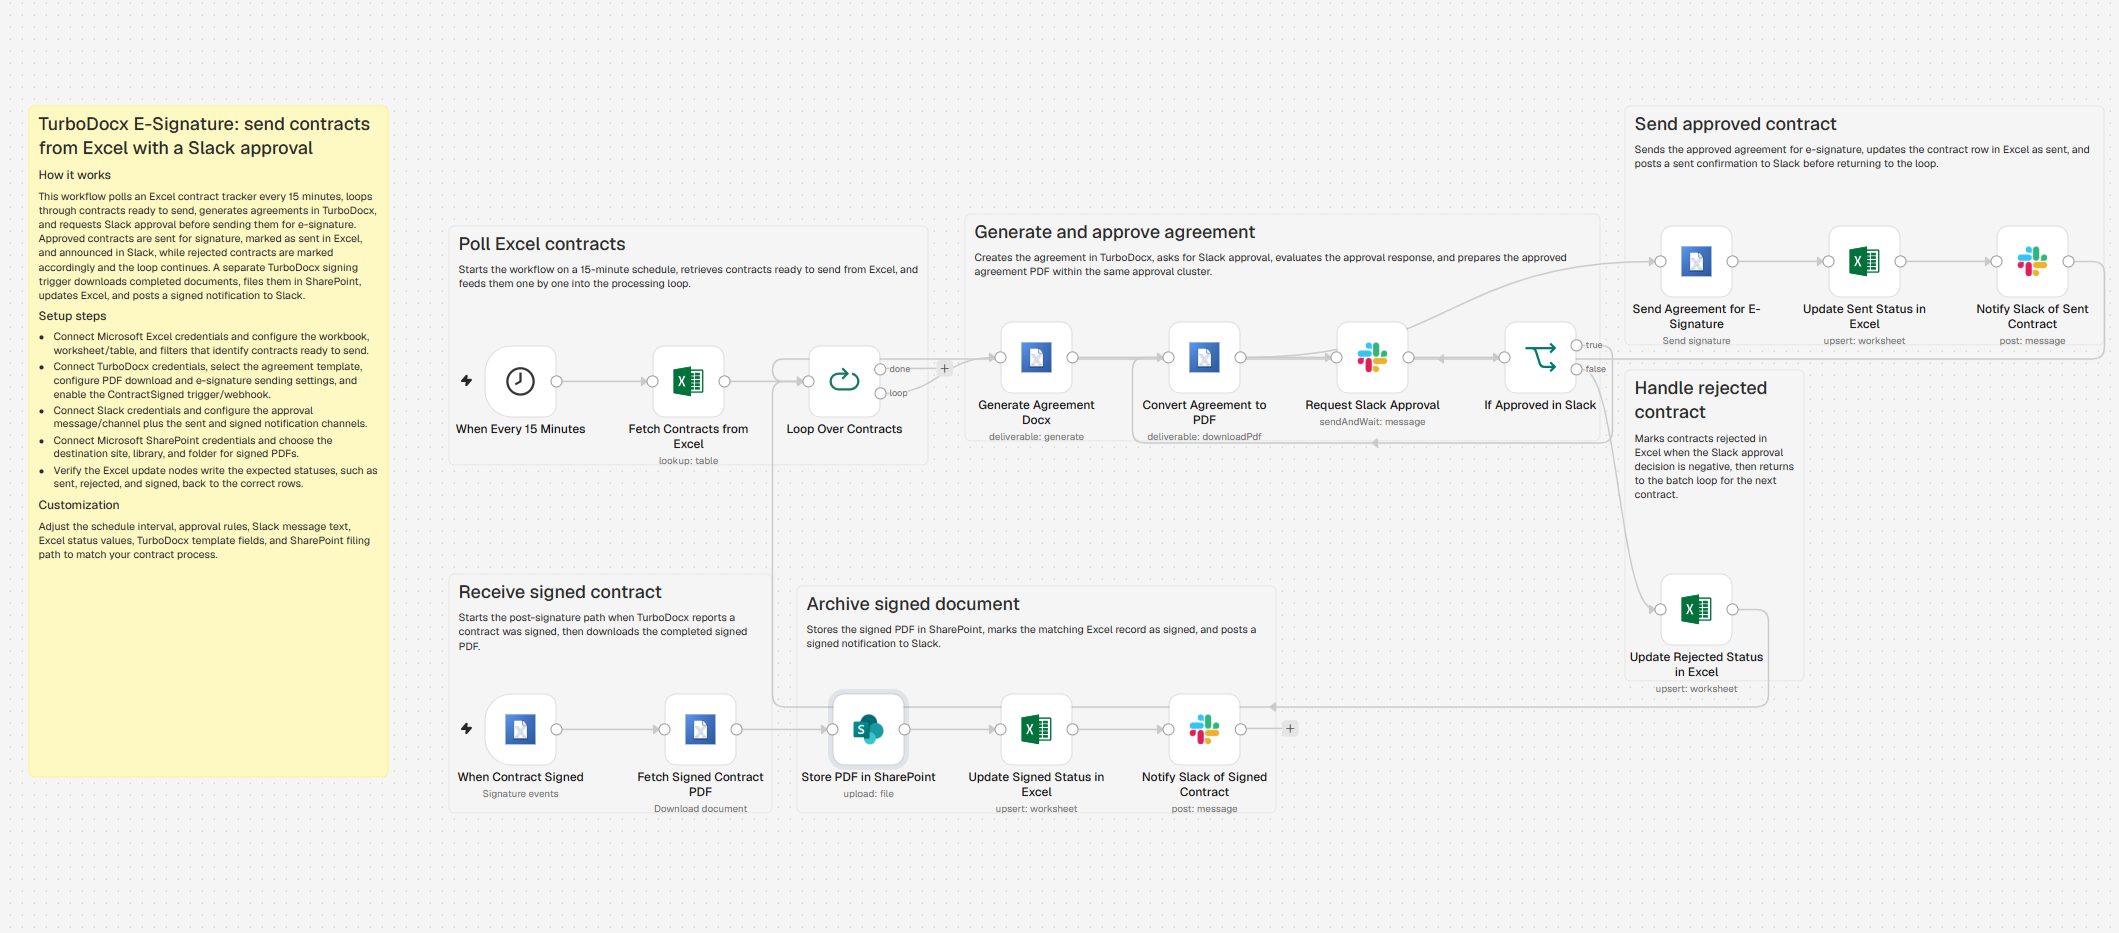
The canvas has two parts. One sends contracts, and the other waits for signatures.
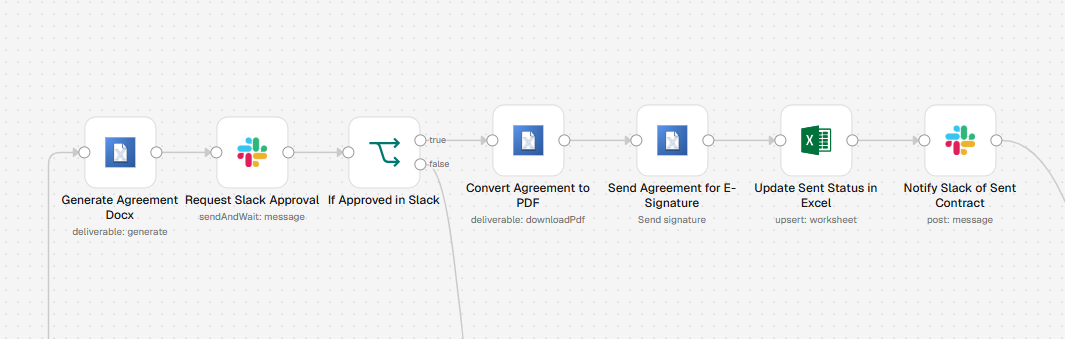
Part A: send. This part runs every 15 minutes.
- Schedule Trigger starts the run.
- Microsoft Excel reads the contract table and keeps only rows marked Ready to send.
- Loop Over Items handles one contract at a time.
- TurboDocx generates the agreement from your template and converts it to PDF.
- Slack posts an Approve & send / Reject message and waits.
- If branches on the answer.
- TurboDocx sends approved contracts for signature.
- Microsoft Excel marks the row Sent or Rejected, and Slack lets the team know.
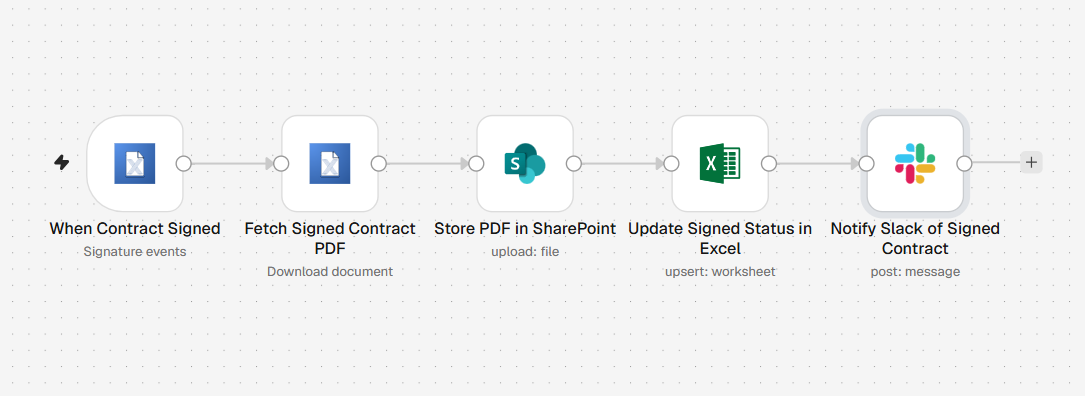
Part B: file. This part runs when someone signs.
- TurboDocx Trigger fires on signature and downloads the executed PDF.
- Microsoft SharePoint uploads it to your contracts folder.
- Microsoft Excel marks the row Signed, and Slack posts the good news.
Before you start
- An n8n instance. Cloud or self-hosted both work. Start a free trial if you don't have one yet.
- The TurboDocx node. Install the TurboDocx node directly from the canvas via the Node panel in n8n. You will be prompted to do this if you import the template below.
- A TurboDocx account. The free tier includes 5 document generations and 5 signatures a month. That's plenty for building and testing.
- Microsoft 365 with Excel and SharePoint, and credentials for both set up in n8n.
- A Slack workspace and an approvals channel, such as #contract-approvals.
Create a free TurboDocx account at TurboDocx.com and start generating documents and sending them for e-signature straight from your n8n workflows. Your account has everything you need to follow this walkthrough end to end. And if you're building quote-to-contract flows, TurboQuote, our CPQ product, brings configure-price-quote into the same document and signature engine.
Import the template to follow along.
Step 1: Set up your contract queue in Excel
Each row is one contract, and the Status column is the queue. The workflow picks up anything marked Ready to send and updates the status as the contract moves along. Your team gets one place to see where every contract stands.
Create a table in an Excel workbook stored in SharePoint or OneDrive, with these columns:
- Status: Ready to send → Sent / Rejected → Signed
- Client Name, Company, Email (the signer)
- Amount, Start Date, plus Document ID and Signed At, which the workflow fills in
In the Microsoft Excel node, pick your workbook, worksheet, and table, then set Operation to Lookup, Lookup Column to Status, Lookup Value to Ready to send, and turn on Return All Matches.

Step 2: Prepare the contract template
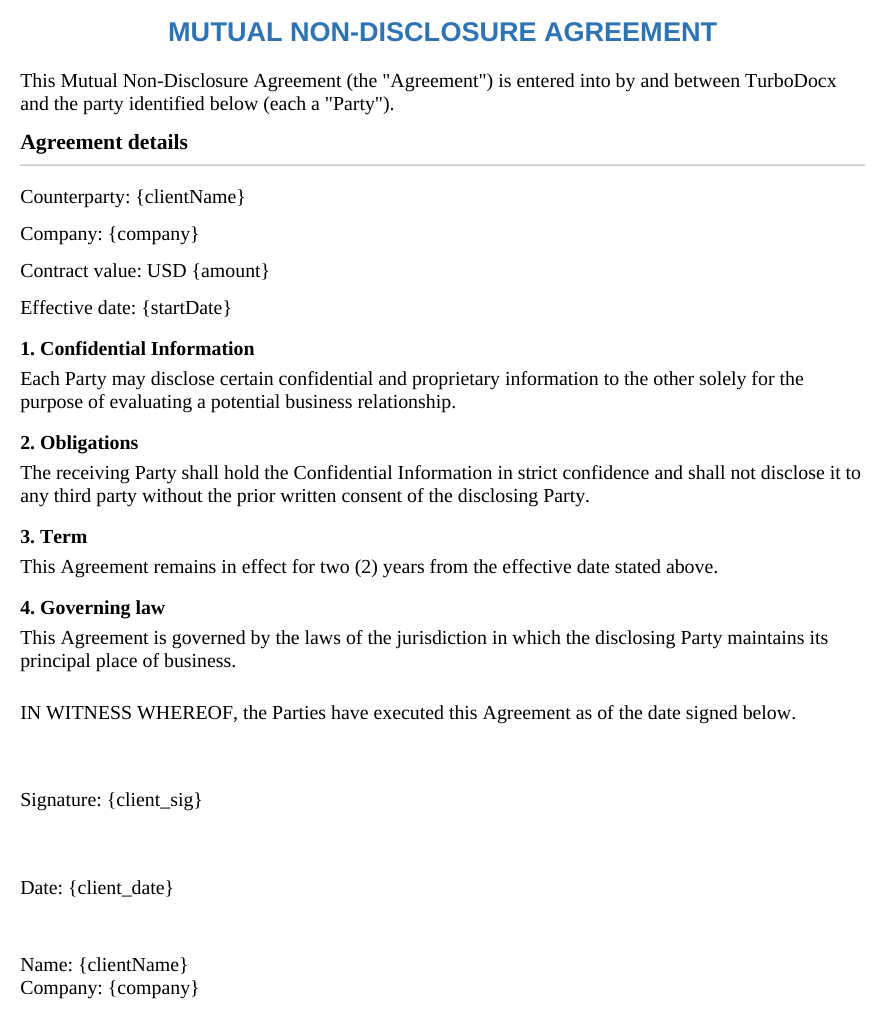
Start with the contract legal has already approved, as a regular Word .docx file. Replace the parts that change with merge variables like {clientName}, {amount}, and {startDate}.
Then add two anchors for the signature:
- {client_sig} marks where the signer's signature goes.
- {client_date} marks where the signing date is stamped.
Upload the file to TurboDocx and copy the template ID. Everything outside the variables stays exactly as legal wrote it.
Step 3: Generate the contract
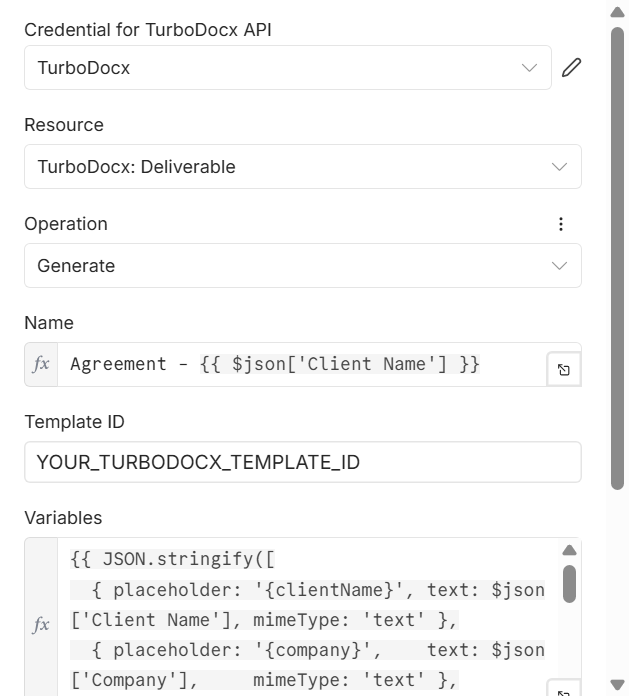
Open the Generate Agreement Docx node, select your credential, and paste in the template ID. Then map each variable to its Excel column:
clientName → {{ $json["Client Name"] }}amount → {{ $json["Amount"] }}startDate → {{ $json["Start Date"] }}
Run the node on a test row. You'll get a finished contract back in a few seconds, formatted exactly like your template.
Step 4: Approve it in Slack
This step is where a person weighs in. The Slack node uses Send and Wait for Response to post the contract to your approvals channel with Approve & send and Reject buttons. The workflow waits until someone clicks one.
Edit the message so the approver has what they need to decide: the client, the value, and a link to the document. The If node sends approvals on to signature. Rejections get marked Rejected in Excel, and the team gets a heads-up.

Step 5: Send it for signature
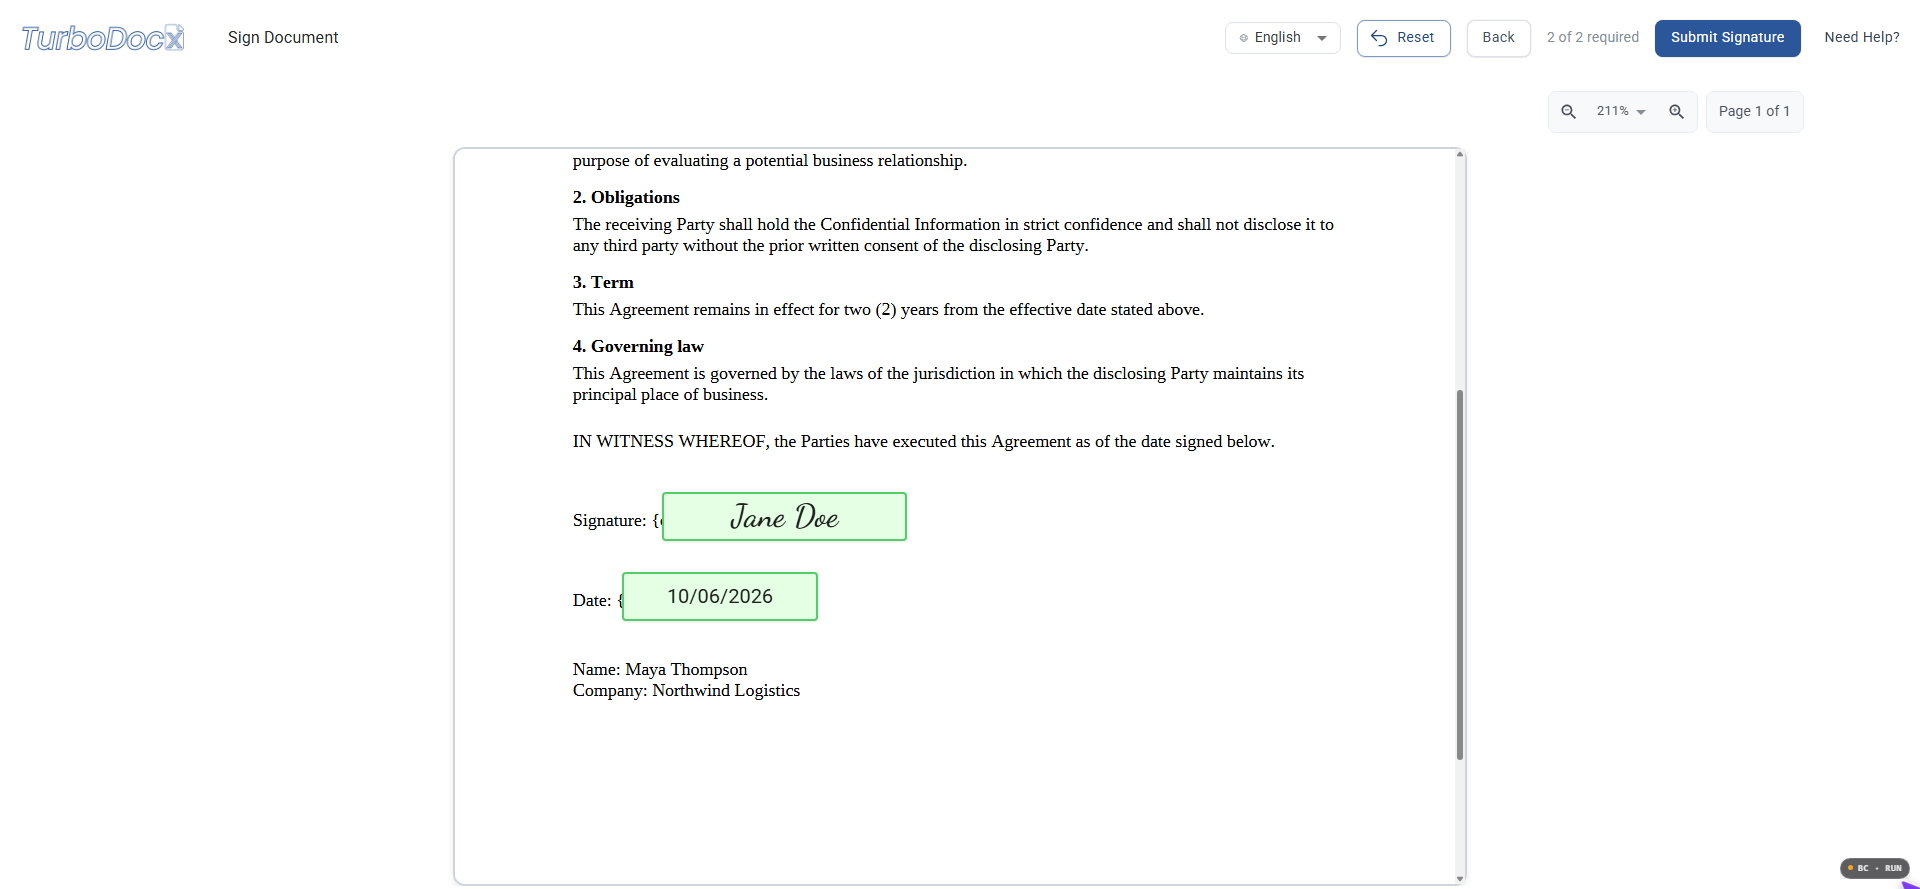
This is the step that used to be tricky in n8n before. Once the contract is approved, the workflow passes the PDF to the Send Agreement for E-Signature node (TurboSign: Send Signature). Map the signer's name and email from the Excel row.
TurboSign places the signature and date fields at the {client_sig} and {client_date} anchors, so you never drag fields into place by hand. The signer gets an email and signs from any device. Meanwhile, the row flips to Sent.
Step 6: File the signed contract in SharePoint
Part B starts with the TurboDocx Trigger. Its webhook registers itself when you activate the workflow, so there's no URL to copy.
In the Microsoft SharePoint node, pick your site and your signed-contracts folder. When the client signs, the executed PDF is uploaded, the row is marked Signed, and Slack lets everyone know.


Step 7: Test it end to end
Before you point this at real clients, run one contract through yourself:
- Activate the workflow.
- Add a row to Excel with your own email as the signer and set it to Ready to send.
- Wait for the next scheduled run, or run the workflow manually.
- Click Approve & send in Slack.
- Sign the contract from your inbox.
- Check that the PDF is in SharePoint and the row says Signed.
If all six steps work, you're done. From here on, marking a row Ready to send and clicking Approve are the only manual steps left.
Troubleshooting
- Signed contracts aren't being filed. Make sure the workflow is activated. The signature webhook only registers on activation.
- Rows aren't being picked up. The status filter matches the text exactly, so check for typos and extra spaces in Ready to send.
- No Slack message. Check that your Slack app has been added to the approvals channel.
- Signature lands in the wrong spot. Check the anchor spelling in your template. It must be exactly {client_sig} and {client_date}.
- Testing on self-hosted n8n fails with “TurboDocx webhooks require an HTTPS callback URL”. The signature trigger needs a public HTTPS address, which n8n Cloud provides out of the box. On a self-hosted instance, put n8n behind HTTPS (or a tunnel) and set WEBHOOK_URL to that address.
Why this works
Legal language can't drift. The clauses live in the template. The workflow only fills in the blanks.
Nothing goes out unapproved. Every contract waits for a click in Slack, and that approval is on record.
Nothing gets lost after signing. Every executed PDF lands in the same SharePoint folder, and the Excel row shows its status at a glance.
Where to go from here
- Swap the system of record. Trigger on a deal stage change in Salesforce or HubSpot instead of a schedule.
- Let AI draft the variable sections. Add an OpenAI or Anthropic node before generation to write the business overview from your call notes. The clauses stay fixed.
- Route by value. Send contracts over a set amount to a different approver or channel.
- Signing quotes, not contracts? The same signature step works for sales quotes. See the CPQ quote template.
Wrap up
Contracts don't need more automation around the edges. They need the last step handled: getting the signature. With that in place, n8n can take a contract all the way from a spreadsheet row to a signed PDF in the right folder, with a person still making the call to send it.
Download the template and send your first contract today with a free TurboDocx account.
We can't wait to see what you build.
Useful resources