
Discord bots offer a fantastic way to enhance your server, from automating routine tasks to adding unique, interactive elements.
In this tutorial, we'll explore how to make a Discord bot that helps streamline product announcements. By directly connecting your Google Sheets inventory to Discord, you'll automate updates and keep your community informed.
You'll learn two approaches: the traditional route using JavaScript and the streamlined power of n8n, the low-code automation platform.
Is making a Discord bot easy?
The ease of creating a Discord bot depends on your chosen approach and your existing coding skills. Here's a breakdown:
- Make a Discord bot with JavaScript, Python, etc: If you're comfortable with programming languages like JavaScript, Python, or C#, you have immense flexibility to build custom Discord bots. Keep in mind that this involves understanding the Discord API and setting up suitable hosting for your bot.
- Make a Discord bot without coding: Low-code tools like n8n streamline the process significantly. With n8n's visual interface, you can connect Discord actions and other services using a drag-and-drop approach. This often eliminates the need for in-depth coding, making bot creation much more accessible, even for beginners.
Let's now dive into making a Discord bot!
How to make a Discord bot using JavaScript
In this tutorial, we'll guide you through building a custom Discord bot that connects to your Google Sheet and posts a message whenever the document is updated. We'll use JavaScript (NodeJS) to create our Discord bot.
Prerequisites
- Node.js: Ensure you have Node.js installed on your system. You can download it from the official website (https://nodejs.org/).
- A Discord channel webhook
- A Google Sheets spreadsheet to store product inventory. This needs to be shared to be accessible using a Google API key. For the sake of simplicity, it can look something like this:

- A Google Cloud project where you'll need to enable the Google Sheets and Google Drive APIs. You will also need to obtain an API key.
Step 1: Set up dependencies and API Keys for Discord bot development
To begin our Discord bot development, let's lay the foundation with a Node.js project and install essential dependencies.
Open your terminal or command prompt and navigate to your desired project location.
Execute the following commands to create a new directory and initialize your Node.js project:
mkdir discord-bot
cd discord-bot
npm init -y
The npm init -y command generates a package.json file to help you manage your project's dependencies.
Next, let’s install the libraries we will use to help us code the bot’s functionalities:
npm install googleapis node-cron
Now, the package.json file should look like this:
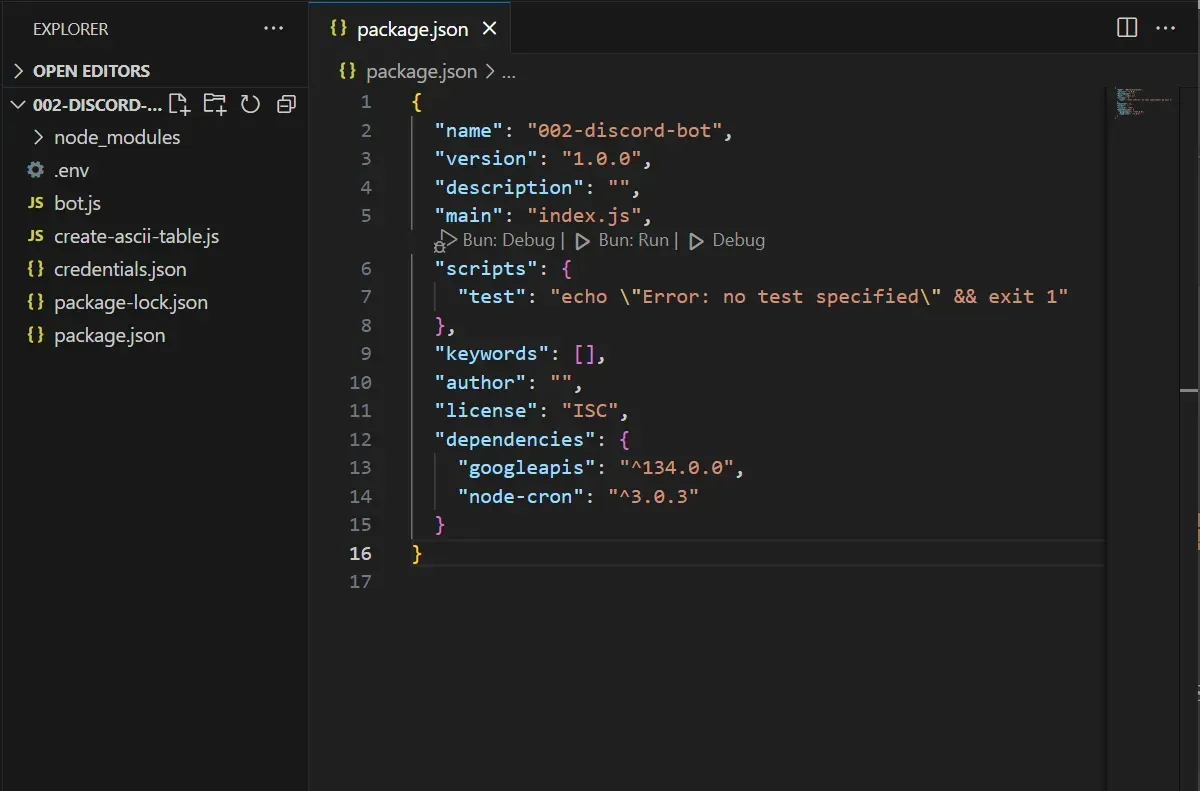
The googleapis library is our key to interacting with both the Google Sheets and Google Drive APIs, enabling us to fetch inventory data and track updates.
node-cron helps us schedule the automated checks that will trigger Discord notifications.
We are going to use fetch for making HTTP requests to the Discord webhook.
Let’s create a new file in our project called bot.js. Inside this file, start by importing the installed dependencies and setting up your API keys and identifiers.This sets the stage for connecting with both Google services and your Discord channel.
const fetch = require('node-fetch');
const { google } = require('googleapis');
const cron = require('node-cron');

const GOOGLE_API_KEY = 'YOUR_GOOGLE_API_KEY';
const SPREADSHEET_ID = 'YOUR_SPREADSHEET_ID';
const DISCORD_WEBHOOK_URL = 'YOUR_DISCORD_WEBHOOK_URL';
Step 2: Configure Google API clients and set up file monitoring
Create instances of the Sheets and Drive API clients and use the API key as authorization method:
const sheets = google.sheets({ version: 'v4', auth: GOOGLE_API_KEY });
const drive = google.drive({ version: 'v3', auth: GOOGLE_API_KEY })
Google Drive API will help us determine when the file last changed, while Google Sheets API will be used to get the actual contents of the file.
Let’s define the function responsible get the last modified date of the file:
async function fetchFileLastModifiedTime() {
  try {
    const response = await drive.files.get({
      fileId: SPREADSHEET_ID,
      fields: 'modifiedTime'
    });
    return response.data.modifiedTime;
  } catch (error) {
    console.error(error);
    return new Date();
  }
}
Additionally, create a function to retrieve product data from the specified column range in your Google Sheet:
async function getSheetData(range) {
  try {
    const response = await sheets.spreadsheets.values.get({
      spreadsheetId: SPREADSHEET_ID,
      range: range
    });
    const rows = response.data.values;
    if (!rows || rows.length === 0) {
      console.log('No data found.');
      return [];
    }
    return rows;
  } catch (error) {
    console.error(error);
    return [];
  }
}
Let’s implement a mechanism that can detect when the file has changed. First, we declare a global variable to keep track of the file's last updated date.
let lastModifiedTime = new Date();
We initialize the timestamp with a new Date object to prevent it from sending a message immediately upon startup.
Next, we can create a function to detect changes:
async function checkForUpdates() {
  const modifiedAt = await fetchFileLastModifiedTime();
  console.log('Checking for updates...');
  if (new Date(modifiedAt).getTime() > new Date(lastModifiedTime).getTime()) {
    lastModifiedTime = modifiedAt;
    console.log('Spreadsheet modified at:', modifiedAt);
    const updatedRows = await getSheetData('stock!A:C');
    await announceProductUpdates(updatedRows);
  } else {
    console.log('No updates found.');
  }
}
Here we retrieve the last modified time from Google Drive API. We then compare it to the stored value we have in our global variable.
When there are updates after our last update, we fetch the content from the Google Sheet and then announce the product updates on the Discord channel.
Step 3: Make a Discord announcement using Discord’s webhook integration
Announcing product updates using Discord’s webhook integration is straightforward . We just need to call an API endpoint with the POST method and the message we want to send in the request body. Here is a function that does just that:
async function announceProductUpdates(updatedRows) {
  const message = `Hey everyone! We have product updates! 🎉\n${updatedRows}`;
  await fetch(DISCORD_WEBHOOK_URL, {
    method: 'POST',
    headers: { 'Content-Type': 'application/json' },
    body: JSON.stringify({ content: message })
  });
}
When we test this out, it sends a message to the Discord channel:

As you can see, the message lacks proper formatting. Let’s improve the message's readability by formatting it as a table. For that, we can create a helper function called formatAsAsciiTable:
function formatAsAsciiTable(data) {
  let table = "";
  let headers = data[0]; // Use first row as headers if it exists
  // Get the longest string in each column
  let longest_strings = [];
  for (let i = 0; i < headers.length; i++) {
    let longest_string = headers[i].toString().length; // Account for header length
    for (let j = 1; j < data.length; j++) {
      let string_length = data[j][i].toString().length;
      if (string_length > longest_string) {
        longest_string = string_length;
      }
    }
    longest_strings.push(longest_string);
  }
  // Add the headers to the table
  for (let i = 0; i < headers.length; i++) {
    table += headers[i].toString().padEnd(longest_strings[i] + 2, " ");
  }
  // Add the data to the table
  for (let i = 1; i < data.length; i++) {
    table += "\n";
    for (let j = 0; j < headers.length; j++) {
      table += data[i][j].toString().padEnd(longest_strings[j] + 2, " ");
    }
  }
  return table;
}
This just takes in the rows from the Google Sheet and creates a nicely formatted table.
Now modify the announceProductUpdates function to send the formatted table in the message:
async function announceProductUpdates(updatedRows) {
  const table = formatAsAsciiTable(updatedRows);
  const message = `Hey everyone! We have product updates! 🎉\n\`${table}\``;
  await fetch(DISCORD_WEBHOOK_URL, {
    method: 'POST',
    headers: { 'Content-Type': 'application/json' },
    body: JSON.stringify({ content: message })
  });
}
And now the message will look like this:
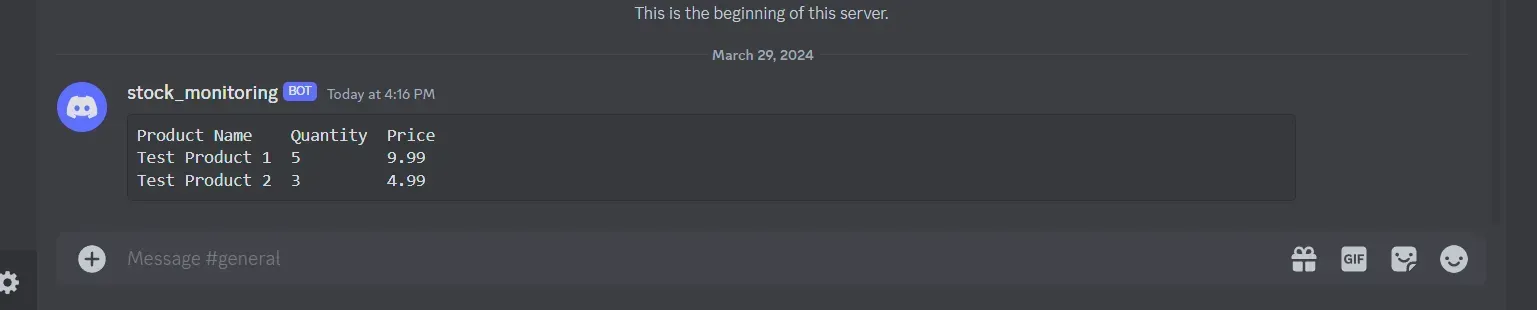
Much better!
Step 4: Implement change detection and automation
To automate the functionality, let’s periodically check for updates to the Google Sheet. We'll use a tool called cron to schedule automatic checks at preferred intervals.
The schedule variable defines how often the cron job will run. * * * * * signifies every minute, but you can adjust the settings for less frequent checks.
Then we create a function called initializeAndStartCron which will call the checkFormUpdates function based on the defined schedule. We’ll only send Discord messages if the sheet has changed since our last check:
const schedule = '* * * * *';
async function initializeAndStartCron() {
  cron.schedule(schedule, async () => {
    try {
      await checkForUpdates();
    } catch (error) {
      console.error('Error during cron update check:', error);
    }
  });
}

initializeAndStartCron();
Here's what the structure of your Discord bot script should look like:
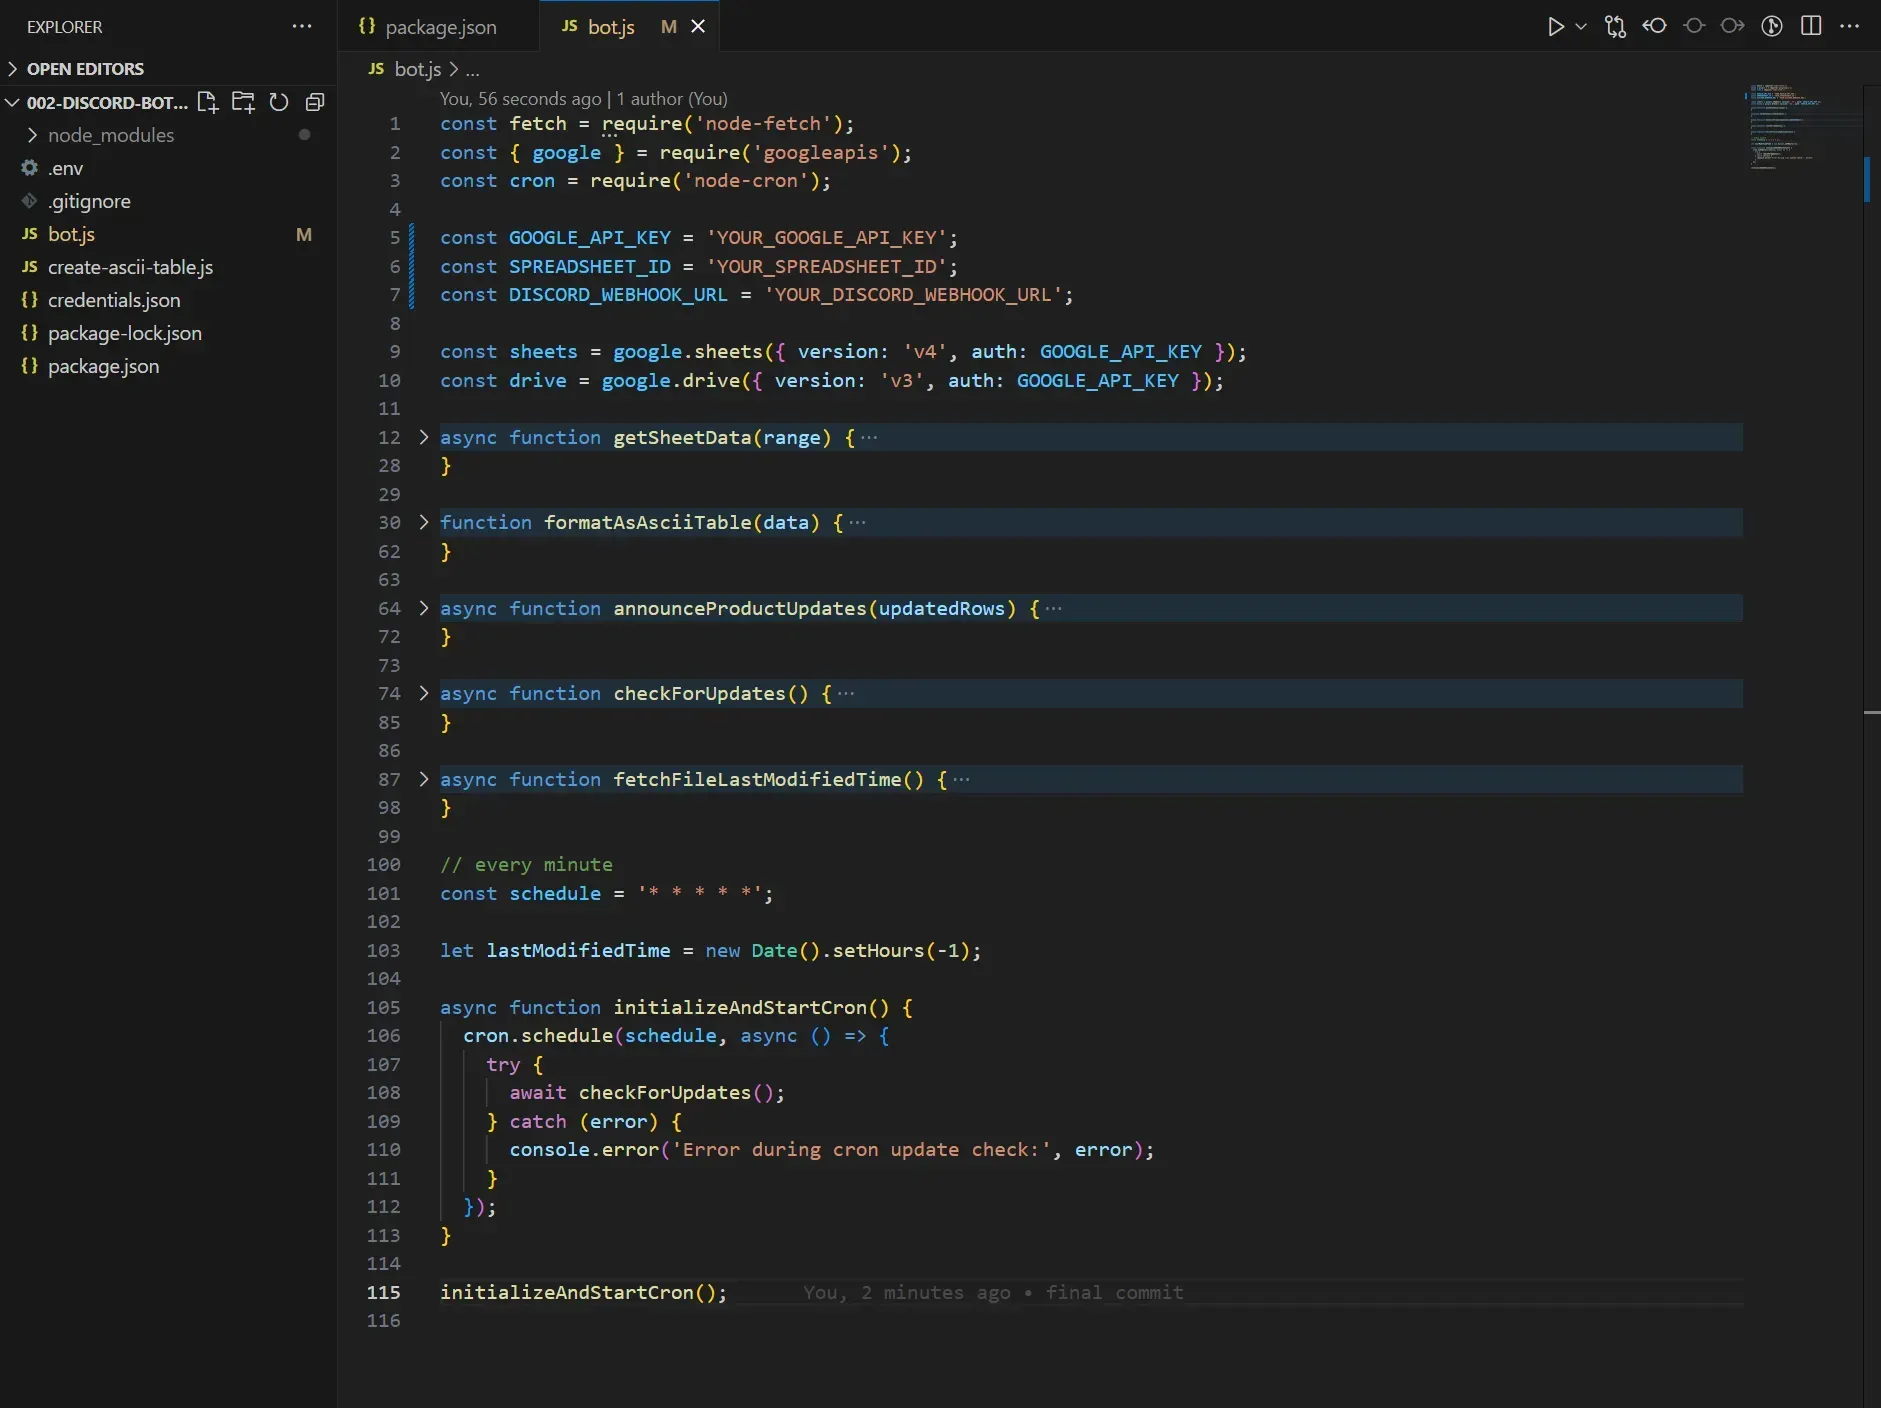
This seemingly basic functionality requires significant coding effort and a thorough understanding of the relevant Google APIs.
Step 5: Choose a hosting platform for your Discord bot
When choosing where to host your bot, consider cloud platforms (e.g., AWS, Cloudflare Workers) for ease of use and scalability. If you need greater control, dedicated servers are an option, but self-hosting is the most technically demanding.
When selecting a host, weigh the following factors:
- Cost: Cloud solutions and dedicated servers can come with significant expenses.
- Scalability: Choose a host that can grow if your bot's popularity increases.
- Security: Prioritize hosts that provide strong security for your sensitive data.
- Ease of use: If you're not a technical expert, opt for a user-friendly hosting platform.
Security is crucial when handling sensitive data like API keys and bot tokens. Always store them securely.
How to make a Discord bot without coding
If you’re looking for the fastest way to build a Discord bot, don't worry! There are simpler ways to achieve this. In this section, we'll explore how to build a Discord bot using a low-code approach, saving you valuable time and effort.
Starting with an n8n workflow template makes it easy to create your own Discord bot:
Step 1: Use Google Sheets as a workflow trigger
Start by adding a new Google Sheets trigger node. This node will initiate our workflow whenever changes are detected in the spreadsheet.
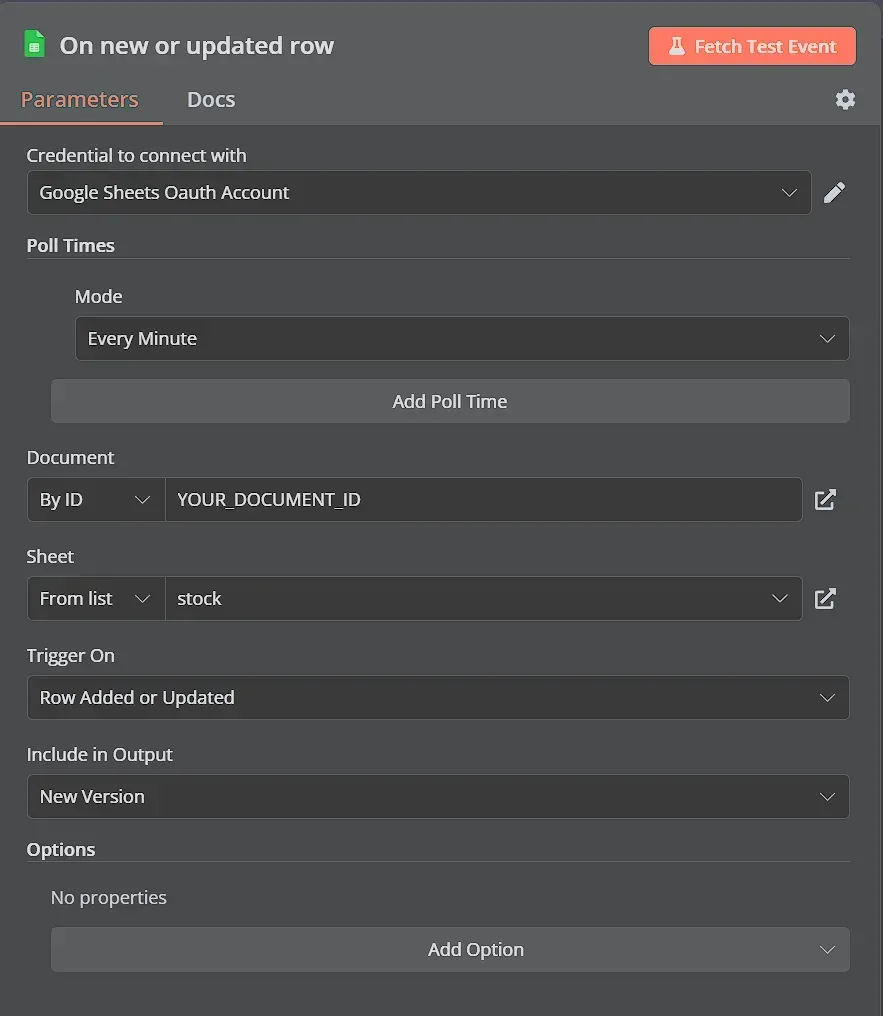
To authorize n8n to access your Google Sheet, click on Create New Credential in the Credentials to connect with the section.
Follow the Google credentials set-up guide for detailed instructions on how to connect your Google account and generate the necessary credentials.
Use the Document field to enter your spreadsheet ID. Then, from the Sheet dropdown menu, choose the specific sheet you want to monitor.
We will trigger on both updates and inserts of new rows - again this is pretty hard to do with the code version, here it’s just a dropdown option. Leave Include in Output as New Version since that is all that we need to compose our Discord message.
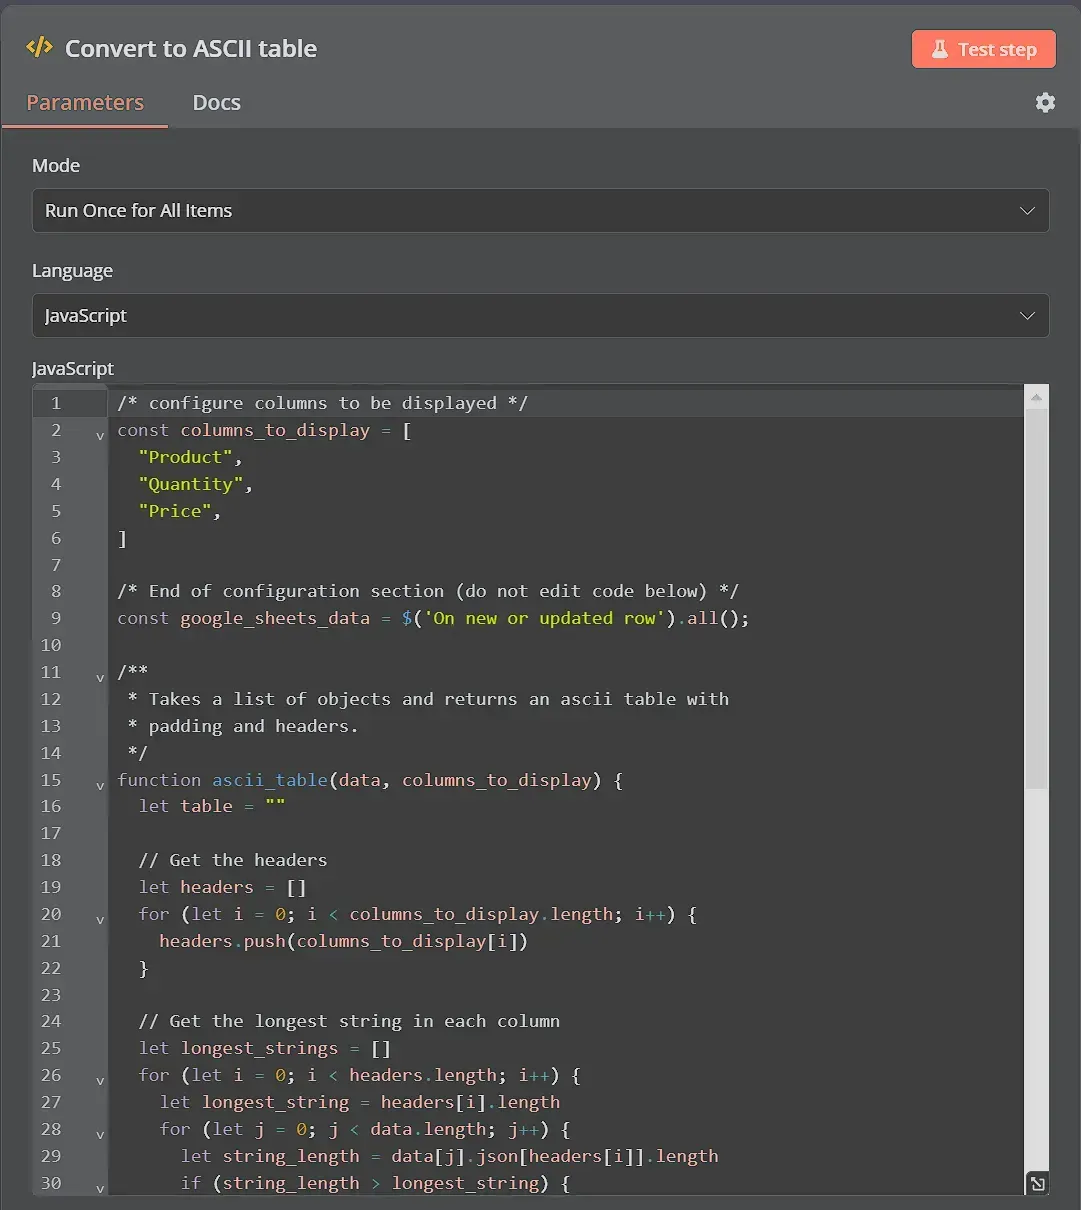
Step 2: Format the data with a JavaScript code node
To make our Discord message easy to read, let’s create a custom Code node named “Convert to ASCII table”. This node will apply a similar table-formatting function as we used in the JavaScript section.
/* configure columns to be displayed */
const columns_to_display = [
  "Product",
  "Quantity",
  "Price",
]

/* End of configuration section (do not edit code below) */
const google_sheets_data = $('On new or updated row').all();

/**
 * Takes a list of objects and returns an ascii table with
 * padding and headers.
 */
function ascii_table(data, columns_to_display) {
  let table = ""

  // Get the headers
  let headers = []
  for (let i = 0; i < columns_to_display.length; i++) {
    headers.push(columns_to_display[i])
  }

  // Get the longest string in each column
  let longest_strings = []
  for (let i = 0; i < headers.length; i++) {
    let longest_string = headers[i].length
    for (let j = 0; j < data.length; j++) {
      let string_length = data[j].json[headers[i]].length
      if (string_length > longest_string) {
        longest_string = string_length
      }
    }
    longest_strings.push(longest_string)
  }

  // Add the headers to the table
  for (let i = 0; i < headers.length; i++) {
    table += headers[i].toString().padEnd(longest_strings[i] + 2, " ")
  }

  // Add the data to the table
  for (let i = 0; i < data.length; i++) {
    table += "\n"
    for (let j = 0; j < headers.length; j++) {
      table += data[i].json[headers[j]].toString().padEnd(longest_strings[j] + 2, " ")
    }
  }

  return table
}

output = {
  ascii_table: ascii_table(google_sheets_data, columns_to_display),
}

console.log(output.ascii_table)

return output
This code formats the raw spreadsheet data into a readable table before sending it to the Discord channel.
Adjust the columns_to_display variable to include all the columns you want the final message to contain.
We then get the output of the previous node, notice we use the $(‘name of the previous node’) built-in variable. Check out the documentation for more info about built-in variables.
const google_sheets_data = $('On new or updated row').all();
And the rest is pretty much identical to the formatAsAsciiTable function from the previous section.
The node should look something like this:
Step 3: Send the update to your Discord channel
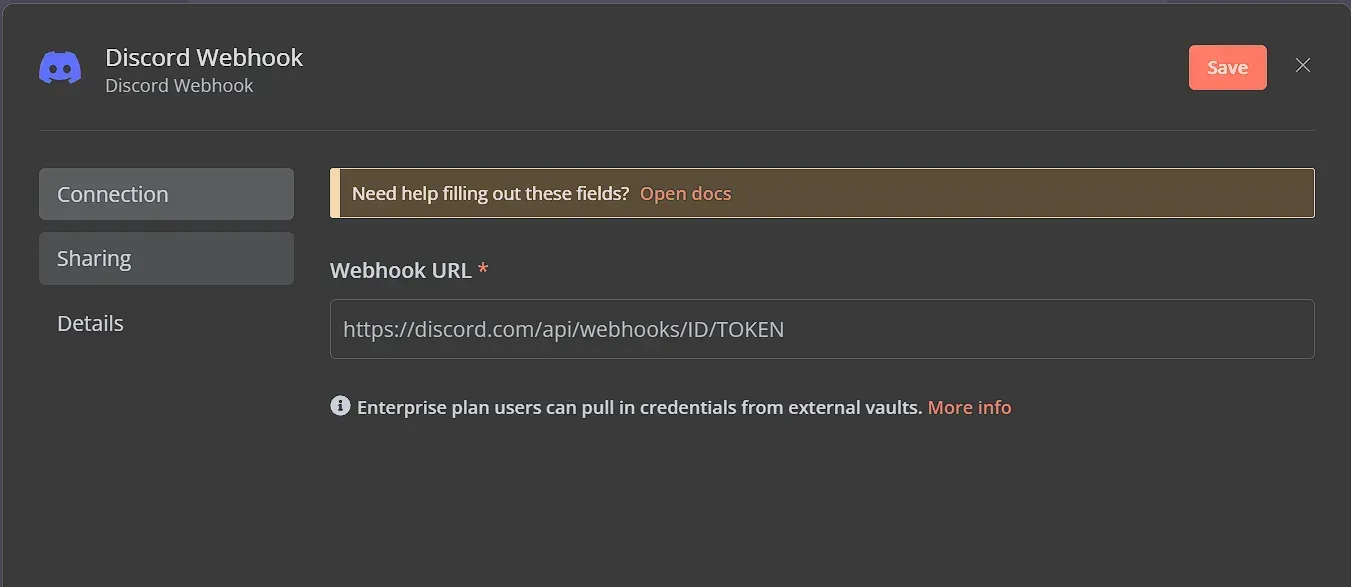
Sending a message couldn’t be easier with the Discord node! First, let’s decide how to connect to your Discord server. The Discord node offers multiple ways to do this. You can use a webhook (as in our JavaScript example), Oauth credentials or Bot credentials. Check out the Discord credentials guide for more details.
To keep it simple, let’s use the same webhook authentication as before. Choose webhook as Connection Type, then from the Credential for Discord Webhook dropdown click on Create New Credential. Using webhook credentials is as easy as pasting in the webhook URL.
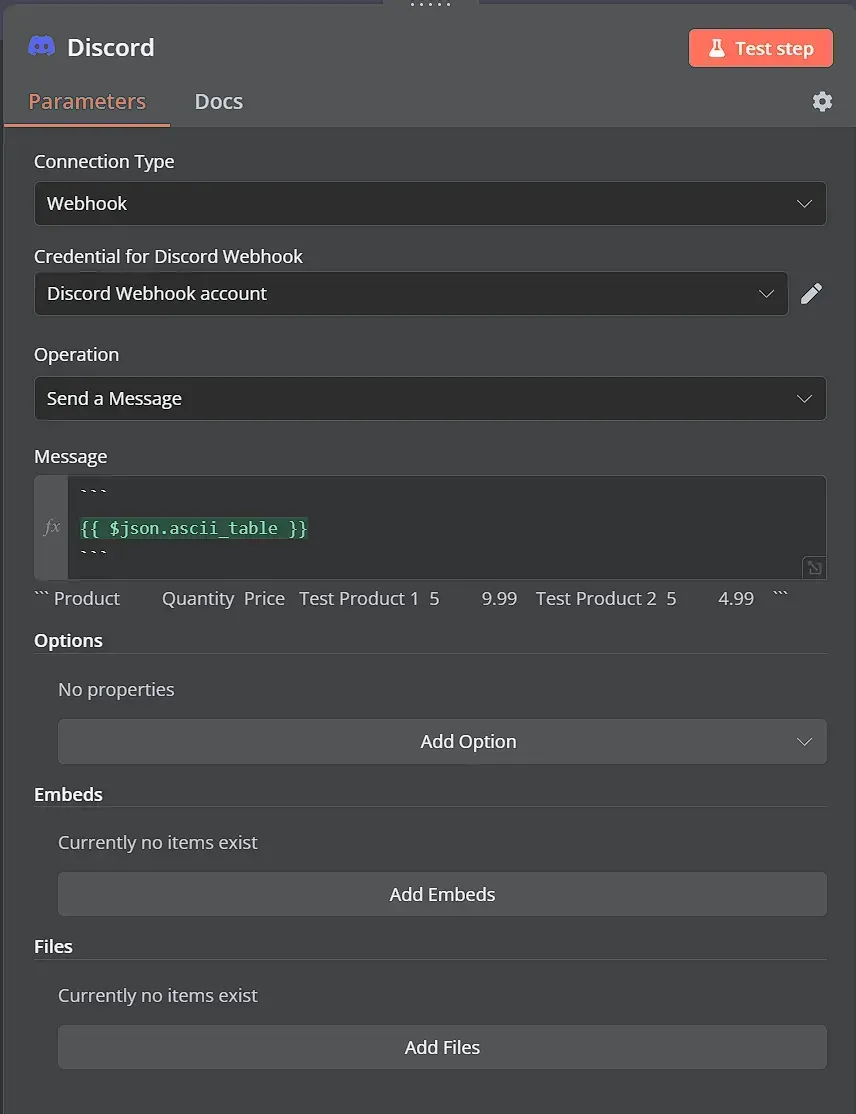
Next, let’s configure the message your bot will send. Choose Message as the Resource and Send for the Operation. Select your community and channel and enter the following in the Message field:
```
{{ $json.ascii_table }}
```
Finally, the Discord node should look like this:
Click on Test workflow and, if successful, you should see a message in your Discord channel containing the formatted product data from your Google Sheet:

Wrap up
We explored two ways to build Discord bots: traditional coding and the ease of n8n. Here's a quick recap to help you decide which path is right for you:
- JavaScript: Choose this for maximum customization and flexibility. It's ideal if you have coding experience and want fine-grained control over your bot's features.
- n8n: This is perfect when you prioritize speed and ease of use. It's great for quickly automating tasks and getting your bot up and running without extensive coding.
Whether you're a seasoned developer or new to chatbots, remember that there's a learning curve involved. We hope this guide has provided a solid foundation!
What’s next?
Ready to create your own Discord bot with n8n?
Get inspired by awesome Discord bot workflows created by other n8n users! These pre-made workflows show how you can connect Discord to other apps and services, automate cool stuff, and add unique features to your bot.
Here are a few examples to get those ideas flowing:
Or power up your Discord bot with ChatGPT! Check out this blog post to learn how to create an AI bot for analyzing user requests and automating notifications in different Discord channels.