Discord is no longer just a gamers' haven. The platform has become a key tool for various communities, even extending its reach into the business world. One of its strengths lies in its automation capabilities, eliminating repetitive tasks and enhancing community engagement.
In today’s tutorial, we’ll delve into the process of combining the power of Discord and the AI prowess of ChatGPT using n8n. You’ll learn how to pinpoint automation opportunities and set up your own user-friendly and efficient ChatGPT Discord bot (without the need for programming)!
How to build a ChatGPT Discord bot with n8n?
Before moving forward with the integration of GPT-3/4 into your Discord channel, let’s take a step back and think about the automation strategy.
First of all, Discord channel webhooks operate as a one-way street. They can post content to the channel, but the user replies are off the table. How can we make the most of it?
- Business operations often include routine announcements. Examples include timesheet reminders, monthly outlines or daily activity summaries;
- Certain notifications are also triggered by specific events: help desk requests, system status reports, or incident alerts.
In simpler scenarios, developers can automate these posts without the need for ChatGPT. But employing AI models offers unique advantages:
- Large Language Models (LLMs) like GPT can generate more human-like announcements, steering clear of a robotic tone;
- GPT can perform basic reasoning, acting as a handy assistant, making your development process more efficient. Rather than dealing with complex code, you can instruct tasks in natural language;
- With the right prompt engineering, LLMs can respond in a uniform JSON format that can be automatically processed in subsequent steps.
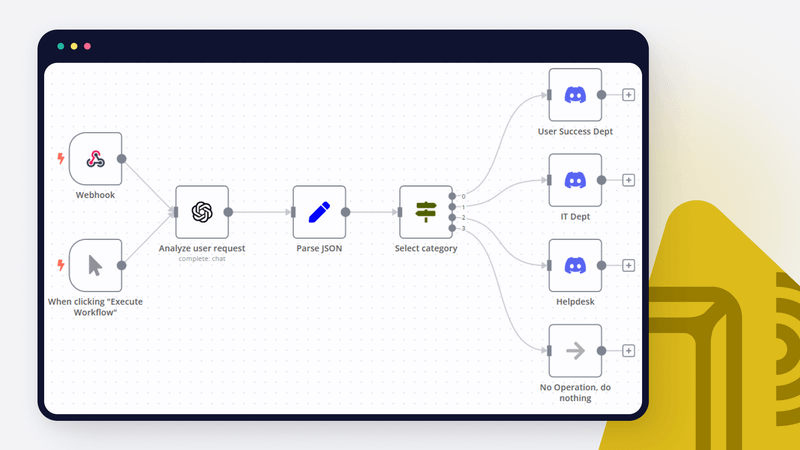
Imagine a help desk system. Users send their queries, complaints, or feedback which a help desk agent then has to triage. They must determine whether to respond or pass the request to an IT or a customer success manager.
Why not automate the triage process in a ChatGPT Discord bot? Even better, why not send a friendly notification to the relevant department?
Let’s take a look at how this works in action!
Step 1. Prepare your tools
Discord automations come in several flavours. Developers can create:
- full-scaled chatbots that can react to user messages and other actions
- slash commands functionality (think about the Midjourney approach)
- channel posts via webhooks.
The latter approach is the most simple to implement. Follow this instruction and set up a Discord channel webhook.

After you obtained a webhook for your Discord channel, there are a few more preparatory steps to take:
- Pick a cloud version of n8n or try out a powerful enterprise version.
- Register on the OpenAI platform and get a new API key.
Step 2. Receive user feedback
Since there are many help desk systems, we’re using a simple webhook to simulate incoming user requests.
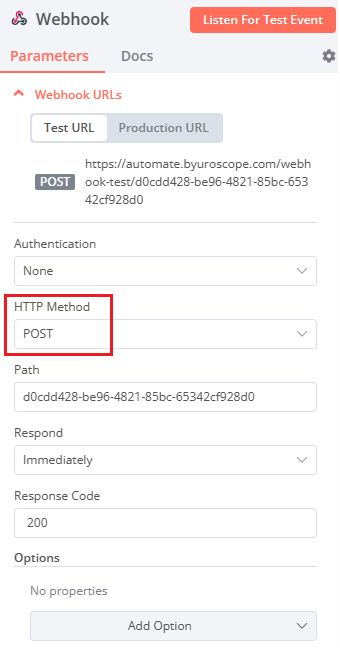
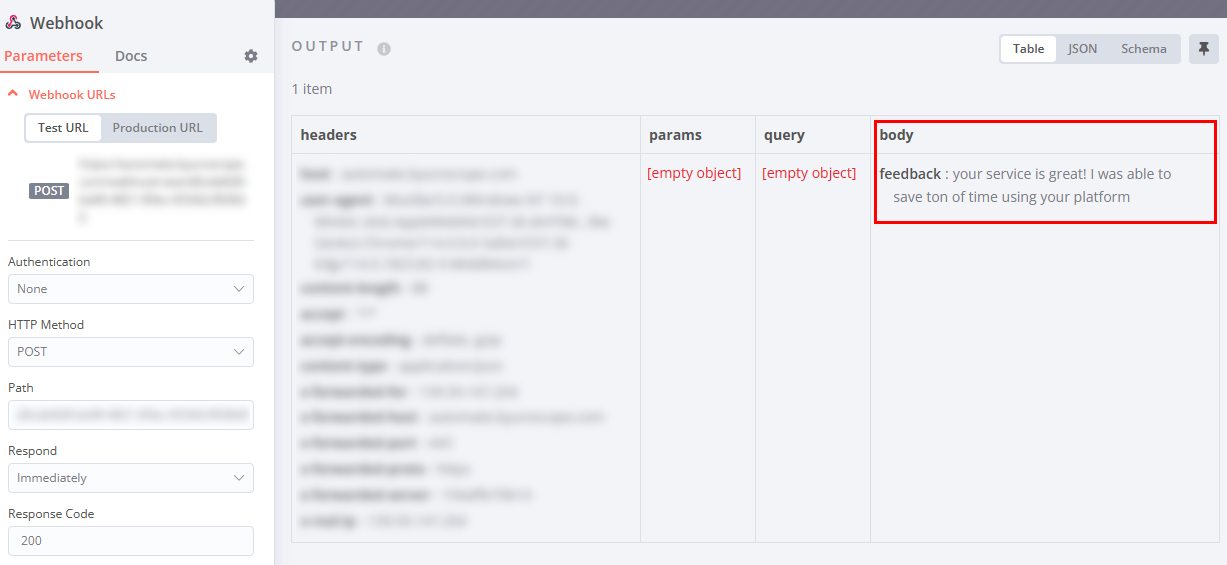
Just drop a new Webhook node on a canvas and adjust the HTTP Method to POST. This is needed because we’re going to send user requests in JSON format.
After creating a new webhook you can test it in Reqbin, Postman or a similar platform.
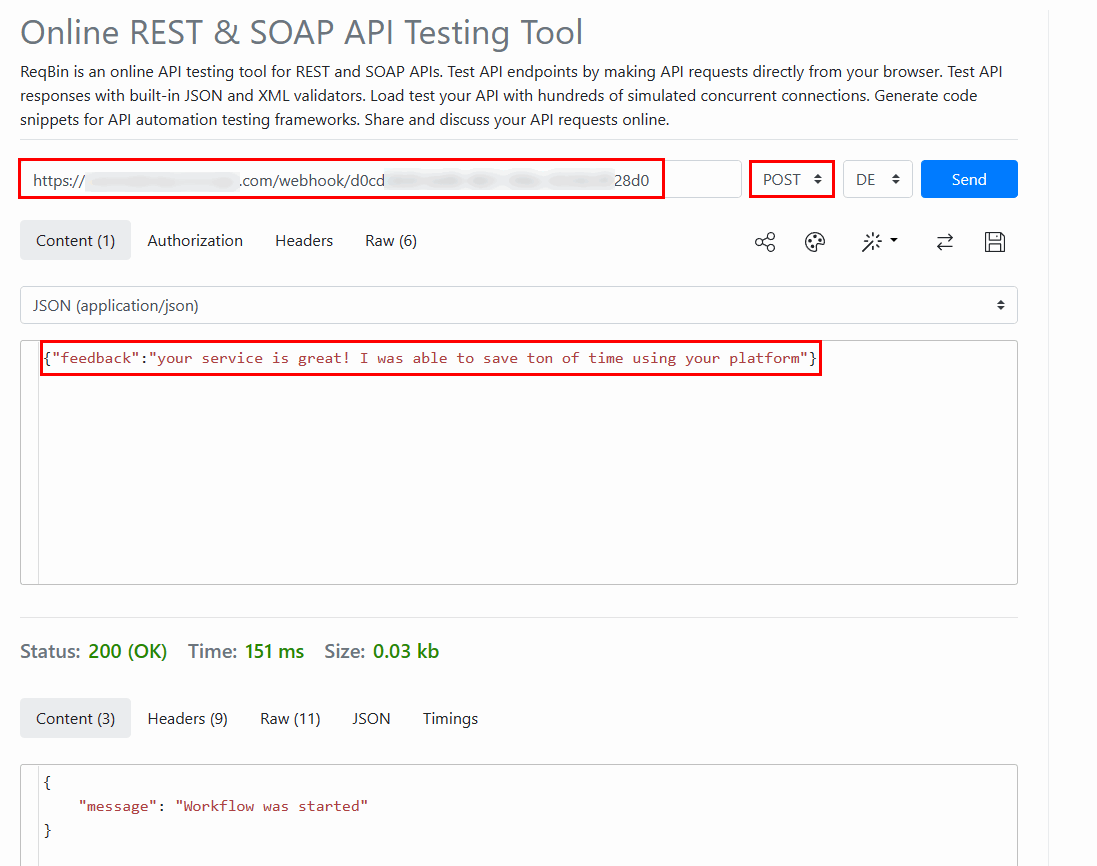
Just put the URL of your newly created webhook (don’t forget to check the test vs production URL), change HTTP Method to POST and write a JSON with a single "feedback" key.
In a real-life scenario, the incoming request will have additional information, like user name, URL in the help desk system, etc. For now, we’re only interested in the user text only.
If you did everything correctly, you’ll see a new incoming message in the execution history.
Step 3. Analyse incoming request
Okay, now the real fun begins!
Usually help desk systems have some kind of a dropdown list where a user can pick a category of the request. However, some issues have to be escalated or forwarded to a certain department. And here ChatGPT comes into place.

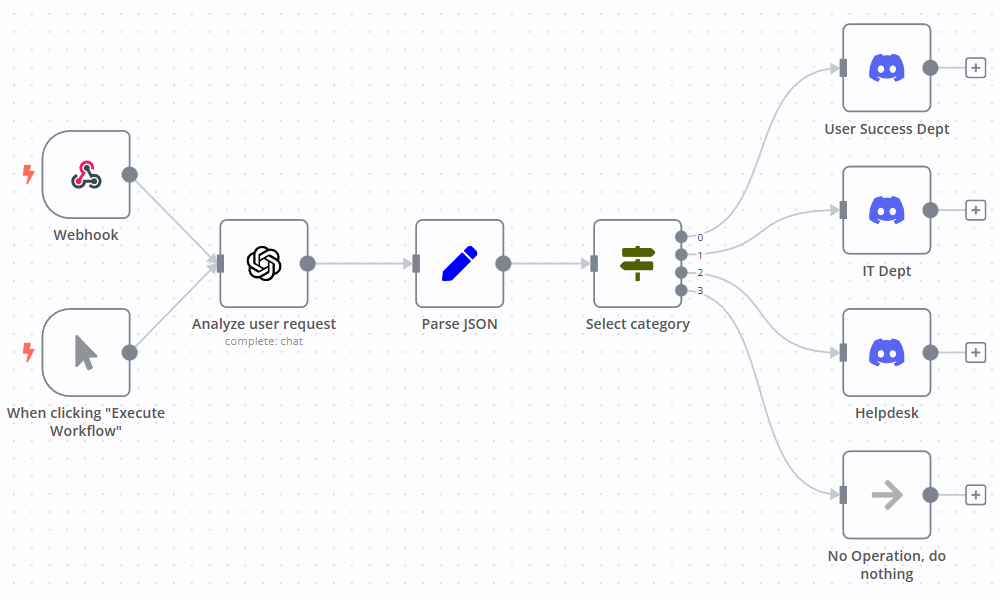
Let’s put an OpenAI node right after the Webhook and configure it in the following way:
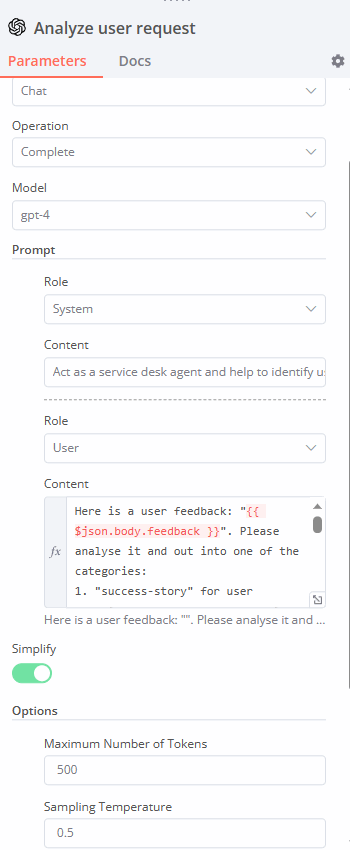
- OpenAI node is set up in the chat completion mode with a GPT-4 model
- Maximum Number of Tokens depends on your task. You may want to increase it, if you expect long replies from GPT.
- Sampling temperature is usually adjusted by trial and error. If the value is too high, the model will behave unexpectedly, and if the value is too low, the results are too repetitive. We’ve figured out that the temperature for categorisation tasks can be set around 0.5, so that both the JSON structure is preserved and the variety of answers is not too limited. You can read more about GPT parameters on the API documentation page.
- Next, there is one simple system role: "Act as a service desk agent and help to categorize user messages. Return back only JSON without quotations. Don’t return anything else." We ask the GPT model to return only unquoted JSONs, this is important for the further automatic processing.
- Finally, there is also one message under the User role with a more detailed instruction:
“Here is a user feedback: "{{ $json.body.feedback }}". Please analyse it and put into one of the categories:
1. "success-story" for user appraisal or success story. This will be processed by the customer success department
2. "urgent-issue" for extreme dissatisfaction or an urgent problem. This will be escalated to the IT team. Please assess, if the request is really urgent and whether it has an immediate impact on the client. If the ticket doesn't look like an immediate problem or an extreme dissatisfaction, then proceed as a normal ticket.
3. "ticket" for everything else. This will be processed as normal by the customer support team.

Please return back a JSON with the following structure: category (string), feedback (string), instruction (string).

“Category” must match the analysed category. “Feedback” must match the original text. “Instruction” should contain a text for a department according to the category with a one sentence summary of the feedback. Please be polite and friendly to your colleagues.”
Note that we ask GPT to perform a classification task and then we describe how we’d like to see the reply. This is simple prompt engineering written in plain English. If you’ve ever worked on classic machine learning projects, you can imagine how much more difficult exactly the same task was in the past.
The best part of prompt engineering with GPT is that you can adapt your task very easily. For example, you may want to add extra categories or provide more context to the model (for example, the time of the day when the request was submitted).
Step 4. Post a task into a Discord channel
Now, after we’ve instructed GPT and received a JSON, we need to make a couple of post-processing steps.
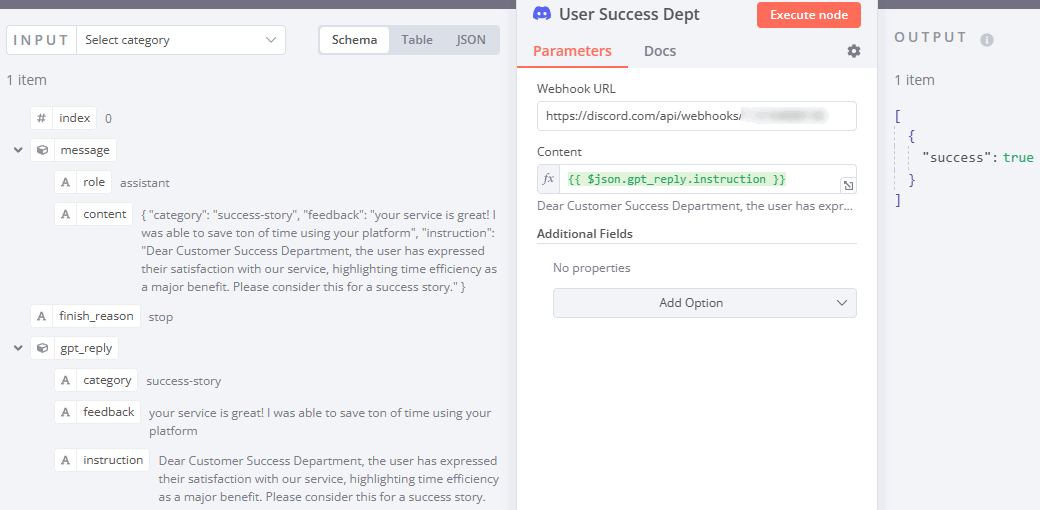
First, let’s take a look at the Parse JSON. GPT returns a JSON reply with a “content” key. Inside this key, there is a stringified JSON that we’ve requested. As you can see, there are three keys: category, feedback, and instruction.
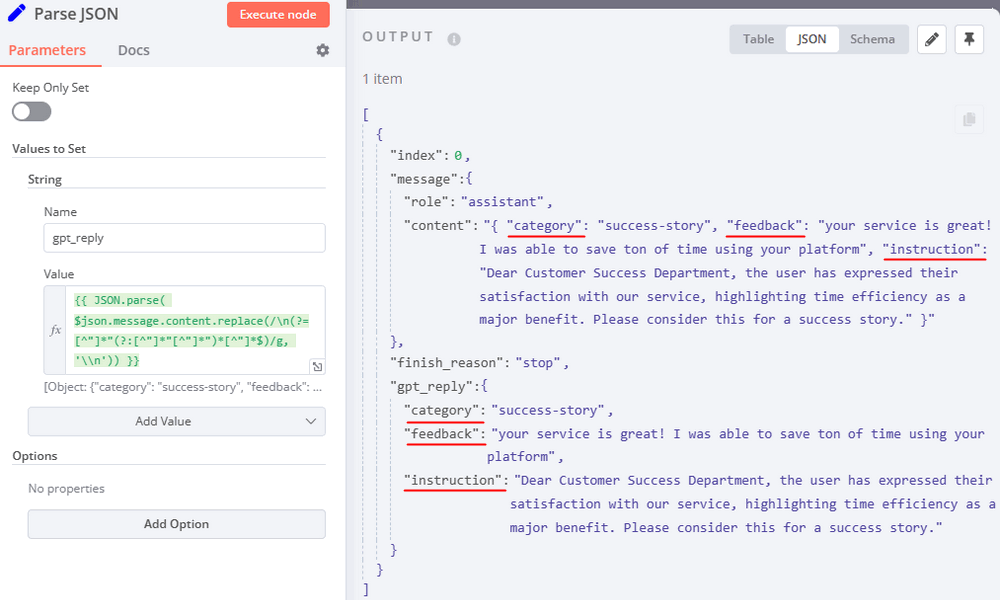
Now we need to parse this text using the following expression: {{ JSON.parse( $json.message.content.replace(/\n(?=[^"]*"(?:[^"]*"[^"]*")*[^"]*$)/g, '\\n')) }}
Why do we use the replace() function? Sometimes GPT returns invalid JSONs with special characters inside quotation marks. Newline characters are the most common case. We need to mask such characters before parsing the JSON, that’s why we’re using some generic regular expression that searches for unmasked \n symbols inside a string and converts them to \\n. With this small trick we reduce the chance of workflow failure.
Second, after we’ve created a new "gpt_reply" JSON key with the parsed reply, we can now decide in which channel our new ChatGPT Discord bot will post the message. This is done in the Select category:
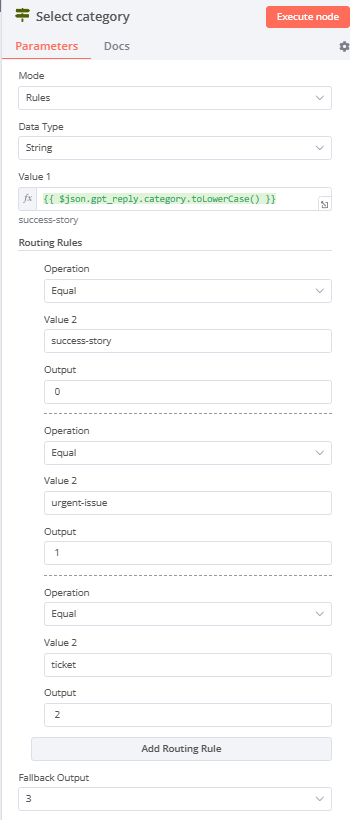
Finally, we need a few Discord nodes for each channel where you would like to post.

Wrap up
In this tutorial, we've shown you how to build a ChatGPT Discord bot. With the help of n8n and ChatGPT, we’ve analyzed user feedback and posted the notification in a relevant Discord channel. This AI bot is highly customizable, so you can configure it for many different tasks via carefully crafted prompts.
What’s next?
At this point, you’re armed with the knowledge to integrate your actual help desk system with your Discord channel. n8n offers a wide range of platform support, including Zendesk, Zammad, HubSpot and more.
You can also enrich the channel message with extra information, like a URL to the help desk system. This will enable your team to access the user requests faster.
With this simple approach you can kill two birds with one stone: create versatile automations and add some personal touch, so that your bot's messages are more appealing to non-tech teams.
For further inspiration, check out our recent blog posts about OpenAI and GPT:
- Get started with ChatGPT in your n8n projects
- Create AI chatbot in Telegram
- AI-powered Tweet generator
- More ideas on automating your workflows with OpenAI node and n8n
Join the community forum and tell us what you plan to automate with the ChatGPT Discord bot!