
Creating a WhatsApp bot might seem like a technical challenge due to the sophisticated nature of the platform:
- Lengthy setup process in Meta developer portal;
- Different types of messages, i.e. business-initiated messages vs replies to the users;
- Approval process and strict requirements for message templates.
| Feature | Business | API | |
|---|---|---|---|
| Usage | For individuals | For small businesses who personally manage conversations with customers |
For medium to large businesses communicating with customers at scale through programmatic access |
| Business profile | ❌ | ✅ | ✅ |
| Product catalogue | ❌ | ✅ | ✅ |
| Contacts Sync | Phone | Phone | CRM |
| Messaging tools | Basic | Enhanced (quick replies, away messages, labels) |
Advanced (chatbots, automated messages) |
| Chat | ✅ | ✅ | Within 24 hours, otherwise via pre-approved template messages |
| Broadcast messages | ❌ | Limited | Thousands of messages |
| Integrations | ❌ | ❌ | ✅ |
| Costs | Free | Free | Usage-based after 1000 conversations / Mo |
Our guide aims to demystify the challenges of making a WhatsApp bot.
With n8n, a source-available low-code workflow automation tool, we'll guide you through creating your WhatsApp bot. You'll:
- Discover basic tools for WhatsApp bot creation;
- Set up your WhatsApp Business account and configure an App on the Meta for Developers portal;
- Learn to create your WhatsApp bot for outgoing template messages;
- Advance to building a WhatsApp bot that responds with custom messages.
And finally, you’ll get inspired with several free n8n workflow templates. Adapt them for use with WhatsApp integrations.
Which is the best WhatsApp bot?
Before diving into creating your own WhatsApp bot, let's take a quick look at some pre-built options that could potentially meet your requirements:
- Twilio API. Twilio offers an API and some helper libraries for various programming languages, making it easier for developers to interact with the WhatsApp Business Platform. Twilio supports both WhatsApp, as well as old-school SMS messages. It's a solid choice for those who prefer a programmatic approach to bot development.
- Vepaar (formerly WhatsHash), offers an all-in-one solution for managing online business. It includes WhatsApp CRM for seamless customer interaction and engagement, catalog management, order tracking, analytics, and much more.
- A bot builder, such as Tiledesk. For those looking for an open-source platform that integrates easily with WhatsApp and other systems, Tiledesk is a viable option. It provides a user-friendly UI to manage user conversations, allows connecting to external tools such as n8n and is available in both cloud and self-hosted versions.
However, if you're aiming to enhance your WhatsApp bot with custom features, integrate it with other apps and services, or incorporate AI capabilities, keep reading to discover how n8n can help you achieve precisely that!
How to build a standard WhatsApp bot with n8n?
In the first case, we’ll create a WhatsApp bot that sends outgoing template messages.
Since WhatsApp tries to prevent unwanted spam messages, companies can only initiate conversations with pre-approved templates.
Before you create an n8n workflow for the WhatsApp bot, you need to set up a few accounts. After that, you need to create an App on the Meta for Developers portal, connect the App to WhatsApp and configure a WhatsApp Cloud API.
But don’t worry, we’ve prepared a step-by-step guide for you.
Let’s begin!
Step 1. Set up a WhatsApp Business account
First, go to the Meta Business Suite page and create a new business account using your existing Facebook credentials. Now visit Meta for Developers and sign in with your Facebook credentials once again. Check out our short video instruction below for the next steps:
- Create a new app on Meta for Developers
- Get a test API access token
- Get a free trial number
- Add up to five WhatsApp numbers to test the bot
- Send a test template message via the Developer console
Step 2. Create a workflow with a WhatsApp node
Add a new n8n workflow and place 2 nodes:
- Manual trigger
- WhatsApp Business Cloud

Add new credentials in the WhatsApp node settings, enter an Access Token and a Business account ID (check the short video instruction above for guidance).

Step 3. Configure WhatsApp node to send a template message
Now, configure the remaining fields of the WhatsApp Node:

- Select a Message resource and a Send Template operation;
- Pick one of the numbers from the Sender Phone Number field. Please refer to the video instruction above on how to add a test number to your Meta Business app.
- Next, enter one of the test numbers that you have already added to your app's phone list.
- Finally, select a default hello_world template from the drop-down list and click the Test step or a Test Workflow button.
If you’ve done everything correctly, you should receive a generic message.

You can create additional templates that are specifically tailored to your needs and contain variable parameters.
Step 4. Add a new message template with custom variables
You can check the current templates in WhatsApp Manager. Make sure that the correct WhatsApp Business Account is selected in the top right-hand corner.

In the main part of the screen, you can see the available templates and their status. You can create a new template and define some variables:

Once the template has been created and approved by Meta (this can take up to one day), you can send the messages via the WhatsApp node. Take a look at the sample configuration with additional Header and Body components. Each of these components contains one text parameter.

Take a look at how this works:

- Hello World is the message from the default template, it doesn’t contain any variable parameters and is always the same.
- The three subsequent welcome messages are different. You can greet users by name or leave the name out. You can also change the date format – a piece of text which comes right after the “Today is” phrase. These variations are controlled by variable parameters.
With these templates and a WhatsApp node, you can power up your n8n workflows: keep users informed by sending them notifications and promo materials.
How to build a custom WhatsApp bot with n8n?
So far, we've explained how to send business-initiated messages in WhatsApp using templates.
But how can you get the bot to reply with a custom message?
Unfortunately, this is not always possible. After a user has written to your bot, there’s only a 24-hour window in which the bot can send messages with customized content.
Before you create a bot that can send custom WhatsApp messages, please, see the second part of the configuration tutorial, which covers more advanced steps:
- Create a webhook to receive incoming messages
- Verify your new webhook
- Select webhook scopes
- Activate your App
Here’s an example workflow of the echo bot for sending custom messages. It will receive messages from the users and echo them back.

Step 1. Configure the first webhook that sends a verification reply
You might be wondering why you need two webhook triggers? The thing is that Meta uses the same webhook URL for verification and for sending user messages. The HTTP Methods are different, which is why you need two webhooks in n8n.
First, add a new workflow and create the first Webhook trigger that will receive a verification challenge for the bot callback URL:
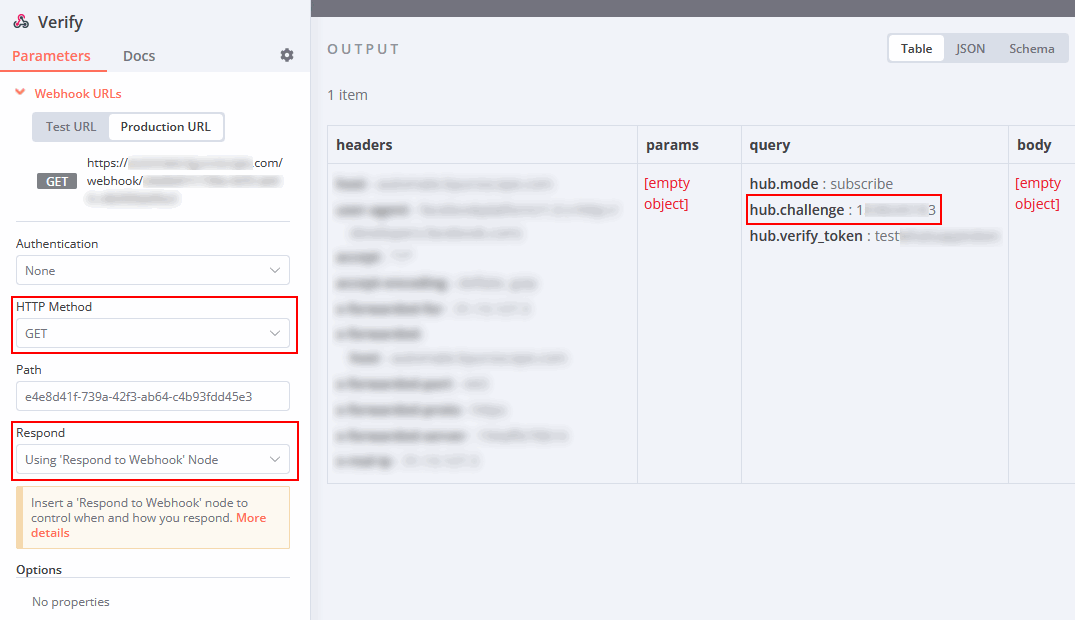
- Select GET HTTP Method
- Pick Respond to Webhook Node as a response
Next, add a Respond to Webhook node to send back the verification code and configure it as follows:

- Pick Text from the Respond With drop-down list
- Enter the expression in the Response Body:
{{ $json.query['hub.challenge'] }}
Now navigate to the App Dashboard and click on the WhatsApp Configuration on the left side. You’ll see a webhook configuration panel: click Edit and paste the production webhook URL along with the Verify token text.

Click Verify and save. If everything has been done correctly, the modal window will close and the webhook is now registered. Otherwise, you’ll receive an error message explaining what went wrong.
Set up the webhook scopes as shown in the video and finally activate the App.
Step 2. Configure the second webhook that receives the user message
Once the App webhook is registered, we can create the part of the workflow that receives and processes user messages.

While setting up the Webhook Node:
- Make sure that Path option is the same as in the first webhook
- Set HTTP Method to POST – this is how WhatsApp sends data to your webhook
- Keep the Respond option to Immediately
Step 3. Filter an incoming message
WhatsApp Cloud API informs about various events related to messages: when the message was delivered or when it was read. Therefore, we only need to react to the events that contain the actual text of the user message. To do this, you need to add and configure an IF Node (renamed to “Is message?”):
Check if the incoming data contains a user message. Enter an expression {{ $json.body.entry[0].changes[0].value.messages[0] }}
and select the Object → Exists condition. Optionally activate the Less Strict Type Validation toggle.
Step 4. Send a custom reply message
After receiving a JSON via the second webhook and filtering for user messages, your bot needs to send a response. In this example, we’ll send back the text of the user message. Add the WhatsApp Node (Echo the message back) and configure it:
- Select Message resource and Send operation
Take the recipient’s phone number from the incoming message and enter the following expression: {{ $json.body.entry[0].changes[0].value.messages[0].from }}
- Select a Text message type
Finally, enter an expression as the Text Body: Echo back: {{ $json.body.entry[0].changes[0].value.messages[0].text.body }}
If a user now sends a message to the bot, the same message will come back. There are no restrictions on the content of the message. Just remember to reply within the 24 hours of the last incoming user message. You can send multiple messages in response to a single incoming user message.

FAQ
Are WhatsApp bots safe?
WhatsApp bots always know the phone number associated with your account (unlike bots on the Telegram platform). It is therefore important to use only trustworthy WhatsApp bots. Meta has implemented several mechanisms to reduce unwanted spam messages, so WhatsApp bots can generally be considered safe.
Is it free to create a WhatsApp bot?
With the right skills, you can create a WhatsApp bot for free. However, this can be quite a time-consuming process. You may want to consider using third-party platforms that facilitate WhatsApp bot creation or outsource the process to a developer. There are some additional fees for bot hosting.
Is WhatsApp business API free?
WhatsApp Business has a conversation-based pricing model. After reaching 1000 free user-initiated conversations per month, you’ll need a payment method. Prices vary depending on the conversation category and country/region.
How do I use AI on WhatsApp?
With n8n it’s very easy to add AI functionality to your WhatsApp bot. The most advanced way is to use new LangChain Nodes. This way, you can seamlessly create a chatbot experience for users, be it a simple AI-powered conversation or an advanced case with responses based on the content of your documents.
Wrap Up
In this tutorial, we explained step-by-step how to get started with WhatsApp Business API and integrate this messaging platform into your n8n workflows:
- The first workflow showed how to send business-initiated messages in WhatsApp via pre-approved templates.
- In the second example, we explained how to build a simple echo bot that replies to users with custom messages.
What’s next?
Now you’re ready to take your WhatsApp bot to the next level: add AI models via LangChain or an OpenAI node, and connect the bot to your business systems – possibilities are limitless.
Here are some workflow ideas that you can extend and include the WhatsApp Node.
Whether you're working alone, in a small team, or in an enterprise, n8n got you covered. Choose from our cloud plans and jump-start right away or explore powerful features of the Enterprise edition. If you are a small growing startup, there is a dedicated plan for you on the pricing page.
Join the community forum and share your success or seek support!