People are the heart of a community. Celebrating their contributions is a way to show them that we value them and appreciate all their hard work. We can give them a shoutout in our community’s Slack workspace and also in our newsletters. And what could be a better way to appreciate their work by sending them some cool swag! Motivated by this idea, I created a workflow with n8n, which gives us the contributors’ GitHub information in the Slack workspace.
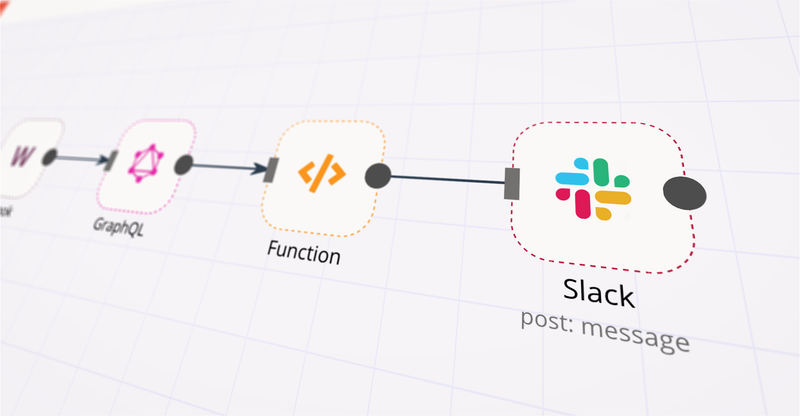
We will accomplish this through these four nodes:
- Webhook node — Triggers the workflow when the slash command is issued
- GraphQL node — Gets information using GitHub’s GraphQL API
- Function node — Filters and extracts the contributor’s email address
- Slack node — Posts the information back in Slack
When we issue a slash command in the Slack channel, the Webhook node gets triggered, and our workflow starts. The GraphQL node then executes a query to get the contributor’s information. The Function node extracts the email address of the contributor, and the Slack node posts this information in the Slack channel from where the information was requested.
Prerequisites
To get started with the workflow in n8n, you will need:
- Node.js or Docker installed on your machine to run n8n. You can also sign-up for n8n.cloud to get access to our hosted service (in beta).
- A Slack app for your workspace
- GitHub Personal Access Token for the GraphQL API
This workflow was created using n8n@105.0.
Install n8n
Note: If you're using n8n.cloud, you can skip this section.
In case, you don’t already have n8n installed, you can do so with npm by issuing the following command:
npm install n8n -g
You can also run n8n using Docker. Once you have installed n8n, you can start it using the following command:
n8n start — tunnel
Note: Make sure that you don’t forget to add the -- tunnel parameter.
n8n has to be reachable from the web as the triggers of external services rely on that to be able to send data to the webhooks. To make that easy, n8n has a special tunnel service that redirects requests from n8n’s servers to your local n8n instance (uses localtunnel).
Typing “o” in the terminal will open the Editor UI for us.
Another option is to get a managed instance of n8n with n8n cloud: hosting, security, and maintenance by n8n.
Let’s get started with the workflow. I have also submitted this workflow on n8n.io, in case you’d like to skim through it. Please note that you will still need to configure credentials for Slack and GitHub.
1. Webhook node
n8n has a Webhook trigger node which will get triggered when we issue the /github slash command in a Slack channel.
Adding the Webhook node
To add the Webhook node in the workflow, click on the '+' button. Under the Trigger section, select the Webhook node. This creates the Webhook node with the default parameters.
Leave the default parameters as they are, we will only change the HTTP Method. Select the ‘POST’ option from the HTTP Method dropdown list.
Here’s a video of me following the steps mentioned above.
Adding slash command to the Slack app
To create a Slack app, go to the Applications page, click on ‘Create New App’. Enter a name for your app a name and select the workspace where you want to add the app.
Under the Add Features and Functionality section, select Slash Commands and click on Create New Command. Enter ‘github’ as the command for the Command field. Get the test webhook URL from the Webhook node and paste it in the Request URL field. Since we are building the workflow, make sure to use the test webhook URL.
The data that is sent to the test webhook URL is displayed in the Editor UI. The test webhook stays active for 120 seconds and then gets deactivated. The Production URL is only registered when the workflow has been activated, but the data that is sent is not displayed in the Editor UI.
To give our app permission to post messages, select 'OAuth & Permissions' under the Features section. In Scopes, under the Bot Token Scopes, click on Add an OAuth Scope and select the ‘chat:write’ scope from the menu. Similarly, add the ‘chat:write.public’ scope.
Install the app in your workspace. Click on Execute Workflow button at the bottom of the n8n workflow editor, and issue the /github harshil1712 (here ‘harshil1712’ is my GitHub username) command to trigger the Webhook node.
Here’s a video of me following the steps mentioned above.
Go back to the n8n workflow editor and check the Webhook node. You’ll see the response from our newly created slash command. Congratulations, your first n8n node is up and running!
2. GraphQL Node
n8n has a GraphQL node which can be used to execute GraphQL queries. We will use GitHub’s GraphQL API in this node to get the contributor’s information.
Creating a GraphQL node to get contributors information
In the n8n workflow editor, click on '+' and select the GraphQL node. We will have to specify the endpoint for the GraphQL API. We will also have to change the Request and Response Formats and add headers.
Enter the following link in the Endpoint field: https://api.github.com/graphql. This is the link to GitHub’s GraphQL API. Select JSON from the dropdown menu, for the Request Format field.
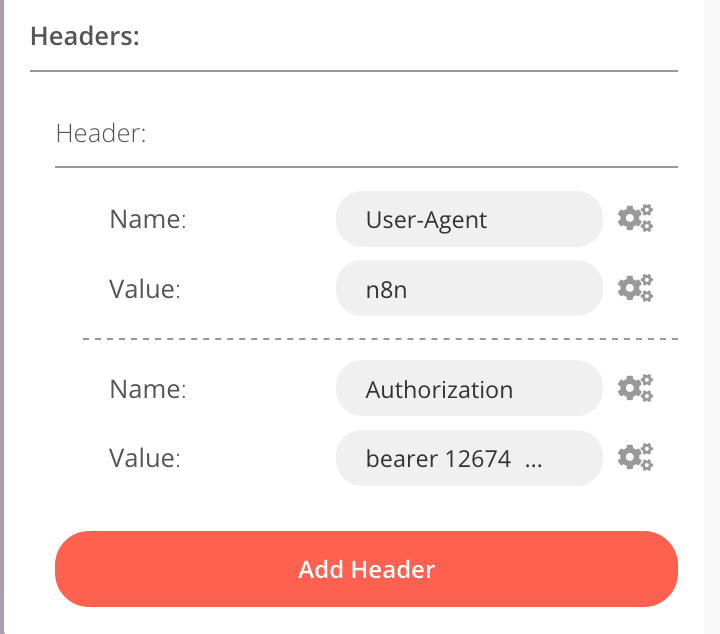
The GitHub GraphQL API requires two headers for running any queries. The first header we will add is the User-Agent header. Click on Add Header in the Header section. Enter User-Agent in the Name field, and n8n in the Value field. Add another header for Authorization. Enter Authorization in the Name field. The value for this header will be in the following format:bearer <GitHub-Personal-Access-Token>
Replace <GitHub-Personal-Access-Token> with your GitHub Personal Access Token. The Headers should look like in the following image.
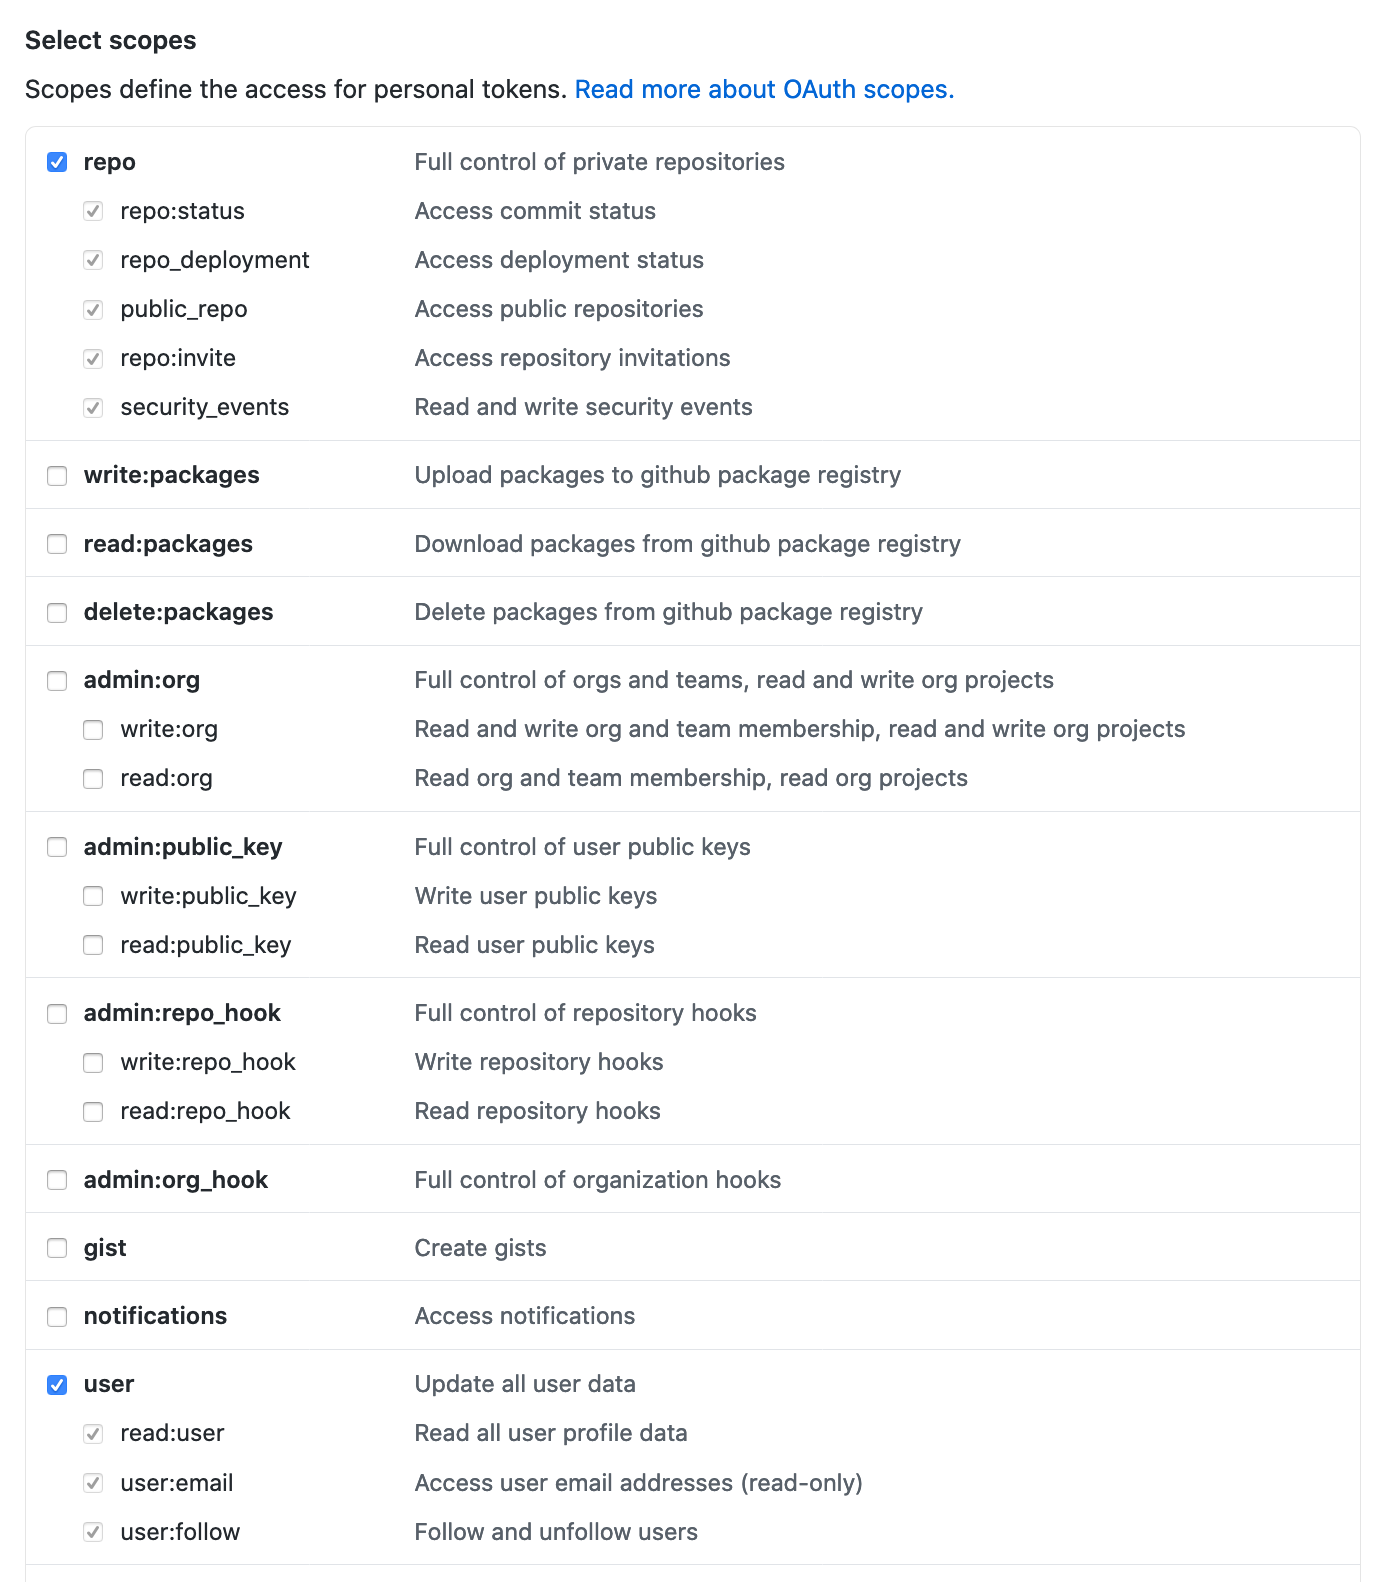
Note: While generating the GitHub Personal Access token, make sure to select repo and user under the Select scopes section.
Copy and paste the following query in the Edit Query editor and click on the Execute Node button to execute the node. On successful execution, it returns the name of the contributor whose username you have passed.
query {
    user(login:"harshil1712") {
        name
    }
}
Here’s a video of me following the steps mentioned above.
Getting more contributor’s information like company, email and location
In the query above, we are passing the username statically, which will give us the information about only that contributor, for every slash command we issue. To make the query dynamic, we will fetch the username returned by the Webhook node.
Connect the Webhook node with the GraphQL node. Open the Edit Expression editor for the Query field, and replace the username with {{$json[“body”][“text”]}}. You can also do this by selecting:Current Node > Input Data > JSON > body > text
Here’s a video of me following the steps mentioned above.
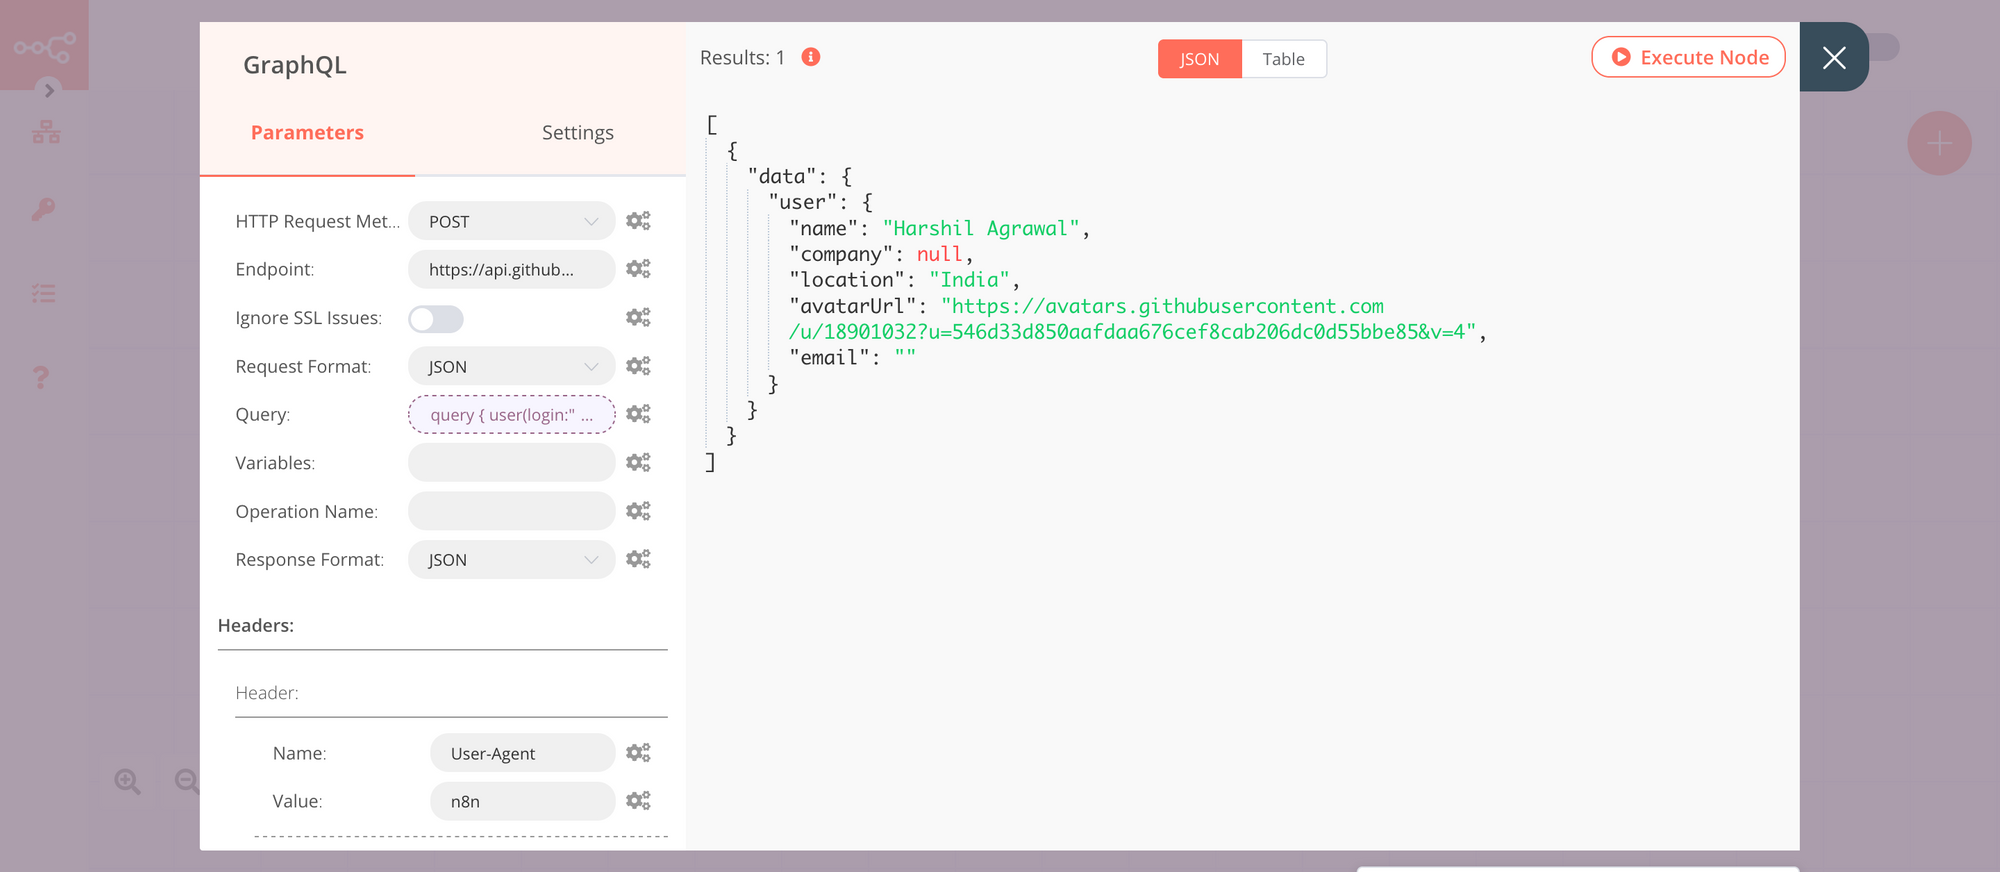
We are now getting the name of the contributor we want. Let’s get more information about them. We will update our query to get additional information like their email address, location, the company they work for, and their profile picture.
Copy and paste the below query in the Edit Query editor.
query {
    user(login:"{{$json["body"]["text"]}}") {
        name
        company
        location
        avatarUrl
        email
    }
}
On executing the workflow, you will get output similar to the following image.
3. Function Node
Some of the contributors on GitHub might have their email addresses private, and so we don’t get this information. But what if we want to get in touch with them, and thank them personally?
To get their email address, we will query their commits. The commit object contains information about the author like their name and email address. Let’s go ahead and update our GraphQL query so that we get at least 25 of their commits.
Update the GraphQL query
In the GraphQL node, open the Edit Expression editor for the Query field. Copy and paste the query below in the editor.
query {
    user(login:"{{$json["body"]["text"]}}") {
        name
        company
        location
        avatarUrl
        email
        pullRequests(last: 25) {
            edges {
                node {
                    commits(last: 25) {
                        nodes {
                            commit {
                                author {
                                    email
                                    name
                                }
                            }
                        }
                    }
                }
            }
        }
    }
}
Execute the node to see the changes in effect. The output now contains the email addresses and names of the authors who made the commits as well.

Using Function node to filter the information
One can observe from the output that we are getting a lot of repeated values for the email addresses. Also, some email addresses belong to different users. We will write a function to solve this and get the email address of our contributor.
n8n has a Function node where we can add custom snippets to JavaScript code to transform data from the other nodes or if you want to implement some custom functionality. Click on the '+' button and select the Function node. Replace the code in the Function node, with the following code.
let emails = [];
let tempEmails = [];
const name = $json["data"]["user"]["name"];
const publicEmail = $json["data"]["user"]["email"];
const username = $node["Webhook"].json["body"]["text"];
const nameRegex = new RegExp(name,"g");

// if public email address exists, push it to the tempEmails array

if(publicEmail){
    tempEmails.push(publicEmail)
}
// looping through the pull requests

for(const edge of $json.data.user.pullRequests.edges){

    // looping through the commits

    for(node of edge.node.commits.nodes){

        // Checks the name associated with the email address

        if(nameRegex.test(node.commit.author.name)|| node.commit.author.name == username) {

            // if name equals to contributors name or username, push the email address in tempEmails
            tempEmails.push(node.commit.author.email)
        }
    }
}

// Remove duplicates

emails = [...new Set(tempEmails)]

// RegEx Pattern for email address generated by GitHub

let re = /^\w+(.)*@users.noreply.github.com/

// Remove the email addresses Generated by GitHub

emails = emails.filter(email => !re.test(email));

return [{json:{emails,}}];
The above code takes the name and the public email address of the contributor from the GraphQL node. It also gets the username from the Webhook node. The code then verifies if the email address belongs to the contributor, and if it does, it pushes it to a temporary array. It then removes any duplicate values for the email addresses and stores them in the emails array. And lastly, it removes email addresses generated by GitHub and returns the emails array.
An important thing to keep in mind while using the Function node is that it returns an array. So make sure you’re returning an array, rather than an object.
Here’s a video of me following the steps mentioned above.
We are now getting the email address of the contributor along with all the other information. Let’s post this in Slack.
4. Slack Node
In n8n, you can perform a lot of operations with the Slack node. You can create or archive channels, upload or get files from the workspace, add or delete stars from an item, and post or update messages in the Slack channels.
To add the Slack node in the workflow, click on the '+' button, and select Slack. Select “OAuth2” from the Authentication dropdown menu. Add your Slack app credentials to the node by selecting "Create New" from the dropdown menu in the Credentials section.
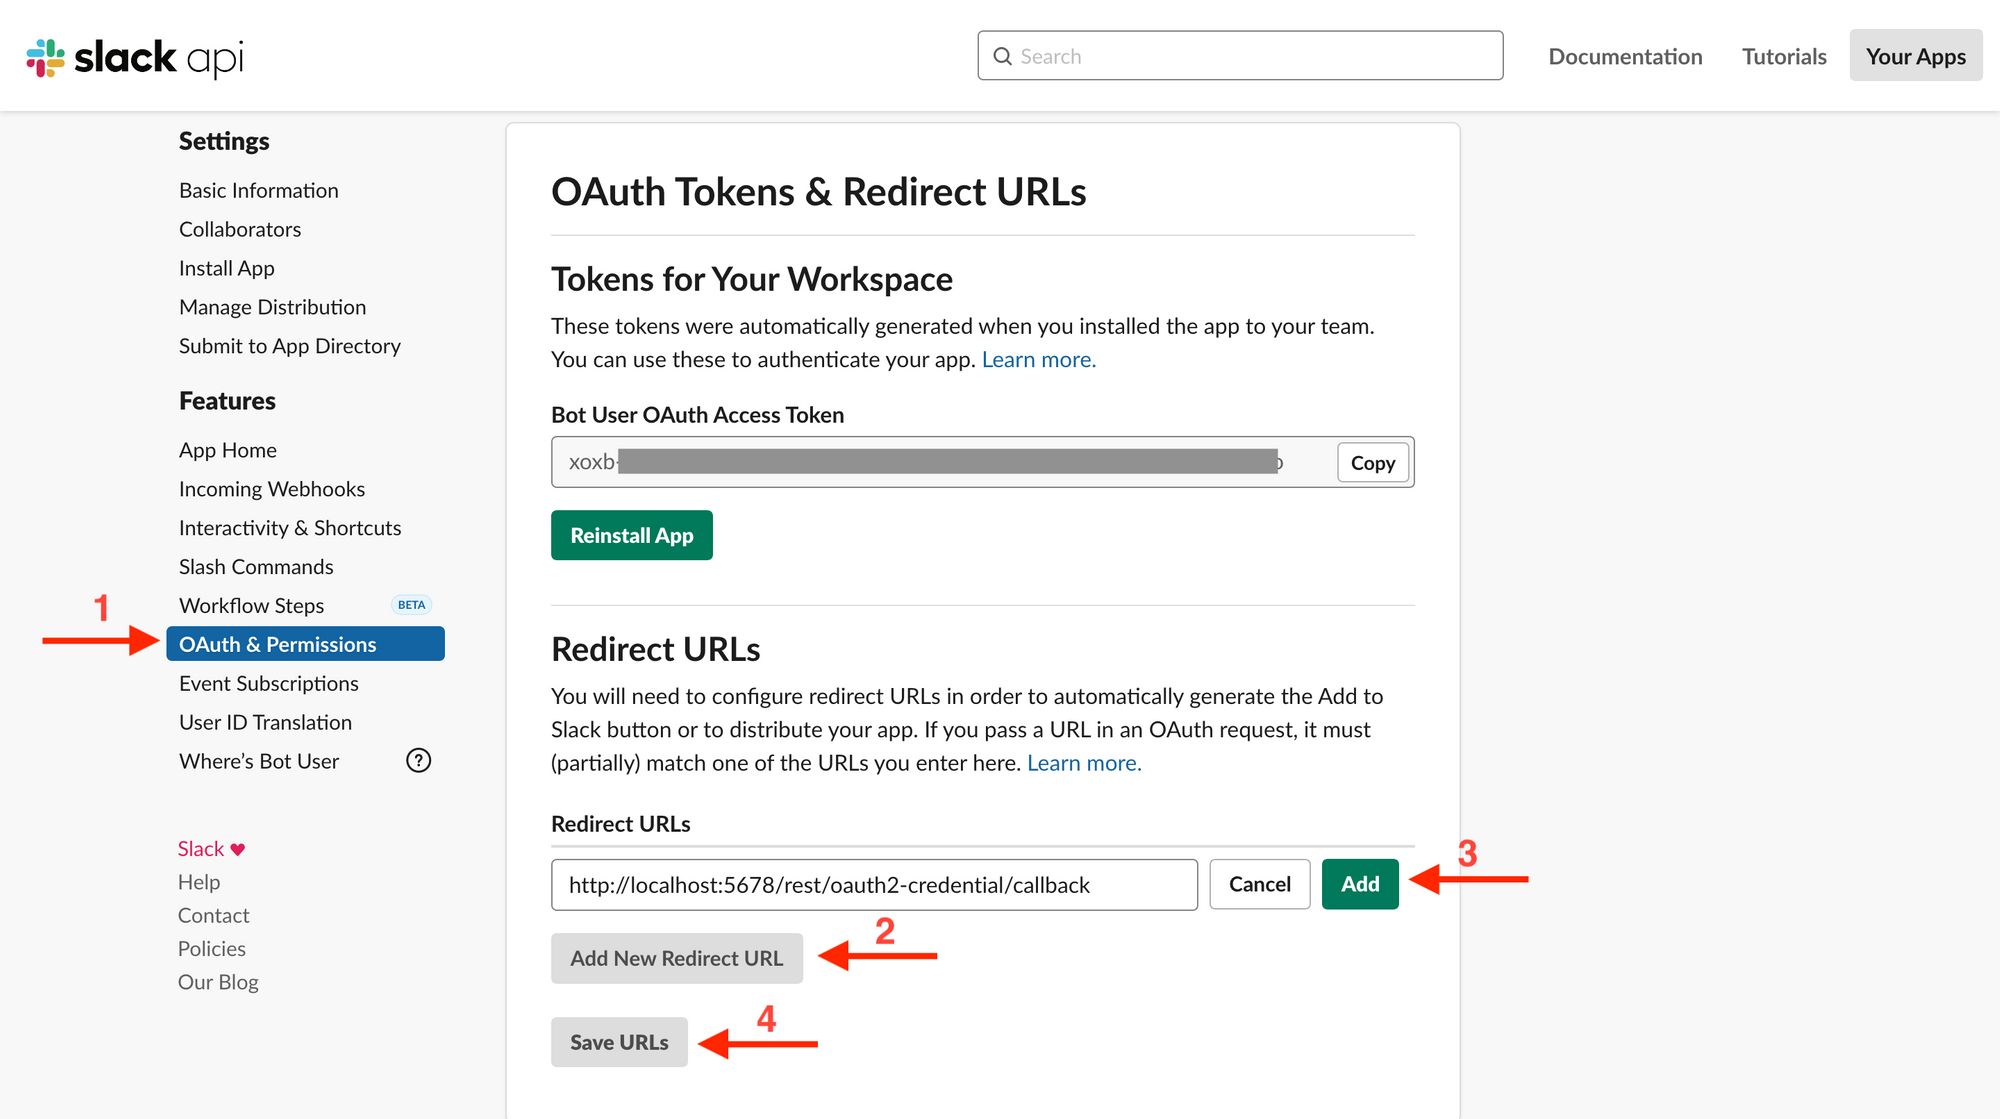
Head back to the Slack App dashboard, and copy the Client ID and Client Secret from the App Credentials section. Paste them in the Create Credentials: “Slack OAuth2 API” editor in the n8n workflow editor. Copy the OAuth Callback URL from the editor. In the Slack App dashboard, select “OAuth and Permissions” and click on Add New Redirect URL under the Redirect URLs section. Paste the URL and click on Add. The last step is to connect the OAuth Credentials. Click on the OAuth button to connect the credentials and select “Allow”.
By default, the Slack node has Message as the Resource and Post as the Operation. If the setting is different for you, make sure to change them. To post a message on the Slack channel where the slash command was issued, we will add the channel id to the Channel field, which is returned by the Webhook node.
Copy and paste {{$node[“Webhook”].json[“body”][“channel_id”]}} in the Channel field. Alternatively you can use the Variable Selector to get this information. Open the Editor Expression editor, and under Variable Selector select: Nodes > Webhook > Output Data > JSON > body > channel_id.
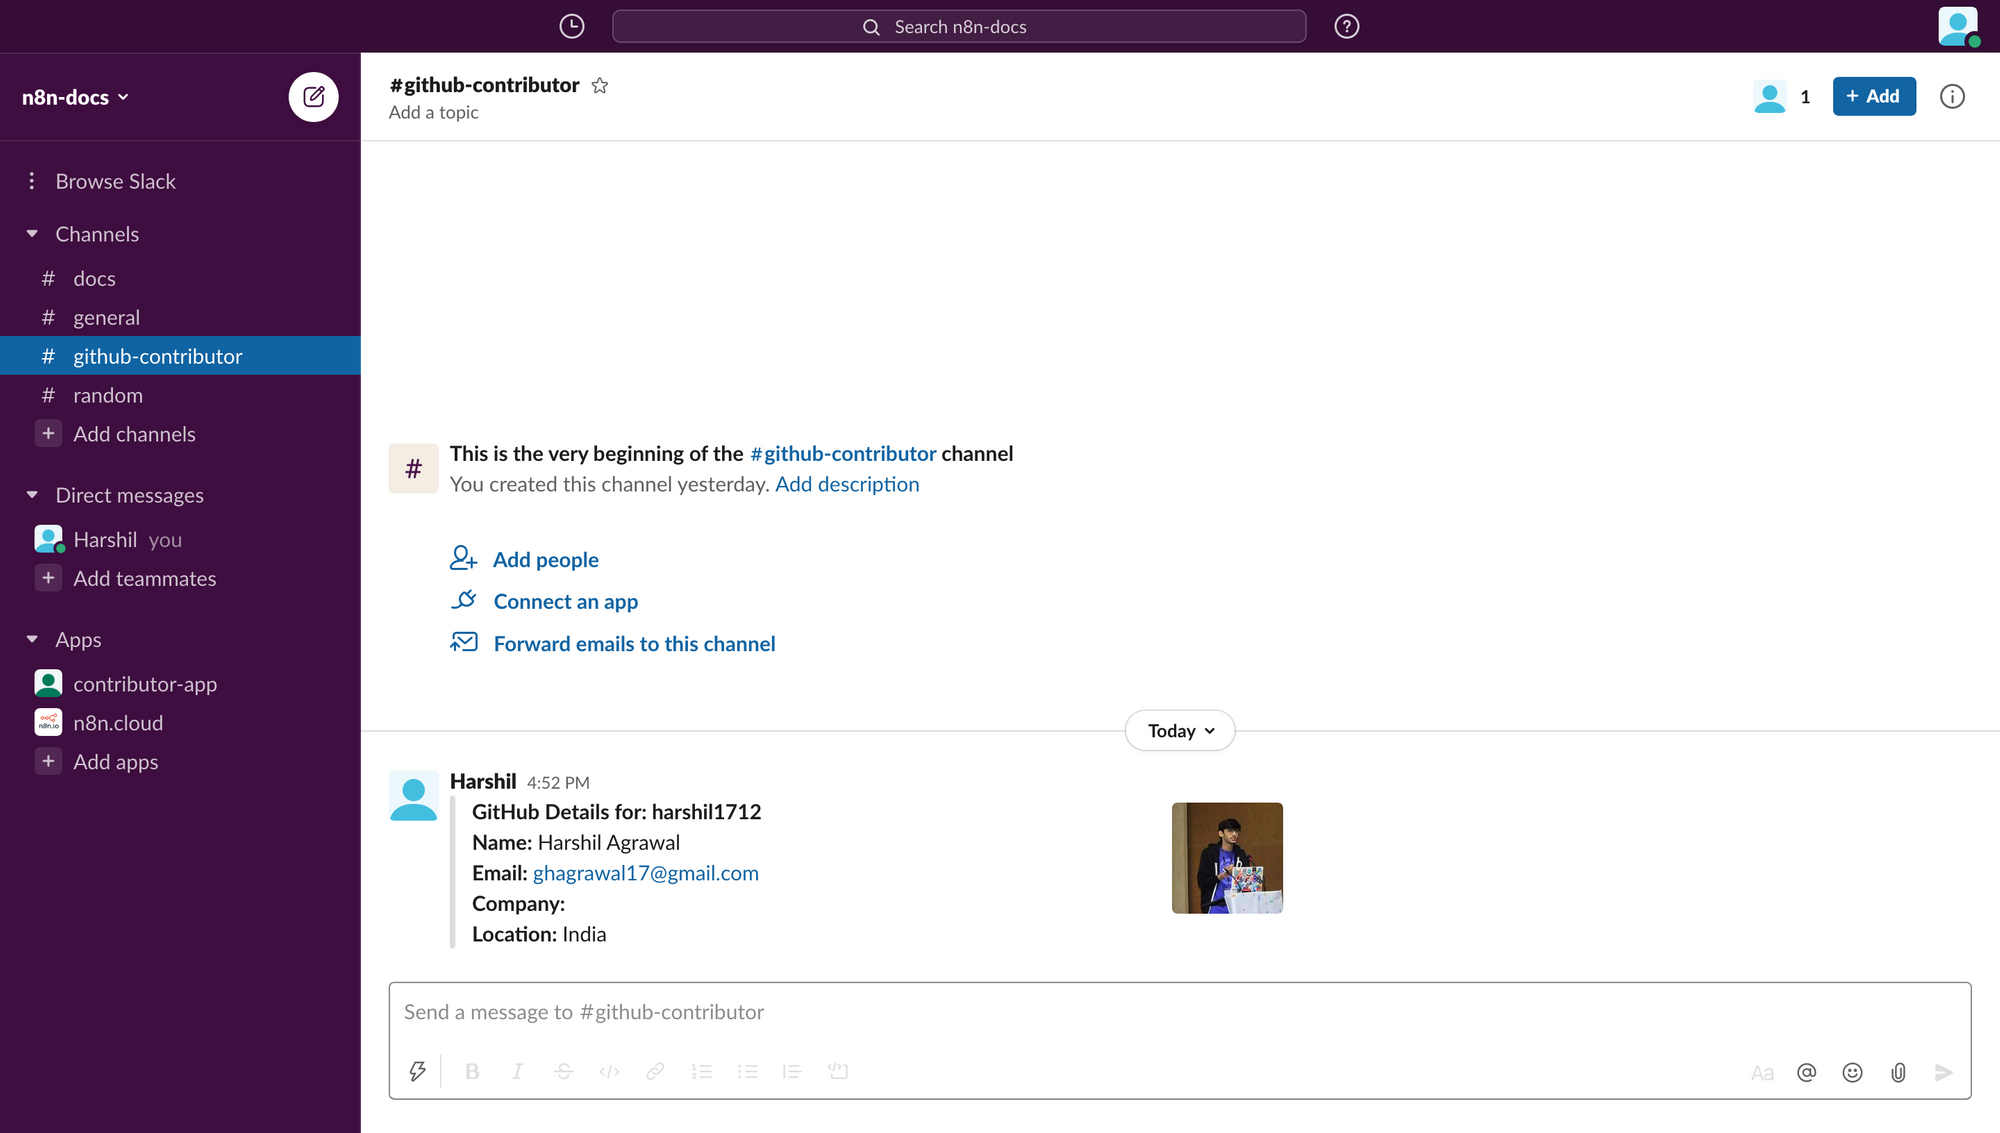
Let us now add some styling and formatting to our message. Our message will contain a title, some text and a thumbnail.
In the Attachment section, click on Add Attachment, and select Title from the Add Attachment Item dropdown menu. Open the Expression editor, and type “GitHub Details for:” in the editor and from the Variable Selector select Nodes > Webhook > Output Data > JSON > body > text.
From the Add Attachment Item, select Text, to add the Text attachment. Open the Expression editor, and copy and paste the following text:
*Name:* {{$node["GraphQL"].json["data"]["user"]["name"]}}
*Email:* {{$json["emails"].join(', ')}}
*Company:* {{$node["GraphQL"].json["data"]["user"]["company"]}}
*Location:* {{$node["GraphQL"].json["data"]["user"]["location"]}}
To display the profile picture of the contributor, create Thumbnail attachment, by selecting the Thumbnail URL option from the Add Attachment Item menu. Open the Edit Expression editor and from the Variable Selector select Nodes > GraphQL > Output Data > JSON > data > user > avatarURL.
Here’s a video showing how to create the Slack node, and get information from the Webhook node, the GraphQL node, and the Function node.
Note: Since the Function node gives an array of email addresses, we will select Values from the menu, while adding the email from the node.
Execute the node, and your app will post a message to the Slack channel.
The following video shows our workflow in action.
To use the workflow in production, follow the instructions provided in the documentation. Make sure to use the production webhook URL for the slash command.
Conclusion
Congratulations! You built a workflow that gives you the information of a contributor. You learned how to get started with n8n and how to add nodes to your workflow. You learned how to use the Webhook node for capturing event triggers, the GraphQL node to query information, the Function node to write custom functions, and the Slack node to post a message on Slack.
You can use this workflow to gather the information about your contributors, celebrate their successes, and appreciate them for their contributions! Using the GitHub API, you can also get their Twitter username. You can use the IF node to check for that, and use the Twitter node to tweet about them. You can even use the Mailgun node to send them a personalized thank you message.
I’d be excited to check out what you’ve built using n8n! In case you’ve run into an issue while following the tutorial, feel free to reach out to me on Twitter or ask for help on our forum 🧡
Start automating!
The best part is, you can start automating for free with n8n. The easiest way to get started is to sign up for a free n8n cloud trial. Thanks to n8n’s fair-code license, you can also self-host n8n for free.