
Imagine building an assistant that can research topics online, summarize the findings, and save them directly to your Notion – automatically. That’s the kind of intelligent automation AI agents make possible.
But here’s the real challenge: getting an AI to reliably act in the real world—interacting with APIs, scraping websites, updating databases. How do you bridge the gap between the AI’s reasoning and the tools it needs to execute real tasks?
In this guide, we’ll discuss three solid ways to build AI agents:
- From scratch (if you're feeling hardcore),
- With frameworks like LangChain and CrewAI (if you want flexibility without reinventing the wheel),
- Or with n8n (if you like visual workflows and want to build fast, production-ready AI agents).
We’ll keep it hands-on, and by the end, you’ll have a working AI agent that actually does stuff — not just thinks about it.
Understanding the basics of building AI Agents
Before diving into building, let's break down how an AI agent works.
At its core, an AI agent acts as a system that acts on behalf of a user (or program) to achieve a specific result by perceiving its environment, making decisions, and taking actions. While they can range from simple chatbots to complex autonomous systems, most AI agents share a few fundamental components:
Perception
It's the ability to gather information from its environment. This environment could be a chat interface, a database, a webpage, or even physical sensors. Inputs might include:
- Text commands from a user (i.e. a message or prompt).
- Events triggered by other systems, such as webhooks or messages.
- Information retrieved from websites or APIs.
- Content from documents or databases.
Decision-making
This is the agent's "brain." Based on its perception (the information gathered) and its programmed goals, the agent decides what to do next. This core logic can involve:
- Large Language Models (LLMs): Modern agents often leverage LLMs (like GPT, Gemini, Claude etc.) as their primary reasoning engine to understand requests, formulate plans, and generate responses.
- Rule-Based Systems: Simple instructions like "if the customer asks for a refund, execute the refund workflow."
- Machine Learning Models: Algorithms trained to predict outcomes or classify information to guide decisions.
Planning: Breaking down a complex goal (e.g., "plan a trip to Rome") into smaller, manageable steps (search flights, find hotels, check visa requirements).
Action
Once a decision is made, the agent needs to act upon it. This involves interacting with its environment to execute the chosen steps. Actions can be diverse, such as:
- Sending a message back to the user.
- Calling an API (like searching the web or posting to to a Discord channel).
- Running a workflow (like an n8n workflow!).
- Updating information in a database.
- Controlling a physical device. Actions are how the agent influences its environment to move closer to its goal. The ability to use various AI agent tools (like APIs or workflows) is central to an agent's effectiveness.
When an agent uses an LLM for decision-making, the LLM needs a structured way to understand which actions it can take and how to execute them. This is often achieved through defining Tools or enabling Function Calling. These mechanisms allow the LLM to signal its intent to use a specific capability (like calling an external API or running an n8n workflow) and provide the necessary parameters.
Memory
Agents often need to remember past interactions or learned information to provide context for future decisions. Memory allows an agent to:
- Recall previous parts of a conversation to maintain context.
- Store user preferences (e.g., "always use metric units").
- Access external knowledge bases (like documents or databases) to answer questions accurately (often using techniques like Retrieval-Augmented Generation or RAG).
- Learn from past experiences to improve future performance.
These components work together in a continuous loop: the agent perceives its environment, decides on an action based on its goals and memory, and then performs that action, potentially changing the environment and starting the cycle again.
Understanding these basic building blocks is the first step. Next, let's look at the different ways you can actually build AI agents.
How to create AI agents: 3 practical approaches
So, how do we actually go about building an AI agent? There are several ways to approach this, each with its own set of trade-offs in terms of flexibility, complexity, and development speed.
Let's look at three common methods:
Building AI agents from scratch
Learning how to build an AI agent from scratch involves coding all the components using programming languages like Python and potentially leveraging specific AI/ML libraries.
This approach offers maximum flexibility and control over every aspect of the agent's behavior.
However, it requires significant technical expertise in areas like software engineering, API integration, and potentially machine learning. It also demands considerable development time and effort to build, test, and maintain the entire system.
This path often answers the question 'how much does it cost to build an AI agent?' with 'significantly', due to the required development time and expertise. It is often chosen for highly specialized or research-oriented projects where existing tools don't meet specific requirements.
Using existing frameworks for building AI agents
Several frameworks (like LangChain, LlamaIndex, Semantic Kernel, or Autogen) provide pre-built components and abstractions designed for creating AI agents. These frameworks offer building blocks for managing prompts, connecting to LLMs, handling memory, defining tools (actions), and orchestrating agent steps. They significantly accelerate development compared to building from scratch by handling much of the underlying complexity.
However, they still require coding proficiency and a good understanding of the chosen framework's architecture and concepts.
This approach strikes a balance between flexibility and development speed, suitable for teams wanting structured development with some customization.
Using workflow automation tools
Platforms like n8n provide a visual, node-based environment for building agents. You connect services like LLMs, APIs, and databases as nodes, defining the agent's logic and actions by arranging and configuring these nodes in a workflow.
This approach significantly lowers the barrier to entry and speeds up development and prototyping, shifting the focus from complex coding to workflow design and tool integration.
It's particularly well-suited for automating tasks, rapidly building agent prototypes, and integrating AI capabilities into broader business processes.
How to build an AI agent with n8n: Step-by-step tutorial
n8n stands out as a choice for building AI agents because it uniquely balances implementation flexibility with speed of delivery. Although primarily a workflow automation tool, it allows for the creation of agents that can call multiple pre-built or custom tools, integrate RAG capabilities for knowledge retrieval and hook up to various chat interfaces via its flexible API and SDK options.
We’re going to build a practical research agent that scrapes the web and saves the summary for us—automatically!
Since AI agents' main functionality is the use of tools such as HTTP requests and the Notion tool – this example leverages advanced LLMs like the recently released Gemini 2.5 Pro, whose reliable tool calling and enormous context window make such tasks feasible!
Here is an image of what we will build using n8n:
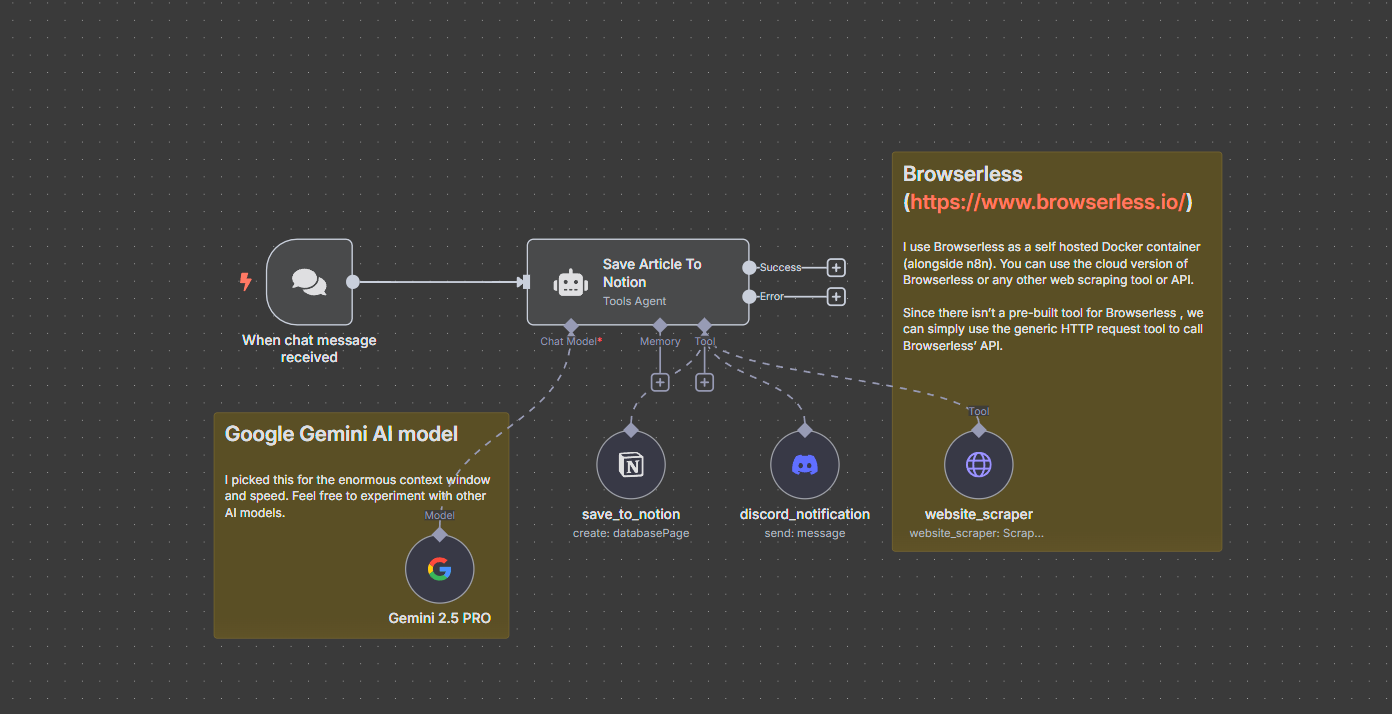
Let's break this down!
Prerequisites
Before we start building the workflow, ensure you have the following set up:
- n8n instance: You need n8n running. This can be a self-hosted instance (e.g., using Docker) or an account on n8n Cloud.
- Browserless: Access to a Browserless instance is required for web scraping. You can use their cloud service or self-host your own instance (e.g., using Docker).
- Google AI API Key: Obtain an API key from Google AI Studio to use the Gemini model.
- Discord: Configure a Discord webhook or bot account to send notification when research is done.
Step 1: Set up the trigger
Every n8n workflow starts with a trigger node. This node initiates the workflow when a specific event occurs. For our AI Research Agent, we want it to activate when we send it a message containing a URL, typically via a chat interface.
In the n8n canvas, click the '+' button to add your first node. Choose a trigger relevant to how you want to interact with your agent. In this case we can use the Chat trigger. Other common triggers for such a use case would be the Webhook trigger, which creates a unique URL to which you can send HTTP requests from a custom application or another service, or the Slack trigger which listens for messages or commands in Slack.
Step 2: Configure the Agent's core
The heart of our workflow is the AI Agent node. This node acts as the central orchestrator, connecting the trigger, the Large Language Model (LLM), and the tools the agent can use.
First, add an AI Agent node to the canvas and connect the output of your trigger node to the input of the AI Agent node.
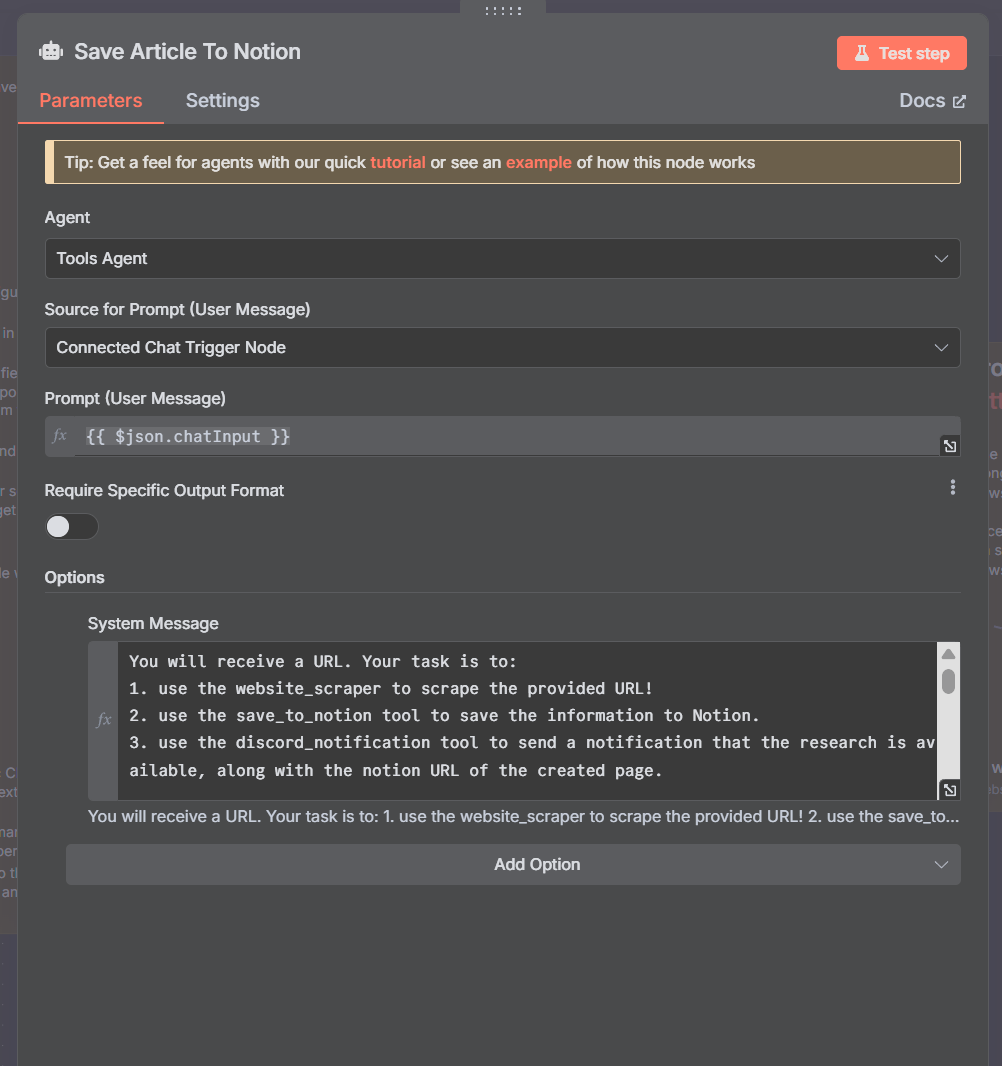
In the AI Agent node settings (see image), ensure the Agent dropdown is set to Tools Agent. This type is designed for agents that need to utilize specific tools to accomplish tasks. Set the Source for Prompt (User Message) to Connected Chat Trigger Node. This tells the agent to use the input from your trigger (e.g., the chat message containing the URL) as the user's request. The specific input field might vary depending on your trigger node's output.
Step 3: Define the Agent's goal and instructions
This is where you tell the AI what you want it to do and how it should use its tools. Clear instructions are crucial for reliable agent performance.
Add a Google Gemini Chat Model node (or your preferred LLM node like OpenAI Chat Model, Anthropic Chat Model, etc.) and configure it with your credentials (your Google AI API Key).
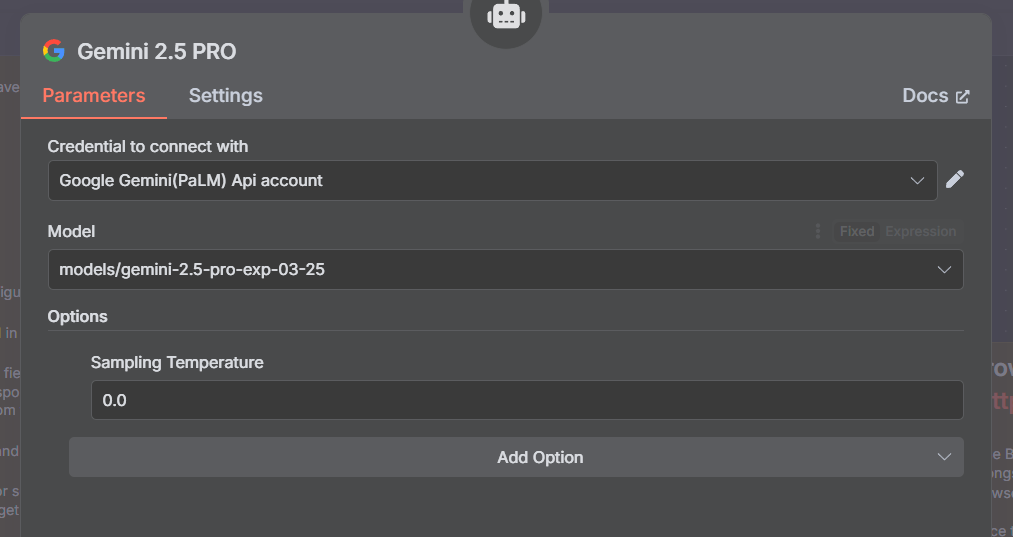
Select the desired Model (e.g., gemini-2.5-pro) and connect this LLM node to the Chat Model input of the AI Agent node.
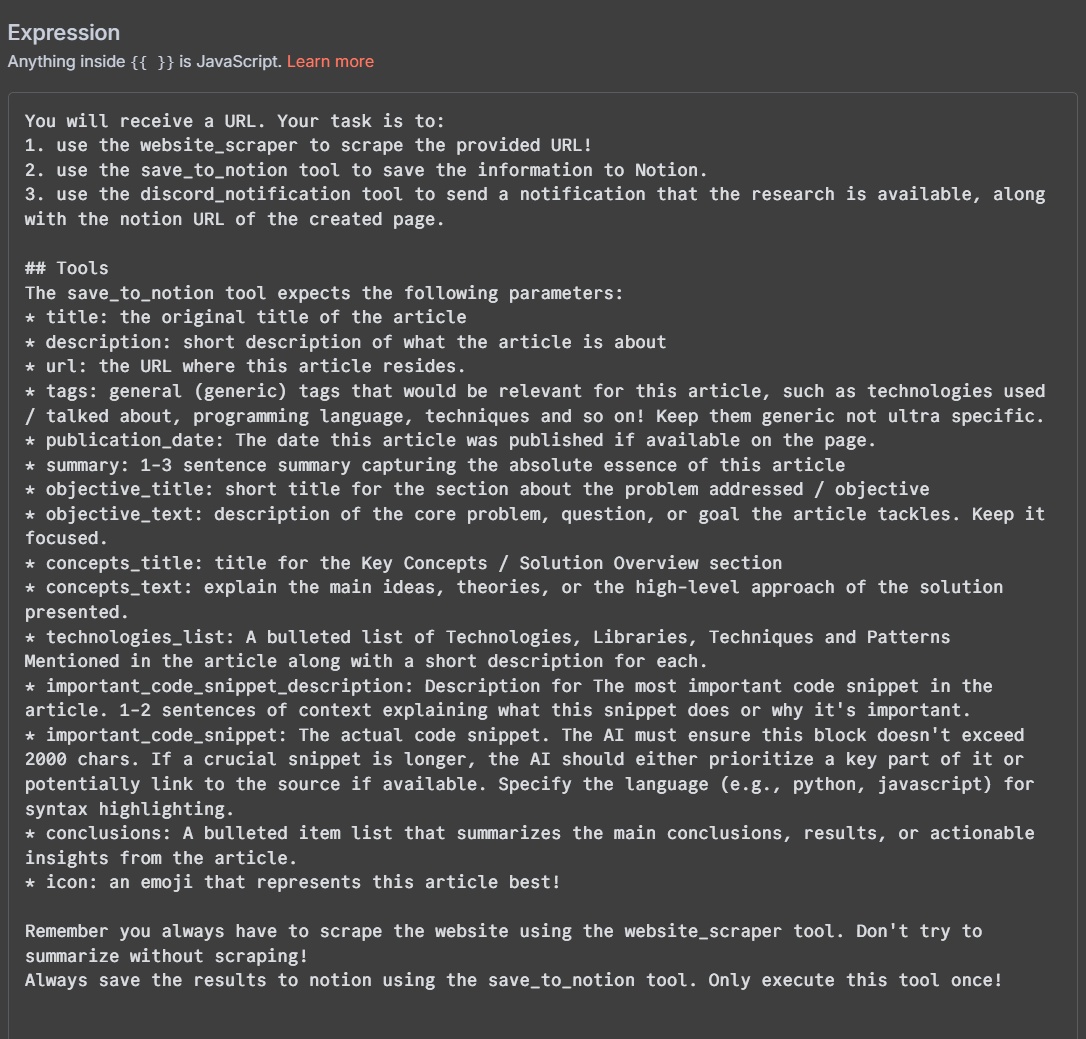
In the AI Agent node parameters, there is a field called System Message within the Options section. This is where you provide the core instructions for the agent. Here you can define the agent's instructions. For best results, the system message should:
- Clearly state the agent's task.
- Explicitly instruct the agent on when and how to use each tool.
- Add any important constraints such as "Remember you always have to scrape the website using the website_scraper tool.", "Don't try to summarize without scraping!" etc.
Step 4: Add the web scraping tool
Now we configure the actual tools the agent can use. First, the web scraper uses Browserless. Since there isn't a dedicated Browserless node, we use the versatile HTTP Request Tool node.
Add an HTTP Request Tool node to the canvas and rename it to website_scraper (or similar). This name must match the tool name used in the AI Agent's system message.
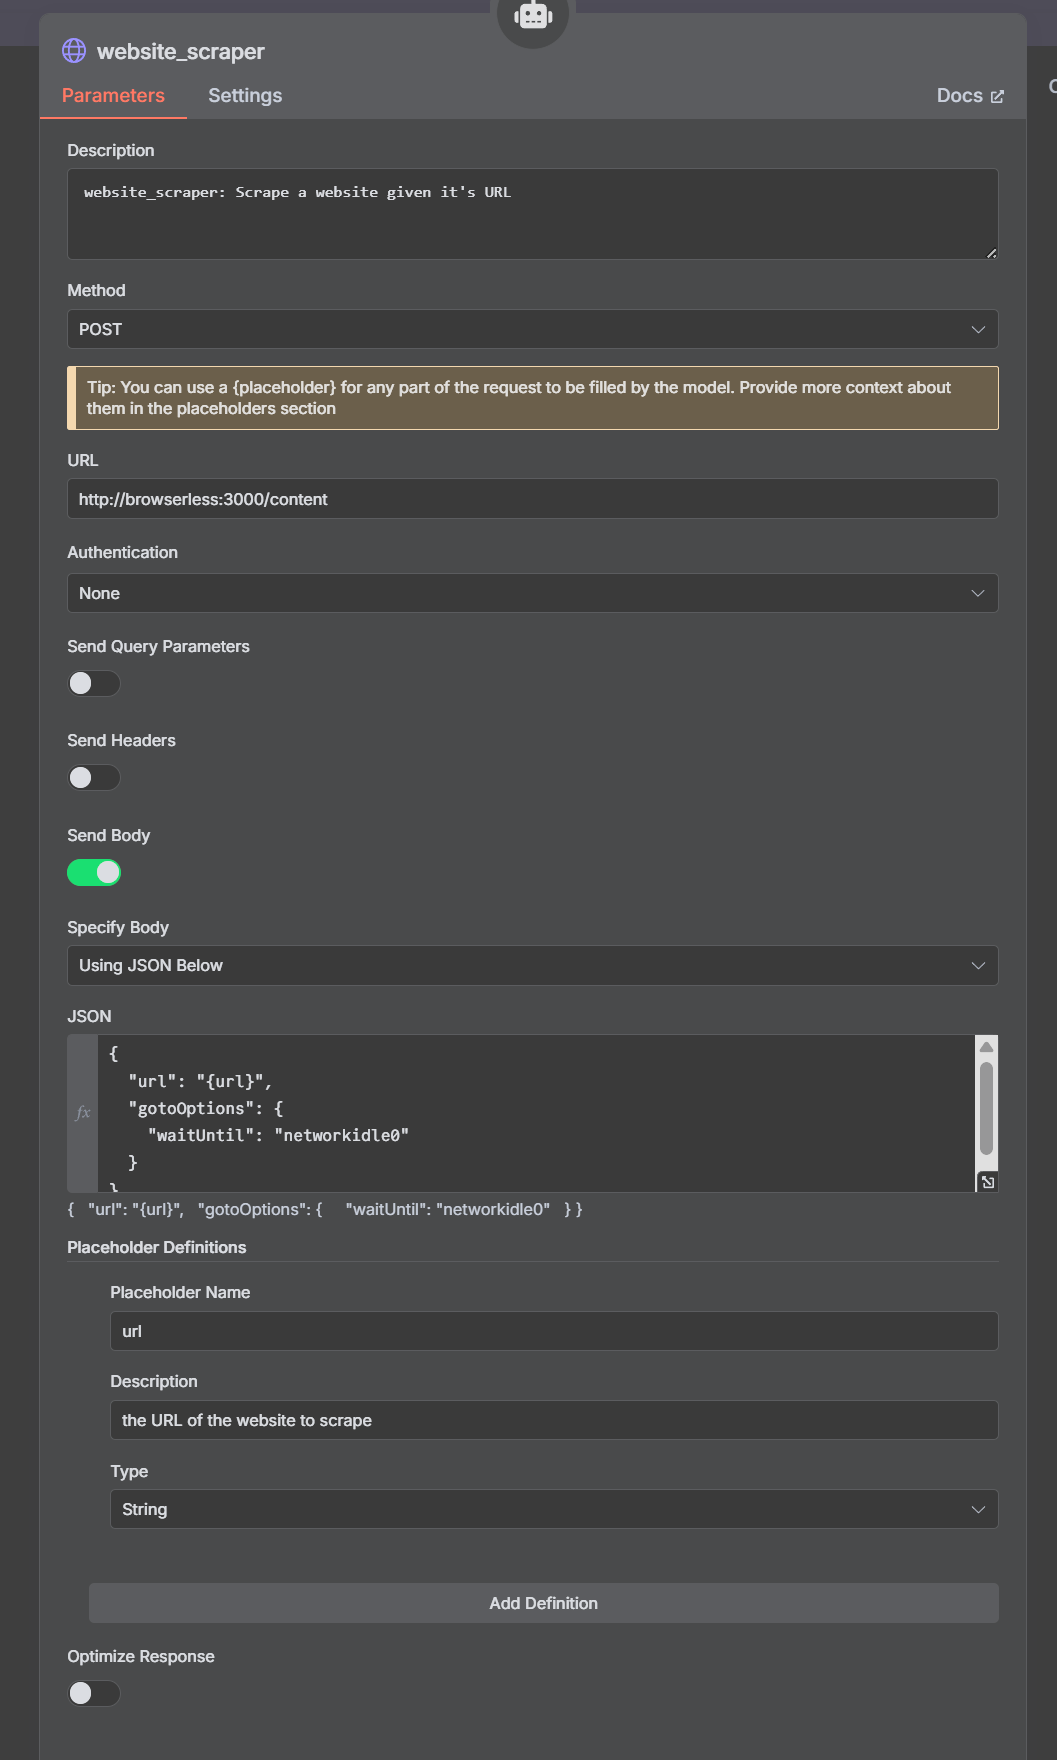
Configure the node like in the image above:
- Method: POST
- URL: Enter your Browserless API endpoint for scraping content.
- Authentication: Configure if required by your Browserless setup.
- Body: Using JSON Below
- JSON: Provide the JSON payload Browserless expects. Use a placeholder for the URL the agent will provide:
{
  "url": "{url}",
  "gotoOptions": {
    "waitUntil": "networkidle0"
  }
}
- Placeholder Definitions: Define the placeholders used in the JSON body.
- Click Add Definition.
- Placeholder Name: url (must match the placeholder name in the JSON body and the parameter name expected by the AI Agent).
- Description: Provide a clear description for the AI (e.g., "the URL of the website to scrape").
- Type: String.
Finally, connect the HTTP Request Tool node (website_scraper) to the Tool input of the AI Agent node.
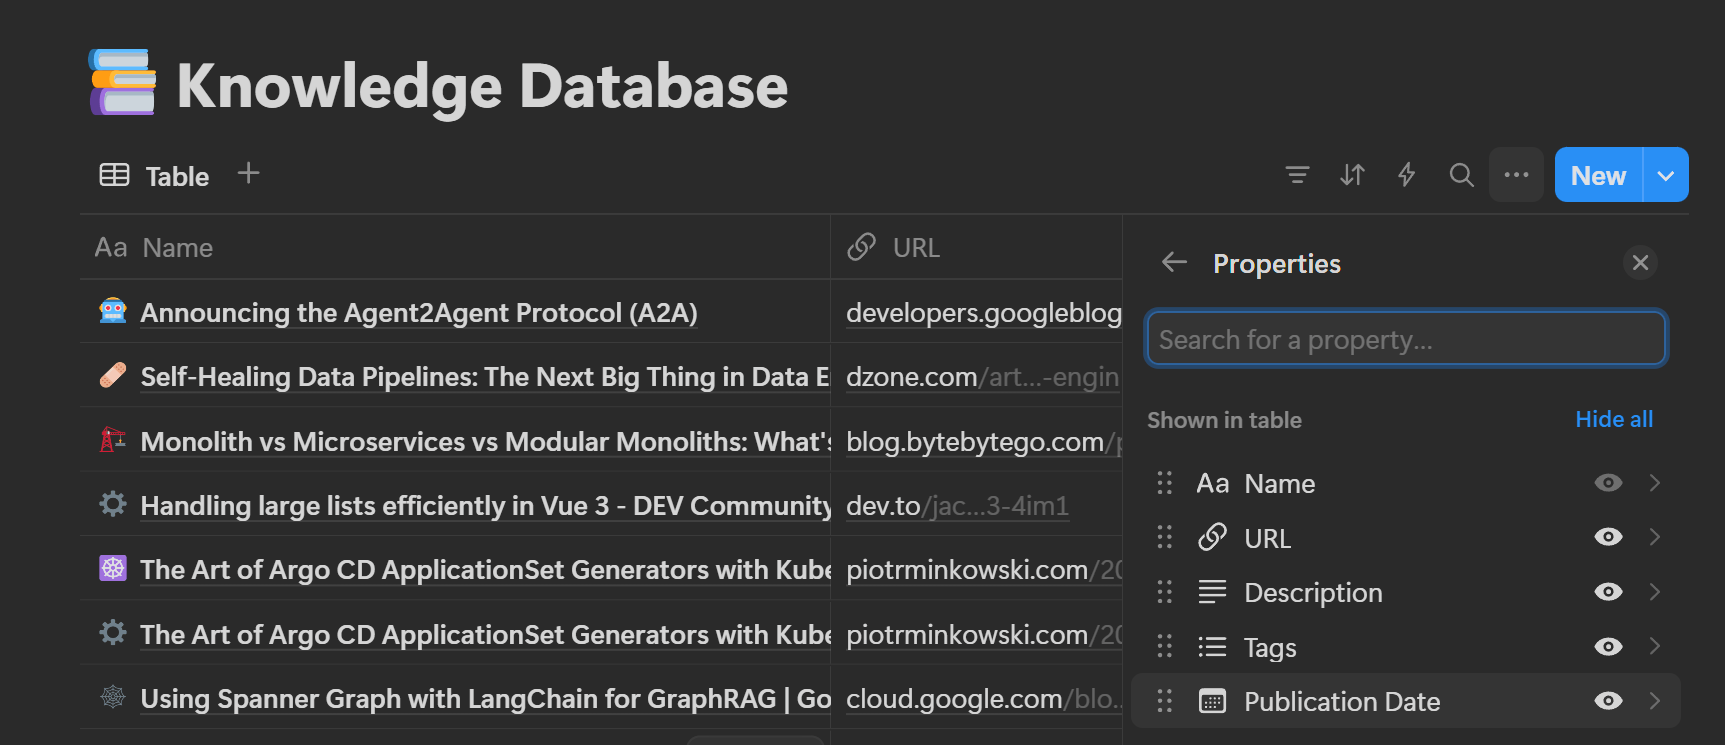
Step 5: Define the save to Notion tool
Next, configure the tool to save the scraped and summarized information to your Notion database.

Add a Notion Tool node to the canvas and rename it to save_to_notion, again, matching the tool name from the system message. Then, Set the Tool Description to Manually and provide a description (e.g., "save_to_notion: This tool saves the information to the Notion database.").
For authenticating to Notion, Select your configured Notion API credentials. Resource should be set to Database Page and Operation to Create.
Select your target Notion database (e.g., "Knowledge Database"). Ensure the n8n integration has access to this database and that it contains the necessary properties (Name, URL, Description, Tags, etc., as defined in your setup). The Properties section is where you map the data generated by the AI Agent (based on the parameters defined in Step 3) to your Notion database fields. For each property (e.g., "Title", "Description", "URL", "Tags", "Publication Date", "Icon"), use the {{ $fromAI('parameterName', 'Description', 'type') }} expression. Replace parameterName with the exact parameter name you defined in the AI Agent's system message. Example for "Title": {{ $fromAI('title', 'The original title of the article', 'string') }}.
Here is how this specific Notion database is structured:

As a useful visual touch, let's prompt the AI agent to select a fitting emoji for each page:

Step 6: Define the Discord notification tool
To ensure the AI agent can report its task completion, we'll equip it with a tool for sending Discord messages. This allows the agent itself to decide when and how to notify you based on its instructions and the outcome of its tasks.

Add a Discord Tool node, name it "discord_notification" and select your Discord Webhook or Bot credentials. Select Send a Message in the Operation dropdown. Here we will prompt the AI agent to craft the notification message, for example: {{ $fromAI('Message', 'Confirmation that research was done along with the URL to the notion page where the research is now available.', 'string') }}. And optionally in the Embeds field, we can embed a link for a richer notification by including the title and URL to the newly created Notion page.
Step 7: Test and refine your AI agent
Make sure to save the workflow and send a chat message containing a URL you want researched. Observe the workflow execution in the n8n UI checking the input/output of each node, especially the AI Agent node, to see how it processes the request and which tools it decides to call.

Verify that the website was scraped correctly, check that a new page was created in your Notion database with the expected content and summary and that you received a notification in Discord.

If the agent doesn't perform as expected, check each node and tool output, looking for reasoning or any errors in tool calling. Modify the instructions in the System Message, make the instructions clearer, add constraints, or refine the parameter definitions. Then save, and test again until the AI Research Agent reliably performs the desired scrape, summarize, save, and notify tasks.
Wrap up
In this article, we looked at the core components of AI agents (like how they perceive, decide, act, and remember) and the main ways to architect them: coding from scratch, using frameworks, or using visual tools like n8n.
Our research agent example showed how n8n makes it straightforward to create powerful agents. By connecting LLMs with different tools visually, you can build systems that act intelligently for you. Good tool integration is vital for agents, and n8n makes this easy.
AI agents are changing quickly, offering new ways to automate tasks and personalize experiences. We hope this guide clarified the basics and encourages you to try building your own agents with n8n.
What’s next?
Now that you have a solid understanding of AI agents and how to start building them with n8n, you can experiment with different LLMs, try building agents for new use cases, and connect with the n8n community to share your creations and learn from others!
You can also dive deeper and explore more resources from the community:
- Check out this Reddit thread for insights on what tools to use for building AI agents.
- See how others are building with n8n in this YouTube video.
- Read more on the n8n blog:
- Learn about building AI agentic workflows.
- Discover more on AI workflow automation.
- Get inspired or find a starting point by browsing AI workflows shared by the n8n community.
Happy automating!