Blogging isn’t just about writing quality content, but also ensuring that it reaches as many members of your audience as possible. This means that bloggers have to post an article multiple times on different platforms. This often entails ensuring that the formatting and layouts are consistent across platforms, which tends to be a time consuming (and exhausting) ordeal.
Automating these processes can save large amounts of time and effort, allowing bloggers to reclaim time to focus on what they do best — writing. This tutorial will teach you how to post blog posts to multiple blogging platforms automatically.
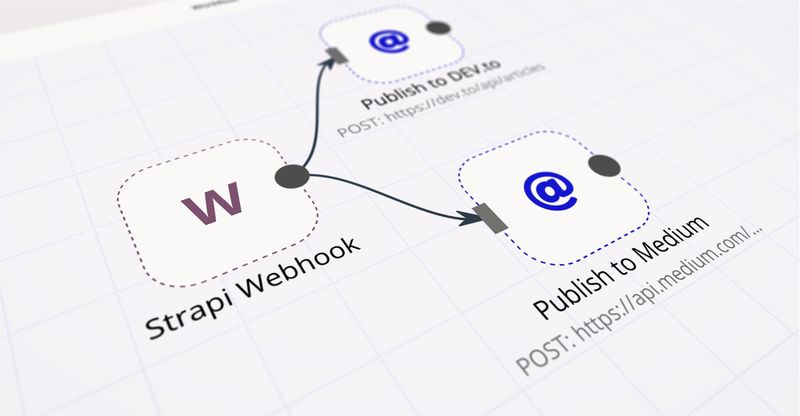
In this tutorial, we’re going to create and store all our posts in one central platform — Strapi. It is a headless CMS which will store all our content. We will use n8n to create a workflow that will take content from Strapi using webhooks and create posts on Medium and Dev.to using their REST APIs. Strapi supports post creation through markdown formatting, which will help maintain the layouts of articles across platforms.
1. Getting ready
This tutorial guide assumes that you already have Strapi and n8n set up and running. In case you don’t already have these services running, you can run them using docker-compose.
If you get stuck, or prefer to not use Docker, you can check out alternative install methods here (strapi setup guide).
Setting up Strapi
Create a docker-compose.yaml file.
version: '3'
services:
	strapi:
    	image: strapi/strapi
        volumes:
        	- ./:/srv/app
        ports:
        	- '1337:1337'
Then, start the service by running:
docker-compose up -d
Setting up n8n
If you prefer not to use Docker, you can check out the alternative install methods in the docs. Alternatively, you can use a free n8n cloud trial to get started quickly.
docker run -it — rm \
— name n8n \
-p 5678:5678 \
-v ~/.n8n:/root/.n8n \
n8nio/n8n \
n8n start — tunnel
Note: This is only meant for local development and testing. For information on how to deploy n8n in a production environment, please refer to the n8n setup guide.
Make sure that all the services have been started using docker ps. You should be able to see two running containers, one for Strapi and one for n8n.
You can also follow along this guide by copying the workflow from n8n.io and making appropriate changes at each step. This workflow was built using n8n@0.107.0 version.
2. Setting up a Webhook node
In this workflow, we will receive all our content from Strapi to distribute it across various platforms. We will accomplish this using the Webhook node.
Add a new node by clicking the '+' button on the top right of the Editor UI. Under the Triggers section, select the Webhook node. Select 'Header Auth' from the Authentication dropdown list and create a new header auth. Then, select the 'POST' option for HTTP Method.
Now, save the workflow. This activates the webhook. Finally, copy the test webhook URL (we will need this later). Here’s a video of me following the steps mentioned above.
3. Creating a collection in Strapi and setting up the webhook
Strapi stores all content in the form of collections. These are user defined stores of data. We will first create a collection and then set up the webhook that we created in the previous step.
Click on the Content-Types Builder in the left sidebar to create a collection. We will name this collection as Post. Add the following fields for the collection:
- Title — Short text
- PostDatetime — Datetime
- PostContent — Rich text
- FeatureImage — Single media
- Tag — Enumeration
Here’s a video of me following the steps mentioned above.
Click on Settings in in the left sidebar and select 'Webhooks' under the Global Settings section. Click on the + Add new webhook button. Enter a name for your webhook in the Name field and paste the n8n webhook URL you copied from the previous step in the URL field. Under the Headers section, select Authorization from the Key dropdown list. Enter the value that you used in the 'Header Auth' credentials in the Webhook node. Now, save your changes by clicking on the Save button.
4. Creating POST requests for the Dev.to API
Now that we have all our content being sent from Strapi to n8n, we need to send that information from n8n to several blogging platforms. Most blogging platforms have a RESTful API using which we can make a post.
Let’s start with Dev.to as an example.
First, create a sample post and retrieve the data model from Strapi. Click on the Execute Node button and then create a new sample post in Strapi. It should look something like the image below.

Note: You will need to use the Test URL to be able to view the data that n8n processes as shown above. The Production URL does not display retrieved data in the workflow editor. We recommend that you use the Test URL to configure the workflow.
Next, we need to send the data to Dev.to via their REST API. One of the ways to do this is by using a POST request. POST requests are a type of web requests that can send data to a server by including it as a ‘payload’. In n8n, POST requests can be created and used via the HTTP Request node.
From your Dev.to dashboard, go to Settings and select Account. Click on the Generate API Key button under the DEV Community API Keys section and generate an API key.
Now, using the HTTP Request node, we can send the data to Dev.to. Set the Authentication to ‘Header Auth’ and use the API key from your Dev.to account to authenticate. Set JSON/RAW Parameters to true (turn the switch on). Set the request method as POST and paste the API endpoint in the URL (https://dev.to/api/articles in our case). In the Headers field enter {"Content-Type": "application/json"}.
The final step to create the node is to add the request body, or the payload, in JSON format. This will contain all the data that is needed to make a post. To dynamically change the data based on previous nodes, we will use the powerful “Add expression” tool. You can access this by clicking the ⚙️ (gears) icon and choosing Add Expression.
Now, select the following variable:
Current Node > Input Data > JSON > body > entry > Title
Similarly select the body content and tag from the Variable Selector. Having previously read through Dev.to’s API documentation, I chose all the information that I wanted to send to Dev.to and encoded it as JSON.
{
	"article": {
    		"title": "Post Title",
        	"published": true,
        	"body_markdown": "I love n8n!",
        	"tags": [ "TutorialSample", "Guide", "Instructional", ],
        	"series": "n8n Guides",
        	"canonical_url": "https://your-strapi.url/postname"
	}
}
For consistency, I chose to only include the fields that both Medium and Dev.to would support.
If you want to include or exclude information, please refer to Dev.to API reference.
Next, test this node by clicking Execute Node to run this node. Then, head over to Dev.to and check if a new post has been created. If you see a new post; it means you’ve set this up correctly!
Here’s a video of me following the steps mentioned above.
5. Creating POST requests for the Medium API
We will use the Medium node in n8n to send the data to Medium. Follow the documentation to get credentials for the node.
Click on the '+' button and select the Medium node under the Regular tab. Create new credentials to connect to your Medium account. Click on the gears icon next to the Title field and select 'Add Expression'. Select the following from the Variable Selector section:
Current Node > Input Data > JSON > body > entry > Title
Next, select 'Markdown' from the Content Format dropdown list. Click on the gears icon next to the Content field and select 'Add Expression'. Select the following from the Variable Selector section:
Current Node > Input Data > JSON > body > entry > PostContent
To add Tags and a canonical URL, click on Add Field and select 'Tags' and 'Canonical URL' respectively. You can select the data from the Variable Selector as you did previously.
Here’s a video of how I set up my Medium node.
6. Executing the workflow
First of all, change the webhook URL in Strapi from the Test URL to the Production URL and activate the workflow. The Test URL is meant only for configuration and setting up the webhook. It is only active for 120 seconds. The Production URL on the other hand, listens for requests all the time.
Create a post in Strapi and save it. Head over to Dev.to and Medium to check if the blog posts have been created (it might take a few seconds).
Here’s a video of me executing my workflow.
The post has shown up with the correct data on both platforms. We’ve set up n8n to cross-post content to both Medium and Dev.to.
And, that’s it! Congratulations, you have just automated cross-posting across blogging platforms 🎉
Adding more platforms
Since n8n supports webhooks, HTTP requests, and GraphQL; you can add any blogging platform that supports either RESTful API or GraphQL using a similar set of steps (consult the documentation) for the appropriate settings.
You can also automate cross-platform updating and deleting of posts; making Strapi a powerful tool to manage and deliver your content across several online platforms.
You can also experiment in a similar manner with social networking workflows such as twitter, announcing a new blog post via a tweet. Such companion social media pages for blogs ensure that your content reaches even wider audiences.
Conclusion
In this tutorial, we learnt to automate cross-posting of blog posts using a single source of truth to ensure consistency and reduce effort. We also discussed the possibility of using companion workflows to handle the update and removal of content and increasing visibility and reach by complementing using social media nodes.
Writing is a creative industry and everyone has their own style and way of doing things — a workflow that they prefer. n8n can help automate the repetitive tasks of your workflow. Which parts of your daily life are repetitive and tedious? What will you automate?
In case you’ve run into an issue while following the tutorial, feel free to reach out to me on LinkedIn or ask for help on our forum 💙
Start automating!
The best part is, you can start automating for free with n8n. The easiest way to get started is to download the desktop app, or sign up for a free n8n cloud trial. Thanks to n8n’s fair-code license, you can also self-host n8n for free.