The steam engine and electrification revolutionized entire sectors of the economy from the 18th century onward. Modern technologies, particularly automation, are beginning to dramatically alter today’s industries. Automation in industries has resulted in higher productivity, better quality of products, and a safer workplace.
Continuously monitoring machines’ health results in effective and efficient maintenance. Real-time monitoring can also help with predictive maintenance. Why have humans continuously monitor the health of machines when we can use an automated system? These automated systems monitor the machines’ health and also warns the staff when incidents are about to take place, even before they happen.
In this tutorial, we will learn to build the foundation of such automated systems. We will create a workflow that will log machine data coming from factory sensors in a database. The workflow will also generate an incident report on PagerDuty and notify the responsible staff members when the temperature of a machine crosses the threshold value. We will also store this incident data into a database, so that it can be used for future reference.
We will build the workflow using n8n, a fair-code licensed tool that helps you automate tasks, sync data between various sources, and react to events all via a visual workflow editor. We will build two workflows:
- Workflow 1 — Smart Factory Data Generator
- Workflow 2 — Smart Factory Incident Report and Data Ingestion
Prerequisites
To get started with the workflow you will need:
- n8n — You can find details on how to install n8n in the Quickstart page (this workflow was created using n8n@0.101.0).
- PagerDuty — You’ll need to obtain an Access Token for the PagerDuty API. You can find the instructions on how to obtain that here.
- ActiveMQ — You’ll need to install ActiveMQ on your machine. You can find the instructions here. You’ll also need to create a queue called
berlin_factory_01. You can find instructions for that here. - CrateDB — You’ll also require an instance of CrateDB running locally or on a server. You can find the instructions here.
Install n8n
You can install n8n with npm, using the following command:
npm install n8n -g
You can also run n8n using Docker.
If you’ve installed n8n using npm, open up a terminal and run the following command:
n8n start
This will start n8n. Press “o” or navigate to the URL shown in the terminal.
You can also sign-up for a free n8n cloud trial to get access to our hosted service.
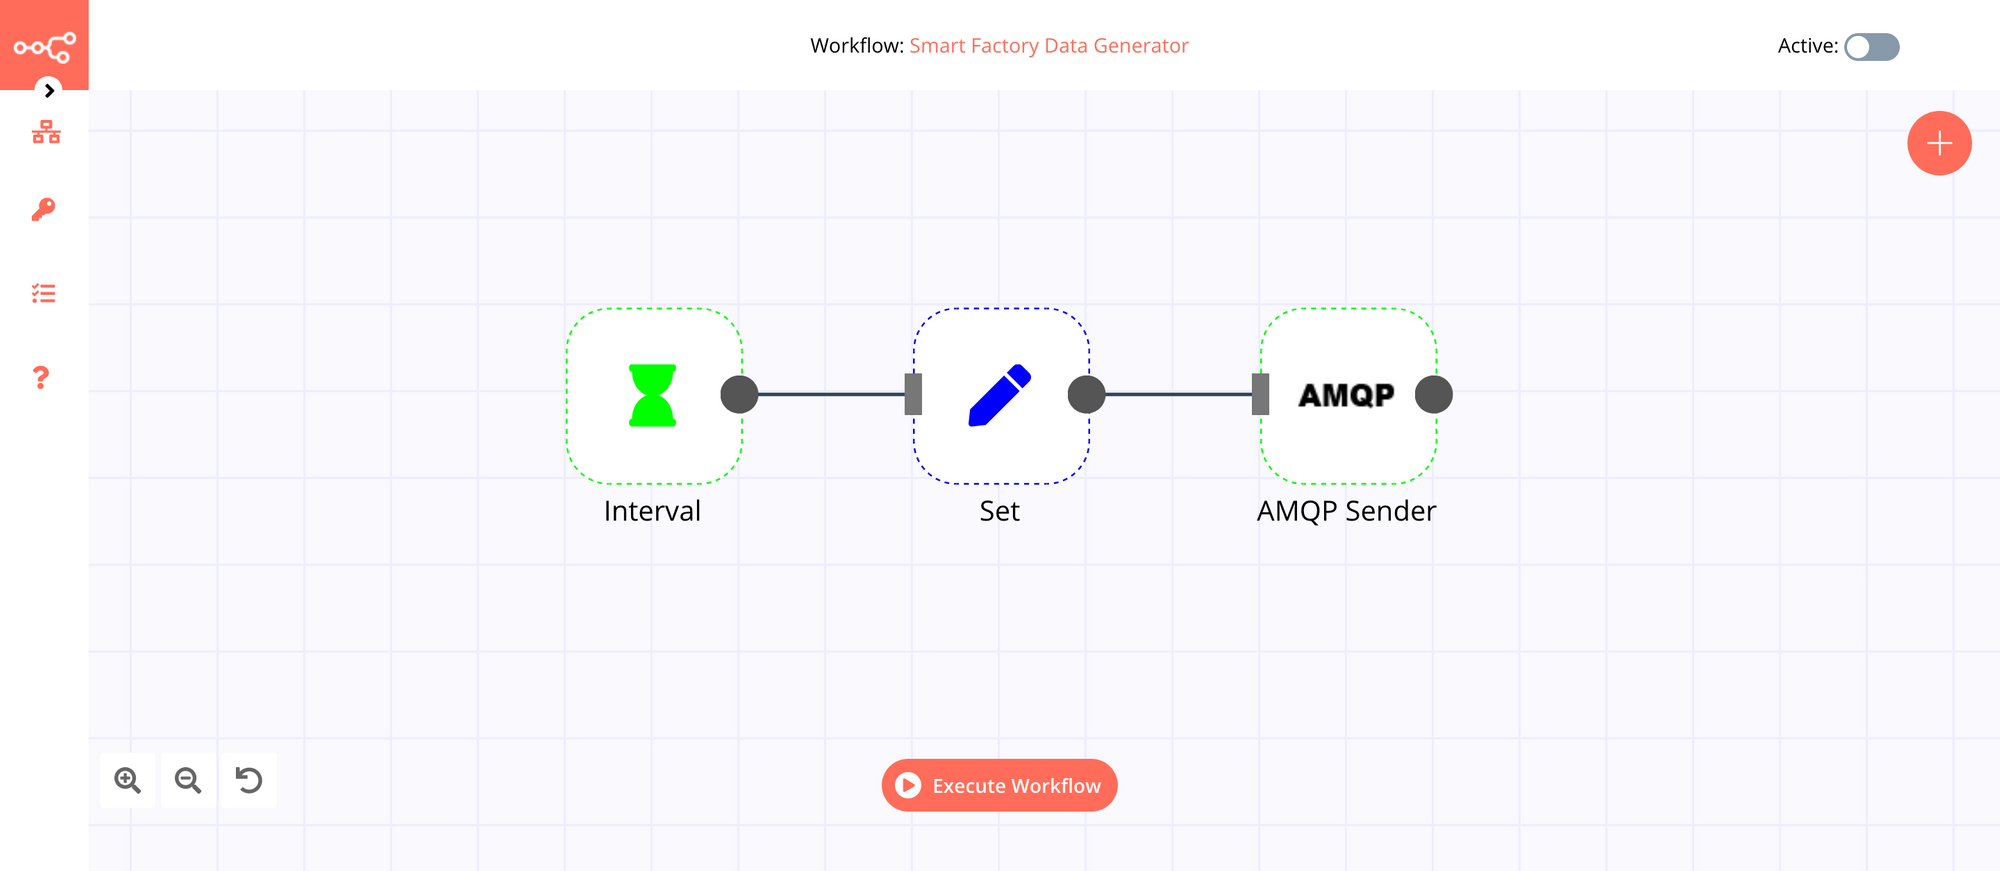
Workflow 1: Smart Factory Data Generator
In factories, machines run 24/7, and it becomes crucial to monitor their health to avoid failure. Data from the sensors can help keep an eye on the functioning of a factory. Using real sensors is out of the scope of this tutorial. However, this workflow will help you understand how to set up a workflow that queues sensor data using the AMQP Sender node. For this workflow, we will use an Interval node that will trigger the workflow every second. The Set node will set the values for the items we want to add to the queue, and the AMQP Sender node will send a raw message to add to the queue.
I have also submitted this workflow on n8n.io, in case you’d like to skim through it. Please note that you will still need to configure credentials for the AMQP Sender node.
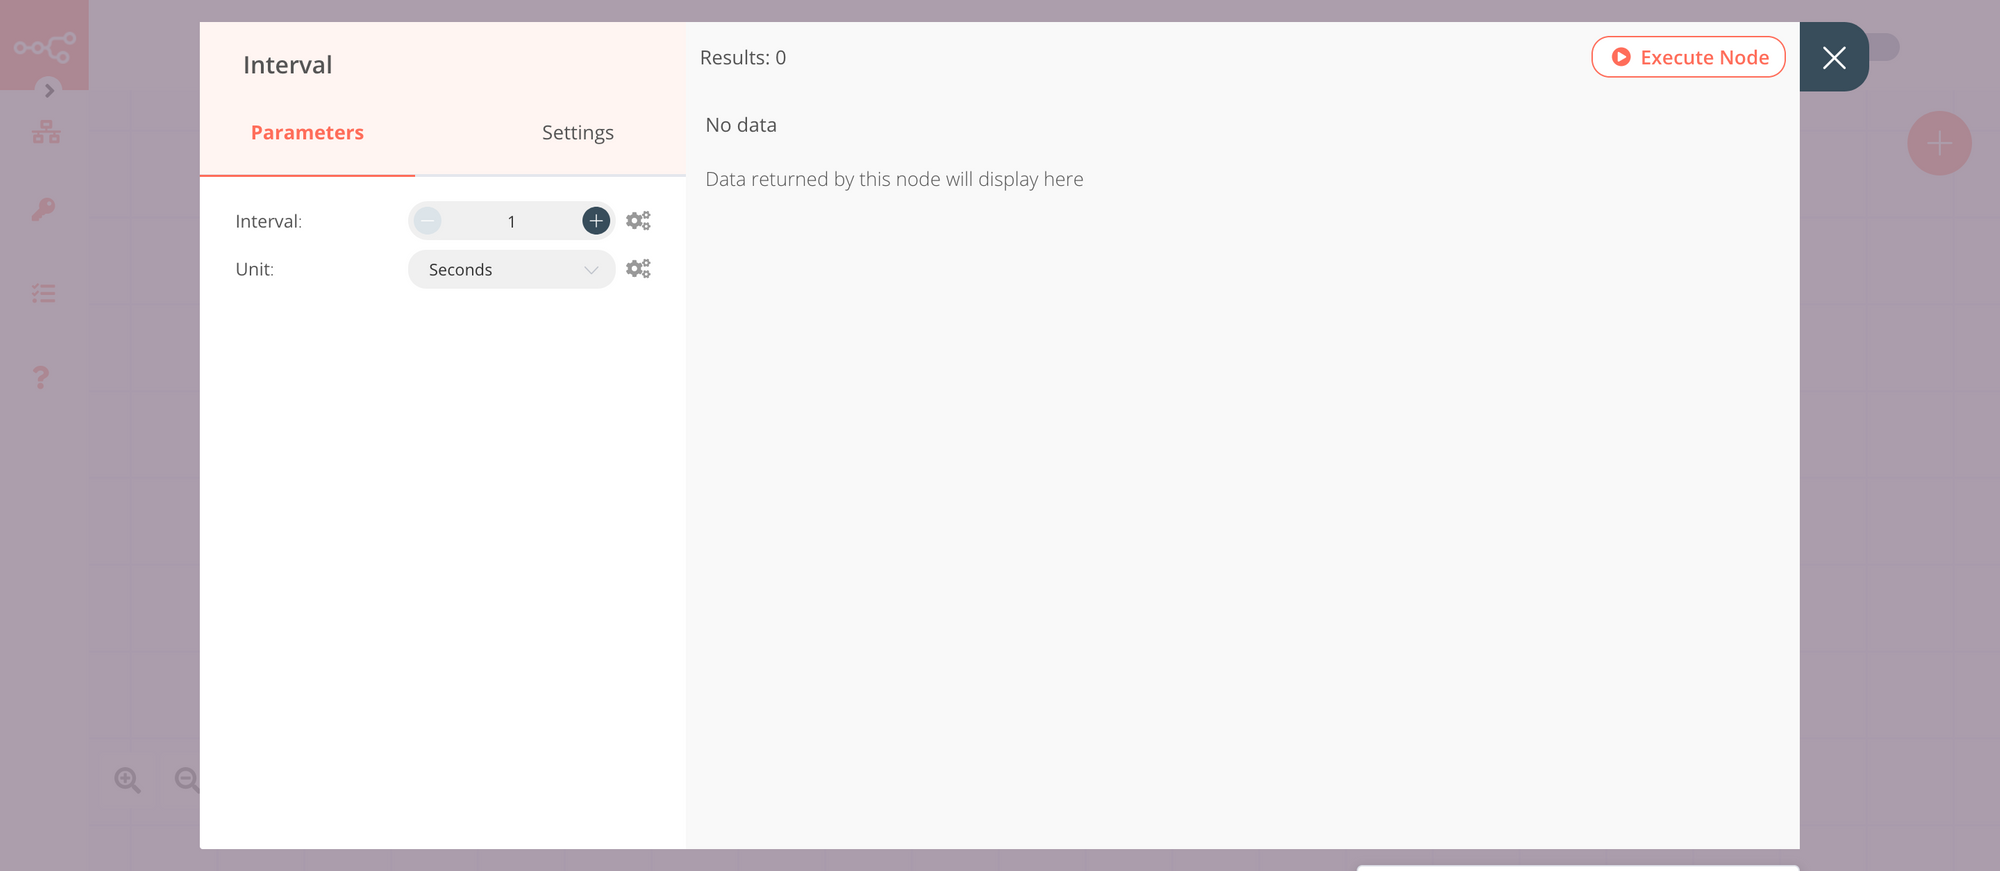
1. Interval node: Trigger the workflow every second
The workflow should execute every second, and to do that we will use the Interval node in n8n. The Interval node is used to trigger the workflow to run at regular intervals of time. To add the Interval node, click on the ‘+’ button on the top right corner. Under the Trigger Section, select the Interval node. Set the value to 1 for the Interval field and select ‘Seconds’ from the Unit dropdown menu.
2. Set node: Set values for sensor data
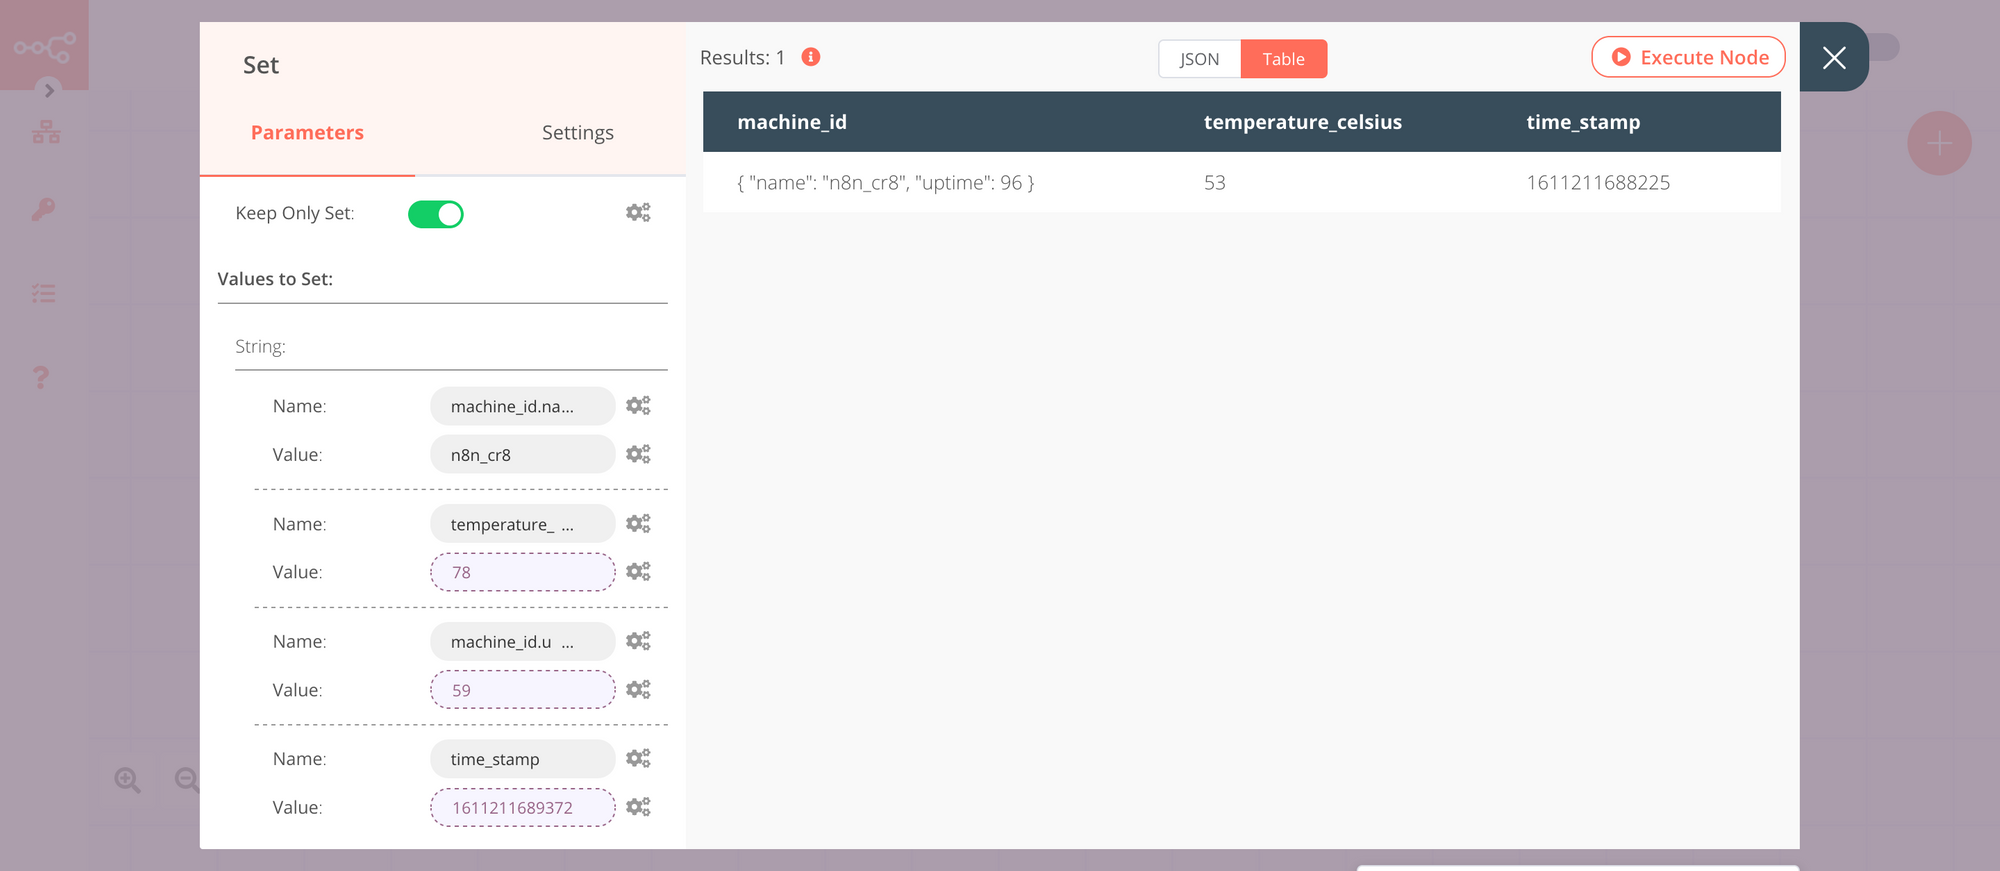
We need relevant data to monitor the health of the machines. The sensors might give a lot of information that may or may not be relevant. The Set node allows us to set the workflow data so that only the data we want passes through this node. For the scope of this tutorial, we will generate some random values for the machine uptime, and the temperature of the machine.
Click on the ‘+’ button on the top right corner and select the Set node. Click on ‘Add Value’, under the Values to Set section, and select ‘String’. Enter machine_id.name in the Name field and n8n_cr8 for the Value field. To add a new value, click on ‘Add Value’ and select ‘String’. Name this as temperature_celsius. Click on the gears symbol next to the Value field and select Add Expression. Paste the following expression {{Math.floor(Math.random()*100);}}. This will create a random temperature value between 1 to 100.
We will also create a random uptime value. Click on ‘Add Value’ and select ‘String’. Enter machine_id.uptime in the Name field. Click on the gears symbol next to the Value field and select Add Expression. Paste the following expression {{Math.floor(Math.random()*100)}}. This will create a random value for machine uptime between 1 and 100. In case of real sensor data, this wouldn’t be a random value 😉
Click on ‘Add Value’ and select ‘String’. In the Name field enter time_stamp. Click on the gears symbol next to the Value field and select Add Expression. Paste the following expression {{Date.now();}}. This will return the timestamp of when the data was generated.
Toggle Keep Only Set to true. This will pass on only the information we have set in this node to the queue. We now have all the data that we need from the sensors.
NOTE: We are using String as the data type, but you can use number or boolean, as per your use case.
Click on the Execute Node button to execute the workflow.
3. AMQP Sender node : Add messages to the ActiveMQ queue
AMQP is an open standard application layer protocol for message-oriented middleware. We will use this node to send messages to the ActiveMQ queue that we created earlier.
To add the AMQP Sender node, click on the ‘+’ button. Select the AMQP Sender node to add it to the workflow. Under the Credentials section, select ‘Create New’ from the dropdown menu. Enter localhost as the Hostname. Make sure the port is 5672. By default, the username and password for ActiveMQ are admin and admin respectively. If you have configured a different username and password for ActiveMQ, please use those credentials. Click on Save to save the credentials.
Enter berlin_factory_01 in the Queue/Topic field. Click on Add Option and toggle Data as Object to true.
Save the workflow and on the top right corner toggle Active to true. Our workflow will now execute every second and produce the sensor data that will be pushed into the ActiveMQ queue.
Here’s a video of me following the steps mentioned above.
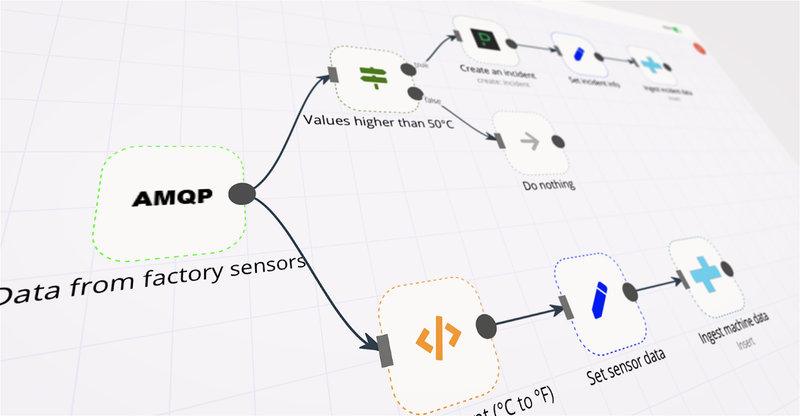
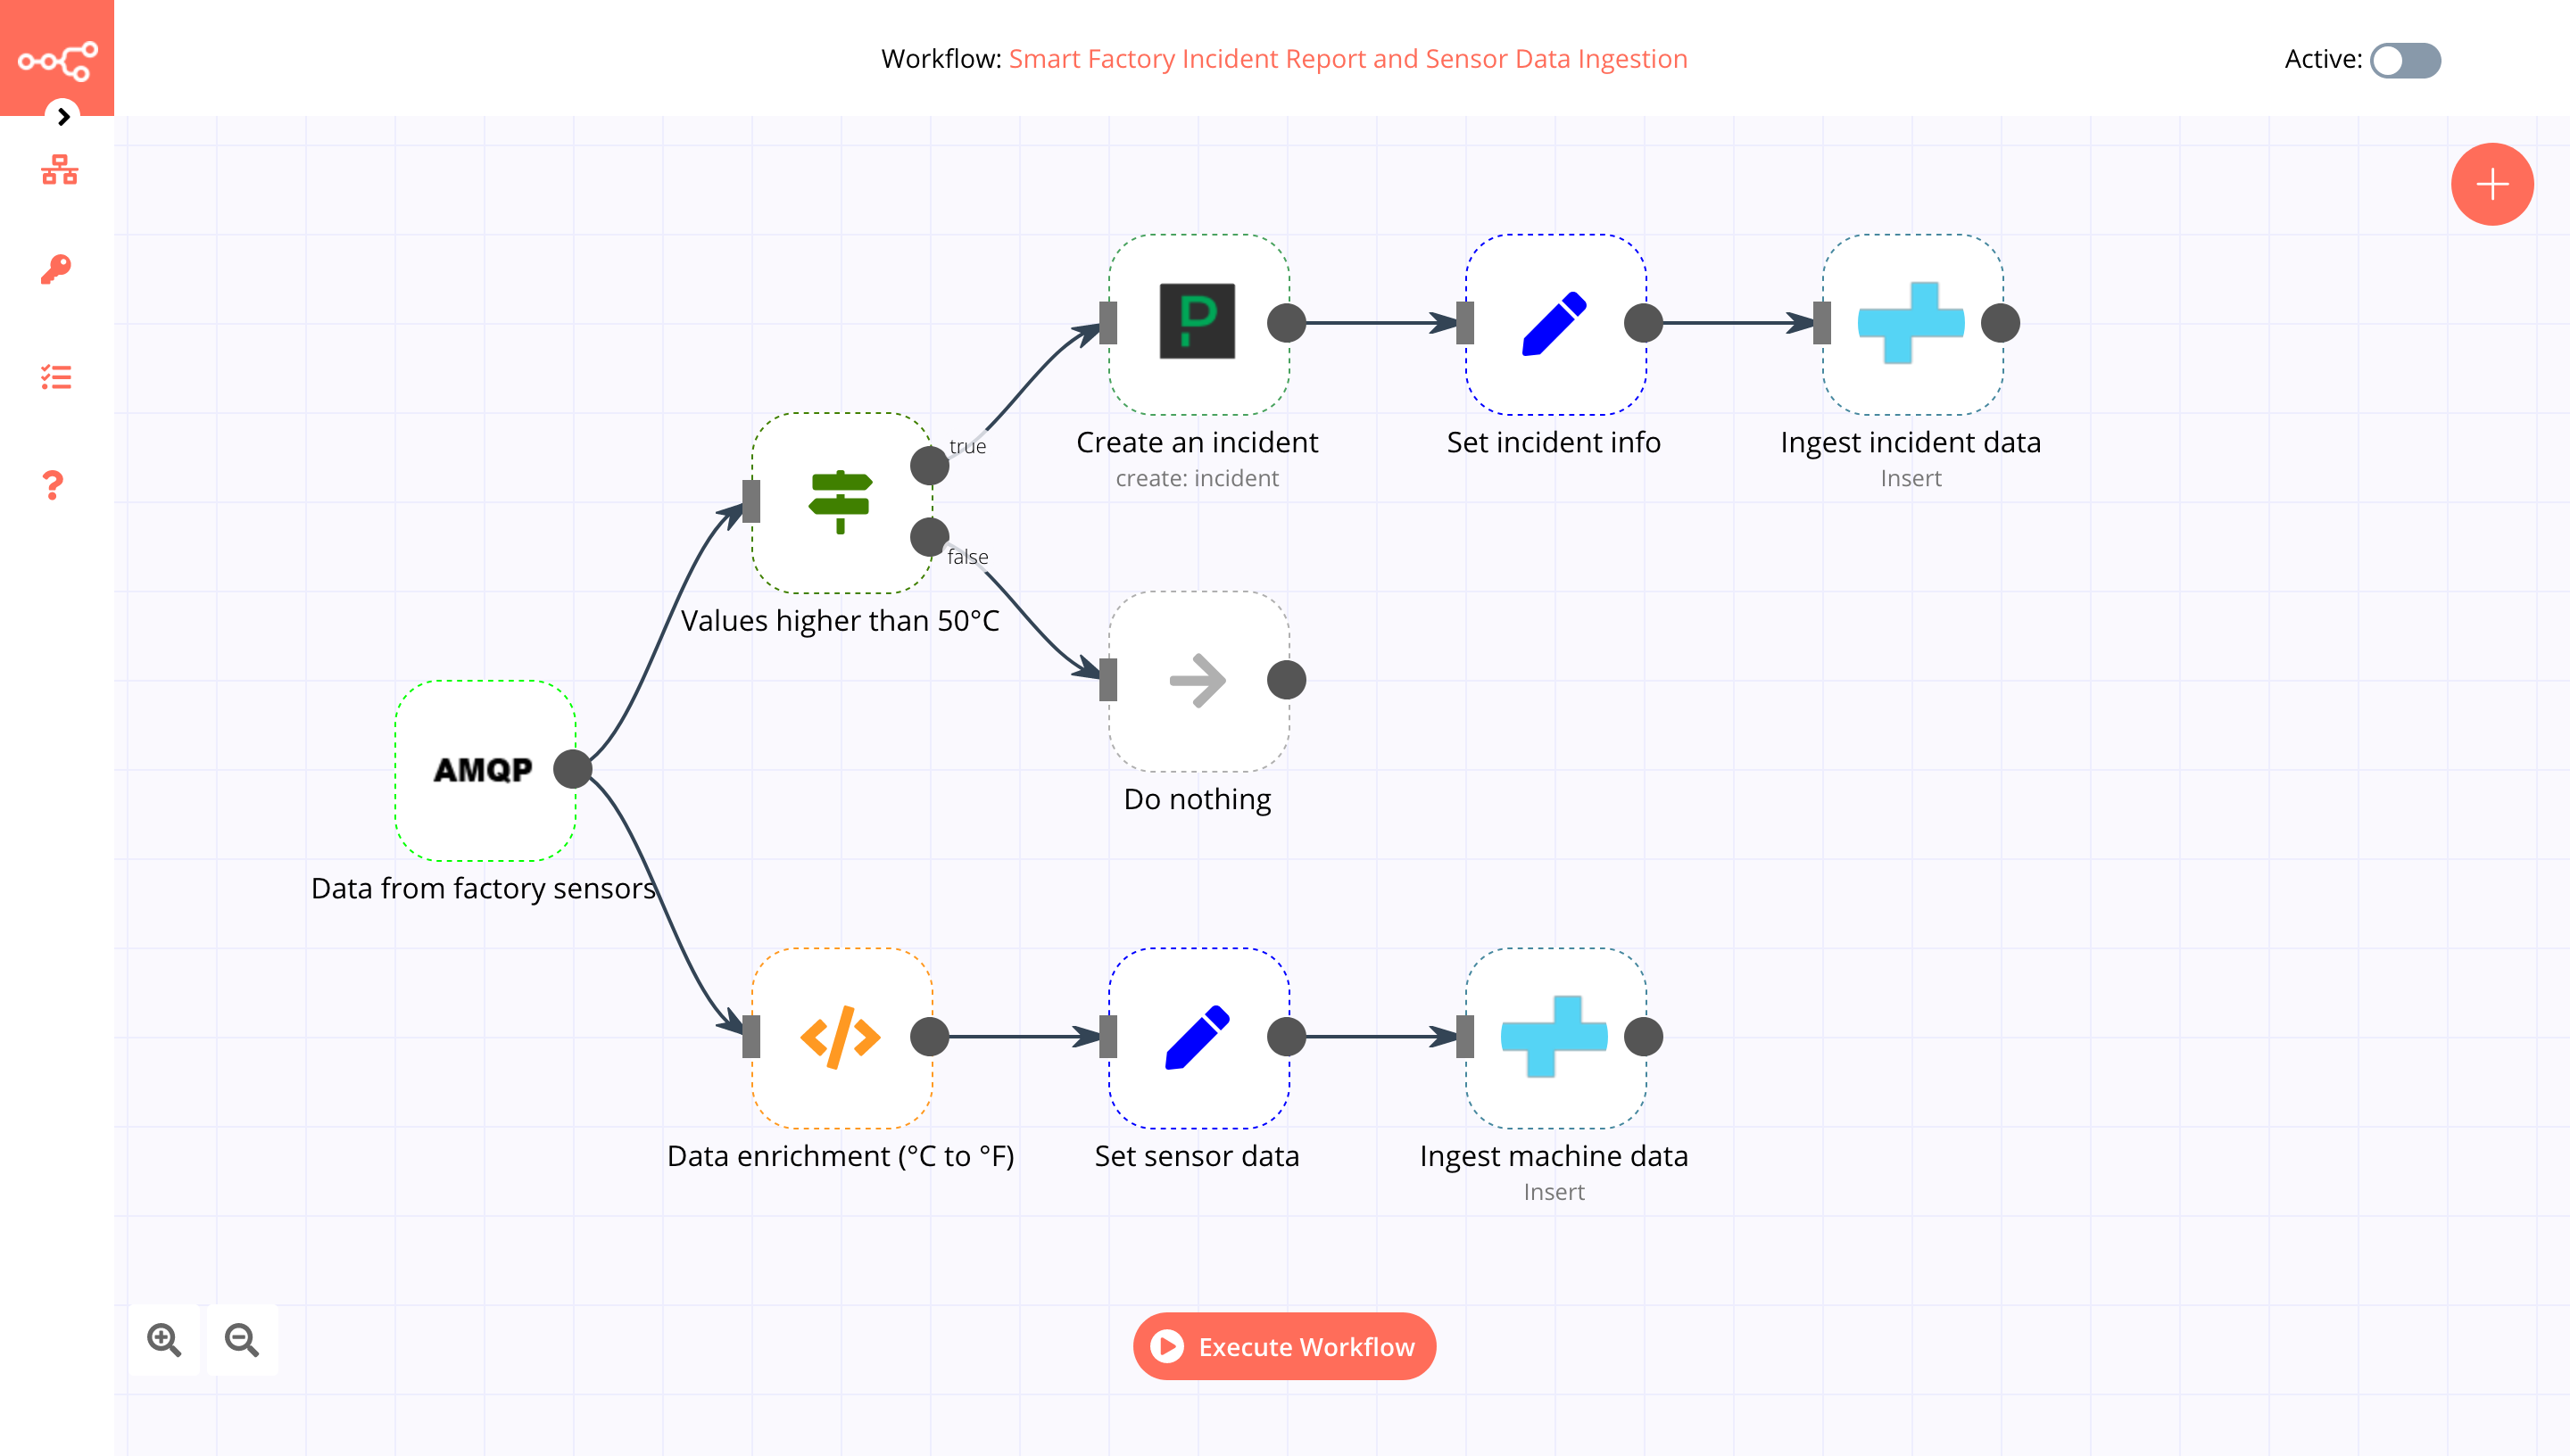
Workflow 2: Smart Factory Incident Report and Sensor Data Ingestion
In the previous section, we learnt to build a workflow that generates sensor data and pushes it into an ActiveMQ queue. In this section, we will build a workflow that generates an incident report if the temperature of the machine crosses the threshold value. This workflow will also store the sensor and the incident data into a database.
We will use the AMQP Trigger node, which will listen to the incoming data from our ActiveMQ queue. We will use the IF node to check for the threshold value. If the temperature crosses the threshold value, the workflow will create an incident report using the PagerDuty node. We will store the incident information in CrateDB, using the CrateDB node. If the temperature is below the threshold value, no action is required.
n8n has nodes for various databases. You can use the QuestDB, MongoDB, Postgres, Microsoft SQL, or the MySQL node depending on your use-case.
In this tutorial we will use CrateDB, which is a time-series database. CrateDB gives the ability to have fast data ingestion for IIoT scale and comes with the flexibility of dynamic data structure. The ease of scaling and high availability makes it an ideal choice for such a use-case.
The temperature we currently have is in the Celsius unit. We will use the Function node to convert this temperature from Celsius to Fahrenheit. We will also store all the relevant machine information in CrateDB, that can be used in monitoring the machines’ health.
I have also submitted this workflow on n8n.io, in case you’d like to skim through it. Please note that you will still need to configure credentials for the AMQP Trigger, PagerDuty, and CrateDB nodes.
Create a new workflow in n8n. We will divide this workflow into two parts.
- Part One — Storing Sensor Data in a Database
- Part Two — Creating Incident Report and Storing Incident Data
Part One — Storing Sensor Data in a Database
In this section, we will create a workflow that converts the temperature from Celsius to Fahrenheit using the Function node. We will use the Set node to set the data we want to store in our database and the CrateDB node to store the data.
1. AMQP Trigger node: Trigger workflow with data from ActiveMQ
The AMQP Trigger node listens to the messages in the ActiveMQ queue and gets triggered when a new message is added to the queue. To add the AMQP Trigger node in the workflow, click on the ‘+’ button. Under the Trigger section, select the AMQP Trigger node. Select the credentials that you created in the previous workflow. We are listening to the messages in the ‘berlin_factory_01’ queue. Hence, enter berlin_factory_01 as the value for the Queue/Topic field.
Click on the Execute Node button.
Rename the node from “AMQP Trigger” to “Data from factory sensors” by clicking on the name, editing it, and clicking the ✔ (checkmark) to the right of the name. This will finish the configuration of the node and close the parameters window. Save the workflow and click on the Execute Node button to execute the node.
2. Function node: Convert the temperature unit from Celsius to Fahrenheit
The Function node in n8n can be used for data enrichment or transformation. We will use this node to convert the temperature from Celsius to Fahrenheit. Click on the ‘+’ button and select the Function node. Copy and paste the following code in the Edit Function field.
temp_fahrenheit = (items[0].json.body.temperature_celsius * 1.8) + 32;
items[0].json.temperature_fahrenheit = temp_fahrenheit;
return items;
Click on the Execute Node button.
To rename the node from “Function” to “Data enrichment (°C to °F)” click on the name, edit it, and click the ✔ (checkmark) to the right of the name. This will finish the configuration of the node and close the parameters window.
Here’s a video of me following the steps mentioned above.
We now have the information coming from the sensors, as well as the temperature in Fahrenheit. The next step is to store this information in the database. We will first use the Set node to select the data we want to store in our database and then store this data in CrateDB.
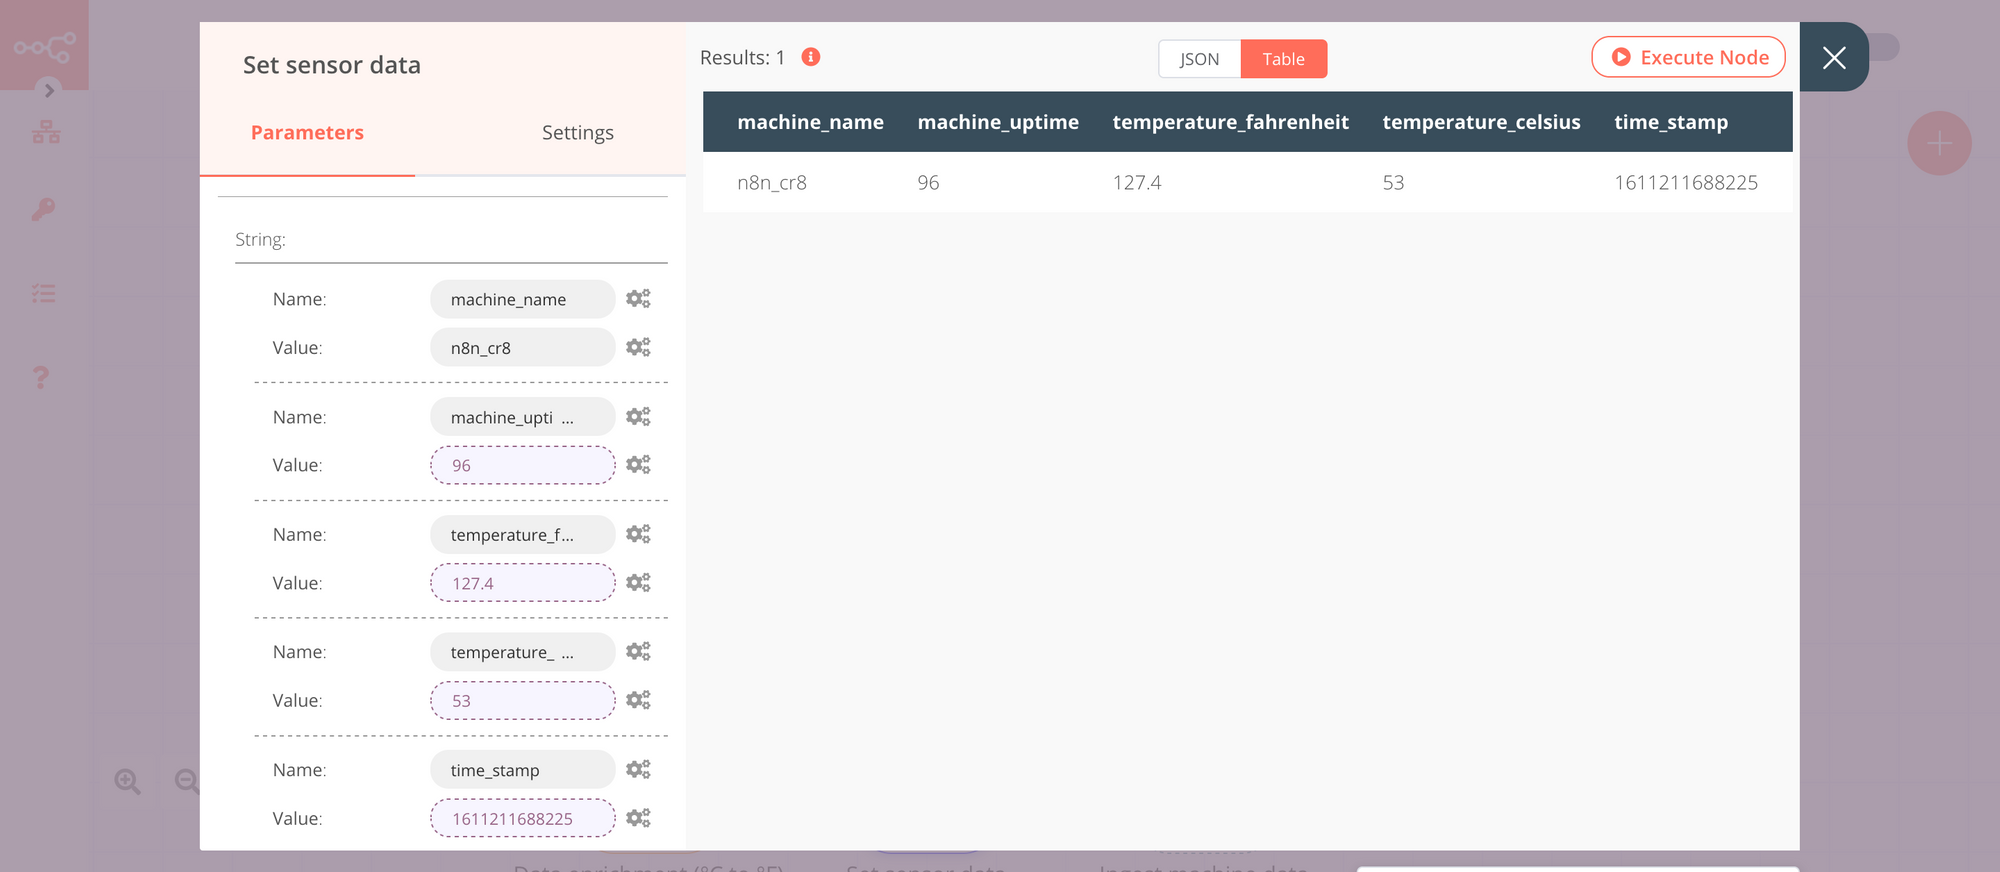
3. Set node: Set values for database
To add the Set node, click on the ‘+’ button, and select the Set node. The information we want to store is the machine name, the machine uptime, temperature in Celsius, the temperature in Fahrenheit, and the timestamp.
Click on the Add Value button and select ‘String’ from the dropdown menu. In the Name field enter machine_name. In the Value field, enter n8n_cr8.
To add the machine uptime, click on the Add Value button and select ‘String’ from the dropdown menu. Enter machine_uptime in the Name field. Click on the gears symbol next to the Value field and select Add Expression. Open the Edit Expression editor and under the Variable Selector section, select:
Current Node > Input Data > JSON > body > machine_id > uptime
Similarly, add values for temperature_fahrenheit, temperature_celsius and the time_stamp. Toggle Keep Only Set to true. This will pass only the information we have set in this node.
Click on the Execute Node button.
To rename the node from “Set” to “Set sensor data” click on the name, edit it, and click the ✔ (checkmark) to the right of the name. This will finish the configuration of the node and close the parameters window.
NOTE: You can use the Function node to send the data to the CrateDB node directly.
4. CrateDB node: Insert sensor data in the database
We have established all the data we want to store in our database. The next step is to add a database node to store this data. n8n has nodes for various databases.
To start CrateDB on your machine using Docker, run the following command (follow the link in the Prerequisites section if you’d like to explore other ways to run CrateDB):
docker run -p 4200:4200 -p 5432:5432 crate -Cdiscovery.type=single-node
NOTE: You can also use CrateDB Cloud if you don’t want to set up CrateDB on your own.
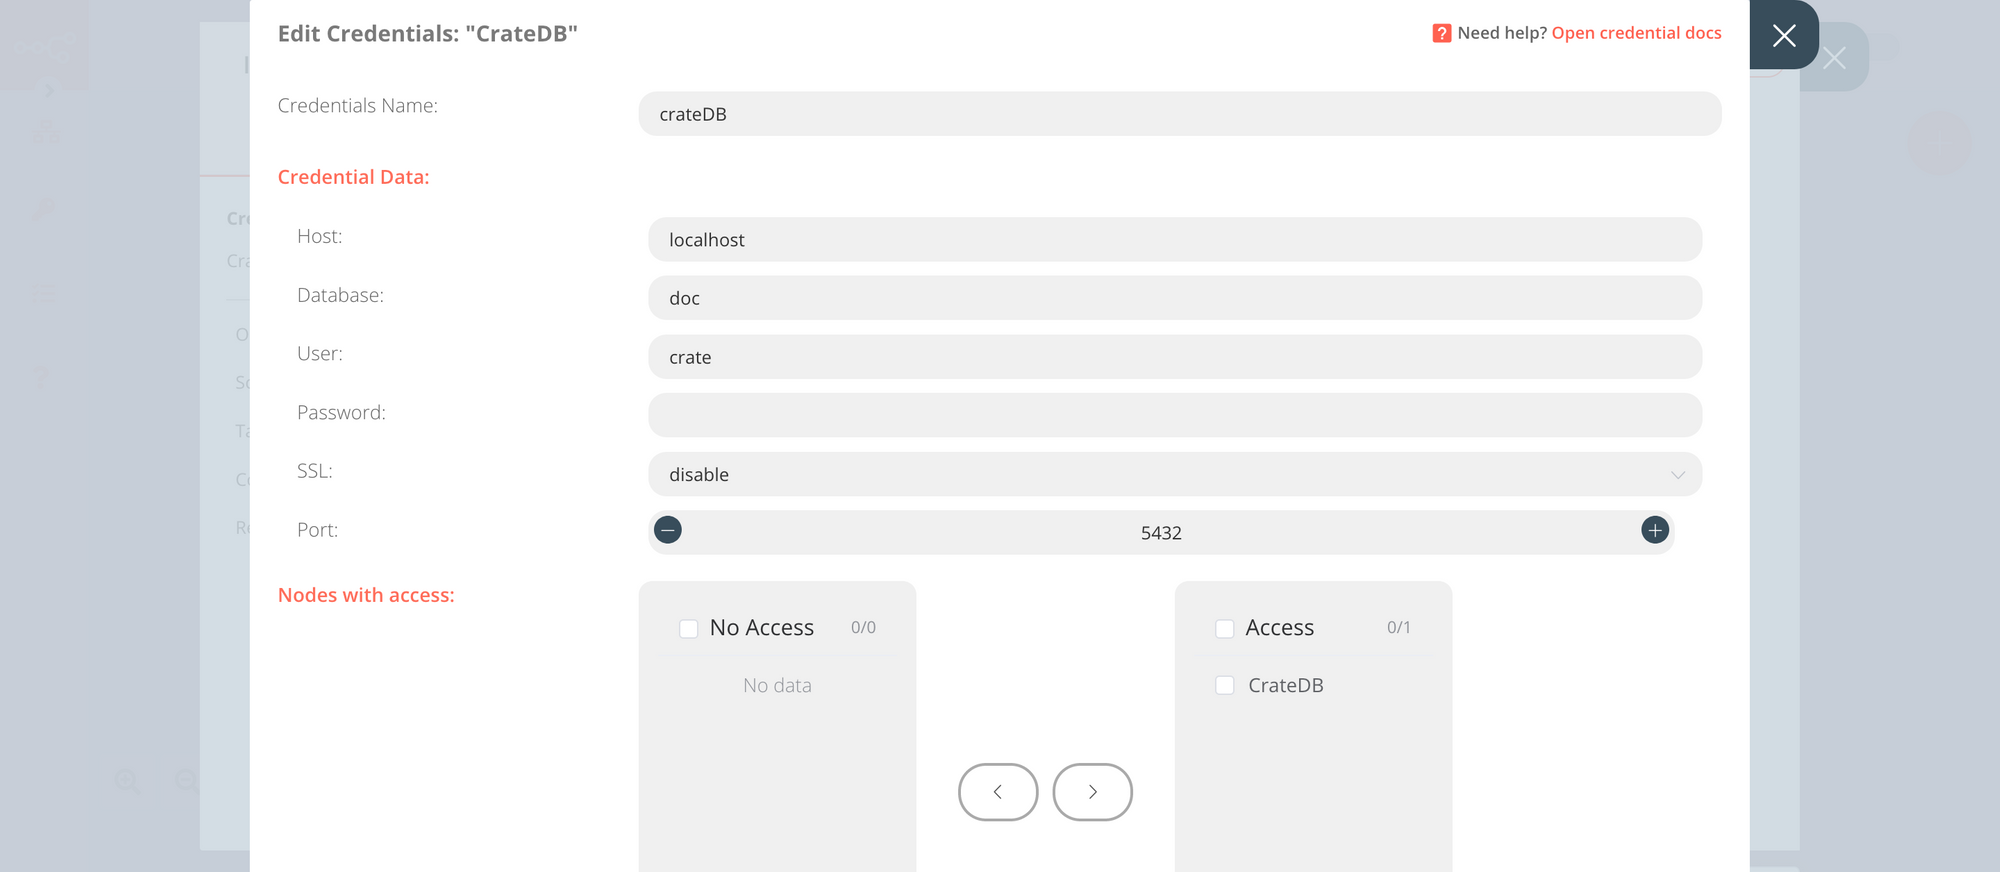
In the n8n workflow editor, click on the ‘+’ button and select the CrateDB node. Select ‘Create New’ from the dropdown menu in the Credentials section.
Give your credentials a name, in the Credentials Name field. We are running CrateDB locally on our machine. Enter ‘localhost’ as the value for the Hostname field.
This is how your CrateDB credentials should look like:
Select ‘Insert’ from the Operation dropdown menu. For the Schema field, enter doc. We will store the data in the table called machine_data, hence enter machine_data in the Table field. Enter machine_name, machine_uptime, time_stamp, temperature_fahrenheit, temperature_celsius in the Columns field.
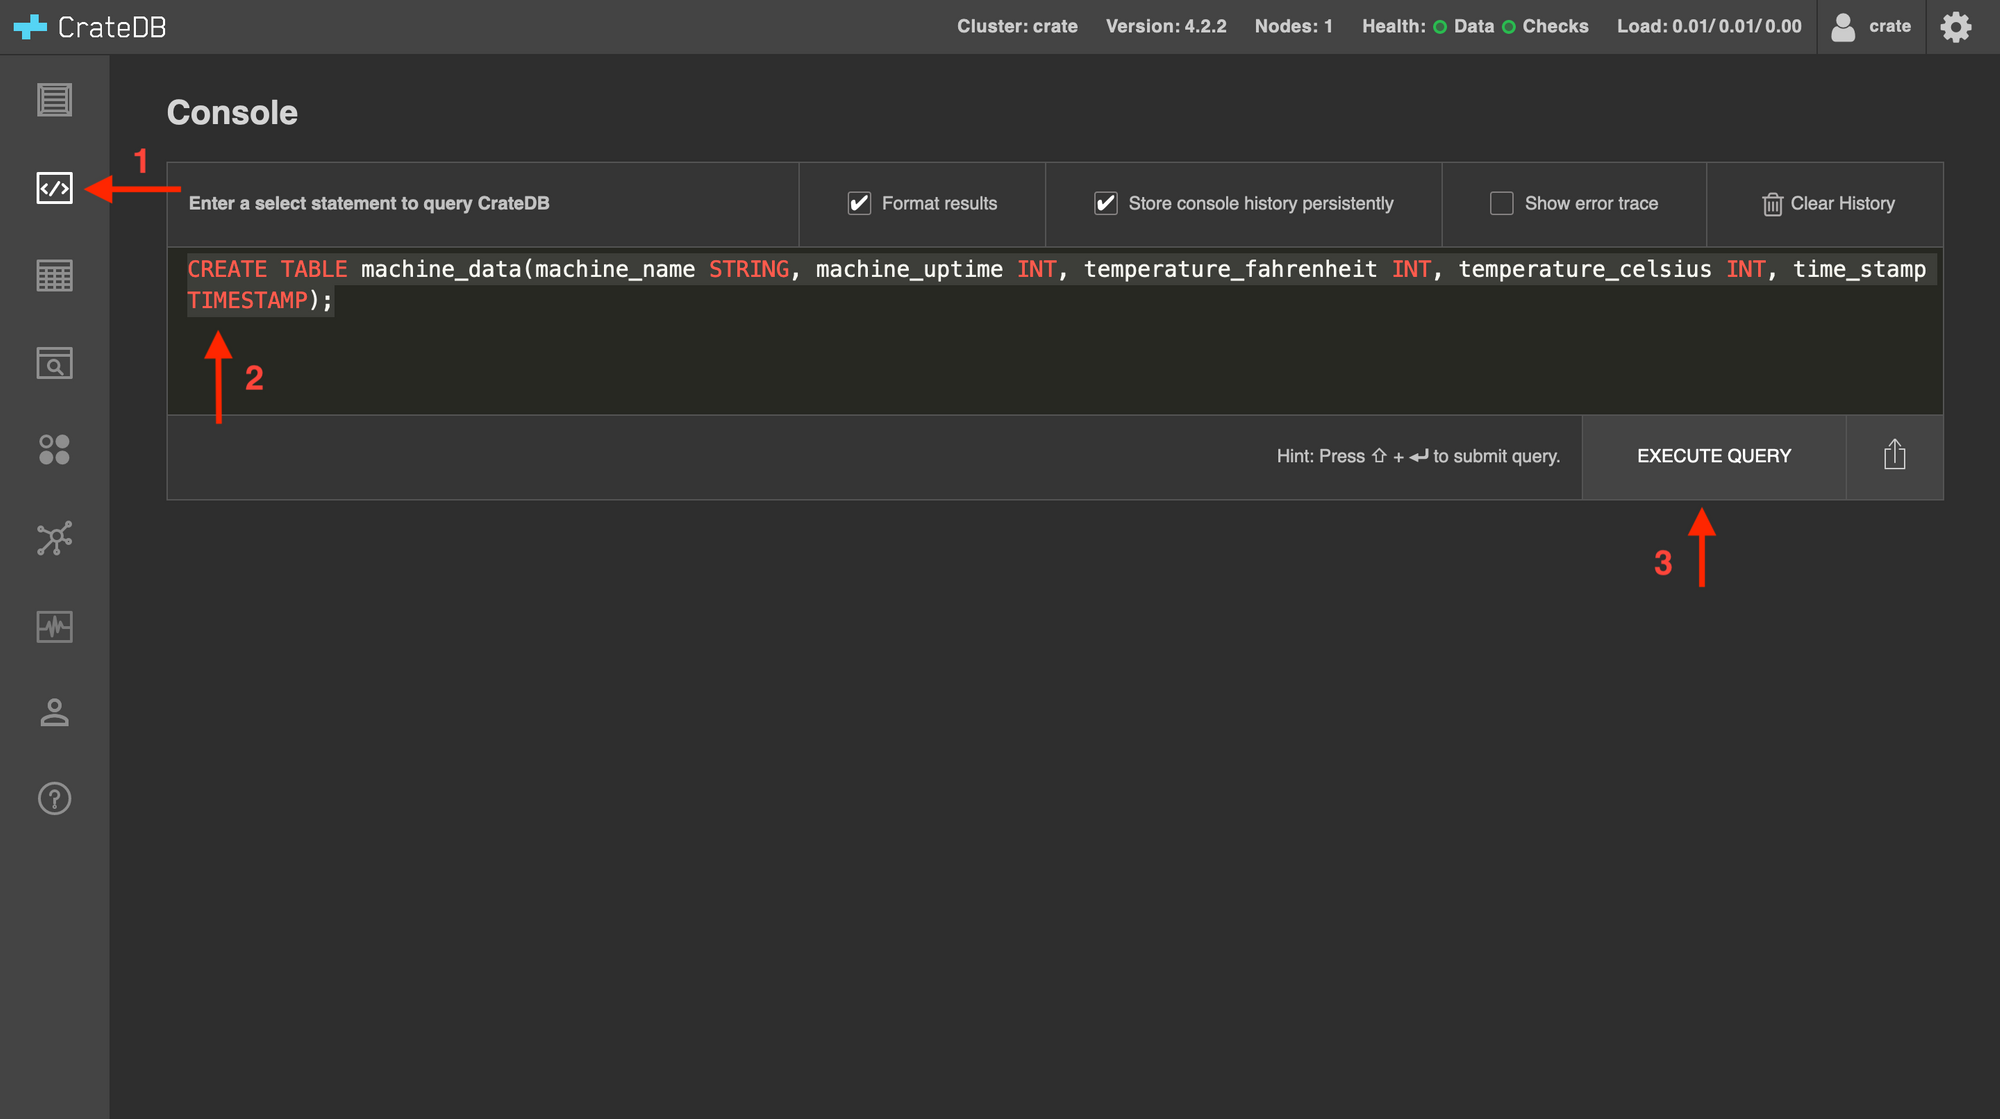
In the CrateDB Admin UI, open the Console. Enter the following SQL command to create a table for our machine data:
CREATE TABLE machine_data(machine_name STRING, machine_uptime INT, temperature_fahrenheit INT, temperature_celsius INT, time_stamp TIMESTAMP);Click on Execute Query to create the table:
NOTE: If you’re running CrateDB locally, you access the Admin UI at http://localhost:4200
In n8n, click on Execute Node to execute the node.
To rename the node from “CrateDB” to “Ingest machine data” click on the name, edit it, and click the ✔ (checkmark) to the right of the name. This will finish the configuration of the node and close the parameters window.
NOTE: Make sure you have some messages in the ActiveMQ queue to trigger the workflow.
Here’s a video of me following the steps mentioned above.
Part Two — Creating Incident Report and Storing Incident Data
The workflow will create an incident report and alert the factory staff whenever the temperature reaches more than 50℃. We will use the IF node that will check this condition. If the temperature is less than 50℃, the No Operation, do nothing node will execute. When the temperature crosses the threshold value, the incident report and alert will be created using the PagerDuty node. The details of the incident will then be stored in a table in CrateDB.
1. IF node: Check if the temperature is greater than or equal to the threshold value
The IF node checks the value of the temperature which is passed on from the AMQP Trigger node. We will add an IF node that will be connected to the AMQP Trigger node. To add the IF node, click on the ‘+’ button, and select the IF node. Select ‘Number’ from the Add Condition dropdown menu. Open the Edit Expression editor for Value 1. Under the Variable Selector section, select Current Node > Input Data > JSON > body > temperature_celsius. Select ‘Larger Equal’ from the Operation dropdown menu and enter 50 for the Value 2 field.
Click on the Execute Node button to execute the node.
To rename the node from “IF” to “Values higher than 50°C” click on the name, edit it, and click the ✔ (checkmark) to the right of the name. This will finish the configuration of the node and close the parameters window.
Here’s a video of me following the steps mentioned above.
2. PagerDuty node: Create an incident report and alert the factory staff
An incident report and alert will be created whenever the value is greater than or equal to 50. Click on the ‘+’ button and select the PagerDuty node. Join the PagerDuty node to the true endpoint of the IF node. Select ‘API Token’ from the Authentication dropdown menu. Select ‘Create New’ from the PagerDuty API dropdown menu. Copy and paste the PagerDuty API token in the API Token field. Click on Save to save the credentials.
Select ‘Incident’ from the Resource dropdown menu and select ‘Create’ from the Operation dropdown menu. For the Title field click on the gear icon and select ‘Add Expression’. In the Expression editor copy and paste the following: Incident with {{$json["body"]["machine_id"]["name"]}}. This will create an incident with a title that has a format similar to Incident with n8n_cr8.
From the Service ID dropdown menu, select the relevant service. Enter your (or the responsible person’s) email address in the Email field.
Click on the Execute Node button.
To rename the node from “PagerDuty” to “Create an incident” click on the name, edit it, and click the ✔ (checkmark) to the right of the name. This will finish the configuration of the node and close the parameters window.
Here’s a video of me following the steps mentioned above.
Now that the workflow is creating the incident report, the next step is to store the data in the database. This data can be used for keeping a log of the incidents and making informed decisions in the future.
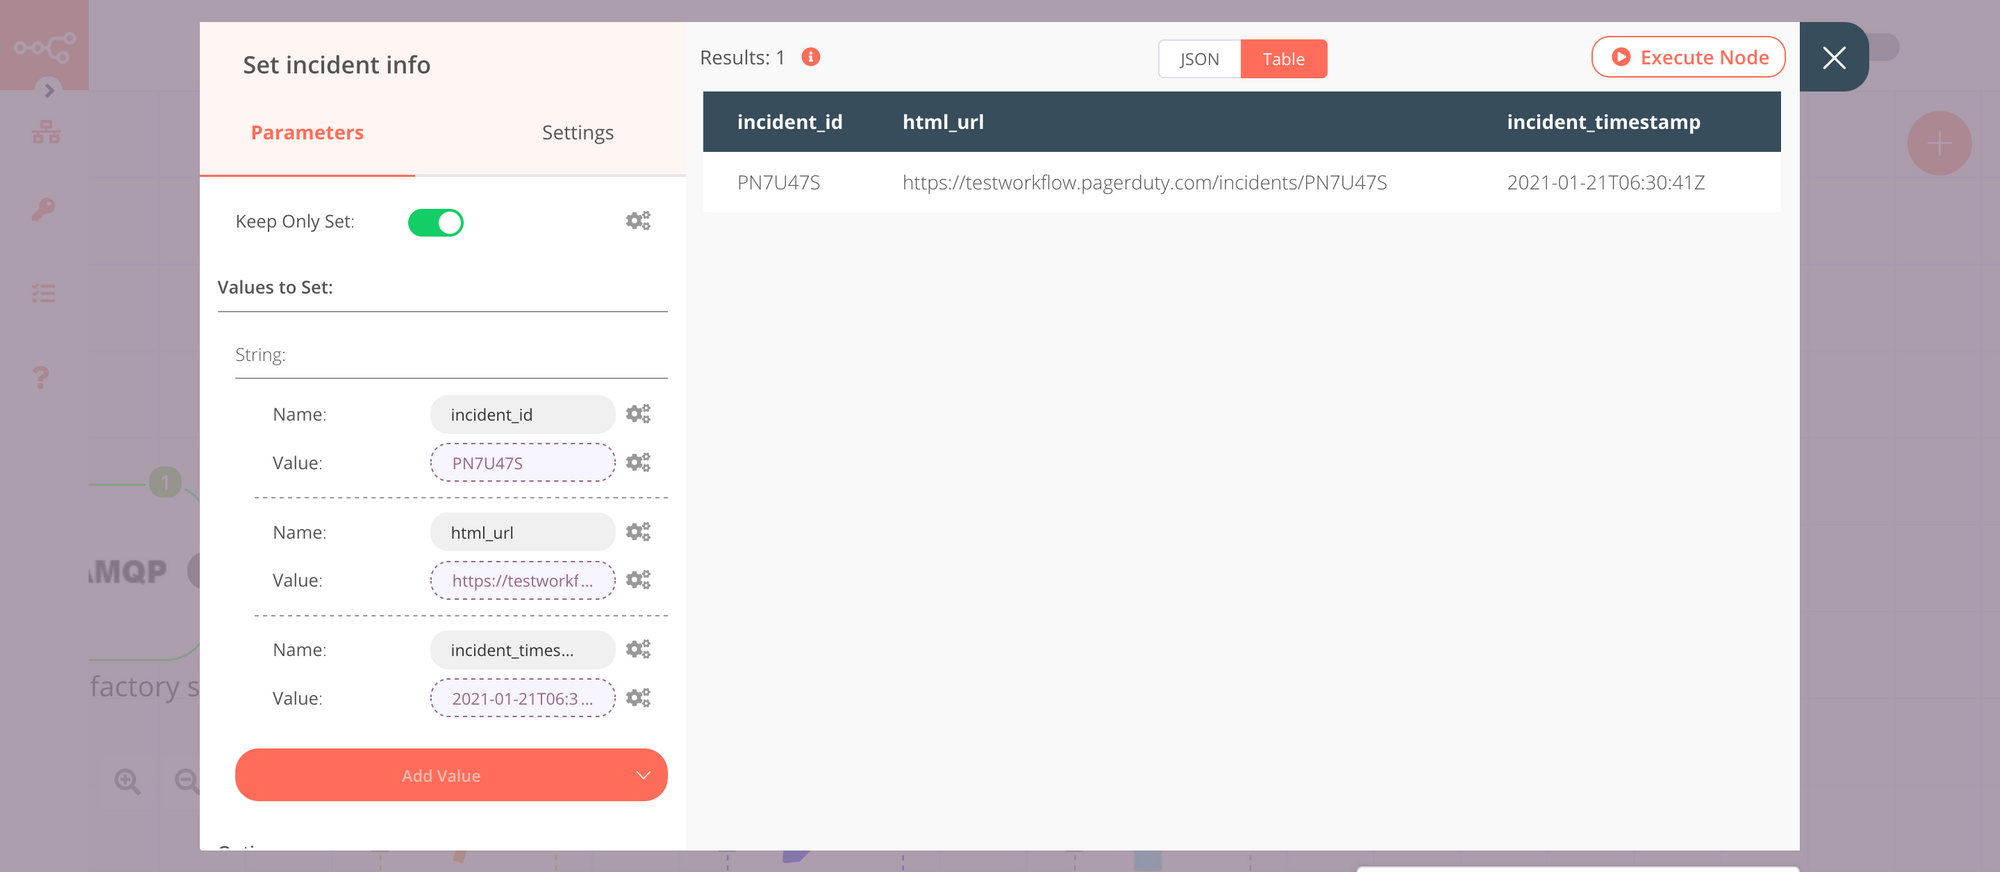
3. Set node: Select incident information
We will use the Set node to select the data we want to store in our database. To add the Set node in the workflow, click on the ‘+’ button. Click on Add Value and select ‘String’ from the dropdown menu. In the Name field, enter incident_id. Click on the gears icon for the Value field and select ‘Add Expression’. From the Variable Selector section select Current Node > Input Data > JSON > id. From the Add Value dropdown menu, select String. Enter html_url for the Name field. Click on the gears icon for the Value field and select ‘Add Expression’. From the Variable Selector section select Current Node > Input Data > JSON > html_url. Similarly, select String from the Add Value dropdown menu in the Set node. In the Name field, enter incident_timestamp. Click on the gears icon for the Value field and select ‘Add Expression’. From the Variable Selector section select Current Node > Input Data > JSON > created_at.
Toggle Keep Only Set to true. This will pass only the information we have set in this node.
Click on the Execute Node button.
To rename the node from “Set” to “Set incident info” click on the name, edit it, and click the ✔ (checkmark) to the right of the name. This will finish the configuration of the node and close the parameters window.
4. CrateDB node: Store incident information
We will store this data in a separate table in CrateDB. In n8n, click on the ‘+’ button and select the CrateDB node. Select the credentials you created earlier from the CrateDB dropdown menu. Make sure the Operation is insert and the value for Schema is doc. In the Table field, enter the table name incident_data. Copy and paste incident_id, html_url, incident_timestamp in the Columns field.
To create the incident_table, open the Console, in the CrateDB Admin UI. In the terminal paste the following SQL command:
CREATE TABLE incident_data (incident_id TEXT, html_url TEXT, incident_timestamp TIMESTAMP);Click on Execute Query to create the table.
In n8n, click on Execute Node to execute the node.
To rename the node from “CrateDB” to “Ingest incident data” click on the name, edit it, and click the ✔ (checkmark) to the right of the name. This will finish the configuration of the node and close the parameters window.
The workflow now creates an incident report using PagerDuty and stores the information in the database.
Here’s a video of me following all the steps mentioned above.
5. No operation, do nothing node: Do nothing 😴
Adding this node here is optional, as the absence of this node won’t make a difference to the functioning of the workflow.
Click on the ‘+’ button and select No operation, do nothing node. Connect this node with the false endpoint of the IF node. Now every time the temperature is less than the threshold, the No operation, do nothing node will execute and perform no action.
Here’s a video of me following the steps mentioned above.
Click on Execute Workflow button, in the n8n workflow editor, to run the workflow.

What’s Next?
We created a workflow that gathers machine data from the sensors and stores the information in a database. With this workflow, we are also storing the incident information. We can use this historical time-series data to predict any future incidents and avoid any downtime. The predictions can also help us with the maintenance and proper functioning of the machines. We can use the database nodes to read the data from the database. We can pass on this data to a machine learning API using the HTTP Request node.
Don’t forget to share the workflow that you build with the community.
Conclusion
Congratulations! We built a workflow that generates incident reports and alerts the factory staff whenever a machine in a factory is malfunctioning. In the first workflow, we learned how to use the Interval node to trigger the workflow every second. We also learned how to use the Set node to set the data we want. Lastly, we saw how to use the AMQP Sender node to add messages to the Queue.
In the second workflow, we learned how the AMQP Trigger node is used. We also learnt to conditionally create incident reports and store this information in the database. We understood how the Function node can be utilized for data enrichment.
You can modify the workflow and adapt it for your use-case without much effort. We are using CrateDB in this tutorial, but you can use any database you want. You can use the QuestDB, MongoDB, Postgres, Microsoft SQL, or the MySQL node to store the data into the respective databases. You can also use a combination of these databases, depending on the use-case.
I’d be excited to check out what you’ve built using n8n! In case you’ve run into an issue while following the tutorial, feel free to reach out to me on Twitter or ask for help on our forum 💙
Start automating!
The best part is, you can start automating for free with n8n. The easiest way to get started is to sign up for a free n8n cloud trial. Thanks to n8n’s fair-code license, you can also self-host n8n for free.