This post is part of a series that explores proven strategies and practical examples for building reliable AI systems. Find out when new topics are added to the Production AI Playbook via RSS, LinkedIn or X. If you are new to n8n, start with the introduction.
The Complexity Cliff
Your first AI workflow worked beautifully. One agent, one task, clean results. So you added a second agent to handle a related job, then a third. You gave the first agent a tool to call the second. You introduced memory so the agents could share context across steps. You added branching logic for edge cases. And somewhere along the way, the system that started as a clean proof of concept turned into something nobody wants to debug on a Friday afternoon.
This is the complexity cliff, and it hits nearly every team that moves beyond single-agent workflows. The challenge isn't that multi-agent systems are inherently fragile. It's that most teams build them the same way they built their first prototype, adding pieces incrementally without an architecture to hold them together. Each agent works fine in isolation, but the interactions between them create failure modes that are hard to predict and harder to trace.
The fix isn't to avoid complexity. Complex problems require complex solutions. The fix is to build your multi-agent systems with the same discipline you'd bring to any production software, which means clear boundaries between components, explicit interfaces, isolated failure domains, and the ability to test each piece independently.
This post covers how to do that in n8n, from architecture decisions to concrete patterns you can apply today.
Thinking in Architecture, Not Prompts
Before you open the n8n canvas and start connecting nodes, step back and think about the problem as an architecture challenge rather than a prompting challenge. The difference between a multi-agent system that scales and one that collapses under its own weight usually comes down to how the work was decomposed before anyone wrote a single system prompt.
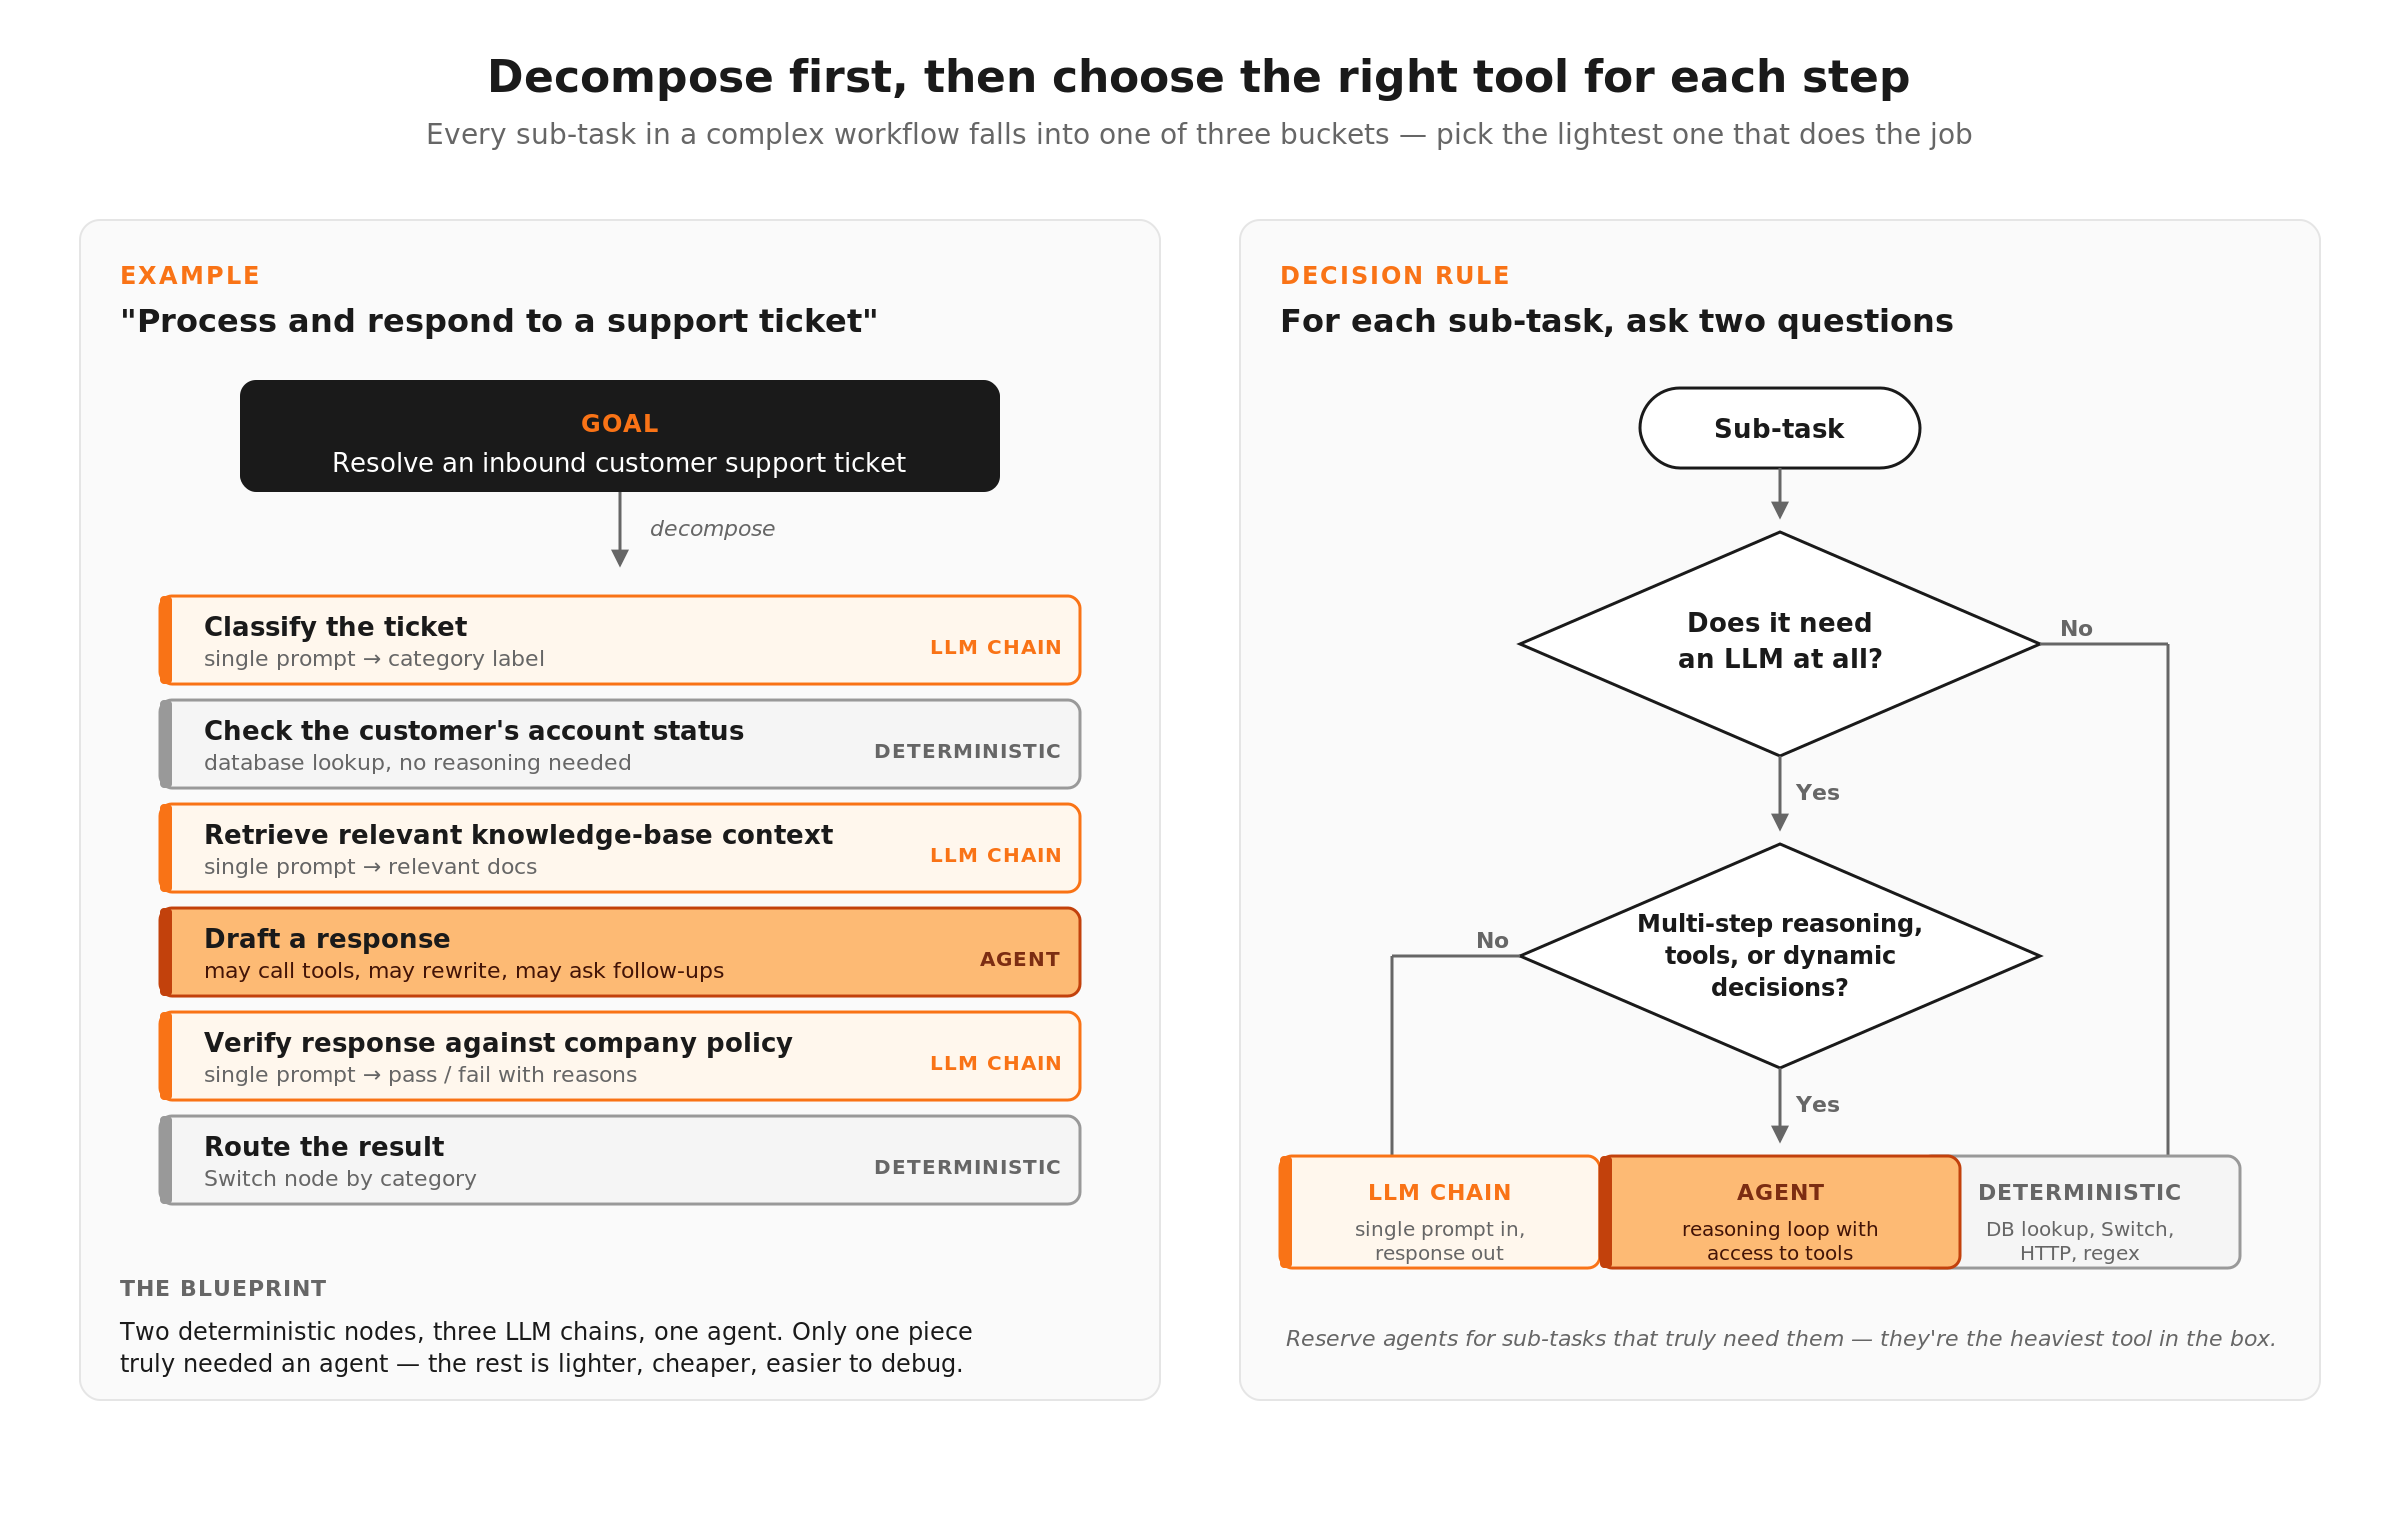
Start by breaking the goal into discrete steps. Take a complex task like "process and respond to customer support tickets" and map out every sub-task involved, from classifying the ticket and retrieving relevant context from the knowledge base, to checking the customer's account status, drafting a response, verifying the response against company policy, and routing the result. Each of those sub-tasks is a candidate for its own agent or workflow step.
Then ask two questions about each sub-task.
Does this need an LLM, or can deterministic logic handle it? Checking account status is a database lookup. Routing by category is a Switch node. Don't use an agent for work that a simple node handles better. (We covered this in detail in the Deterministic Steps + AI Steps post.)
If it does need an LLM, does it need its own agent? An agent is a reasoning loop with access to tools. If the sub-task is a single prompt-in, response-out operation (like summarizing a document or classifying text), a basic LLM chain is lighter weight and easier to control. Reserve agents for sub-tasks that require multi-step reasoning, tool use, or dynamic decision-making.
This decomposition gives you a blueprint. You know which pieces are deterministic nodes, which are simple LLM calls, and which genuinely need agent reasoning. That blueprint is your architecture, and it's what keeps the system manageable as it grows.
Multi-Agent Architectures with the AI Agent Tool

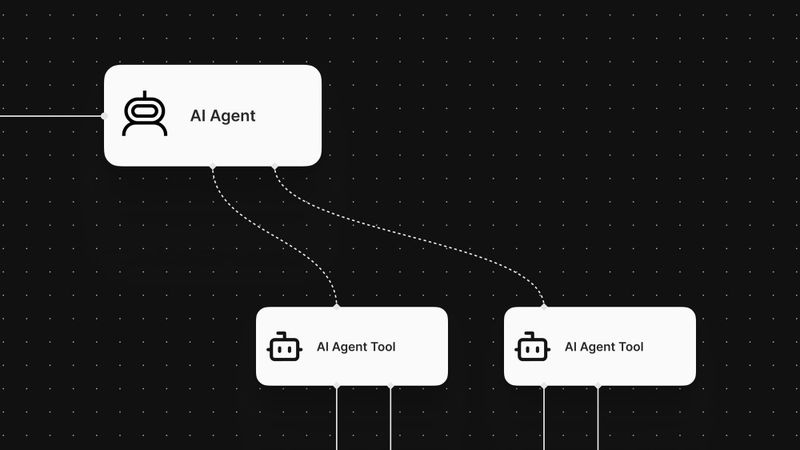
n8n supports multi-agent architectures where one agent can delegate tasks to another. The primary mechanism is the AI Agent Tool, which lets you configure a second agent as a tool that the first agent can call.
Here's how this works in practice. You have an orchestrator agent, the one that receives the initial input and decides what needs to happen. That orchestrator has access to several tools, and one or more of those tools are themselves fully configured agents with their own models, system prompts, and tool sets.
Example: A customer operations agent with specialists
The orchestrator receives a customer request and uses its reasoning to determine which specialist to engage.
- A billing agent has access to the billing API, knows the refund policy, and is prompted to handle payment-related inquiries
- A technical support agent has access to the knowledge base and troubleshooting documentation, prompted to diagnose and resolve technical issues
- A account management agent has access to the CRM and account data, prompted to handle upgrades, cancellations, and account changes
The orchestrator doesn't need to know how to handle billing edge cases or diagnose technical problems. It needs to understand the request well enough to route it to the right specialist, then relay the result back to the user. Each specialist agent is self-contained, with its own system prompt, its own tools, and its own model. If the billing agent starts producing poor responses, you debug and fix that agent without touching the others.
The tool description is critical here. The orchestrator's decision about which specialist to call is driven by the descriptions you write for each tool. Vague descriptions lead to misrouting. Be specific about what each specialist handles and, just as importantly, what it doesn't handle.
When to use this pattern: Dynamic delegation, where the orchestrator needs to reason about which specialist to engage at runtime. This works well when the routing decision is ambiguous and benefits from LLM reasoning rather than deterministic rules.
Try it yourself
Exercise 1: Multi-Agent Customer Router (AI Agent Tool)
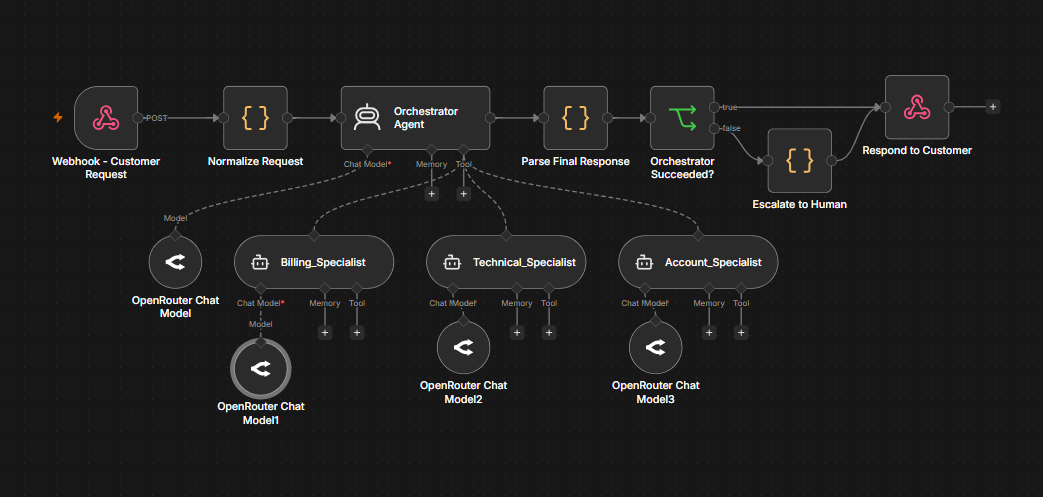
The pattern described in this section is provided end-to-end in this workflow template. An orchestrator agent receives a customer request, dynamically delegates to a billing, technical, or account specialist via the AI Agent Tool, parses the structured response, and routes ambiguous or failed requests to human escalation before returning a unified JSON envelope.
openai/gpt-4.1-mini, but you can swap in any supported model or provider). The orchestrator and each of the three specialists has its own Chat Model sub-node.
curl -X POST "YOUR_WEBHOOK_ENDPOINT_URL" \
  -H "Content-Type: application/json" \
  -d '{
    "requestId": "REQ-001",
    "customerId": "cust-12345",
    "customerTier": "pro",
    "message": "I was charged twice for my monthly subscription on April 15. Can you refund the duplicate charge?",
    "email": "test@example.com"
  }'
Note: Examples use curl. Windows PowerShell users can run them in WSL, swap in Invoke-RestMethod, or use any HTTP client like Postman.
Sub-workflows as Reusable Agent Components
The AI Agent Tool is powerful for dynamic delegation, but it's not always the right choice. When the execution path is more predictable, or when you need the same agent logic across multiple workflows, sub-workflows are the cleaner approach.
The Call n8n Workflow Tool lets you package any n8n workflow as a tool that an AI agent can call. The sub-workflow is a standalone workflow with its own trigger, logic, and output. The parent agent calls it like any other tool, passing inputs and receiving structured results.
Why sub-workflows over the AI Agent Tool
- Independent testing: Each sub-workflow can be triggered and tested on its own. You don't need to run the entire parent workflow to verify that the research sub-workflow returns good results.
- Reusability: The same sub-workflow can be used as a tool in multiple parent workflows. A "fetch and summarize documentation" sub-workflow might serve a customer support agent, an onboarding agent, and an internal Q&A agent.
- Team collaboration: Different team members can own different sub-workflows. The person who understands billing logic maintains the billing sub-workflow. The person who understands the knowledge base maintains the retrieval sub-workflow. Changes to one don't require coordination with the others.
- Version control: Sub-workflows can be versioned independently. You can update the research sub-workflow without touching the parent agent, and roll back if the update causes problems.
Example: A content pipeline with sub-workflow agents
Say you're building a workflow that takes a topic, researches it, writes a draft, and reviews the draft for quality. Instead of building this as one massive agent, break it into three sub-workflows.
1. Research sub-workflow: Takes a topic as input, searches relevant sources (knowledge base, web, internal docs), and returns structured research notes. This sub-workflow has its own AI agent with search and retrieval tools.
2. Writer sub-workflow: Takes research notes and a brief as input, generates a draft article. This sub-workflow uses a capable model for generation and might include its own validation step.
3. Reviewer sub-workflow: Takes the draft and the original brief as input, evaluates quality against criteria (accuracy, tone, completeness), and returns a score with revision suggestions. This could use an LLM-as-a-Judge pattern.
The parent workflow orchestrates the pipeline by calling the research sub-workflow, passing its output to the writer, and then handing the draft to the reviewer. If the reviewer scores the draft below threshold, loop back to the writer with the revision notes. Each piece is testable, replaceable, and maintainable on its own.
When to use this pattern: Predictable pipelines where you know the sequence of operations, reusable components that multiple workflows share, and any scenario where independent testability matters more than dynamic routing flexibility.
Try it yourself
Exercise 2: Content Pipeline (Subworkflow Orchestrator)
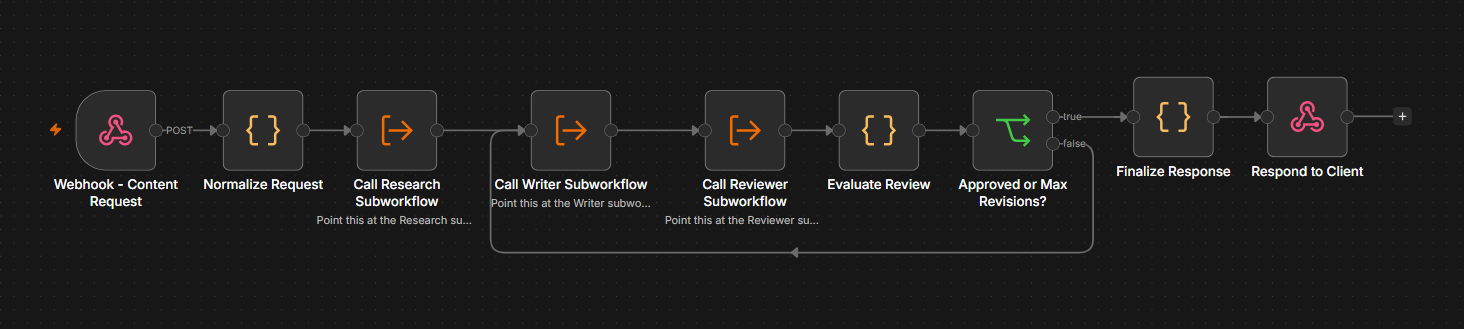
The pattern described in this section is provided end-to-end as four workflows: a parent orchestrator that calls three independent subworkflows.
– Parent: Content Pipeline. Webhook, Normalize, Research, Writer, Reviewer, Evaluate, IF (Quality Gate), Finalize, Respond.
– Research subworkflow. Gathers background notes on the topic.
– Writer subworkflow. Produces a draft of roughly 400 words from the research and brief.
– Reviewer subworkflow. Scores the draft on accuracy, tone, completeness, and clarity, and returns revision notes when it falls short.
The parent threads a shared state object through each subworkflow using the Execute Workflow Trigger in passthrough mode, then runs an IF check that either finalizes the draft (score meets threshold) or loops it back to the Writer with the Reviewer's feedback. A revisionCount plus maxRevisions cap acts as a safety exit so the loop never runs forever.
openai/gpt-4.1-mini), so you can mix capabilities (lighter model for Research, more capable model for Writer and Reviewer) without touching the parent. Swap in any supported provider if you prefer.
curl -X POST "YOUR_WEBHOOK_ENDPOINT_URL" \
  -H "Content-Type: application/json" \
  -d '{
    "topic": "Prompt caching for LLM APIs",
    "brief": "Explain prompt caching, when to use it, and the cost tradeoffs. ~400 words for API developers.",
    "qualityThreshold": 7.5,
    "maxRevisions": 2
  }'
qualityThreshold to a near-unreachable value like 9.99 and resend. The Reviewer will score below threshold on every pass, the IF node will route the draft back to the Writer with revision notes, and after maxRevisions iterations the loop exits with hitMaxRevisions: true and qualityPassed: false. The response envelope keeps the same shape in both the pass and max-revisions cases, so your downstream consumers can rely on a stable contract.
curl -X POST "YOUR_WEBHOOK_ENDPOINT_URL" \
  -H "Content-Type: application/json" \
  -d '{
    "topic": "Prompt caching for LLM APIs",
    "brief": "Explain prompt caching, when to use it, and the cost tradeoffs. ~400 words for API developers.",
    "qualityThreshold": 9.99,
    "maxRevisions": 2
  }'
Download the Exercise 2 parent workflow template
Memory and Context Management
When agents work together across multiple steps or conversations, managing what each agent knows becomes a core design decision. Too much context and you waste tokens, slow down responses, and confuse the model with irrelevant information. Too little context and the agent makes decisions without the information it needs.
n8n provides several memory sub-nodes that connect to the AI Agent node, including Simple Memory for window buffer memory and database-backed options like Postgres Chat Memory, Redis Chat Memory, and MongoDB Chat Memory.
Simple Memory (Window Buffer)
The most common choice. It stores the last N messages in the conversation and passes them as context with each new request. The window size is configurable, so you control how much history the agent sees. This works well for conversational workflows where recent context matters most. The trade-off is that once a message falls outside the window, the agent forgets it entirely.
When to use it: Single-agent conversations, support chat workflows, any scenario where the last 5-10 exchanges provide sufficient context.
Database-backed memory (Postgres, Redis, MongoDB)
For workflows that need persistent memory across sessions, these options store conversation history in an external database. The agent can recall context from previous interactions, not just the current session. This enables workflows where a customer contacts support multiple times and the agent should remember prior conversations.
When to use it: Multi-session workflows, long-running processes, any scenario where context needs to survive beyond a single execution.
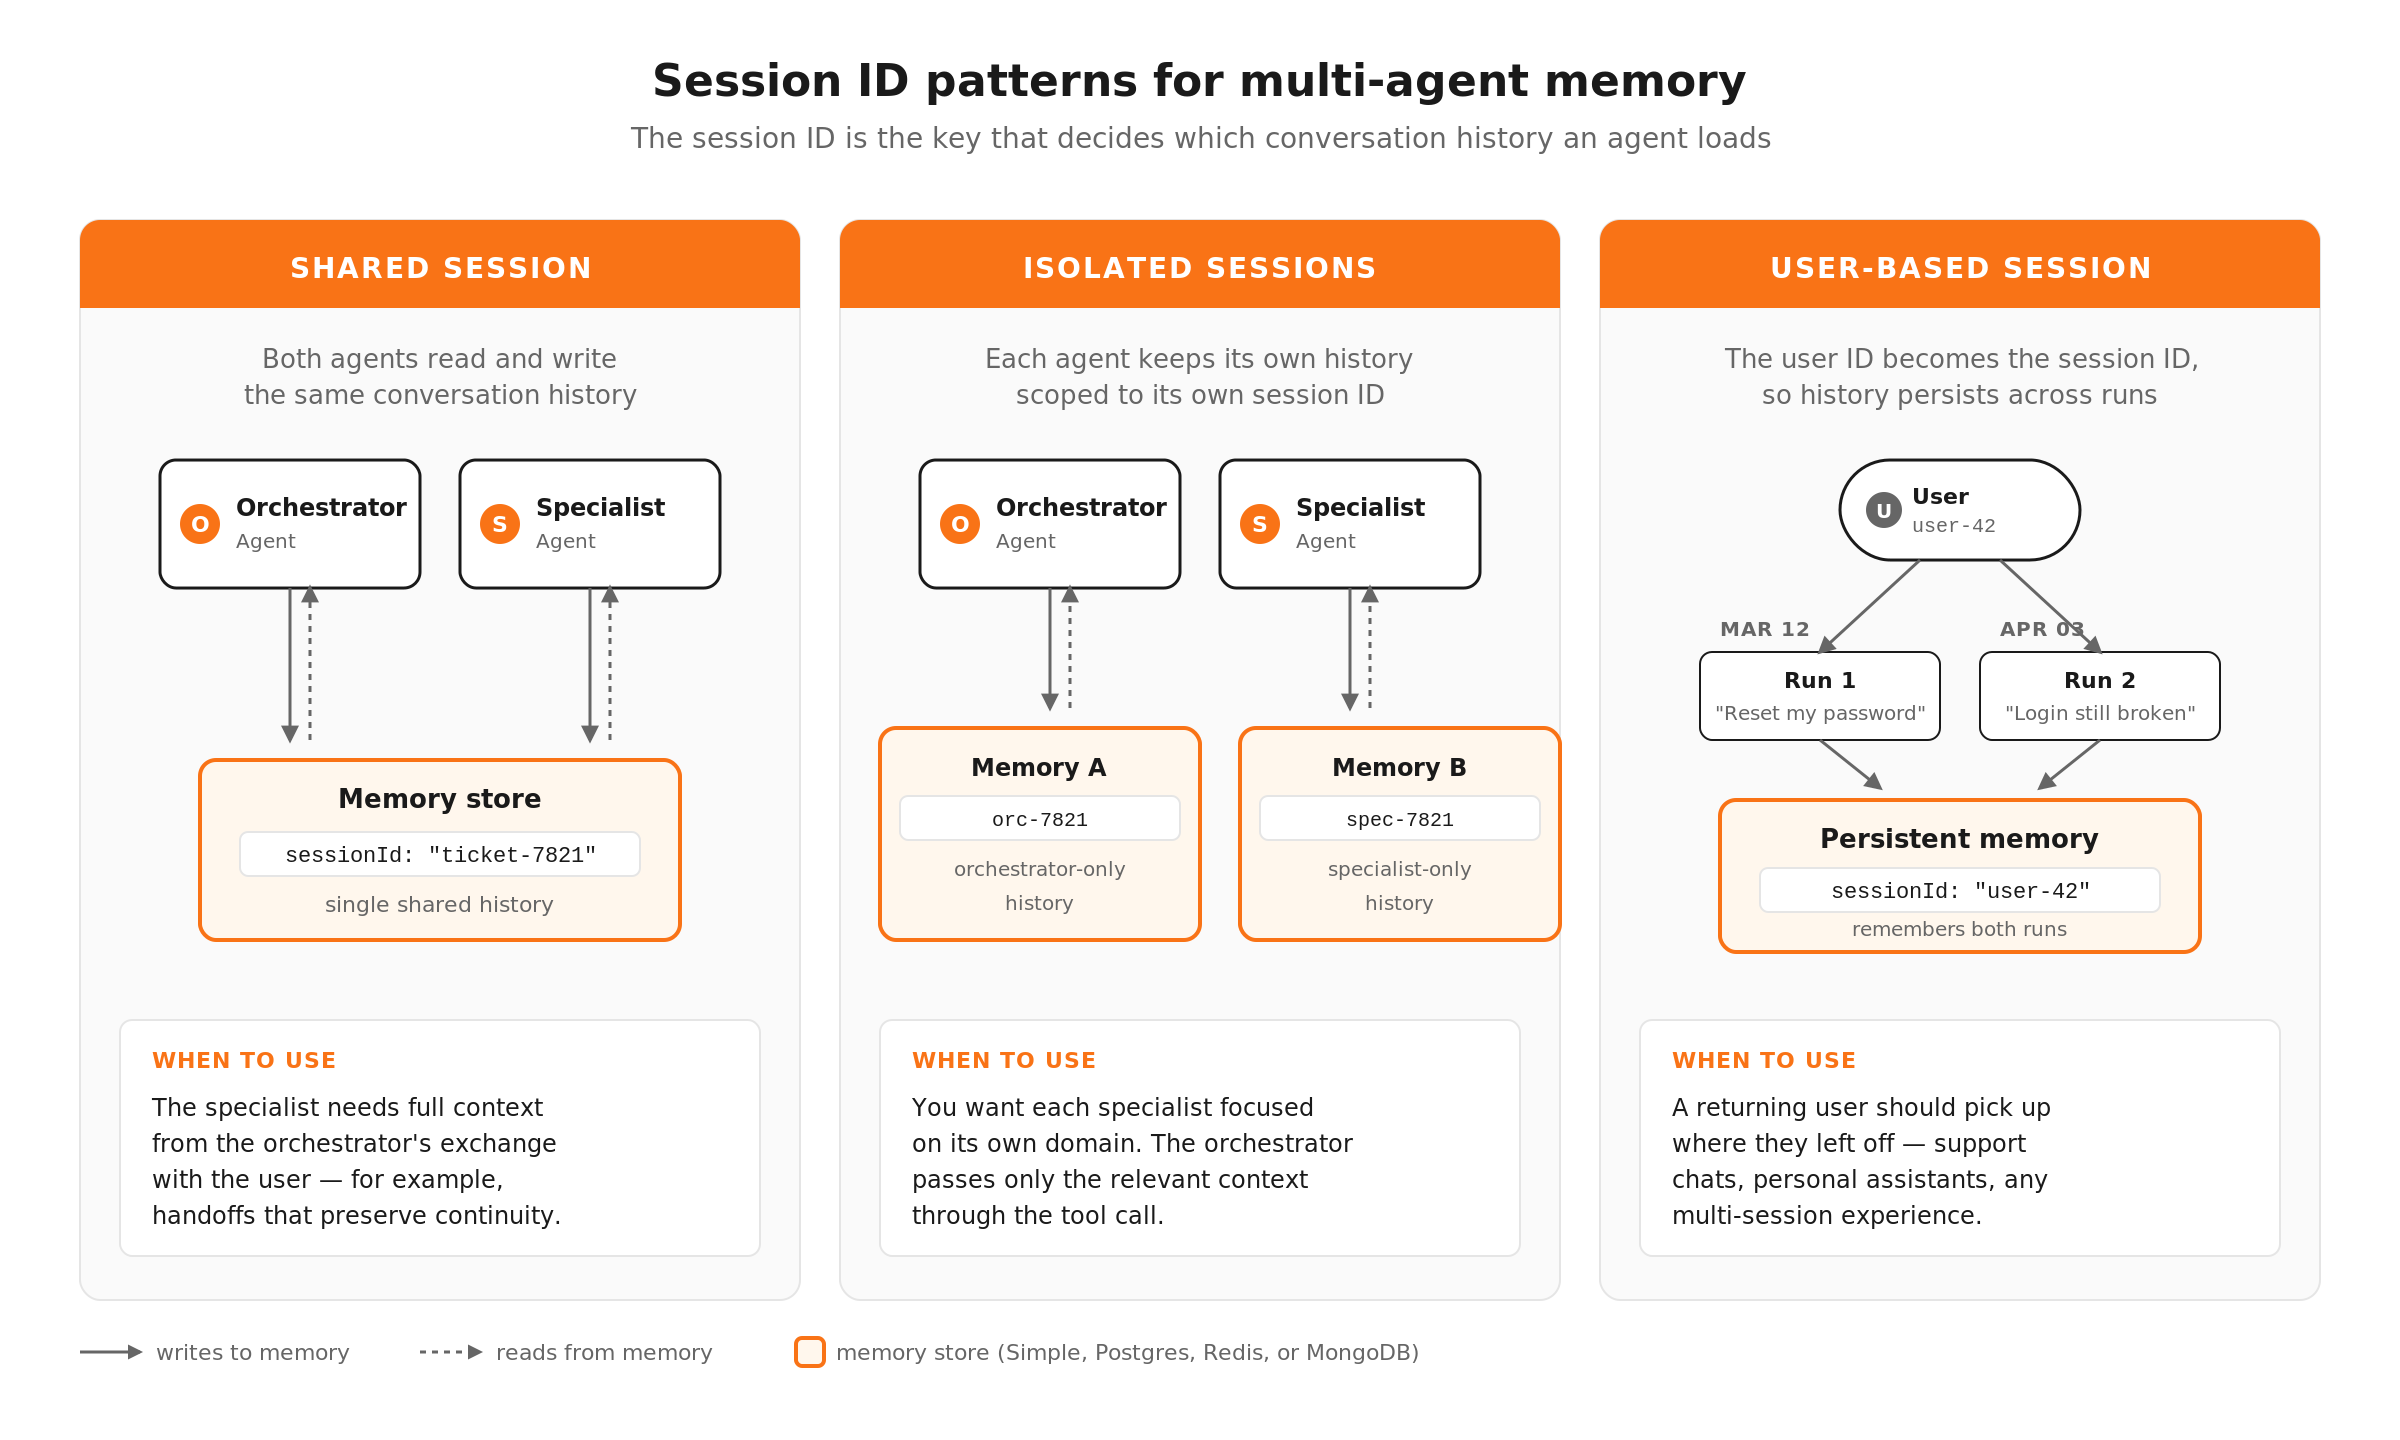
Session IDs (the key to multi-agent memory)
Session IDs determine which conversation history an agent loads. By default, each execution gets its own session. But you can control this to enable powerful patterns.
- Shared session ID across agents: If your orchestrator and specialist agents use the same session ID, they share conversation history. The specialist can see what the user told the orchestrator. This is useful when you want continuity across the delegation.
- Isolated session IDs per agent: Each agent gets its own session ID, so it only sees its own conversation history. This keeps specialist agents focused and prevents context leakage between domains. The orchestrator passes relevant context explicitly through the tool call rather than relying on shared memory.
- User-based session IDs: Use a customer ID or user ID as the session ID so the agent remembers past interactions with that specific user across multiple executions. A returning customer gets contextual support without having to re-explain their issue.
Practical guidance for multi-agent setups
- Scope context aggressively. Don't pass the full conversation history to every agent. The billing specialist doesn't need to see the technical troubleshooting that happened three steps ago. Pass only what's relevant through the tool call parameters.
- Use summary memory for long conversations. If conversations regularly exceed your window buffer, consider using a summarization step that condenses older messages into a summary. The agent sees the summary plus recent messages, keeping context manageable without losing important details.
- Store key facts outside of memory. If there are critical pieces of information the agent must never forget (customer tier, account status, active subscriptions), don't rely on memory to preserve them. Pull that data fresh from your systems at the start of each interaction and inject it into the system prompt or context.
Try it yourself
Exercise 3: Self-Correcting Extraction Agent (with Memory)
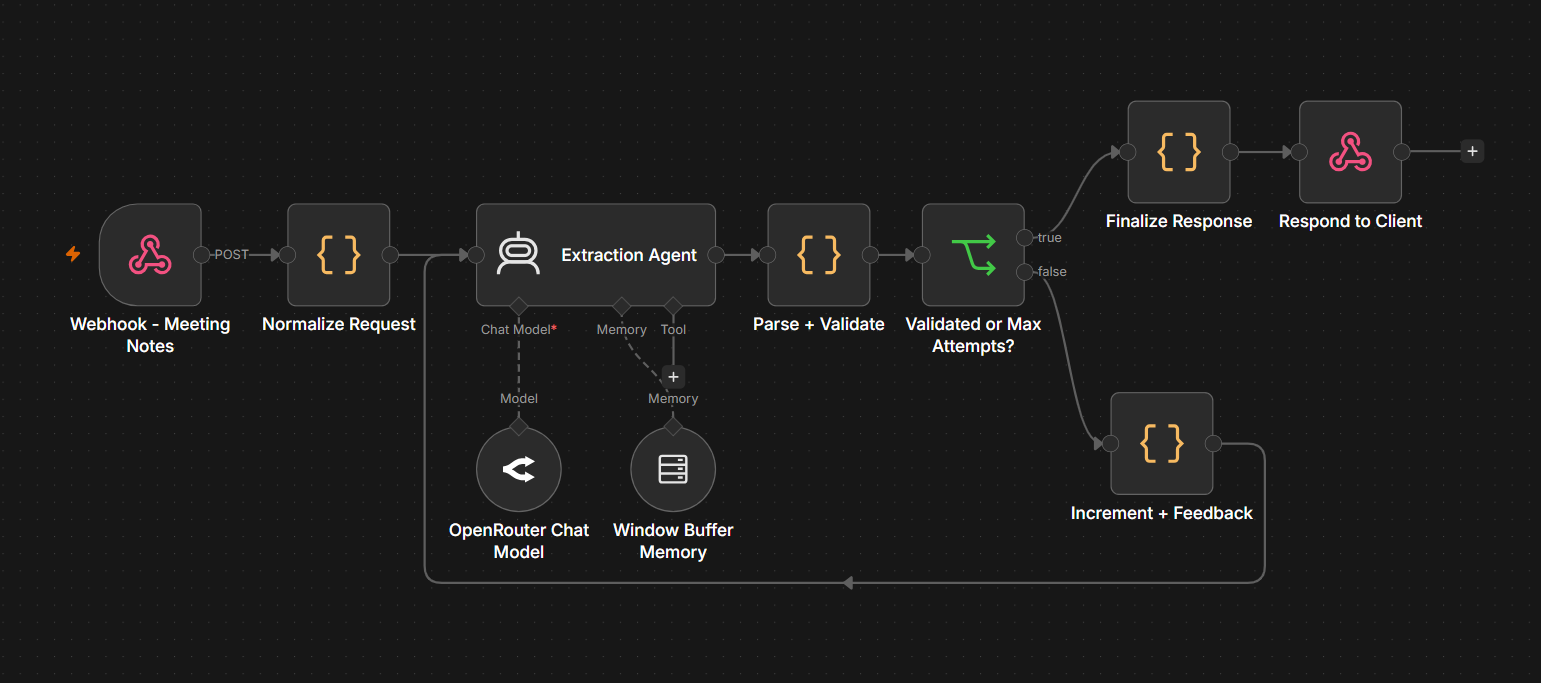
The pattern described in this section is provided end-to-end in this workflow template. An extraction agent parses meeting notes into a strict JSON schema for action items (id, title, assignee, deadline, priority, context). A Window Buffer Memory sub-node keyed on sessionId keeps the agent consistent across runs in the same session, so calling the workflow multiple times with the same sessionId preserves id numbering and tone. A Code node validates each item against the schema, and on validation failure the workflow loops back to the agent with a numbered list of the specific errors so it can revise. A maxAttempts cap exits the loop and routes to human review when the agent cannot produce valid output.
The template pairs two independent state layers. Memory provides cross-session continuity (the agent remembers prior extractions for the same sessionId), while a self-correcting loop handles within-execution quality control (the agent revises its output when validation fails). The buffer holds the cross-session conversation, and attemptCount plus previousExtraction flow through the pipeline as part of the loop state.
openai/gpt-4.1-mini, which works well for this task, but you can swap in any supported model or provider.
sessionIdType is set to customKey with the key bound to {{ $('Normalize Request').first().json.sessionId }}. This is what makes the memory user-scoped rather than execution-scoped.
curl -X POST "YOUR_WEBHOOK_ENDPOINT_URL" \
  -H "Content-Type: application/json" \
  -d '{
    "requestId": "REQ-001",
    "sessionId": "session-demo-1",
    "meetingNotes": "Sync notes (April 16): Sara to send updated pricing deck to Acme by Friday. Marco will follow up with the legal team about the new MSA before next Tuesday. Push the security review to next sprint, assignee TBD. Everyone should review the Q3 OKRs draft before our planning session on April 24.",
    "maxAttempts": 3
  }'
sessionId and a fresh batch of meeting notes. The agent will continue id numbering from where step 4 left off (so if step 4 produced AI-001 through AI-004, this run will start at AI-005) instead of restarting at AI-001.
curl -X POST "YOUR_WEBHOOK_ENDPOINT_URL" \
  -H "Content-Type: application/json" \
  -d '{
    "requestId": "REQ-002",
    "sessionId": "session-demo-1",
    "meetingNotes": "Standup (April 23): Priya will draft the launch announcement for the new dashboard by Monday. Liam to schedule a kickoff with the design team for the redesign project this week. Defer the analytics audit to next month.",
    "maxAttempts": 3
  }'
Now switch to a different sessionId to confirm the per-session isolation. Id numbering should reset to AI-001:
curl -X POST "YOUR_WEBHOOK_ENDPOINT_URL" \
  -H "Content-Type: application/json" \
  -d '{
    "requestId": "REQ-003",
    "sessionId": "session-demo-fresh",
    "meetingNotes": "Quick sync (April 24): Alex to ship the API rate-limit fix before EOD Friday. Jamie will draft the RFC for the caching layer next week.",
    "maxAttempts": 3
  }'
maxAttempts: 2, the Parse + Validate node will reject the first attempt, the workflow loops back through the Extraction Agent with the validation errors as feedback, and you'll see attemptsUsed: 2 in the response. The agent usually recovers on the second pass, so expect success: true with one extracted item.
curl -X POST "YOUR_WEBHOOK_ENDPOINT_URL" \
  -H "Content-Type: application/json" \
  -d '{
    "requestId": "REQ-004",
    "sessionId": "session-demo-retry",
    "meetingNotes": "Random thoughts: maybe we should do something. someone might. eventually. unclear.",
    "maxAttempts": 2
  }'
maxAttempts to 1 with the same ambiguous notes. The first failed validation immediately trips the exit branch, and the response envelope keeps the same shape as the happy path but with success: false, hitMaxAttempts: true, and routedTo: "human_review" so a teammate can pick up the failed extraction. The downstream contract is stable across both pass and failure cases.
curl -X POST "YOUR_WEBHOOK_ENDPOINT_URL" \
  -H "Content-Type: application/json" \
  -d '{
    "requestId": "REQ-005",
    "sessionId": "session-demo-exit",
    "meetingNotes": "Random thoughts: maybe we should do something. someone might. eventually. unclear.",
    "maxAttempts": 1
  }'
Tip: if you want to see both the retry loop firing AND the max-attempts exit in a single run, temporarily tighten the validation rules in the Parse + Validate node (for example, require every item to have a non-TBD deadline). With stricter validation and maxAttempts: 2, the agent often can't satisfy the rule on either attempt, so you'll see attemptsUsed: 2 along with hitMaxAttempts: true.
Agent Loops and Iterative Reasoning
Some tasks benefit from letting an agent review and refine its own output before passing it downstream. Instead of generating a response once and hoping it's good enough, you give the agent a feedback loop that lets it generate, evaluate, and revise until the output meets your quality bar.
Pattern: Self-correcting agent loop
1. The agent generates its initial output (a draft response, a data extraction, a classification with reasoning).
2. A validation step checks the output against quality criteria. This could be a Code node with deterministic checks, an LLM-as-a-Judge evaluation, or both.
3. If the output passes, it continues downstream. If it fails, the agent receives the feedback (what was wrong, what to fix) and generates a revised output.
4. A loop counter ensures this doesn't run forever. After 2-3 attempts, if the output still doesn't pass, route to a fallback path (human review, simpler model, templated response).
In n8n, the loop works through a combination of the AI Agent node, a validation Code node, and an IF node that either routes the output forward or loops back. Use a Set node to track the attempt count and increment it on each loop. The IF node checks two conditions, whether the output passed validation and whether the attempt count exceeded the maximum. Either condition exits the loop.
JavaScript
// Loop counter and exit check
const maxAttempts = 3;
const currentAttempt = $input.first().json.attemptCount || 1;
const validationPassed = $input.first().json.isValid;

return {
  shouldContinue: !validationPassed && currentAttempt < maxAttempts,
  attemptCount: currentAttempt + 1,
  output: $input.first().json.output,
  feedback: $input.first().json.validationErrors
};
Feeding back the validation result
The key to making self-correction work is telling the agent what went wrong. Don't just say "try again." Include the specific validation errors in the next prompt. For example, something like "Your previous response listed a confidence score of 1.5, which is outside the valid range of 0-1. The category 'misc' is not in the allowed list. Revise your response to fix these issues." Specific feedback produces targeted fixes.
When to use agent loops:
- Content generation where quality varies (drafting, summarizing, translating)
- Structured data extraction where the output must conform to a strict schema
- Any task where the cost of a second LLM call is lower than the cost of a bad output reaching production
When to skip agent loops:
- Classification tasks where the model's first answer is usually its best answer (retrying rarely improves classification)
- Time-sensitive workflows where the added latency of 2-3 loop iterations is unacceptable
- Tasks with deterministic post-processing that can fix common errors without re-invoking the model (like regex cleanup on a structured output)
Try it yourself
Exercise 4: Self-Critiquing Writer Loop (Writer + Critic)
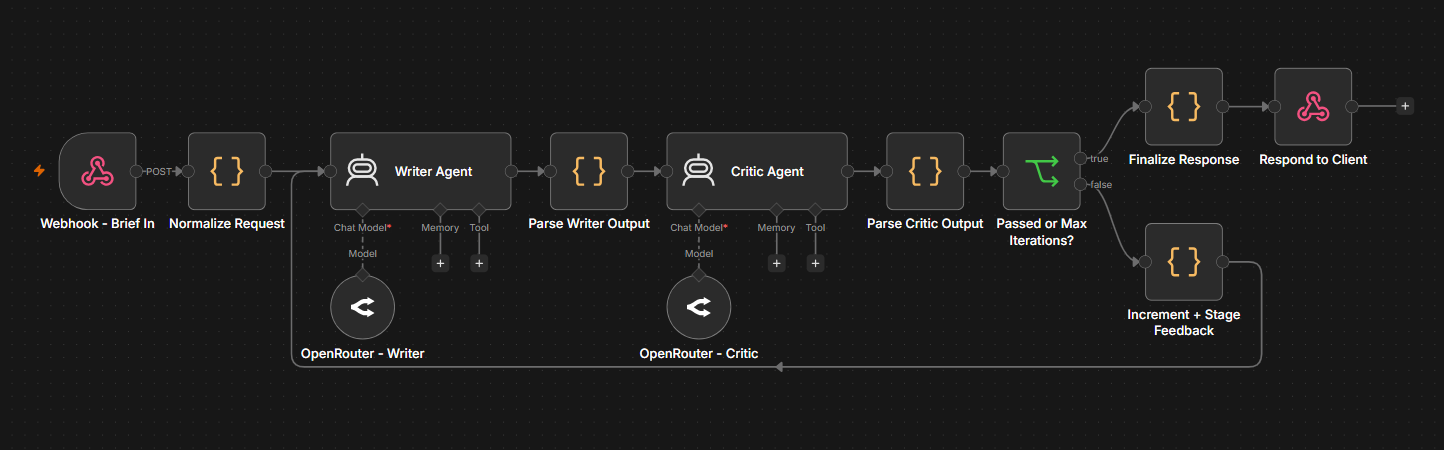
The pattern described in this section is provided end-to-end in this workflow template. A Writer Agent drafts an article from a topic and brief. A Critic Agent scores the draft on accuracy, clarity, relevance, and conciseness, and returns specific issues. If the score is below minScore, the workflow loops back to the Writer with the critic's enumerated issues so it can revise. A maxIterations cap exits the loop and routes to human review when the draft cannot meet the bar.
This is a two-agent cooperating loop: the Writer and Critic have separate system prompts, separate roles, and separate Chat Model sub-nodes (so you can use a cheaper model for the Writer and a stronger one for the Critic if you want). The Writer never scores its own work, and the Critic never writes. That separation keeps each agent's prompt focused and makes the failure modes easy to diagnose.
openai/gpt-4.1-mini for both, but you can mix capabilities (lighter model for the Writer, stronger one for the Critic) without touching anything else.
curl -X POST "YOUR_WEBHOOK_ENDPOINT_URL" \
  -H "Content-Type: application/json" \
  -d '{
    "requestId": "REQ-001",
    "topic": "Prompt caching for LLM APIs",
    "brief": "Explain prompt caching in roughly 350 words for backend developers. Cover what it is, when to use it, and the cost tradeoffs.",
    "minScore": 7.5,
    "maxIterations": 3
  }'
minScore to 9.5 and resend. The Critic will score below threshold on every pass, the IF node will route the draft back to the Writer with the enumerated issues, and after maxIterations iterations the loop exits with success: false, hitMaxIterations: true, and routedTo: "human_review". The last raw draft and the unresolved critic feedback are preserved on the response so a human reviewer can pick up where the loop gave up.
curl -X POST "YOUR_WEBHOOK_ENDPOINT_URL" \
  -H "Content-Type: application/json" \
  -d '{
    "requestId": "REQ-002",
    "topic": "Prompt caching for LLM APIs",
    "brief": "Explain prompt caching in roughly 350 words for backend developers. Cover what it is, when to use it, and the cost tradeoffs.",
    "minScore": 9.5,
    "maxIterations": 2
  }'
Download the Exercise 4 workflow template
Design Decisions
Prompt Chaining vs. Agent Delegation
When you have a multi-step AI task, there are two fundamentally different ways to structure it, and choosing the wrong one creates unnecessary complexity or unnecessary rigidity.
Prompt chaining is a linear pipeline where each step's output feeds the next step's input. Step 1 extracts key information, Step 2 uses that information to generate a draft, Step 3 evaluates the draft. The sequence is fixed at design time. Each step is a simple LLM call (not a full agent with tools), and the workflow controls the flow between them.
Agent delegation gives the orchestrating agent the ability to decide what to do next. The agent reasons about the input, decides which tool or sub-agent to call, processes the result, and decides the next action. The sequence emerges at runtime based on the agent's reasoning.
When to use prompt chaining:
- The steps are known in advance and always execute in the same order
- Each step has a clear, focused task (extract, then generate, then validate)
- You want maximum predictability and debuggability
- Cost efficiency matters because each step uses only the tokens it needs, without the overhead of an agent's reasoning loop
When to use agent delegation:
- The steps depend on the input and may vary per execution
- The agent needs to decide between multiple possible actions (consult the knowledge base, check the database, call an API) based on what it learns at each step
- You need the system to handle novel inputs that don't fit a predetermined pipeline
- The task requires iterative reasoning where the agent builds on what it discovers
In practice, the best systems combine both. Use prompt chaining for the predictable parts of your workflow (data cleaning, formatting, final validation) and agent delegation for the parts that genuinely require flexible reasoning (understanding an ambiguous request, choosing the right information source). The goal is to minimize the scope of agent reasoning to only the steps that need it, keeping the rest deterministic and predictable.
Example: A hybrid prompt chain and agent delegation flow
1. Prompt chain, Step 1: A basic LLM call extracts structured information from the incoming request (customer name, issue type, urgency). This is a fixed extraction task that doesn't need agent reasoning.
2. Agent delegation, Step 2: An agent receives the structured information and decides how to handle it. For billing issues, it queries the billing API. For technical issues, it searches the knowledge base. For account issues, it looks up the CRM. The agent chooses the right tools based on the issue type.
3. Prompt chain, Step 3: The agent's findings feed into a simple LLM call that generates a response draft following a template structure. Fixed task, no agent reasoning needed.
4. Deterministic, Step 4: A Code node validates the response and routes it based on confidence.
Steps 1 and 3 are cheap, fast, and predictable. Step 2 is where the agent earns its keep. Step 4 is pure logic. Each layer uses the right tool for the job.
When to Break a Workflow Apart (and When to Keep It Flat)
Not every workflow needs sub-workflows or multi-agent hierarchies. Over-engineering a simple process adds overhead without benefit. Here's a practical decision framework.
Keep it flat when:
- The workflow has a linear sequence of 3-5 steps with no branching
- Only one person maintains it
- The logic is specific to one use case and unlikely to be reused
- You're still prototyping and the architecture might change
- The total workflow fits comfortably on a single canvas view
Break it into sub-workflows when:
- You're copying the same logic across multiple workflows (normalize it into one sub-workflow)
- The workflow has grown past 15-20 nodes and is becoming hard to navigate
- Different parts require different expertise to maintain (billing logic vs. AI prompting vs. API integration)
- You need to test a specific section independently without triggering the full pipeline
- A failure in one section should be isolated from the rest
Add multi-agent coordination when:
- The input is ambiguous and requires reasoning to determine the right processing path
- Different sub-tasks need fundamentally different models, tools, or system prompts
- The system needs to handle novel task types that you can't fully anticipate in advance
- A single agent's context window would overflow trying to handle everything
The progression is natural, starting flat, extracting sub-workflows when you find yourself duplicating or struggling with scale, and adding multi-agent delegation when the routing decisions genuinely benefit from LLM reasoning. Resist the urge to start with the most complex pattern. Build what you need, then refactor as complexity demands it.
Production Best Practices
Handling Failures in Agent Chains
In a multi-agent or multi-step system, failures are inevitable. A model returns garbage. An API times out. A specialist agent gets confused by an unusual input. The question isn't whether failures will happen but how your system responds when they do.
Principle: Isolate failure domains
Each agent or sub-workflow should have its own error handling. If the billing specialist agent fails, that failure shouldn't cascade into the technical support agent or crash the orchestrator. Build each component to handle its own errors and return a structured failure response that the parent workflow can act on.
Pattern: Structured error responses
Instead of letting agent failures throw unhandled errors, wrap each agent or sub-workflow call in error handling that returns a consistent structure.
JavaScript
// Standard error response structure
return {
  success: false,
  error: {
    type: 'agent_failure', // or 'timeout', 'validation_error', 'api_error'
    message: 'Billing agent could not process the refund request',
    attemptCount: 2,
    lastOutput: rawOutput
  },
  fallback: 'route_to_human'
};
The orchestrator checks the `success` field and routes accordingly. Successful results continue through the normal path. Failures route to fallback logic based on the error type.
Fallback strategies:
- Retry with a simpler prompt. If the agent's response didn't meet the schema or quality bar, retry with a more constrained prompt that reduces the agent's decision space.
- Fall back to a simpler model or approach. If a complex agent chain keeps failing on a particular input, route it to a simpler single-step LLM call with a narrowly scoped prompt. You trade flexibility for reliability.
- Escalate to human review. For critical workflows, always have a path that routes to a human when automated handling fails. This is the safety net that prevents failures from producing bad outcomes. (We covered human-in-the-loop patterns in detail in the Human Oversight post.)
- Return a safe default. For low-stakes workflows, a templated "We received your request and a team member will follow up" response is better than a hallucinated answer or a silent failure.
Timeouts matter. When one agent in a chain hangs, the entire pipeline stalls. Set explicit timeouts on every sub-workflow call and agent tool invocation. If a specialist agent doesn't respond within your threshold (30 seconds is a reasonable starting point for most API-backed agents), treat it as a failure and route to fallback logic. An explicit timeout is better than an indefinite wait.
Cost and Token Management
Multi-agent systems multiply token usage. Every agent consumes tokens for its system prompt, conversation history, tool descriptions, and reasoning. An orchestrator that calls three specialist agents, each with their own context, can easily consume 10-20x the tokens of a single-agent workflow. Without deliberate management, costs scale faster than the complexity of the task being solved.
Strategy 1: Scope context per agent
Don't give every agent the full conversation history. The billing specialist needs the billing-relevant portion of the conversation, not the 15 messages about technical troubleshooting that came before. Use your workflow logic to extract and pass only the relevant context to each specialist.
Strategy 2: Choose the right model per task
Not every agent needs your most capable (and expensive) model. Use a lightweight model for classification, routing, and simple extraction tasks. Reserve your most capable model for tasks that genuinely require advanced reasoning, nuanced generation, or complex tool use. In n8n, each agent and LLM node can connect to a different model, so this is a configuration decision, not an architecture change.
Strategy 3: Limit loop iterations
Self-correcting loops and agent reasoning loops should always have a maximum iteration count. Without a cap, a confused agent can loop indefinitely, consuming tokens and producing nothing useful. Two to three iterations is usually sufficient. If the agent can't produce a valid response in three attempts, the issue is likely in the prompt or the task definition, not in the number of retries.
Strategy 4: Minimize tool descriptions
Every tool attached to an agent adds tokens to every request because the agent needs the tool descriptions in its context to decide which tools to use. If an agent has 15 tools but only uses 3 for most requests, consider breaking it into focused agents with fewer tools each. Fewer tool descriptions means lower per-request token costs and often better tool selection accuracy.
Strategy 5: Monitor and set budgets
Track token usage per workflow execution, per agent, and per tool call. n8n's execution data includes this information. Set alert thresholds for abnormal token consumption. A sudden spike in tokens for a particular agent often indicates a prompt issue, a loop that's running more iterations than expected, or context that's growing unbounded.
Tips and Tricks
1. Start with one agent, then decompose. Build the entire task as a single agent first. Once it works, identify which parts of its reasoning are separable and extract them into specialist agents or sub-workflows. This approach ensures you understand the full problem before you split it up, and it prevents premature decomposition that creates unnecessary coordination overhead.
2. Write tool descriptions like API documentation. The orchestrator decides which specialist to call based on tool descriptions. Treat these descriptions like API docs, being specific about what the tool does, what inputs it expects, what it returns, and what it doesn't handle. "Handles billing stuff" is a bad description. "Processes refund requests, billing inquiries, and payment disputes. Requires a customer ID and issue description. Returns a resolution with action taken." is a description that drives reliable routing.
3. Test specialists in isolation before connecting them. Each sub-workflow or specialist agent should work correctly on its own before you wire it into the parent workflow. Run test inputs directly against the specialist, verify the outputs, and fix issues at the component level. Debugging a multi-agent system where you're not sure which component is failing is exponentially harder than debugging each piece independently.
4. Use deterministic routing when you can, agent routing when you must. If you can determine which specialist to call with a Switch node (based on a category field, a ticket type, or a prior classification step), do that instead of having an agent decide. Deterministic routing is faster, cheaper, and never routes to the wrong specialist because it misunderstood the description. Agent-based routing is for cases where the input is genuinely ambiguous and classification can't be reduced to explicit rules.
5. Log the orchestrator's reasoning. When the orchestrator decides to call a specialist, log that decision along with the input that triggered it. This creates an audit trail that's invaluable for debugging misroutes. If the orchestrator keeps sending billing questions to the technical support agent, the logs will show you the pattern so you can fix the tool descriptions or the system prompt.
6. Keep system prompts focused. A specialist agent should have a system prompt that covers its domain and nothing else. Don't include general instructions about being helpful, formatting rules for every possible output type, or context about the broader system. Focused system prompts produce better results and consume fewer tokens.
7. Design for graceful degradation. Every multi-agent workflow should have an answer to "what happens if this agent fails?" If the answer is "the whole thing breaks," add fallback logic. The mark of a production-grade system isn't that it never fails. It's that failures are handled predictably and don't cascade.
8. Version your agent configurations. When you change a system prompt, swap a model, or modify a tool set, track that change. Multi-agent systems have a lot of moving parts, and a performance regression could come from any one of them. Without versioning, you're left guessing which change caused the problem.
What's Next
Complex agent patterns give you the architecture to handle sophisticated AI tasks without creating a system that's impossible to maintain. By breaking problems into specialist agents, composing logic through sub-workflows, managing memory deliberately, and building for failure, you get a system that scales with your use case instead of collapsing under its own weight.
In the next post, we'll cover Extending Agent Capabilities, how to equip your agents with tools from your existing stack and the broader ecosystem so they can grow alongside the tools and services your team relies on.
This post is part of a series that explores proven strategies and practical examples for building reliable AI systems. Find out what topics are already available in the Production AI Playbook here, or be the first to know when new topics are added via RSS, LinkedIn or X.
References: