Are you tired of entering receipts and bills manually for household expenses, reimbursements, and tax returns? BillBot is here to make your life easier.
Take a picture of your receipts with Telegram, and details like amount, date, and category will be automatically added to Google Sheets. Your spouse or your accountant will also receive an SMS notification using a Twilio account.
In this tutorial you’ll learn how to escape the paper jungle and simplify your digitization process.
You’ll use your Telegram account to create a BillBot to upload your receipts and get a confirmation of the added data right away.
The Mindee API for receipts automatically parses the information out of the images. The Google Sheets node acts as your expense record keeper. The automation is made possible by a workflow in n8n (pronounced “n-eight-n”).
The service provided by Twilio Programmable SMS sends a text message notification of your added expenses.
Even if you’re coming from a non-developer background, don’t miss out: previous coding experience is not required, since this is a no-code tutorial.
Prerequisites
Completing this workflow will require a number of resources. In addition to the computer on which you’re reading this post, you’ll also need an iOS or Android phone and the ability to install apps.
You’ll be adding the Telegram Messenger app to your phone and associating it with your phone number. This installation is reversible, but does require you to provide your phone number to Telegram and grant the app some permissions.
In addition, you’ll need to establish the following accounts to complete the project described in this tutorial:
- n8n — You can find details on how to install n8n in the Quickstart page.
- Telegram Messenger app — You’ll need the iOS or Android app installed on your mobile phone to create a Telegram account.
- Telegram account — You’ll need to go to the Telegram website in addition to installing the app.
- Mindee — You can register for the Receipts API (250 API calls per month are free).
- Google account — You create an account, if you don’t use Gmail yet.
- Twilio account — Sign up with this link to receive an additional $10 credit.
Creating your Telegram Bot
Before you get started with building the workflow, you’ll need to create your own “BillBot”. It will allow you to upload receipts and bills to the workflow via Telegram and it will send you a confirmation of expenses added in Google Sheets via Twilio SMS.
You can create your BillBot by having a chat with the Telegram BotFather bot at the following address: https://web.telegram.org/#/im?p=@BotFather. You may need to sign into Telegram, for which you’ll need your mobile phone handy. Note that you should be chatting with the BotFather with a blue and white “verified” symbol next to its name. To verify, click on the BotFather username.
In the chat with BotFather, enter the command /newbot and reply with your new bot’s display name and username. Name your BillBot as you please; note that some names might be taken already. Copy the URL for your bot and the bot token to a safe place; it’s a user secret, so handle it securely. You’ll be using the credentials for creating the Telegram Trigger.
Using the Mindee Receipts API
After creating a free account with Mindee, you’ll want to get the Mindee API for parsing receipts before creating the workflow.
First, log in to your Mindee account. Click on the Expense Receipts card to get to your Expense Receipt API environment. Click on the Try for Free button. You’ll find the Credentials button on the left side of the screen. Then click on Add key. Enter a Token Name in the Name field and click on the Add new key button. After creating this key, you can always find it in the Credentials tab. You’ll need this key for the HTTP Request node later on.
Obtaining your Twilio credentials
If you don’t already have a Twilio account, use the link above to create one. During the registration process be sure to register a phone number that can receive SMS messages.
Go to the Twilio console dashboard and get the Account SID and Auth Token for the ExplorationOne (or your default project, or the project of your choice, if you’ve created additional projects). You can find these credentials on the upper right-hand side of the dashboard. These are user secrets, so copy them someplace safe and handle them securely.
Obtaining an SMS-enabled Twilio phone number
Go to the Phone Numbers page on your Twilio console and add a number with SMS capabilities. You won’t be charged for the number you register in your trial account. Copy the phone number someplace handy.
For the purposes of this post, all you’ll need are your Account SID, Auth Token, and phone number. But for more information on getting started with your Twilio trial account, see the Twilio Docs post:
How to Work With Your Free Twilio Trial Account
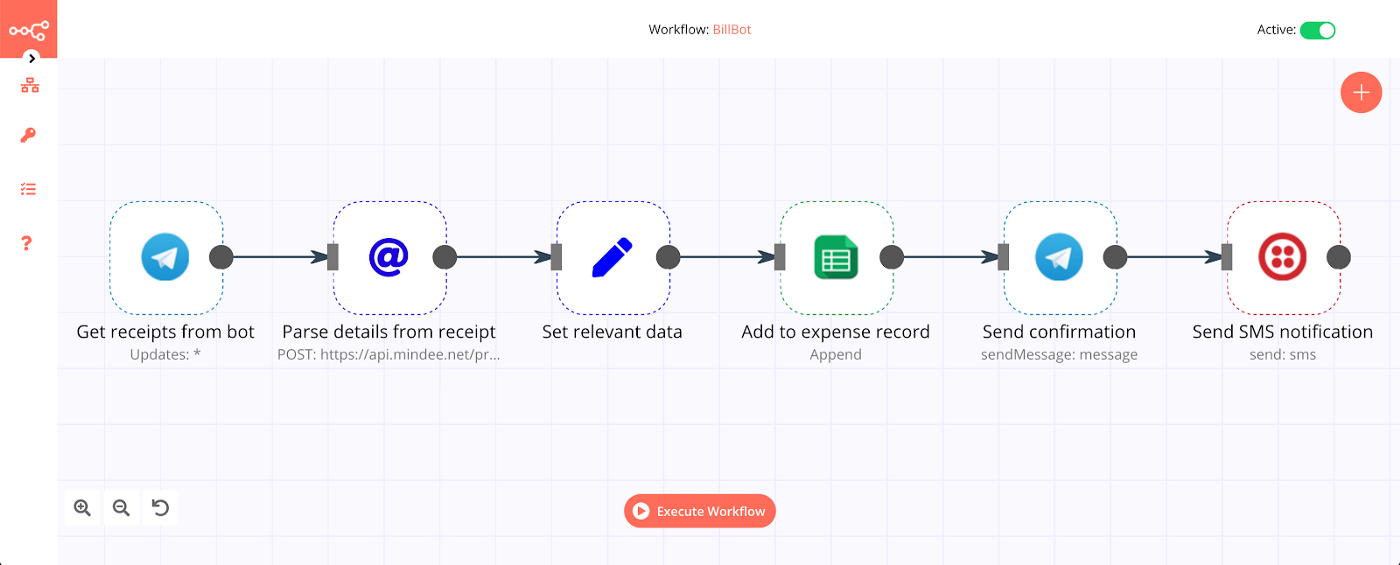
Building the n8n workflow
This n8n workflow automates adding details from your receipts to Google Sheets using six different nodes. Nodes are the binding agents in the workflow: they execute, obtain, and send data. The following nodes will be used:
- Telegram Trigger — Starts workflow each time when sending an image from your Telegram BillBot
- HTTP Request — Sends the image from the previous node to the Mindee API to parse the information out of it
- Set — Selects the relevant data to add to Google Sheets
- Google Sheets — Adds the expense information to your Google Sheets
- Telegram — Sends you the confirmation of the addition from your BillBot
- Twilio — Sends you, or another specified person, an SMS notification of your added expenses
As you add these node types you’ll be renaming them so their names reflect their functional role. The final version of the workflow with the functional names is shown below:
To start n8n, open a console window and type the following command:
n8n start --tunnel
You’ll start n8n using the --tunnel parameter to be able to use the webhook trigger from Telegram, as it has to be reachable from the web. To learn more about this, check out the documentation.
Then type “o” or go to the URL visible in your console output; n8n should open with a single node called Start. As we will be using a Trigger node instead of Start, simply move it to the side, as it can’t be deleted, but won’t be necessary for the BillBot workflow.
If you prefer to download the finished workflow, you’ll have to configure the workflow by filling out the missing information, as indicated by an exclamation mark.
Saving a workflow
Don’t forget to save your workflow in the beginning and from time to time. For saving open the left side panel of n8n through selecting the > (expand) icon. Click Save As and name your workflow, e.g. “BillBot” and click Save. After the first Save As, simply click Save in the Worklows section of this panel to update your saved copy.
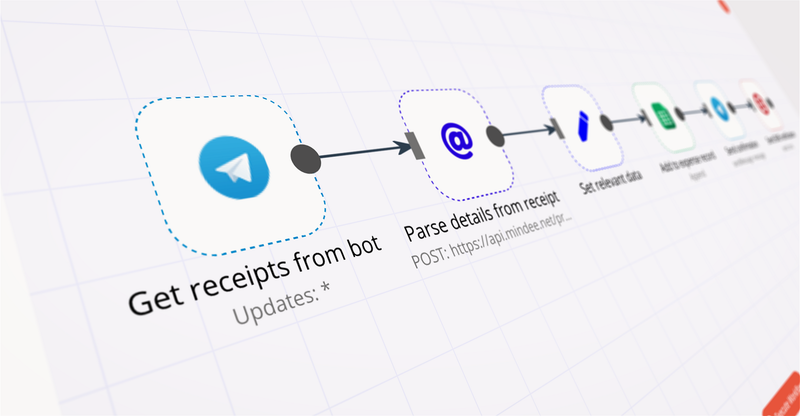
1. Creating the Telegram Trigger for getting receipts
First, click on the + button on your n8n dashboard, select the Trigger tab and type “Telegram” into the search box and select the Telegram Trigger node.
Your first trigger node opens automatically after adding. In the Credentials section, click in the Telegram API field and select “-Create New-”. In the Create New Credentials: Telegram API window, enter a name for your credentials in the Credentials Name field. Paste your bot access token given by BotFather in the Access Token field. Click on the Create button.
In the Updates field, select the * symbol (All updates) in order to get all updates you post in the BillBot.
Click on Add Field under the Additional Fields section and select Download Images/Files in order to get the image that you sent to BillBot. Toggle the Download Images/Files field to true (green).
Rename the node’s headline from “Telegram Trigger” to “Get receipts from bot” by clicking the name, editing it, and clicking the ✔ (checkmark) to the right of the name. This will finish the configuration of the node and close the parameters window.
Now save your workflow so that the webhook in the Telegram Trigger node can be activated. Since you’ll be using the test webhooks while building the workflow, the node only stays active for 120 seconds after you click the Execute Node button.
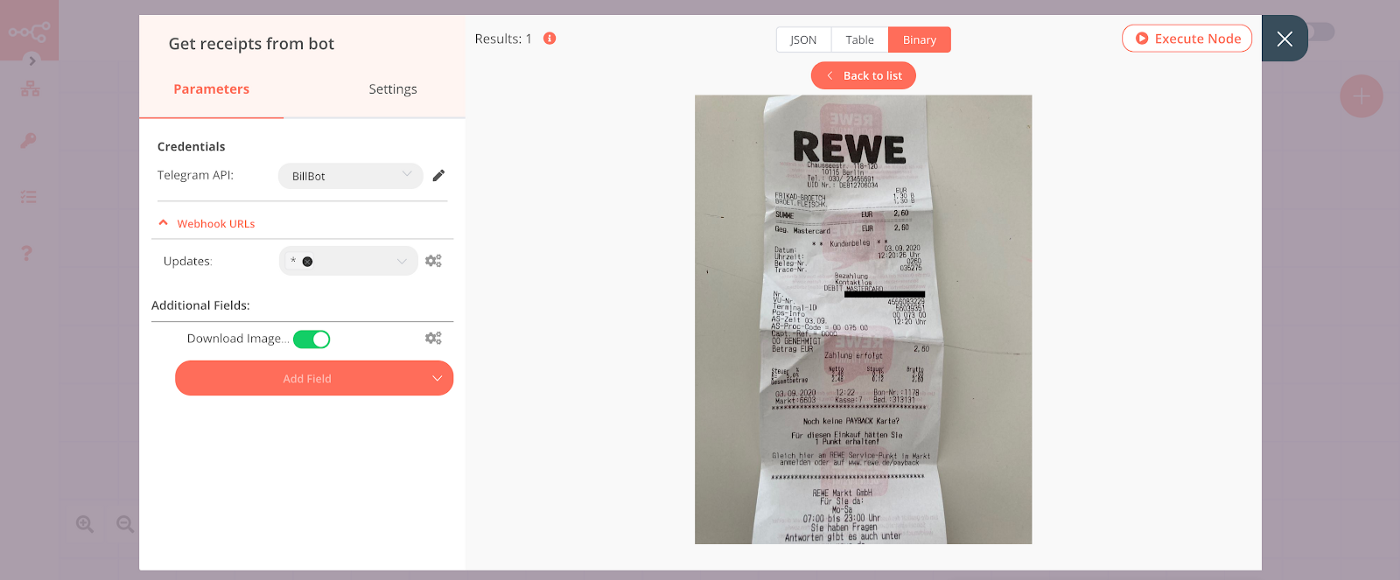
Reopen the Get receipts from bot node and click Execute Node and send a picture of a receipt in Telegram to your BillBot.
Note that you won’t have to grant Telegram access to your contacts to do this if you have an existing chat session open with your BillBot. You can open one by tapping/clicking on the link to your new BillBot in the chat session with BotFather (although at some point the BotFather may come to you and ask you for a favor). You can do this from the mobile app or the Telegram Web version.
Also note that you can upload images to your BillBot from the Telegram Web version. If you use that method you won’t have to grant the Telegram mobile app permissions to access your camera, photos, or storage.
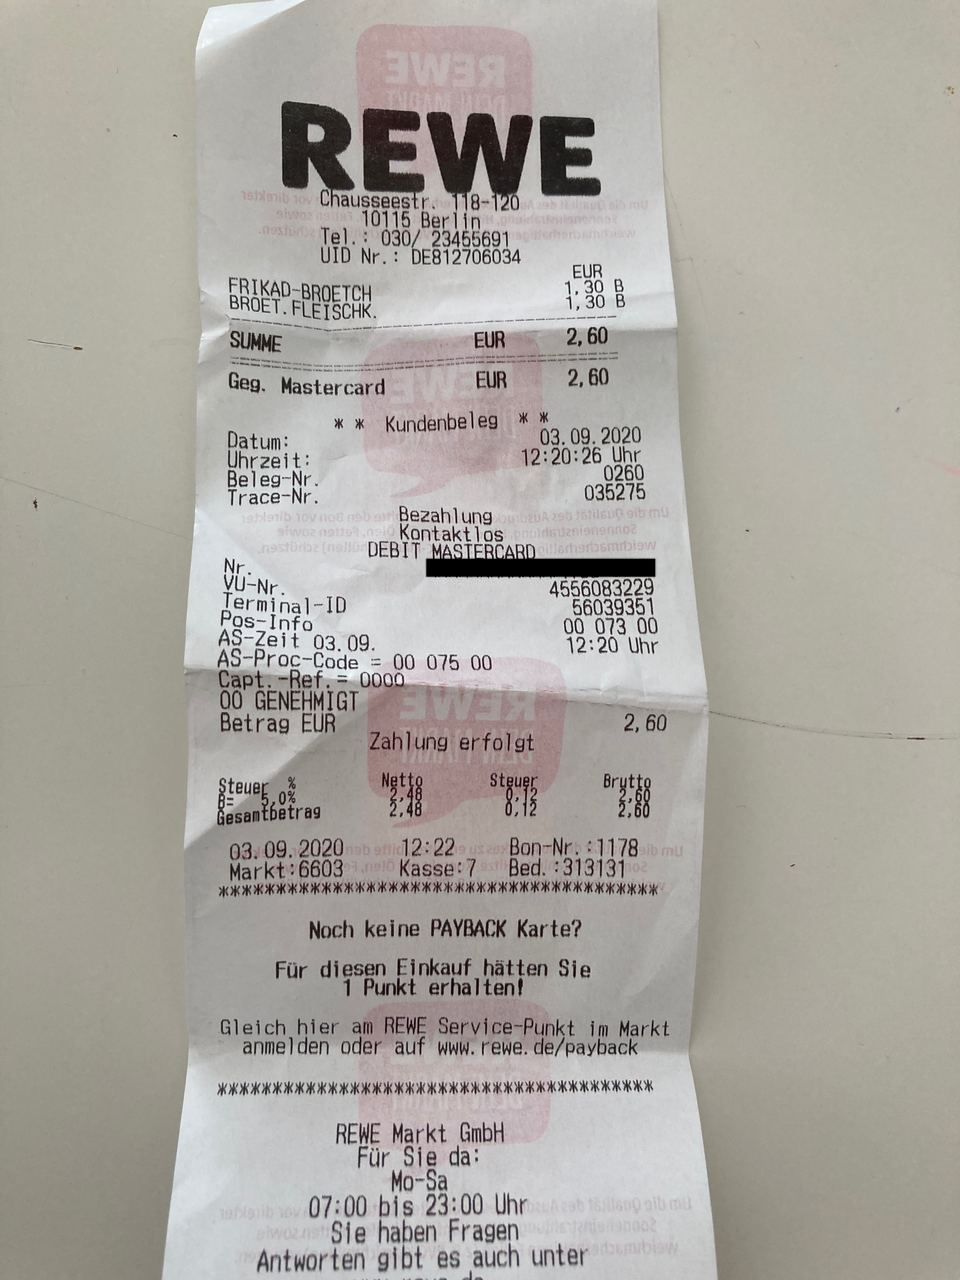
If you don’t have a receipt at hand now, feel free to use the following image of a receipt for testing purposes (even wrinkly receipts work 😅).
The image will show up under the Binary section on the top of the node. In the workflow you’ll then find the Telegram Trigger node is accompanied by an icon of a “1” in a green field. That means the image was successfully uploaded.
Here’s how the node should look:
2. Parsing receipts with the HTTP Request node and Mindee API
Now you need to send the image to the Mindee API so that it can parse the information out of the receipt. You’ll need to create an HTTP Request node, which you’ll find under Regular in the Create Node section. Add the node to your workflow and make sure it is linked to the Telegram Trigger.
In the Parameters section, find the Authentication field and select the “Header Auth” option from the dropdown list for the. In the Header Auth field select “-Create New-”.
In the Create New Credentials: “Header Auth” window, enter a name for your Mindee credentials in the Credentials Name field.
Paste the string “X-Inferuser-Token” into the Name field.
Paste your Mindee API key that you obtained earlier, in the Value field. Don’t share this key with anyone, as it grants access to your personal Mindee account. Click Save.
In the Request Method field select “POST”. Paste the following API endpoint in the URL field: https://api.mindee.net/products/expense_receipts/v2/predict
Toggle the field JSON/RAW Parameters to active. Under the Options section, set the Send Binary Data field to active (green).
Click on Add Option under the Options section and select Body Content Type. Select “Form-Data Multipart” from the dropdown list for the Body Content Type field.
Now rename the node from “HTTP Request” to “Parse details from receipt” and click the ✔(checkmark) to close the node editor and return to the canvas.
You should see the Parse details from receipt node connected to the Get receipts from bot node from the disk on the right side of Get receipts from bot to the bar on the left side of Parse details from receipt node.
Note: As you follow these tutorial steps make sure the nodes are connected from left to right in the order you create them. This will ensure each node can properly access the data from the preceding node. You can draw a connection by dragging from a circle (output) to a vertical bar (input).
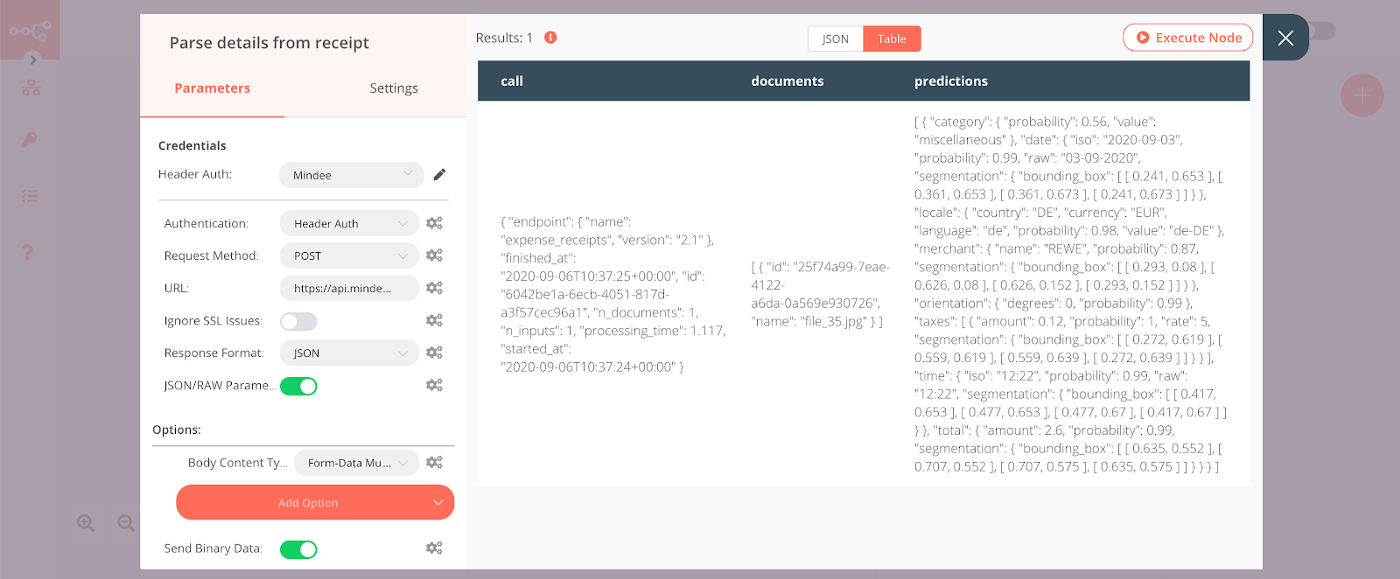
Go back into the Parse details from receipts node and click on Execute Node. Close the node with X after seeing the successful data entries in the Table section.
Here’s how the node should look:
3. Setting relevant data with the Set node
In order to only add the relevant information to your Google Sheets, you’ll need to select the data that will be sent to the next nodes in the workflow with a Set node. Start by adding the Set node to your workflow.
Toggle the Keep Only Set to active. This will ensure that only the data that is set in this node will be sent to the next nodes. Click Add Value and select “String”. Start with the category of the bill (e.g., food, miscellaneous) and type “Category” in the Name field.
Since this will be a dynamic piece of data that will change with each receipt, add an expression for the Value field by clicking on the gears symbol next to the Value field, and select Add Expression. The Edit Expression window will open. In the Variable Selector section, select the following:
Nodes > Parse details from receipt > Output Data > JSON > predictions > [Item: 0] > category > value
Your expression in the Expression field should look like this:
{{$node[“Parse details from receipt”].json[“predictions”][0][“category”][“value”]}}
Close the Edit Expression window with X.
Add other categories by adding their names, and setting their values with expressions. You will find other predictions like total (amount), date, and merchant. As you add expressions you’ll see that the Mindee API also offers a probability value with each data point. This tells you how correct the value is according to their system.
It’s also useful to get the details of the person who has sent this receipt via the Telegram Trigger node since multiple people in a household or a company might be sending their receipts to this bot.
To do that, click Add Value and select String. Type in “Added by” in the Name field.
Since this will be a dynamic piece of data that will usually change with each receipt, add an expression for the Value field by clicking on the gears symbol next to the Value field, and select Add Expression. The Edit Expression window will open. In the Variable Selector section, select the following:
Nodes > Get receipts from bot > Output Data > JSON > message > from > first_name
Your expression in the Expression field should look like this:
{{$node[“Get receipts from bot”].json[“message”][“chat”][“first_name”]}}
You can also add the last_name along with this. Then close the Edit Expression window with X.
Now rename the node from “Set” to “Set relevant data” and click the ✔(checkmark) to close the node editor and return to the canvas.
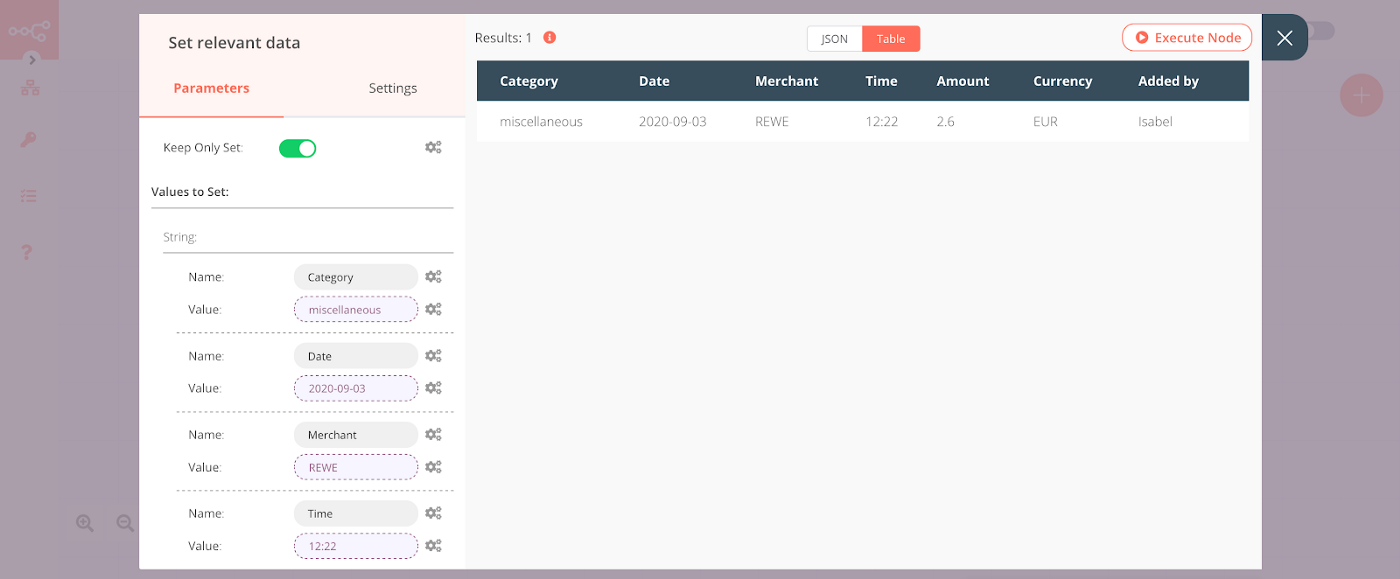
Return to the Set relevant data node and click on Execute Node. Are you impressed by the accuracy of the predictions?
Here’s an example of how the Set relevant data node can look after executing the node Don’t forget to add an expression for each value.
4. Adding expense records through the Google Sheets node
Google Sheets will help you keep track of your expenses that were parsed from your uploaded receipts.
The Google Sheets node will allow you to add the information that you set in the previous node to a sheet.
Creating a Google Sheet
In Google Sheets, create a table with the relevant data categories as the headlines. These headings need to match the names of the categories that you’ve created in the Set node. Make sure to include all categories that you added in the Set node into your personal Google Sheets.
It can look like this, depending on your added categories:

Creating a Google Sheets node
Add a Google Sheets node to your workflow from the Regular nodes list.
In the Parameters panel of the Google Sheets properties window, locate the Authentication field and change the value of the dropdown list to “OAuth2”. The name of the first field in the Credentials section will change to GoogleSheets OAut… Change the selection in the dropdown list for this field to “-Create New-”.
The Create New Credentials: “Google Sheets OAuth2 API” window should open. Locate the OAuth section and find the OAuth Callback URL field and click it. A URL ending in “/callback” should be displayed. Copy this URL to someplace handy.
You’ll need to add your Google Client ID and Client Secret to the Credential Data section to enable it to get data from your Google Sheets. At the same time, you’ll need to add the node’s OAuth Callback URL to the Google Cloud Console. Don’t share these credentials.
Leave this window open.
Creating Google API OAuth client credentials and permissions
In another browser tab or window, go to: https://console.cloud.google.com/.
If you’re not already signed in you’ll need to do so using your Google Account sign in credentials (Gmail address and password). You may also need to create a Google Cloud Platform account if this is the first time you’re using it.
Click the ☰ (hamburger menu) on the top left to open the navigation panel if it isn’t already open.
Click API & Services.
Click Credentials.
Click + Create Credentials and select OAuth client ID from the dropdown list.
You may be asked to configure an OAuth Consent Screen. If so, complete the following steps. If not, you can continue with the instructions after this section.
- If so, under User Type select External and click the Create button.
- On the OAuth consent screen, find the Application name field and enter “n8n demo”. Click the Save button.
- Again click Credentials in the left-hand navigation panel, then click + Create Credentials and select OAuth client ID from the dropdown list.
You’ll see the Create OAuth client ID page.
In the Application type dropdown list, select Web application.
In the Name field enter “n8n billbot demo” so you’ll recognize this client ID later.
In the Authorized redirect URIs section, click the Add URI button and insert the OAuth Callback URL that you copied from the Create New Credentials: “Google Sheets OAuth2 API” window of the Google Sheets node in n8n.
Click the Create button. The OAuth client created popup window will appear.
Copy the values for Your Client ID and Your Client Secret and insert them into the Client ID and Client Secret fields in the Create New Credentials: Google Sheets OAuth2 API panel in n8n.
While still in n8n, click the (Connect OAuth Credentials) button in the OAuth section.
If you are logged into more than one Google account you may be prompted to select a Google account with which to connect. Select the account for which you created the OAuth client in the Google Cloud Platform console.
You may see a Google Accounts security popup warning you that “This app isn’t verified”. Click Advanced, then click the Go to n8n.cloud (unsafe) link.
You may see a Grant n8n demo permission popup requesting permission to:
“See, edit, create, and delete all of your Google Drive files”. Click Allow.
This will be followed by another warning that requests permission to “View and manage Google Drive files and folders that you have opened or created with this app”. Click Allow.
The third warning will be “See, edit, create, and delete your spreadsheeting in Google Drive”. Click Allow.
When you see the Confirm your choices popup click the Allow button.
Once the connection is complete, click the Create button.
Go back to the Google Cloud Platform console and click on Library in the menu on the left.
Search for “Google Sheets”, and click Google Sheets API. You’ll see the Google Sheets API page.
Click the Enable button.
Return to the n8n Google Sheets node properties window.
In the Operations field, select Append from the dropdown list.
In another browser window or tab, open the Google Sheet you created for receiving expense information and copy the string of characters between, but not including, /d/ and /edit in your sheet’s URL. Paste this value into the field for Sheet ID in the n8n Google Sheets node parameters window.
In the Range field, type your starting and ending column letters, depending on your specific spreadsheet, in the form “A:G”, where “A” is the starting column and “G” is the ending column.
Now rename the node from “Google Sheets” to “Add to expense record” and click the ✔(checkmark) to close the node editor and return to the canvas.
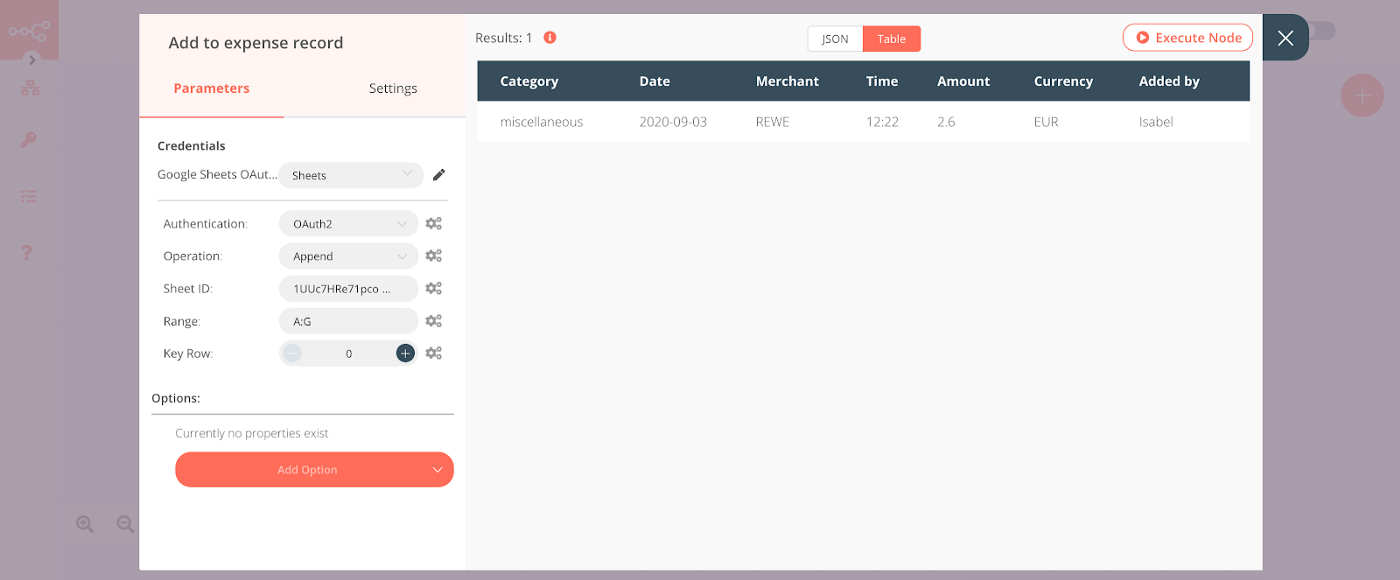
Return to the Add to expense record node and click on Execute Node. You’ll see the matching information according to the set headline categories.
The node should appear similar to the following example:
Check out the changes made by this node to your Google Sheet, which should look similar to this:

5. Sending confirmation of the added expenses through the Telegram node
You’ll be adding a Telegram node to get a confirmation that the data from the receipt has been parsed and added to the Google Sheets successfully.
Add a regular Telegram node (from the Regular list in the Create Node panel).
Under the Credentials section, select the name of the credentials that you added in the Telegram Trigger node.
Click on the gears symbol next to the field Chat ID and select Add Expression. In the Variable Selector section, select the following:
Nodes > Get receipts from bot > Output Data > JSON > message > chat > id
Your expression in the Expression field should look like this:
{{$node[“Get receipts from bot”].json[“message”][“chat”][“id”]}}
Close the Edit Expression window and next to the Text field click on the gears symbol and select Add Expression.
Another Edit Expression field opens; now you can design your individual confirmation from the BillBot. Make sure to include the relevant data categories from your Set node.
You can incorporate text and emoji with the matching data categories.
For example, for Category select the following under the Variable Selector section:
Nodes > Set relevant data > Output Data > JSON > Category
Your expression in the Expression field should look like this:
{{$node[“Set relevant data”].json[“Category”]}}
The following is a sample expression you can use. (It might not work for you if you named the values differently or if you didn’t add the values mentioned here in the Set node.)
✅ Bill of {{$node[“Set relevant data”].json[“Amount”]}} {{$node[“Set relevant data”].json[“Currency”]}} from {{$node[“Set relevant data”].json[“Merchant”]}}, dated {{$node[“Set relevant data”].json[“Date”]}} at {{$node[“Set relevant data”].json[“Time”]}}. Category was {{$node[“Set relevant data”].json[“Category”]}}.
Now rename the node from Telegram” to “Send confirmation” and click the ✔(checkmark) to close the node editor and return to the canvas.
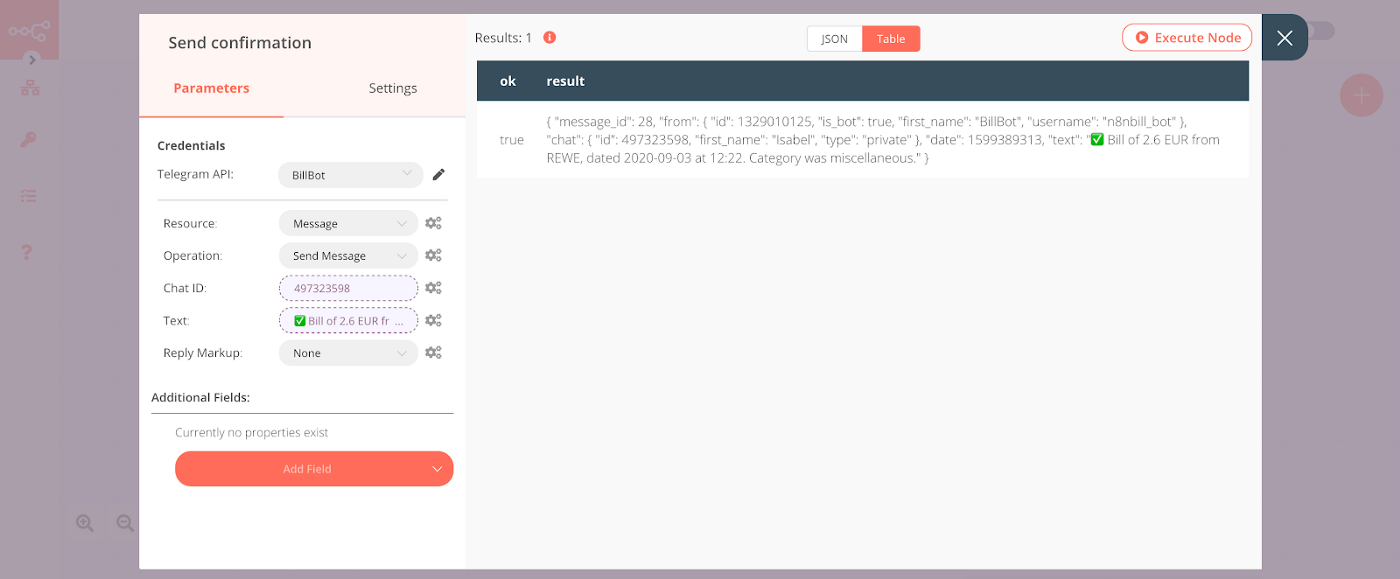
Return to the Send confirmation node and click on the Execute Node button to execute the node to send a confirmation text via Telegram.
The node should look like this:
6. Sending an SMS notification with the Twilio node
With a Twilio node you can inform your company’s accountant or your spouse of the expenses added to your Google Sheets. The Twilio node type enables you to send SMS or WhatsApp messages to mobile phones (and other devices capable of receiving messages). In this workflow you’ll use a Twilio node to send a confirmation of added details from the receipts.
If you’re using a Twilio trial account you’ll only be able to send SMS messages to phone numbers you’ve registered with Twilio, like the number you used when you signed up. You’ll need to do one of the following: 1) simulate sending messages to other people using your registered number, 2) register their phone numbers, or 3) upgrade to a paid account. If you choose the latter option the credit you received by signing up with Twilio using the link above will pay for a lot of text messages.
Add a Twilio node. In the Twilio API field in the Credentials section, click in the field and click Create New in the dropdown list.
In the Credentials Name field, enter “Twilio Programmable SMS”.
In the Credential Data section, enter the values you obtained from your Twilio console dashboard for Account SID and Auth Token.
Click Create.
In the From field, enter the Twilio phone number you obtained earlier in E.164 format.
In the To field, enter the mobile phone number you registered when you signed up for your Twilio account. (Twilio trial accounts can only send messages to registered phone numbers. To send messages to other numbers, upgrade to a regular account.) Use E.164 format for this number as well.
To send a dynamic text message with the time spent in meetings, click on the gears symbol next to the Message field and select Add Expression from the dropdown list.
In the Expression field, enter “A receipt worth X EUR was submitted by Y and has been added to the following spreadsheet: https://docs.google.com/spreadsheets/d/Z“, then highlight the “X”.
In the Variable Selector, select:
Nodes > Set relevant data > Output Data > JSON > Amount
This will insert a variable that uses data from the previous node. Delete the “X”.
For the “Y” repeat this step and choose Added by instead of Amount in the Variable Selector.
The “Z” represents the link your accountant or spouse can click on the SMS notification by Twilio that will lead directly to the Google Sheets, where the expense was added.
Highlight the “Z” and select the following in the Variable Selector:
Nodes > Add to expense record > parameters > sheetID
Your expression in the Expression field should look like this:
A receipt worth {{$node[“Set relevant data”].json[“Amount”]}} {{$node[“Set relevant data”].json[“Currency”]}} was submitted by {{$node[“Set relevant data”].json[“Added by”]}} and has been added to the following spreadsheet:
https://docs.google.com/spreadsheets/d/{{$node["Add to expense record”].parameter[“sheetId”]}}/
Click the X (close) button to return to the node editor.
Now rename the node from “Twilio” to “Send SMS notification” and click the ✔(checkmark) to close the node editor and return to the canvas.
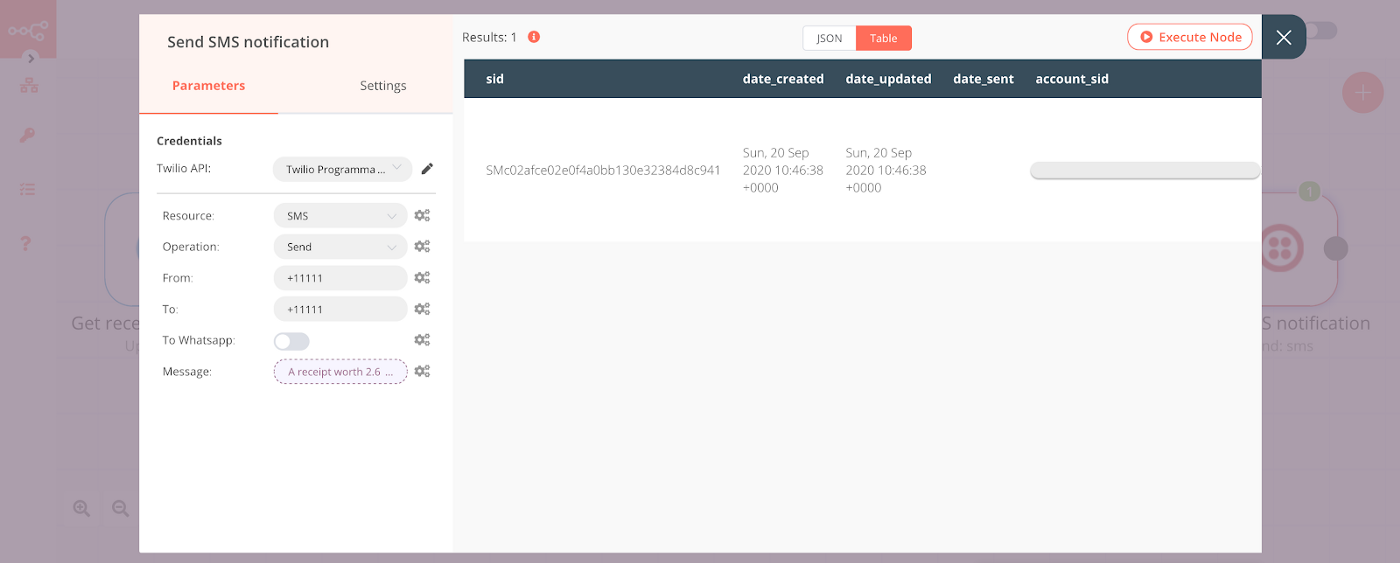
Return to the Send SMS notification node and click on Execute Node to send the SMS notification.
The node should look like this:
Save your workflow and toggle Active to on (green) in the top right of the workflow editor. Well done, you’ve completed the workflow! 💪
Testing the completed workflow
Test the workflow by sending a bill or receipt to your BillBot.
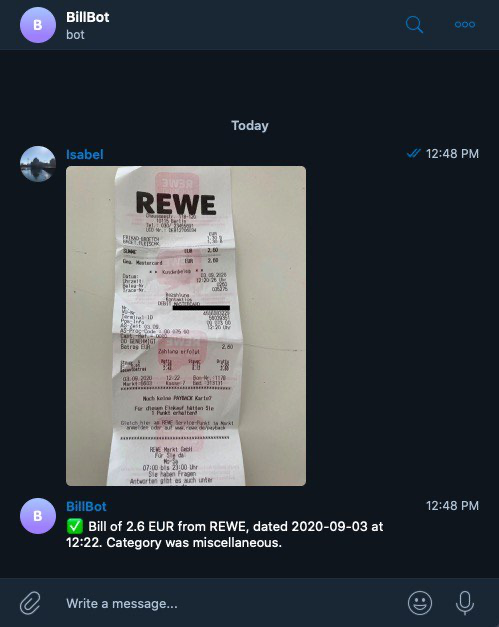
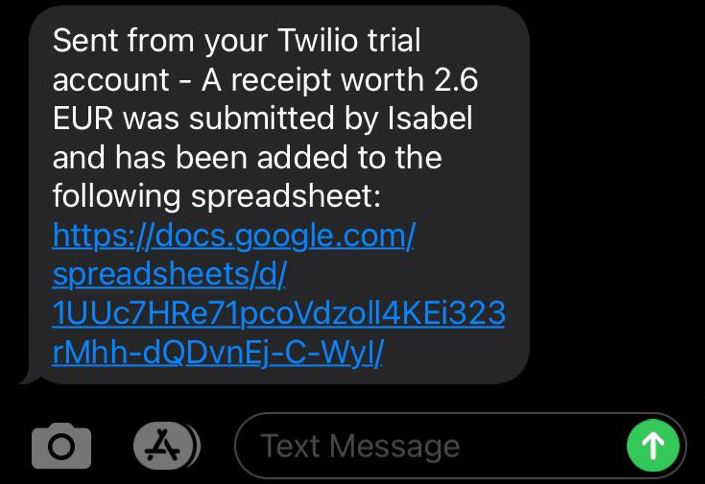
Within moments you should receive a Telegram message from your BillBot on your mobile device, followed shortly by an SMS message to the phone number you specified. In both messages you should see that the template placeholders have been replaced with actual data from the receipt you sent to your Telegram bot. How cool is that?
Here’s how the chat with your BillBot could look:
Here’s how the SMS from Twilio could look:
What’s next?
You’ve felt the rush of accomplishment for building this workflow and wonder how to improve it further? How about duplicating the workflow, but this time with using the Mindee API for invoices and order forms? Then you can not only parse receipts, but also invoices and data extractions to broaden the usability of your app.
Summary
In this teamwork between Telegram, Twilio, Mindee, and n8n, you have learned how to build your own workflow that will allow you to automatically add relevant receipt data from an image upload to Telegram to your Google Sheets. This will save you time and effort in the long run, so you don’t have to manually enter data for tax returns, household plans, and reimbursements.
What types of images, other than receipts and bills, would you like to add to your Sheets?
Consider sharing this workflow with others and get in touch with the n8n community through their forum.
Start automating!
The best part is, you can start automating for free with n8n. The easiest way to get started is to sign up for a free n8n cloud trial. Thanks to n8n’s fair-code license, you can also self-host n8n for free.
This post originally appeared on the Twilio.com blog.