
There is a lot to do for the average person living in the 21st century. Between work, family, and personal obligations, it is not uncommon for someone to get up early in the morning and run hard all day long just to collapse in bed that night with a list of tasks still unfinished.
Many people will turn to a virtual assistant to help them with these daily tasks. This can take the form of someone who works remotely for you, receiving direction through the internet. But, more recently, a new type of virtual assistant has emerged.
This is the electronic virtual assistant. They are not people at all. Rather, they are programs on our computer/phone or devices that sit on our kitchen counter at home. Two well known examples of these virtual assistants are the Amazon Alexa and the Google Assistant. They can find details about your day or retrieve information for you quickly and (sometimes) easily.
The one challenge with these virtual assistants is that, at their core, they have a number of basic abilities that can be augmented with different skills created by either the manufacturer or a 3rd party. Because of this model, the majority of the abilities available from your personal assistant do not apply to you and, even worse, they may not have the ability to actually perform the tasks that you want them to do.
A Lesson from Suits
If you’ve watched even just one episode of the television series Suits, it becomes pretty apparent almost immediately that, despite all of his self confidence, the main character Harvey would not be where he is today without his personal assistant Donna.
Donna knows what Harvey wants before Harvey does. Donna anticipates Harvey’s needs and acts on them so that by time Harvey realizes he needs something, Donna has already done it. She is the glue that holds his life together.
Wouldn’t it be wonderful if our virtual assistants were more like Donna?
Well, I may have some good news for you!
Nathan is Here to Help
While it would be impossible to completely recreate the awesome that is Donna, we can definitely put together a useful virtual assistant who can deal with some of the day to day details that somehow find a way to consume our lives!
In this article, we are going to show you how to build your very own virtual assistant using many of the services that you already use today and connecting them all together with n8n. To add a personal touch to our virtual assistant we are going to call him Nathan.
Throughout this article, I’m going to use a Suits analogy. If you haven’t watched Suits, that’s OK! Everything will still make sense so feel free to ignore it! 😄
Goals
We are going to set some specific short term goals which we will complete during this article and then some long term goals which are ideas we can add-on at a later date once we build this initial framework.
- Give Nathan the ability to perform basic email management
- Set up a way to communicate with Nathan behind the scenes
- Give Nathan some sass!
Prerequisites
In order to get Nathan up and running, we need to have the following in place:
- n8n — You can get this up and running by checking out the Quickstart page. You should have a fresh install without any workflows. You can also sign-up for a free n8n cloud trial to get access to our hosted service. This workflow was created in n8n version 0.104.2.
- Slack — You will need a Slack workspace set up with at least one account for the person who is being assisted. You can find information about your Slack requirements here.
- Yahoo Mail — This is used for communication between our users. (Please note that I have decided to use Yahoo mail but most other mail providers will work as well. For example, Gmail, Outlook.com, Zoho and others are fine to use.) Set up the Yahoo mail credentials following the instructions mentioned here.
n8n
The core of our Nathan is the n8n system. It has two primary purposes:
- Connect services together that do not presently talk with each other
- Provide the logic for how these services interact
A Note About Screenshots and the Start Node
The Start node is the default node for a workflow and can’t be removed. It’s used to initiate processing in a workflow that doesn’t begin with a trigger node (something you’ll learn about next). In the screenshots, the Start node has been omitted for clarity. You can also get your own copy of the workflow to help you follow along as we go.
Okay, enough of the preamble. Let’s get this project started!
You’ve Got Mail!
The first ability that we want to give Nathan is to work with Harvey’s email. We are going to accomplish this using two integrations:
- EmailReadImap — reads email from an IMAP enabled mailbox and executes a workflow. This node is sometimes referred to as IMAP Email.
- Send Email — sends emails using information received by the node from a workflow.
Reading Email
The first node we are going to configure is the EmailReadImap node. This node will allow Nathan to monitor Harvey’s email and then perform actions based on the email.
Add the EmailReadImap Node
The first step is to add the node into the workflow. To do this, follow these steps:
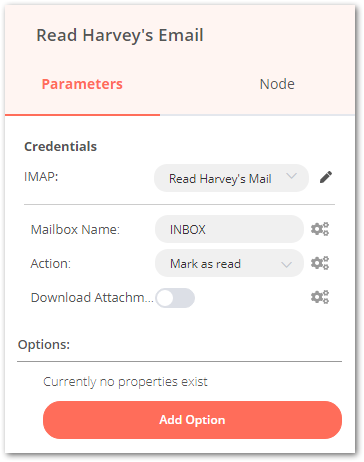
- Click on the '+' button in the top right corner
- Under the All tab, find the EmailReadImap node and click on it to open up the node parameters
- In the Parameters tab, under Credentials > IMAP select 'Create New' and enter the credentials you created earlier.
- I’ve also chosen to change the name of the node to Read Harvey’s Email so that we will know exactly what this node does when looking at the workflow (Trust me, this helps later on when things get really complicated). We rename nodes by opening the node, clicking on the title of the node at the top left corner to enable renaming the node, edit the name and then click on the ✔ to set the new node name.
- You can leave the rest of the options as defaults
Test the EmailReadImap Node
Before we move on, let’s test the EmailReadImap node to ensure that it is working properly.
Pro Tip: Save any changes you made to your workflow before you test it. This way, you will not lose your work if you run into any problems.
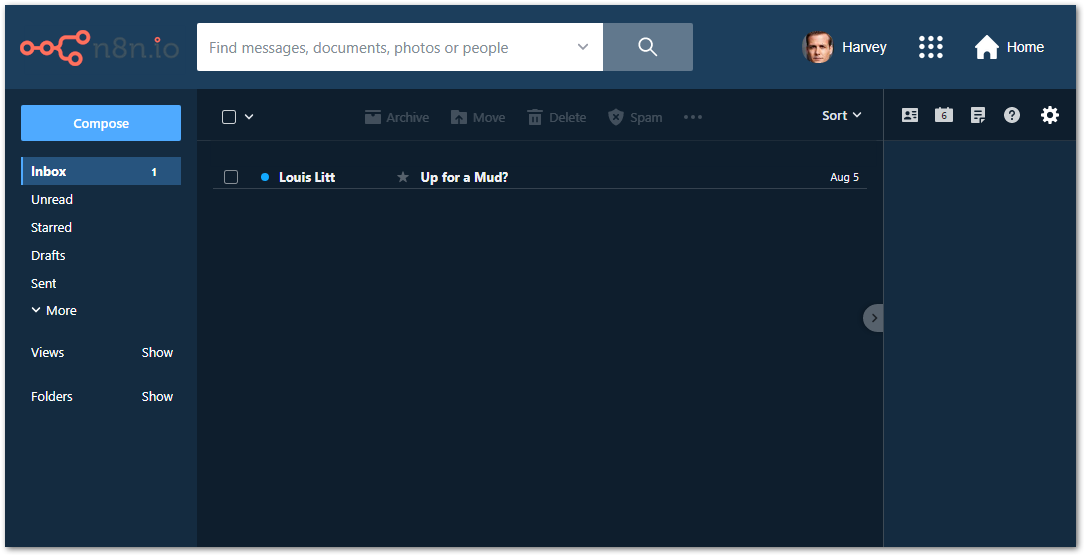
- Make sure that there is an unread email for the node to read. As it turns out, it appears that Louis has plans for him and Harvey after court this evening
- In the open EmailReadImap node, click on the Execute Node button in the top right corner. This will get the node to reach out and read Harvey’s email.
- If everything works right, you should get a table of information in the right hand pane with the following information:
• textHTML: The message body in HTML format
• textPlain: The message body in plain text format
• metadata: All of the information that is needed for the mail client to read the message (mainly looks like gibberish)
• date: Time and date that the message was sent
• from: Name and email address of the person who sent the message
• to: Name and email address of the person who sent the message
• subject: The subject line of the email
If we go back into Harvey’s email, we will also see that the email from Louis is now marked as read compared to the unread message from Mike that came in after we tested the node:

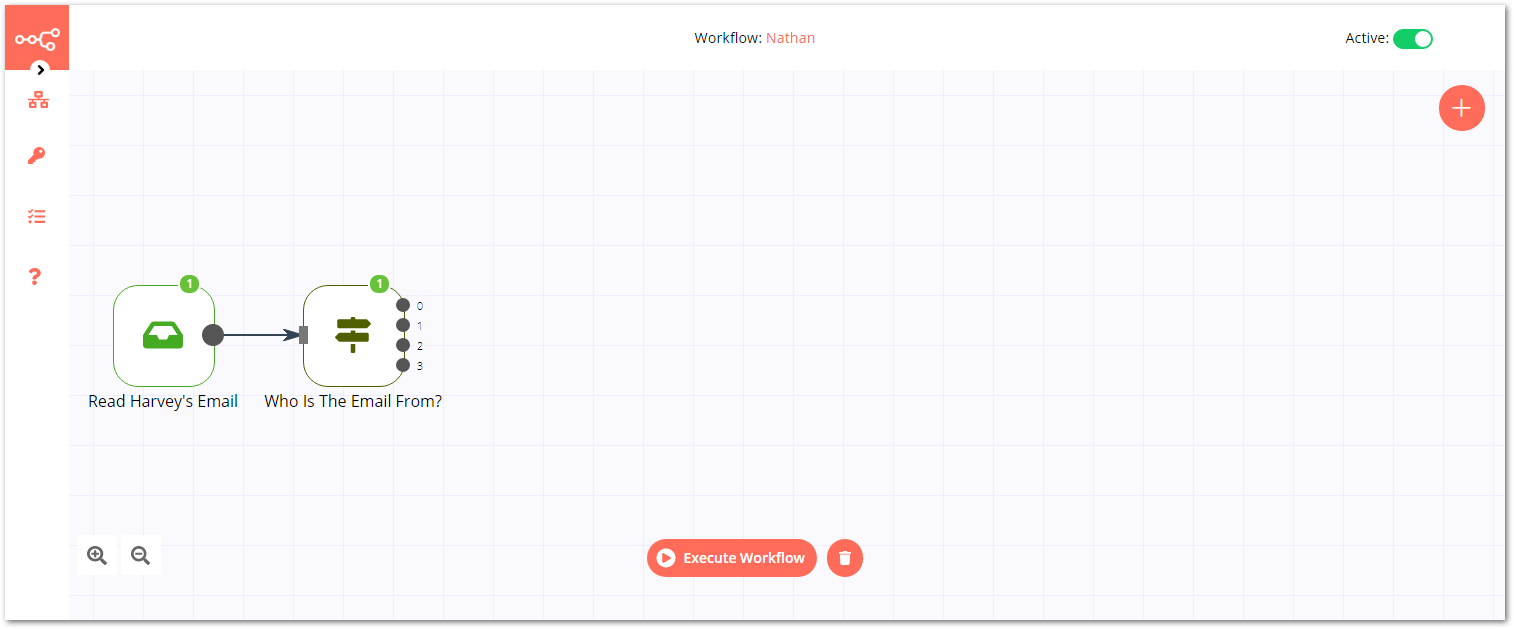
You can now close the node and your workflow should look something like this:
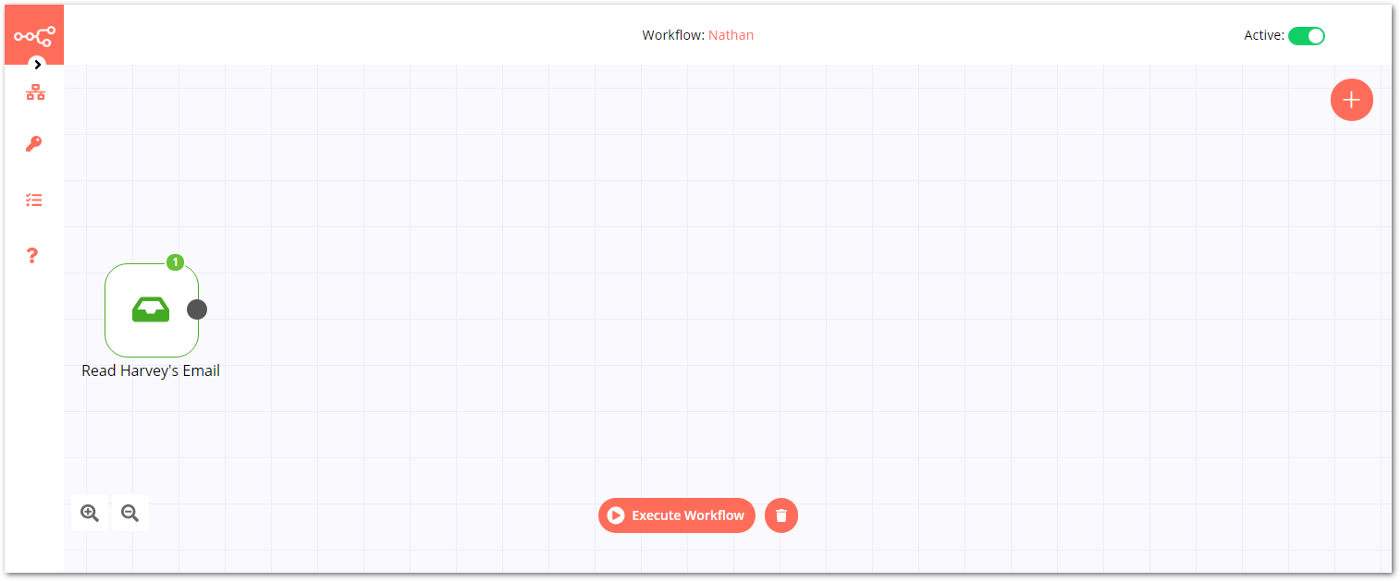
Because the EmailReadImap node is a trigger node, it does not have an input but it is triggered each time a new email is detected so that the email can be processed.
Making a Decision
Now that we have the email, what do we do with it? Well, Harvey has given Nathan explicit instructions that he does not want to waste time on any of Louis’s emails. So, Nathan is going to check who sent the email.
There are a couple of ways to do this in n8n:
- IF node: Checks a parameter and performs one action if it results in a true result and performs another if it results in a false result
- Switch node: Checks a parameter and performs one of many actions, depending upon the value of the parameter.
While either would work for Nathan, we are going to use the Switch node because it allows us more flexibility for further expansion later.
Once you have added the Switch node and made sure that the output from the EmailReadImap node is connected to the input of the new Switch node, this is how we are going to configure it:
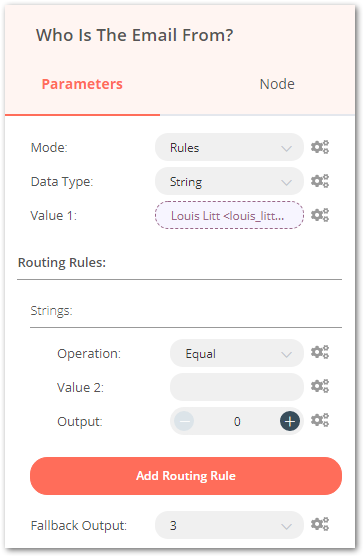
- Set the following parameters in the Parameters section:
• Mode: Rules
• Data Type: String - For Value 1, click on the gears icon to the right of the field and click on Add Expression in the dropdown menu to open up the variable selector windows
- Click on Current Node > Input Data > JSON > from. You should see the expression display
{{$json[“from”]}}and the result below it read Louis Litt <louis_litt_1970@yahoo.com>. This displays the expression that you need to look for and what it is presently based on the information provided by the previous node. - Close the Edit Expression window
- Under Routing Rules:, click the Add Routing Rule button. Three new labels and fields appear
- Fill in the rule fields as follows:
• Operation: Equal
• Value 2: Louis Litt <louis_litt_1970@yahoo.com>
• Output: 0 - Beneath the Add Routing Rule button, select 3 for the Fallback Output
That completes the configuration of the Switch node. What we have told it to do is this:
If the unread email is from Louis, send it for further processing. Otherwise, let it go through.
I’ve also taken the liberty of renaming the node Who Is The Email From?.
Test the Switch Node
To test the Switch node, simply click on the Execute Node button at the top right corner of the node. If we have configured everything correctly, you should see an indicator above the output side of the node windows.

This is telling me that we are seeing the results for Output 0. It is also telling me that the Switch node sent information out of Output 0 and this information is displayed below. In this case, it is the JSON data that was received in the input sent from the EmailReadImap node (i.e. the contents of the email).
If you were to click on the dropdown field beside the Output label, the Results would change and the output information below would also change to reflect the results and the output from the selected Output.
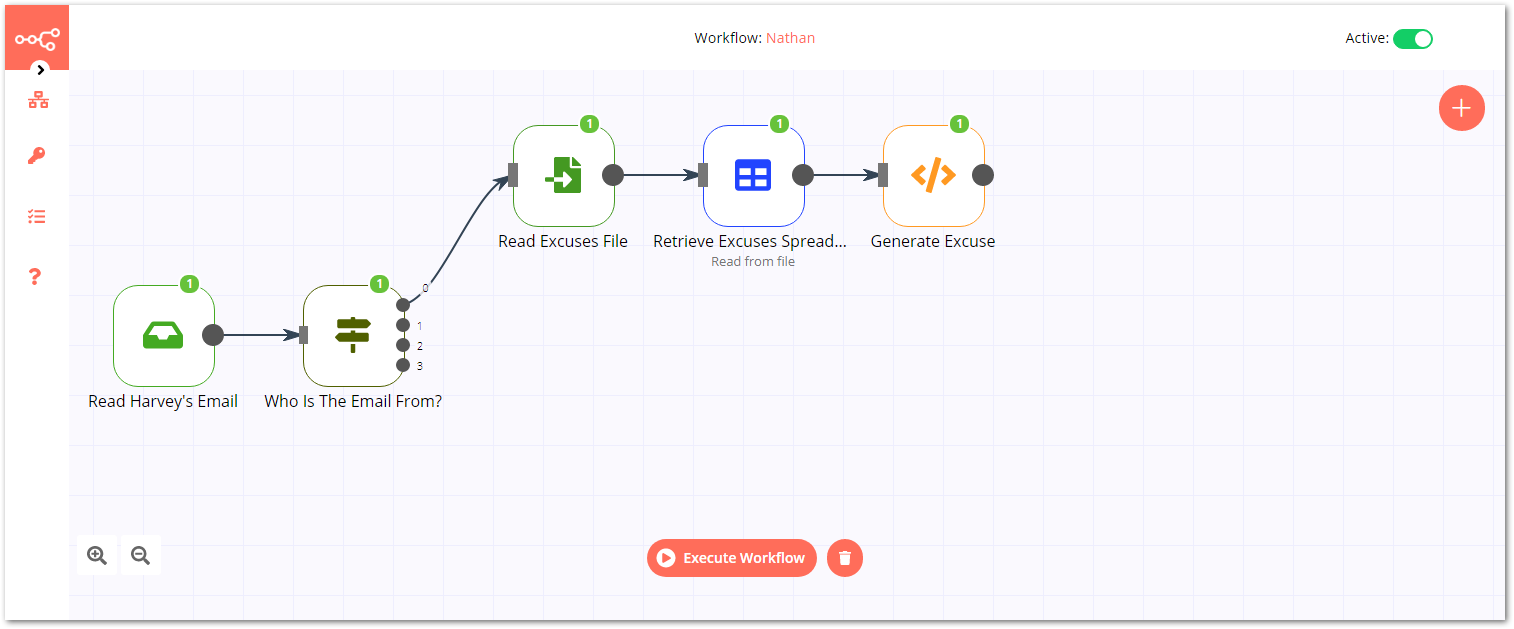
You can now close the Switch node. The workflow now looks like this:
Making Up Excuses
Since Harvey doesn’t want to do anything with Louis, Nathan needs to make up a good excuse for Harvey. Fortunately, he has several (13,800 to be exact) excuses ready to go. We just need to build the excuse generator for him.
There are three separate nodes to this part of the system:
Spreadsheet Node Note
While I chose to create a copy of the Google Sheet as an Excel spreadsheet and then access it from the Read Binary File node, I could have just as easily accessed the information directly from Google Sheets using the Google Sheets node. For bonus points, see if you can replace the Read Binary File and Spreadsheet File nodes with a Google Sheets node.
Create a Spreadsheet
The raw data for the generator is stored in an Excel spreadsheet. You can see the Google Sheets version yourself here. Download the file as an Excel spreadsheet and then save it in the same folder where you have installed n8n.
This spreadsheet acts like a database and stores each separate part of the excuse in the file. This spreadsheet should be installed somewhere that the n8n server can get access to; either on the n8n server itself or a remotely mounted network share.
Read Data as Binary Information
Next, we have to load the binary file into the system. This is done using a Read Binary File node. There are only two parameters for this node:
- File Path: The full file path to the spreadsheet
- Property Name: The property which will contain the binary data. This can be left as the default data
Once they are set, the node can be closed.
Retrieve Information from Spreadsheet
We can now actually view the information stored in the spreadsheet. Using the Spreadsheet File node, we can retrieve the binary data output from the previous node.
The two parameters to set are:
- Operation: Since we are reading from the file, we set the value to Read from file
- Binary Property: This needs to match the Property Name value entered in the Read Binary File node previously
Create the Excuse
The final node in our excuse generator workflow is a Function node. The Function node is a bit special because it gives you the freedom to do pretty much anything you want with the data that it receives and spit out whatever you want on the other side as long as it follows the proper data structure (See Data Structure for more information).
This is the code that runs in the Function node:
var leadinmax = 24;
var perpmax = 25;
var delaymax = 23;
var leadin = Math.floor((Math.random() * leadinmax ) + 1);
var perp = Math.floor((Math.random() * perpmax ) + 1);
var delay = Math.floor((Math.random() * delaymax) + 1);

var excuse = items[leadin].json.Leadin + “ “ + items[perp].json.Perpetrator + “ “ + items[delay].json.Delay;

items = [{json:{}}];
items[0].json.excuse = excuse;

return items;
And this is what it does:
- Lines 1–3: The number of entries that are available for each of the three portions of the excuse
- Lines 4–6: Generates a random number to retrieve a random excuse portion
- Line 8: Creates the excuse from the three randomly selected portions pulled from the Spreadsheet node
- Line 10: Clears all the data originally retrieved from the Spreadsheet node so there isn’t any unused data consuming resources
- Line 12: Adds the excuse to the JSON data
- Line 13: Sends the data to the next node
When done, our workflow now looks like this:
Next, Nathan is going to make sure that Harvey is not stuck with Louis in a vat of mud this evening.
Not Tonight!
Now that Nathan has the perfect excuse to get Harvey out of that appointment with Louis, he will email Louis (as Harvey) and let him know that Harvey will not be there.
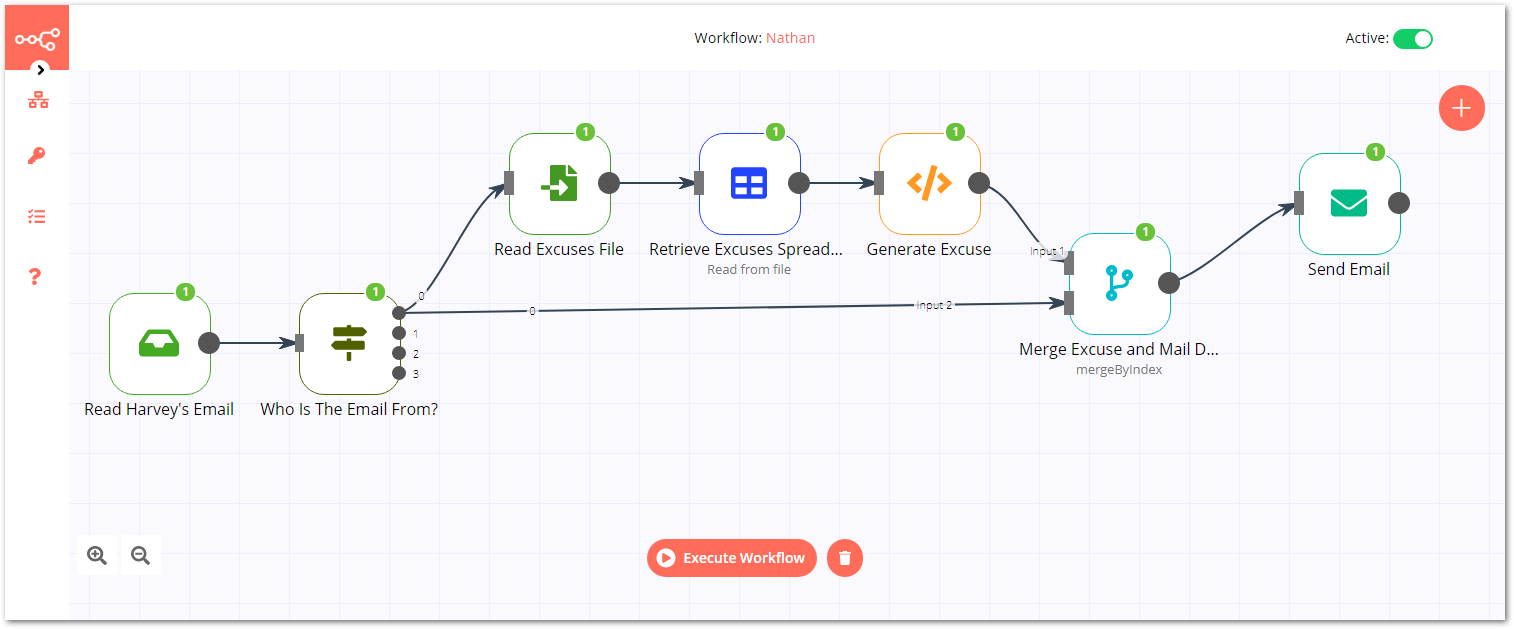
To do this, we need to use the Merge node to combine the excuse with the mail information and then feed that data into the Send Email node which will send the reply to Louis.
Merging the Information
Some nodes do not forward the information they received along to the nodes that follow so the Merge node is useful to retrieve that information and add it to other information for processing together. So, we are going to add a Merge node to the workflow and connect the output from the Generate Excuse Function node to Input 1 of the Merge node.
Next we are going to take a second connector from Output 0 of the Switch node (this contains the email information) and attach it to Input 2 of the Merge node.
Inside the Merge node, there are two parameters that we are going to set:
- Mode: Merge By Index
- Join: Left Join
By setting these parameters, we are going to merge the data into a single JSON array and then send it on its way to the Send Email node.
Send the Email
The Send Email node now has all of the information that it needs to send an email back to Louis. This does take a bit of configuring to get it set up right:
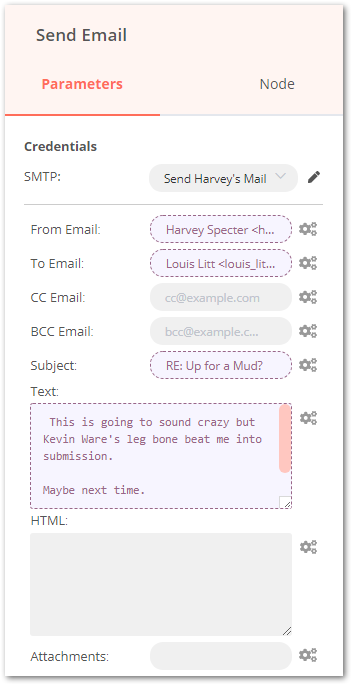
- Credentials — SMTP: This is a new credential set that was created to connect to Harvey’s email and send email on his behalf. Much of this information is available in this handy help article.
- From Email: This is filled in from the To field supplied by the email by using the expression
{{$json[“to”]}} - To Email: This is filled in from the From field supplied by the email by using the expression
{{$json[“from”]}} - Subject: This is the same subject that the email used except it is prepended with RE:. This is generated using the expression RE:
{{$json[“subject”]}} - Text: This is where we put in the excuse (generated by the expression
{{$json[“excuse”]}}) followed by “Maybe next time. Harvey”
The rest of the parameters can be left empty for the time being or if you want to get fancy, you can fill in the HTML field with the same message but format the text using HTML and CSS.
You can now close the Send Email node.
The workflow should now look like this:
Take Up the Slack
Now, the last thing that Harvey needs is for Louis to come in the next day and start talking about the excuse Nathan made up if Harvey knows nothing about it. This is why we are creating a “back channel” for Harvey and Nathan to communicate with each other while everyone else is none the wiser.
To accomplish this, we have set up Slack accounts for everyone in the team and set up Nathan Slack app with the proper permissions to access the Pearson Specter LLC Slack workspace. We have also created a private channel which only Harvey and Nathan have access to and added Nathan app to that channel. (While I would love to go into all the fine details about how we set up Slack, it is quite simply beyond the scope of this article. But this could turn into a future article so stay tuned! For now, check out Giving kudos to contributors with GitHub, Slack, and n8n another example.)
Now that all of that preliminary information is out of the way, here is how Nathan is configured to send Harvey a message. The first thing that we need to do is add the Slack node to the workflow and connect the output of the Merge node to the input of the Slack node.
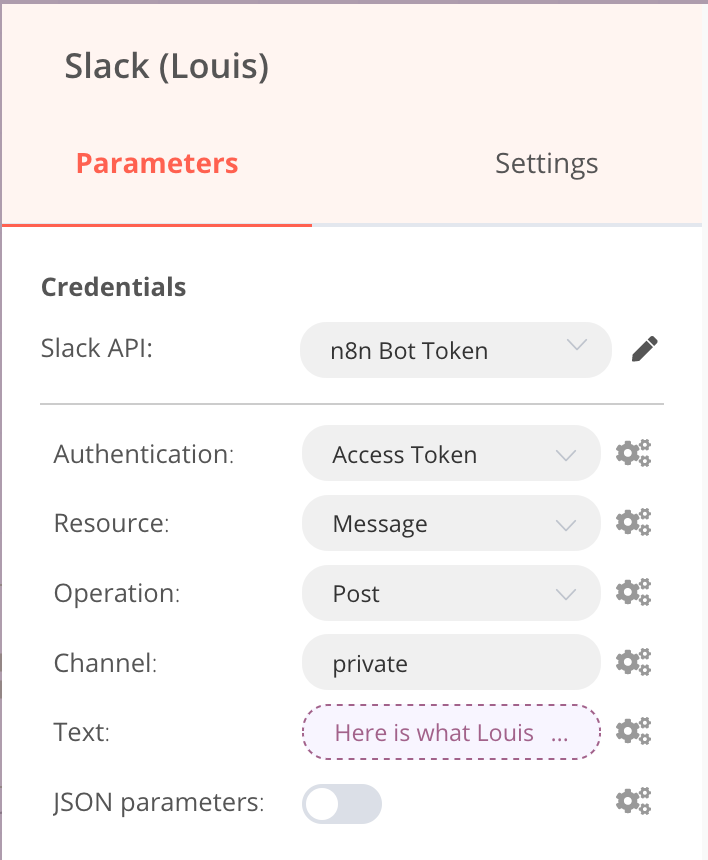
Next, open up the Slack node so we can set up the parameters. The Slack API credential is the first item we need to fill out. This is critical because if it is done incorrectly, then the node will fail.
The reset of the parameters are as follows:
- Authentication: Access Token
- Resource: Message
- Operation: Post
- Channel: This is the name of the private channel that we created in Slack. For Nathan, this is called private (Yes, unique, I know!)
- Text: The is the content of the actual message (we will talk a bit more about this in a bit)
One of the other things that we would like to do is give our messages a bit more punch by being able to style them. We are going to accomplish this using Markdown language. To enable Markdown language, simply click on the Add option button near the bottom of the Parameters tab and click on Markdown on the pop-up menu. This will add a Markdown option which will, by default, be on.
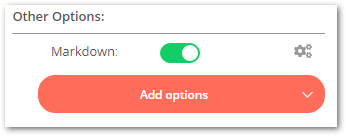
Now, you can style the text using Markdown language. If you are not familiar with Markdown language, it is a quick way to format text. There is an excellent tutorial on Markdown available here.
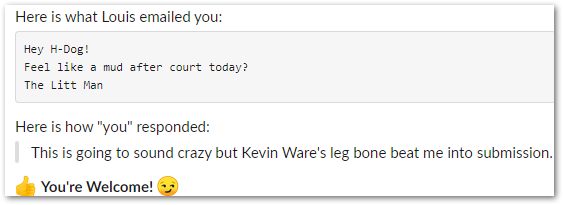
The final piece to this puzzle is to generate the message to Harvey using the excuse that Nathan sent to Louis. For the Text field, we are going to create an expression that looks like this:Here is what Louis emailed you:
Here is what Louis emailed you:

```
{{$json[“textPlain”]}}
```

Here is how “you” responded:

> {{$json[“excuse”]}}

:+1: *You’re Welcome!* :smirk:
This code tells the node to put into a text box the contents of Louis’s email and then add the excuse that Nathan made up. He then finishes off the message with a sassy “You’re Welcome!” with a couple of emojis for good measure.
The final message that will be posted to the private Slack channel will look like this:
More Mail!?
Now that we have taken care of all the email from Louis, Harvey needs to be notified when he gets an email from anyone else. To accomplish this, we are going to make a copy of the Slack node that we just finished creating and connect the Switch node’s Output 3 to the input of this copied node.
Next, we will reset the value of the Text field and enter You’ve just received an email. You may wish to check it out. into that field.
Now, whenever a non-Louis email comes in, Harvey will get a notification.
What Else Could Nathan Do?
Because Nathan’s abilities are only limited by the services that are available through the internet, there are a lot of things that we could get Nathan to do for us. Some ideas include:
- Buy and sell items online
- Speak and be spoken to
- Make dinner reservations or order food
- Oversee our smart homes
- Manage our communications (text messages, email, phone calls, etc.)
- Make recommendations (movies, recipes, etc.)
- Direct employees and customers
- Whatever else comes to mind!
Everyone, Introducing Nathan!
That concludes the first steps in creating Nathan! Let’s do a brief review of what Nathan does so far:
- Check Harvey’s Email
- If there is new email check if it is from Louis
- If it is from Louis:
- Make-up an excuse
- Email the excuse to Louis
- Send Harvey a message on Slack with the excuse
- If it is not from Louis:
- Send a Slack message to Harvey that there is a new email
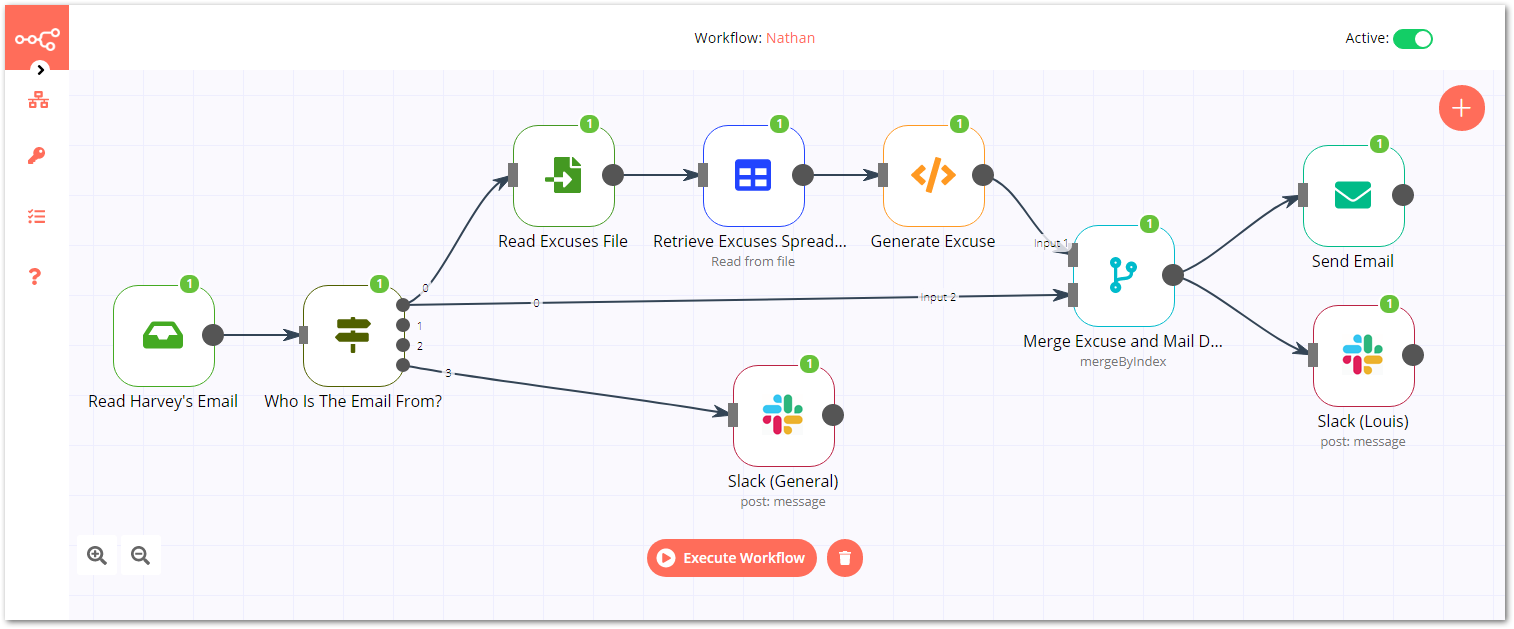
The final workflow looks like this:
I’d be excited to check out what you’ve built using n8n! In case you’ve run into an issue while following the tutorial, feel free to reach out to me on Twitter or ask for help on our forum 💙
Start automating!
The best part is, you can start automating for free with n8n. The easiest way to get started is to download the desktop app, or sign up for a free n8n cloud trial. Thanks to n8n’s fair-code license, you can also self-host n8n for free.