Cyber incidents (like cybercrime, IT failure/outage, and data breaches) are the number one threat to large and small companies. Now imagine your company is hit by a data breach. One moment you're minding your business as usual, the next you notice unusually high outbound traffic, some changes in important files, suspicious user activity, or you're straight-up locked out of your accounts.
How do you react?
If simply thinking about this scenario triggered trepidation, you're unprepared for such a situation. But don't panic.
In this post, we'll explain what incident response playbooks are, why it's crucial to have one when an incident happens, and how to automate your own incident response playbook with the help of n8n workflow templates.
What is an incident response playbook?
An IRP is a guidebook for navigating cybersecurity problems, offering instructions for organizations — particularly security and operations teams — during cyberattacks, data breaches, or other high-risk security events.
The primary goal of an IRP is to provide a clear and organized plan of action, ensuring everyone knows their role and can respond quickly. This structured approach supports expedient responses, minimizing the impact of cybersecurity incidents.
Benefits of incident response playbooks
IRPs offer several benefits for organizations dealing with cybersecurity threats:
- Systematic approach: IRPs outline a clear and standardized set of actions, ensuring that every response team member knows what to do during a cyber incident. Having a cyber incident response playbook reduces confusion and potential errors.
- Faster reaction times: With predefined steps in place, your organization can respond swiftly to security breaches. This rapid response minimizes the impact of incidents, potentially saving sensitive data and reducing financial losses.
- Legal and regulatory compliance: Following an IRP demonstrates your organization is taking cybersecurity seriously and meeting industry-specific obligations.
- Clear role definition: IRPs define roles and responsibilities, enhancing coordination within your response team. This clarity reduces response chaos and ensures everyone knows their part in mitigating the incident.
- Continuous improvement: After each incident, your organization can review and update its playbooks based on lessons learned. This iterative process helps you adapt and improve your cybersecurity strategies over time.
Why should you automate the incident response playbook?
Having an incident response playbook is a first step towards managing incidents more efficiently. However, it still involves manual actions (for example, notifying all team members in due time or creating tickets).
The solution to this problem is automated incident response.
While it's true that you can't fully automate the entire incident resolution process – there's no substitute for human expertise when it comes to fixing the core issue – you can certainly automate a myriad of low-level tasks that often contribute to these delays and errors.
Automation steps in as a helping hand, either complementing or entirely taking over certain manual tasks.
The result?
Your IT team finds themselves with fewer trivial responsibilities and more time to focus on the critical ones.
By automating virtually every facet of your incident response playbook, you not only streamline communication among team members but also achieve faster response times.
The ultimate payoff?
Improvement in key incident response metrics, including mean time to detect (MTTD), mean time to acknowledge (MTTA), and mean time to resolution/respond (MTTR). It's a transformation that promises a more efficient, effective, and responsive incident management process.
Build an incident response playbook
Let's review the process of creating an incident response playbook for your organization while also implementing automation for certain workflows within it.
Step 1: Incident classification
Define what constitutes an incident for your organization to determine the playbook’s scope and necessary resources for incident response. Next, categorize incidents based on severity and type to prioritize responses and allocate resources effectively.
Step 2: Roles and responsibilities
Identify the members of the incident response team, including representatives from relevant departments, such as IT, security, and operations. Define each team member’s roles and responsibilities to ensure a cohesive response during incidents.
Step 3: Communication protocols
Develop a communication plan for internal and external stakeholders.
Internally, communicate with the incident response team, other employees, and senior management to coordinate responses, provide updates, and support decision-making.
Externally, communicate with customers, vendors, and regulators to maintain customer trust, coordinate resolution efforts with vendors, and meet compliance requirements.
Use automation tools to send all necessary communications to relevant parties swiftly, keeping everyone informed about the incident and its resolution progress.
For example, use n8n, a workflow automation tool, for incident communication. With n8n, create workflows that automatically notify the incident response team of an incident, generate incident reports, and send them to relevant stakeholders.
You can use n8n workflows to:
- Notify the incident response team via email when a new incident is detected.
- Create a new ticket in your project management system about incidents.
- Send Slack messages to the incident response team upon incident detection.
- Generate and send incident reports to relevant stakeholders.
Step 4: Detection and analysis
Next, implement tools and processes for detecting and analyzing security threats. Teams can use DevSecOps tools, such as security information and event management (SIEM) systems, intrusion detection systems (IDS), and vulnerability scanners, to identify and remediate vulnerabilities efficiently. Automation is pivotal here.
Using n8n, you can build workflows connecting threat detection tools and triggering actions based on outcomes. For example, use the VirusTotal node for scanning files and URLs for malware, the Humantic AI node for analyzing potential threats, and the GitHub node for managing your code security.
The Webhook node lets you receive data from external sources and choose from hundreds of n8n-supported integrations and functions. You can also use existing workflow templates to get started quickly.
Step 5: Containment strategies
After detecting an incident, take steps to contain it, such as isolating affected systems, deactivating user accounts, and changing passwords.
Develop long-term containment strategies to prevent the incident from reoccurring, including patching vulnerabilities, implementing new security controls, and improving your incident detection and response capabilities.
Step 6: Eradication and recovery
Once you’ve contained the incident, eradicate the threat and recover your systems to operational status. Tasks include removing malware, restoring data from backups, and reconfiguring systems. Have a plan in place to restore your systems to a known good state to minimize downtime.
Step 7: Lessons learned
Conduct a post-incident review to learn from the incident and prevent recurrence. Involve all incident response team members in your review and follow these best practices:
- Review the full incident timeline from discovery to resolution. Identify successes, failures, and areas for improvement.
- Evaluate data and diagnostic tool usage. Ensure that you have sufficient visibility into the system, use the right metrics and alerts, and leverage the best communication and troubleshooting tools.
- Clarify decision-making during the incident. Understand who was in charge, who was consulted, and who was informed. Assess timelines, response effectiveness, and alignment with the IRP.
- Strengthen future incident response by creating actionable items based on the lessons learned. Update your IRP with clear roles, responsibilities, escalation procedures, communication channels, and recovery steps.
Incorporate lessons learned from the assessment into your IRP and share them with stakeholders. This helps ensure your organization is better prepared to respond to future incidents and continuously improve your processes and systems.
Incident response playbook templates
n8n workflows can play a crucial role in developing a robust and flexible IRP. A primary challenge in incident response involves integrating various tools and platforms. Often, security tools lack native communication, resulting in manual processes that delay response times.
n8n’s node-based, no-code approach enables your security teams to visually design workflows, seamlessly automating steps that would otherwise be manual.
For instance, if a security information and event management (SIEM) system detects a suspicious login, an n8n workflow can automatically retrieve user activity logs from a user behavior analytics tool, alert the security team via Slack or email, and create an incident management ticket in Jira Software — all in real time.
n8n’s flexibility, including creating custom nodes and integrating with a wide range of applications, ensures that the IRP remains adaptive to your organization’s evolving technology stack.
Imagine a scenario where you’re adopting a new cloud storage solution. Traditional IR playbooks might require significant manual adjustment and retraining. However, with n8n, you can integrate or customize a new node, letting your teams visually update the workflow without a complete overhaul.
For example, if sensitive data is detected in this new cloud storage, an n8n workflow can automatically quarantine the data, notify the data owner, and log the incident for compliance purposes.
In essence, n8n workflows bring a level of automation and scalability to your IRPs that are essential for tackling today’s cybersecurity threats. n8n ensures that the right information reaches you at the right time and that the right actions are taken as soon as possible, bolstering your organization’s cybersecurity posture.
Let’s explore a few incident response playbook examples that use n8n workflows. As you’ll see, with the help of n8n, you can create an effective, efficient security incident response playbook.
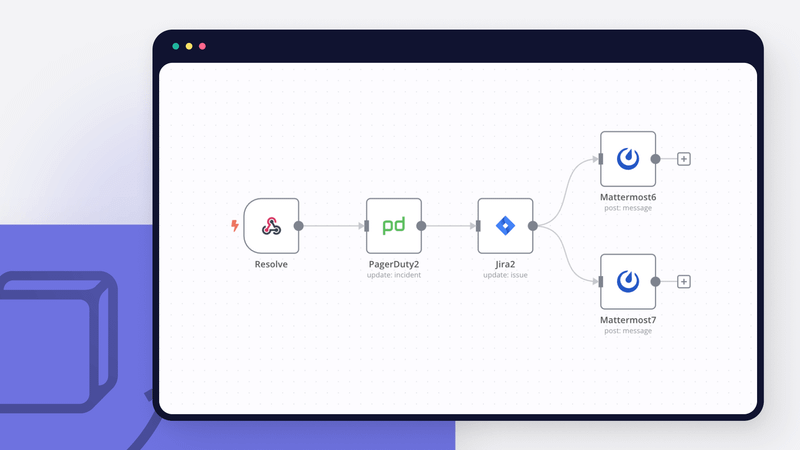
Workflow 1: Monitor responses automatically
This n8n workflow enables you to monitor responses automatically by managing custom incident response in PagerDuty and Jira. It includes three sub-workflows automating the following key steps:
- Create an auxiliary Mattermost channel and invite the on-call team.
- Update the status of the incident in PagerDuty.
- Create a Jira Software issue for the incident and update its status upon resolution.
Here’s how the workflow works:
- When you create an incident in PagerDuty, the PagerDuty webhook triggers the workflow.
- The workflow creates an auxiliary Mattermost channel and invites the on-call team.
- The workflow updates the status of the incident in PagerDuty.
- The workflow creates a Jira Software issue for the incident.
- Upon incident resolution, the on-call team marks the Jira Software ticket as resolved.
- The Jira Software webhook triggers the workflow.
- The workflow updates the status of the incident in PagerDuty.
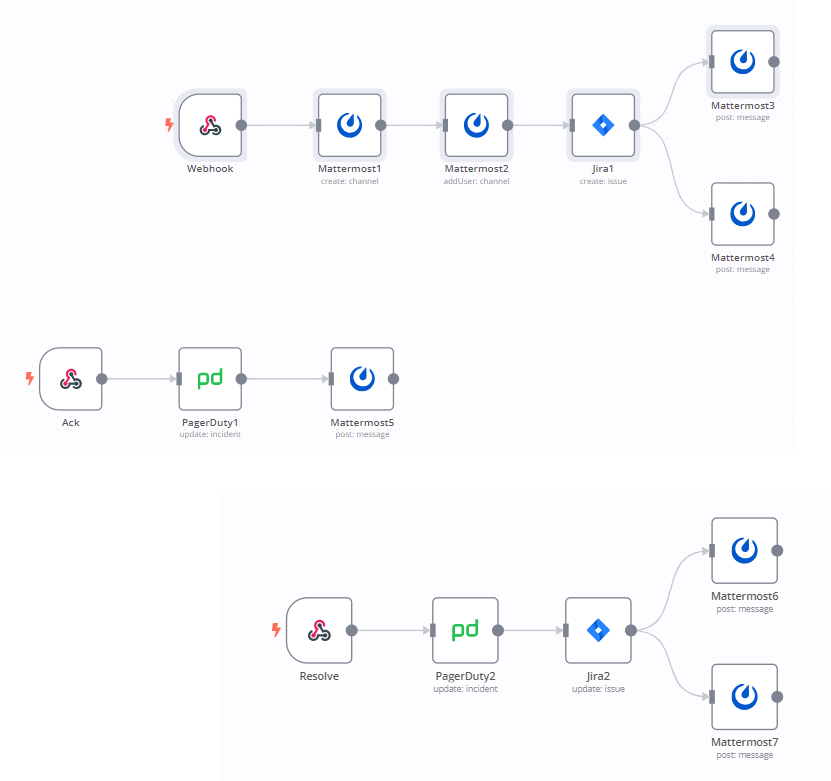
This automated workflow significantly enhances incident response time and efficiency by eliminating manual tasks and streamlining communication between team members.
Workflow 2: Email monitoring
Let’s review how you can create a phishing email incident response playbook. Emails are a common vector for cyber threats, and the Analyze emails with S1EM workflow helps enhance email protection as part of an IRP. It integrates n8n with TheHive, a security orchestration, automation, and response (SOAR) platform, to automatically trigger actions in response to suspicious emails.
You can configure this workflow to perform a variety of tasks, such as:
- Quarantining the email
- Alerting your security team
- Logging the incident
- Creating a case in TheHive
- Enriching the case with information from other sources, such as IP address lookups and domain reputation checks
- Escalating the case to the appropriate team or individual
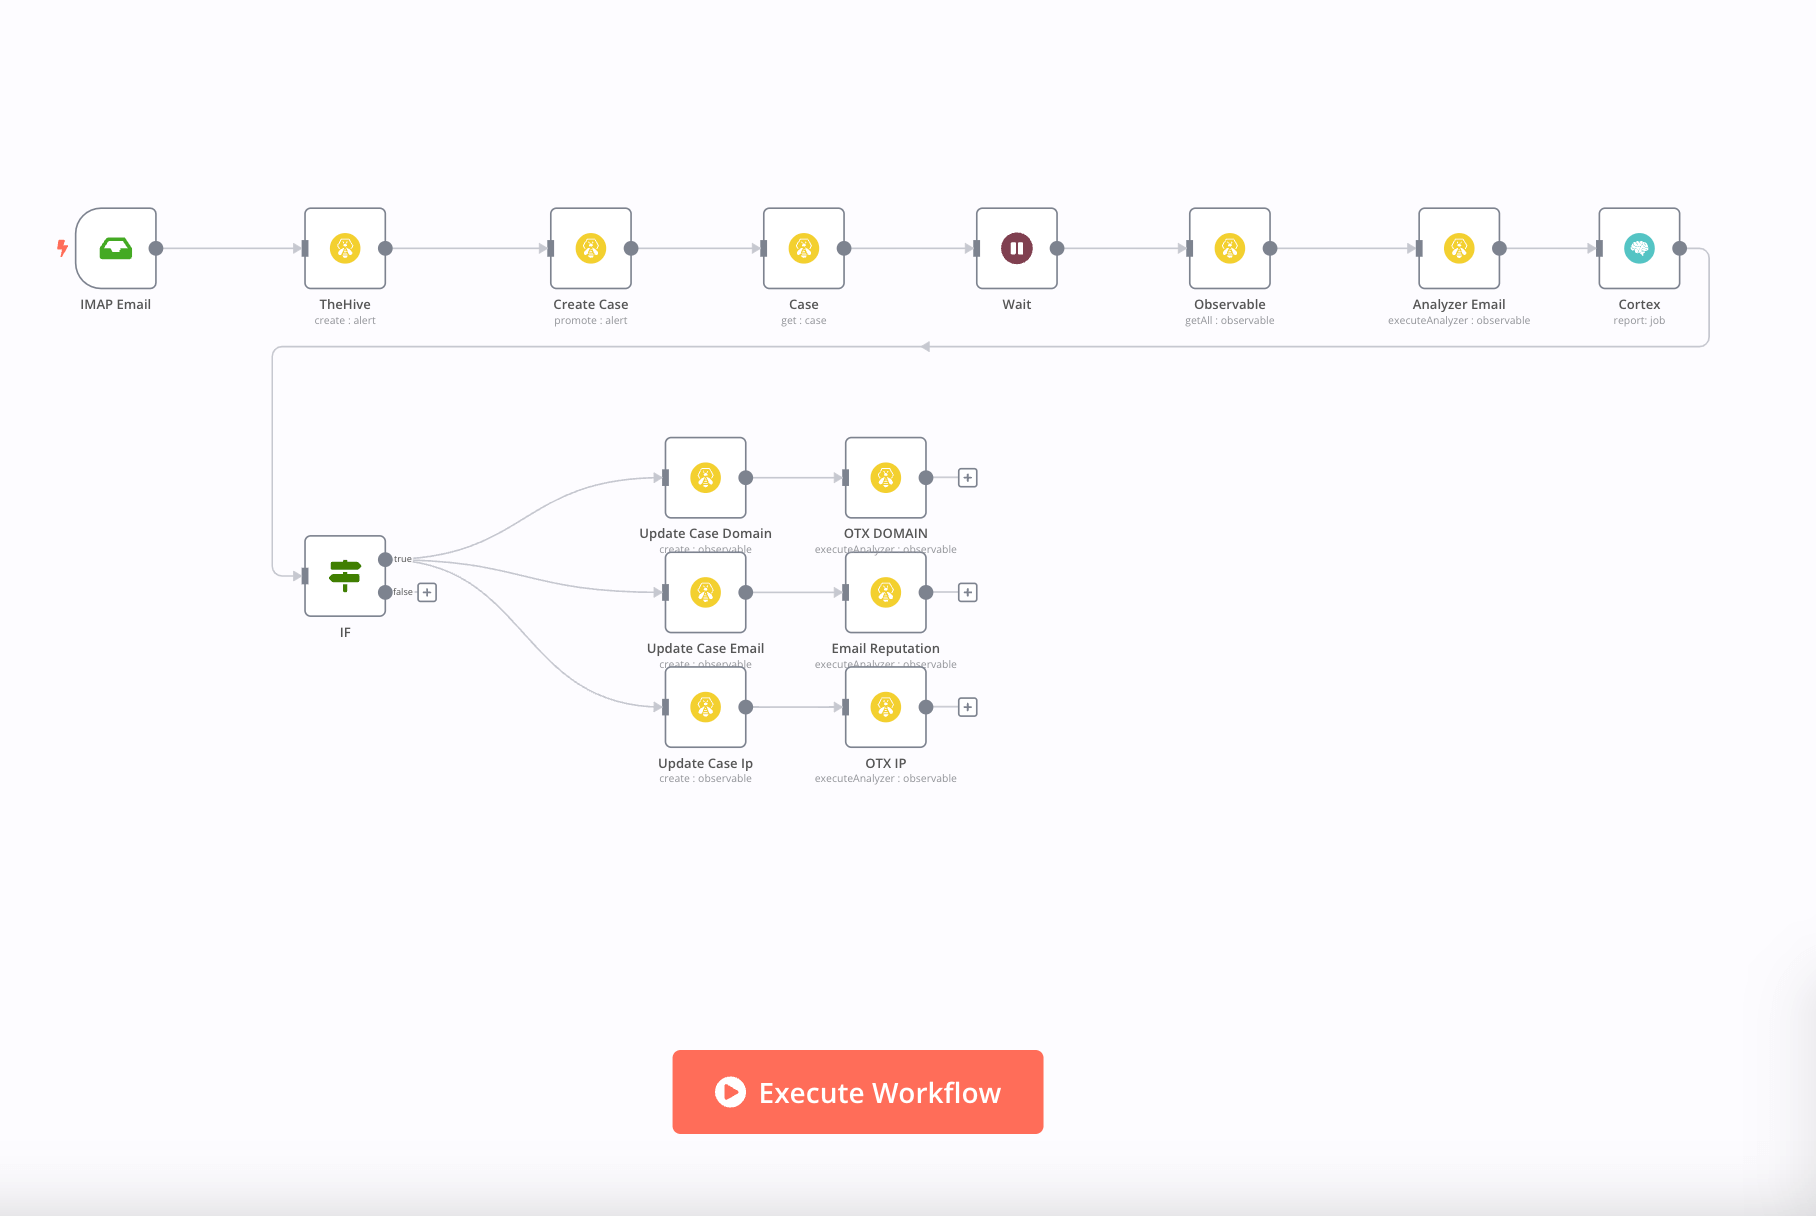
This proactive approach promptly identifies and mitigates potentially harmful emails, reducing the risk of a security breach.
Workflow 3: Password breach
In the event of a data breach compromising user passwords, your rapid response is crucial. The Create and share temporary passwords via Telegram bot workflow automates the process of resetting passwords and notifying affected users via Telegram, a secure messaging platform.
- When a security incident is confirmed, you can trigger this workflow within your IRP to generate temporary passwords for affected accounts.
- It uses an if/else node to check if the user has a Telegram account based on their email address.
- If yes, the workflow sends a notification to the user via a Telegram bot with their temporary password and a link to reset it.
- If no, it skips the notification step and logs the user’s email address for manual follow-up.
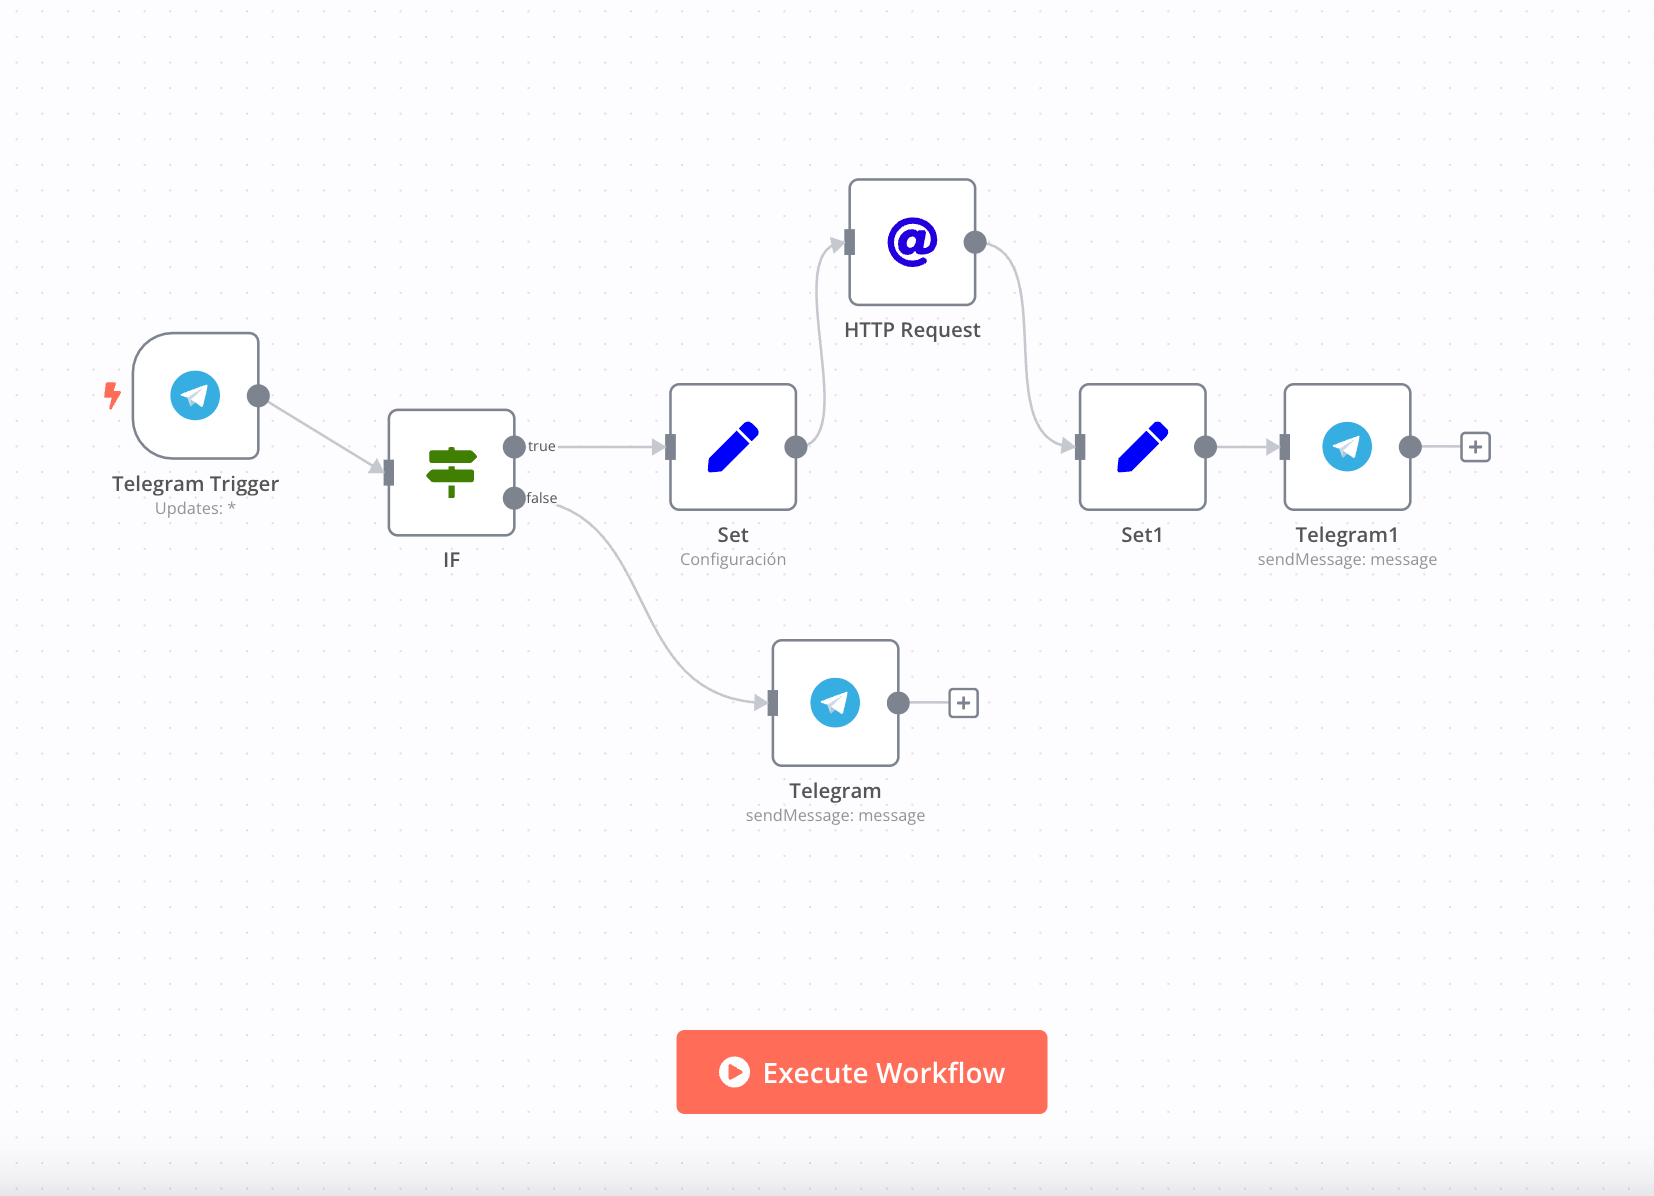
By automating these steps, you can minimize the time it takes to secure compromised accounts and reduce the risk of unauthorized access.
Wrap up
An effective IRP is a vital tool in today’s cybersecurity landscape.
It should include clear guidelines for incident classification, defined roles and responsibilities, communication protocols, detection and analysis processes, containment actions, and recovery strategies. Following standard incident response processes, it should also include a post-incident evaluation period, where parties involved review and re-evaluate the incident response strategy, learning lessons about what worked (or didn’t).
n8n plays a significant role in incident response playbook automation.
It streamlines SecOps processes and communication through automated notifications, integrates threat detection tools for quicker response, and facilitates data collection and reporting for post-incident analysis. By incorporating n8n workflows, you can ensure a consistent, efficient, and adaptive response to cybersecurity incidents within your organization, strengthening your security posture.
What’s next?
It’s time to embrace automation in your incident response strategies. As the future of cybersecurity unfolds, predictive analysis, AI-driven responses, and intricate automation workflows will play pivotal roles. These advancements will empower you to protect your digital assets proactively.
Create an adaptable, efficient, and top-tier IRP today. Check out n8n today and explore how its security automation capabilities can benefit your incident response strategy.