Swapping CSV to Excel is a common task for tech enthusiasts and professionals dealing with data. Excel offers advanced features for analyzing, visualizing, and manipulating datasets effectively.
In this tutorial, we’ll get into how to transform your CSV files into Excel format with two powerful methods:
- First, we'll check out the simple way to do it straight from Excel. We'll start by navigating to the 'Data' tab in Excel, selecting 'From Text,' and using the import wizard to organize and import the CSV file.
- After that, we'll introduce you to an automated process with n8n, a source-available workflow automation tool. First, we'll set up a workflow, then add a Read Files from Disk node, configure it to read your file and then connect it to a Convert to File node to ensure smooth data conversion (for versions below 1.23.0 please use Spreadsheet File node).
But that's not it – we'll cover some advanced n8n workflows that can enhance your efficiency with CSV files.
Let's jump in!
Method 1: How to convert a CSV file to Excel using Microsoft Excel?
Excel has been a powerhouse for billions of people for over 35 years. One of its notable features is the ability to import data in different formats. Manually importing CSV into Excel is a reasonable solution:
- If you only need to import CSV data occasionally and you don’t mind a few extra clicks.
- If you want to keep things simple and avoid adding another tool to your existing arsenal.
- If you or your teammate are not highly proficient in technical skills for automating the task through VBA or other programming languages.

If you want to check out a more robust way of importing CSV data into Excel – jump to the second method right away!
Step 1. Import CSV from the Data tab
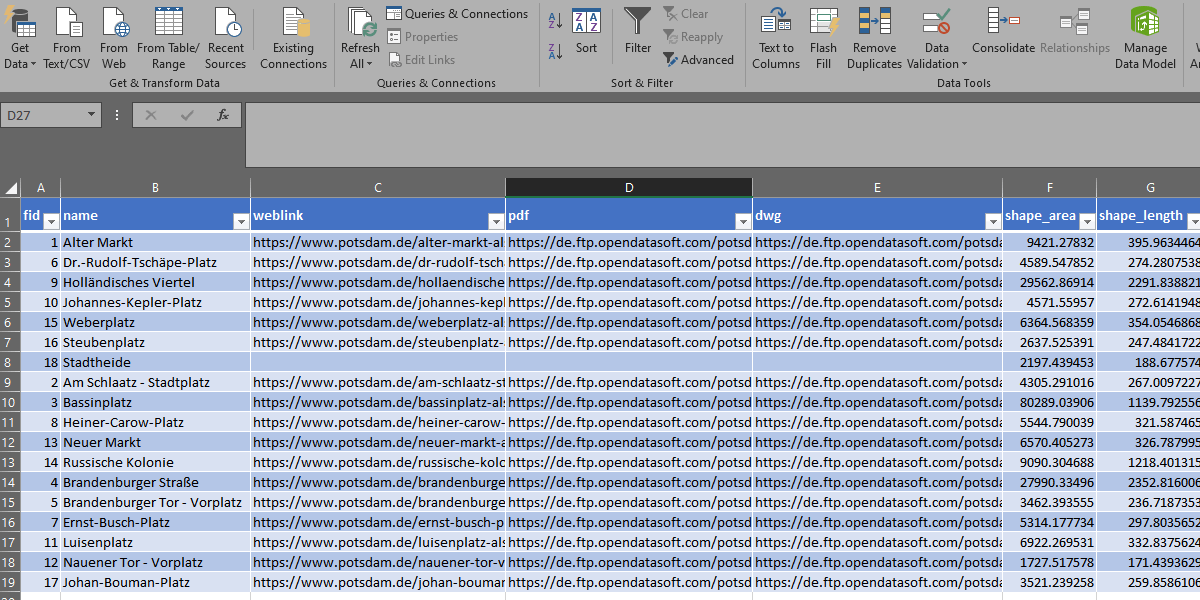
Let's take an example CSV file from the European Open Data portal. We’ll need to download a list of public venues in Potsdam.
- Find the Data tab in the Excel ribbon.
- Then find the Get & Transform Data group and click on the From Text / CSV button. Then select the CSV file that you want to import.

Step 2. Configure the Import Wizard
Once you’ve selected the CSV file, an Import Wizard will appear. Let’s take a closer look at its options:

Configure three main options in the upper part of the Wizard:
- Under File Origin you can select the character encoding. Make sure that the encoding is correct. In the example, you can see that the Windows-1252 encoding doesn’t display special characters properly. Selecting Unicode (UTF-8) might help.
- The delimiter has been recognized correctly, but you can pick one of the common delimiters from the drop-down list. Alternatively, you can select a Custom item and enter the valid delimiter.
- Finally, Excel tries to recognize data types automatically. By default, it relies on the first 200 rows. However, you can also select the entire document or switch off the auto-detect data types at all.
Step 3. Load the CSV data
If the preview window looks correct, either press the Load button (6) to import the data immediately, or press the triangle nearby, select Load to… and fine-grain the import settings:

You can import CSV data into a new or existing worksheet. Alternatively, you can also immediately create a Pivot Table or Chart.
After successfully importing into a new worksheet, you will see an automatically formatted table. You can further configure the appearance and save the file in Excel format.
Method 2: How to convert a CSV file to Excel using n8n?
Now let's look at how the same goal of converting CSV to Excel can be achieved with n8n.
But why do we need n8n for doing such a simple task at all?
Generally, n8n goes beyond basic import wizard features, providing advanced functionalities for comprehensive data management. To be more specific:
- Convert CSV data to Excel automatically. Save a whole lot of time by automating the repetitive actions. You can even perform a bulk conversion of multiple files at once.
- Manipulate data before converting. Apply filtering, and create additional columns programmatically or via OpenAI node.
- Avoid Excel worksheet limits. For example, each Excel cell can contain no more than 32767 characters. With n8n, you can detect edge cases and fix the input file by splitting long content into several cells.
- Create custom automations. Finally, n8n is capable of connecting hundreds of systems, so you can extend your automations or integrate them into larger workflows over time with little effort and virtually without coding.
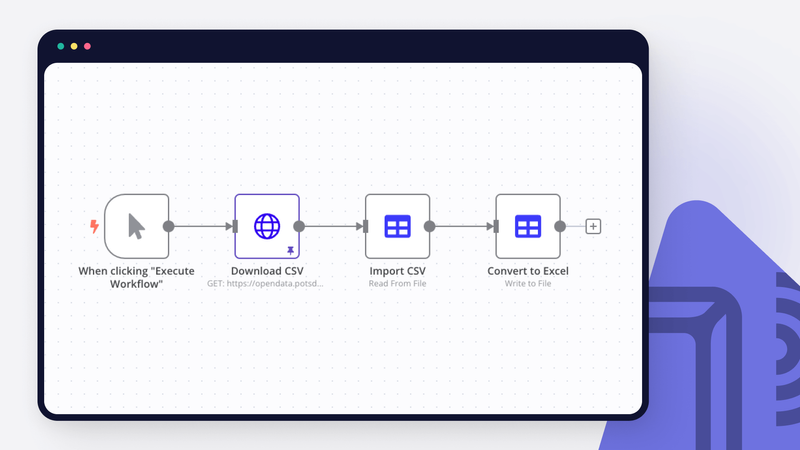
Now, let’s consider the following automation scenario: the n8n workflow downloads a CSV from a URL and then converts it to an Excel file. This conversion commonly occurs when sourcing data from public databases or when an external system can only export data in CSV but not Excel format.
We are going to use the same list of public venues in Potsdam as in a previous example.

Step 1. Get a CSV file
When the workflow is started, n8n executes the HTTP Request node, which sends a GET request to the specified URL. We expect a CSV file, so we add the Response option with the File as Response format.
Step 2. Convert CSV data to JSON
Once the CSV file is downloaded, the workflow uses the Spreadsheet node to read the CSV file.

Select the Read From File as the Operation setting. Also add a Header Row option and specify a semicolon (`;`) as the Delimiter.
This node always converts incoming data (whether in CSV or other formats) into a JSON format. JSON is used universally in all n8n nodes. You can add more nodes after this step and perform additional data processing steps.
Step 3. Convert JSON data to Excel
After the CSV data has been imported and converted to JSON, there is another node (Convert to Excel) that saves a table as an Excel file.

Select the Write to File as the Operation setting. Select XLSX File Format and then enter a File Name as an expression, e.g. converted_csv.{{ $parameter.fileFormat }}. This expression sets the correct file extension dynamically based on the node setting. If you select a different output format, the resulting filename will always have the correct extension. Finally, specify the Sheet Name for the Excel file.
More workflow examples for working with CSV
With hundreds of nodes in n8n, you have many options for processing CSV data. Here are some examples from our workflow gallery.
Import CSV from URL to Google Sheets

This workflow goes one step further and shows how the downloaded CSV file is processed and then sent to Google Sheets. It is particularly useful if the public data is updated regularly and requires periodic processing.
Import multiple CSVs to Google Sheets

This workflow combines several CSV files and transfers them to Google Sheets after several pre-processing steps. This starter workflow is very helpful if you need to process multiple CSV files at once.
Prepare CSV files with GPT-4

When developing or testing new integrations, some mock data is often required. This workflow creates multiple CSV files with lists of users and their respective subscription status. There are different approaches to creating simulated data, in this example we’ve used the GPT-4 API with a one-shot prompting technique. Feel free to use and adapt it to your use case.
Import CSV data into MySQL

With n8n you can easily import CSV data into many different systems. Here is an example of loading a CSV file into a MySQL database via a dedicated node. Check out our tutorial on four methods of importing CSV into MySQL.
Export SQL table to CSV file

Sometimes you may need to do the opposite. Here’s an initial workflow for converting data from MS SQL to CSV. We also have a special tutorial with three methods of exporting SQL to CSV.
Upload leads from a CSV file to Pipedrive CRM

Finally, let’s see how you can upload data from a CSV file to other systems. With the Pipedrive node, you can create new organizations and leads that are stored in a CSV file.
There are hundreds of other systems that you can integrate with n8n right out of the box. On top of that, custom integrations are possible thanks to a generic HTTP Request node.
Wrap Up
Today we’ve covered two techniques for converting CSV data to Excel format, using both the Excel UI and the n8n.
You've seen how a manual approach within Excel enables straightforward conversions for isolated cases, while n8n workflows equip you with the means for seamless, ongoing data processing tasks.
Finally, we’ve reviewed several CSV workflows that demonstrate n8n’s ability to act as a central hub for numerous integrations and complex processes.
What’s next?
Use this tutorial as a starting point for creating more complex workflows:
- Explore hundreds of n8n's nodes and create workflows to process and analyze your CSV files in new ways.
- Learn how to export data from SQL database to CSV or how to import CSV to Snowflake.
- Challenge yourself by adding n8n's HTTP Request node for custom integrations.
Start automating with n8n today. Sign up for a free cloud account or install n8n on your personal server. We have three tiers: free Community Edition, Enterprise and a new plan for startups!