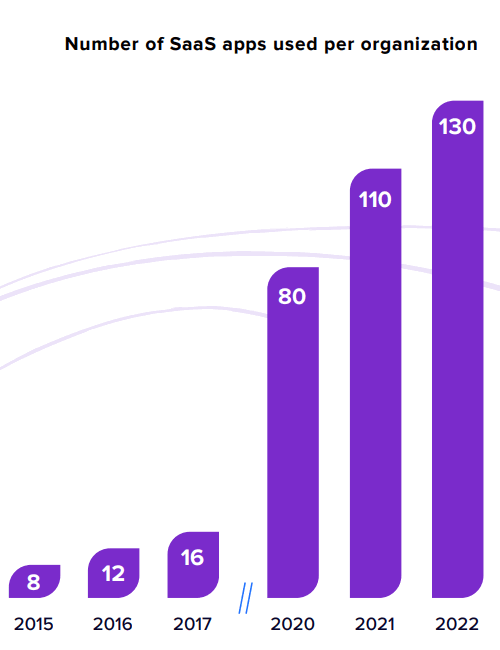
With companies using a gazillion SaaS apps these days, syncing data between different apps can be a real pain.
If these apps don't share a common database, you've got two options:
- Integrate via API
- Transfer data in a universally accepted format, like CSV
Integration via API doesn't always work out, but don't worry – you can always fall back on CSV transfers as a solid alternative.
CSV has some pretty sweet advantages over Excel spreadsheets too:
- It's an open format, meaning everyone can use it
- It's a plain-text format, so no need for fancy software to read it
- It stores data "as is," so you won't mess up your data (which often happens with Excel date variables, for example)
So, buckle up, folks! We've got an easy-to-follow tutorial on three ways to export SQL database to CSV: using SQL Server Management Studio, sqlcmd command line utility and n8n automation tool.
How do I transfer data from SQL to CSV?
Let's dive into some cool ways to quickly export our MySQL data into a handy CSV file. We've got three nifty methods lined up for you:
- Whipping up a CSV using SQL Server Management Studio (SSMS) – the classic method
- Speeding things up with a command line utility, so you can skip opening SSMS every time
- Harnessing the power of n8n, a low-code automation tool, so you can sleep tight at night while your data is in sync 24/7
Let's roll up our sleeves and find out how you can get more in less time with creative automation techniques!
Export SQL table to CSV via SQL Server Management Studio
One common way to perform SQL export to CSV is via SSMS. The SQL Server Import and Export Wizard is a popular tool among engineers. It allows for both manual data transfer as well as writing SQL queries. In this article, we'll demonstrate how to transfer data without running SQL statements. This technique is handy if you occasionally need to create CSV exports.
Step 1. Install SSMS and configure the local SQL Server
If you don’t already have a working SQL Server, we explained the installation process in another article on how to export MySQL to Excel.
Step 2. Connect to the SQL Server and export SQL table to CSV
Once you created a local SQL server and loaded a sample database, you can open the SQL Server Management Studio. Then connect to the database from the Object Explorer panel.
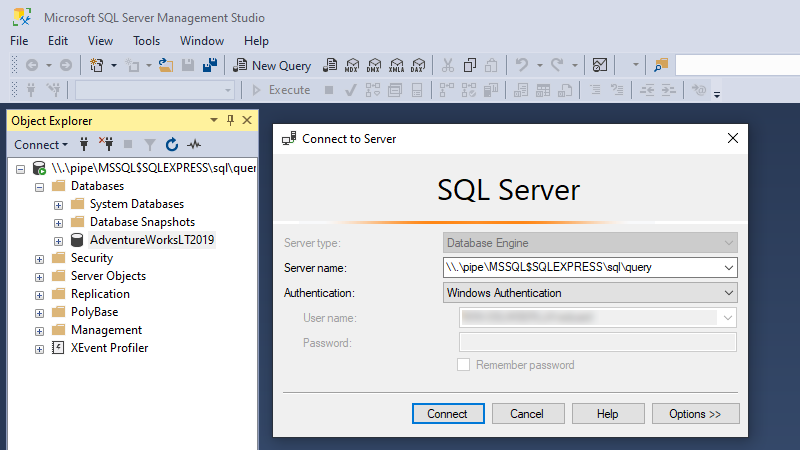
Once connected, right-click on the database name and select Tasks - Export Data. An Import and Export Wizard will open. We need to configure the Data source first. Select “Microsoft OLE DB Driver for SQL Server”, then press Properties and configure the connection. Here you need to provide a named pipe as a server name and select Windows Authentication. Don’t forget to Select the database! Finally, press Test Connection and OK once finished.
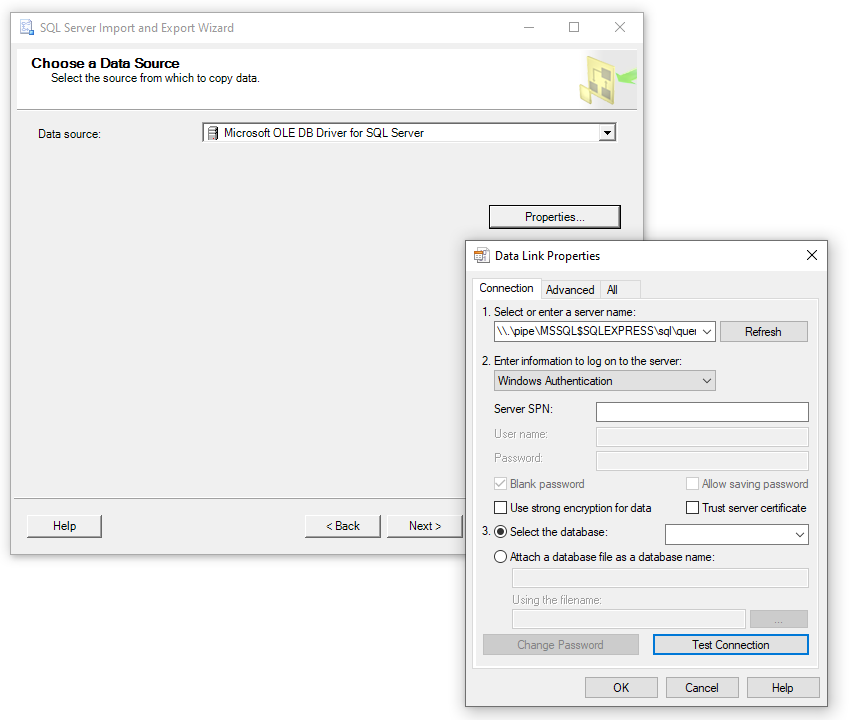
Next, we need to pick Flat File as a Destination. Select a File Name on your local drive and configure other settings, such as file locale and encoding. Press next and select whether you want to:
- copy data from one or more tables or views, or
- write an SQL query to specify the data to transfer
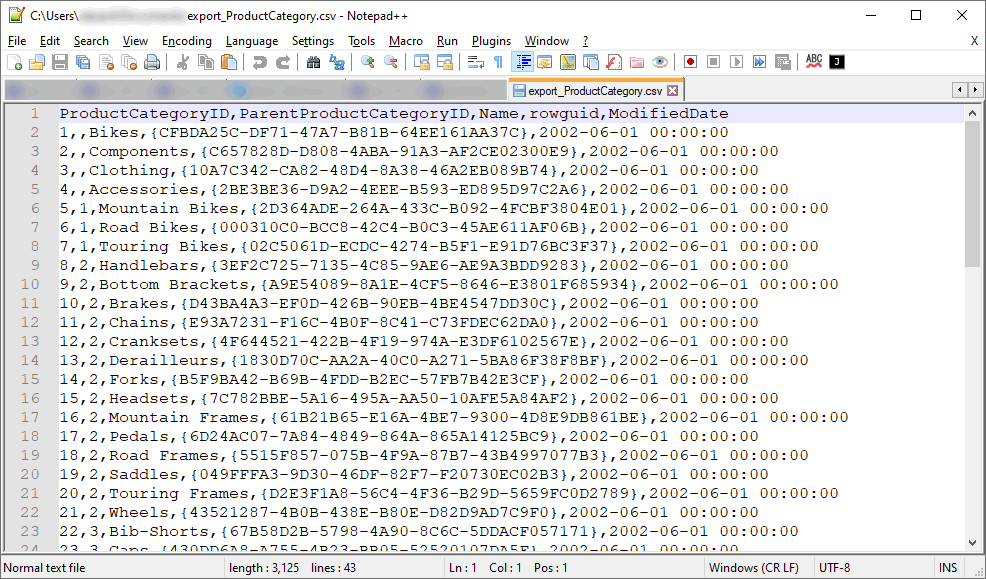
Pick the first option now. In the next window choose one source table. Let’s export the ProductCategory table. Follow the wizard until the end and open the created CSV file.
MySQL export to CSV via command line
If you're allergic to clunky corporate interfaces, don't worry – a command line tool can save the day. For Windows users there's the sqlcmd utility. Just type sqlcmd -? to see if it's already installed. If it's not, check out the Microsoft documentation page on sqlcmd for more guidance.
Step 1. Get familiar with sqlcmd
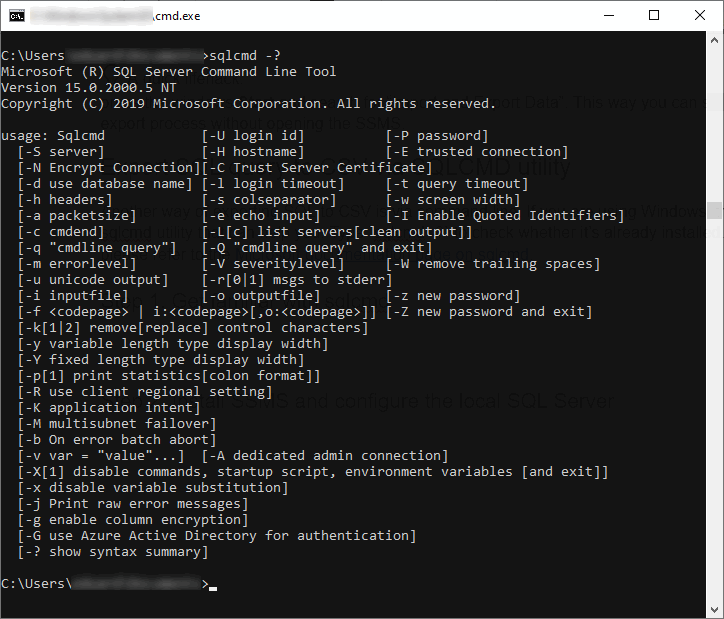
The sqlcmd tool offers a range of options that you can explore by typing sqlcmd -? in the command line:
Step 2. Export SQL query to CSV file
Let’s export the same table without further ado:
sqlcmd -S \\.\pipe\MSSQL$SQLEXPRESS\sql\query ^
-Q "select top 10 * from AdventureWorksLT2019.SalesLT.ProductCategory;" ^
-o "<YOUR PATH HERE>\Export_test1.csv" ^
-W ^
-s ","- Specify your server name in the -S option
- Write SQL query inside the -Q option
- Provide output file in the -o option
- -W removes trailing spaces
- Lastly, choose a delimiter symbol with the -s option
- SELECT TOP 10 is for illustrative purposes only
As you can see, the CSV export file is created but it looks a bit odd:
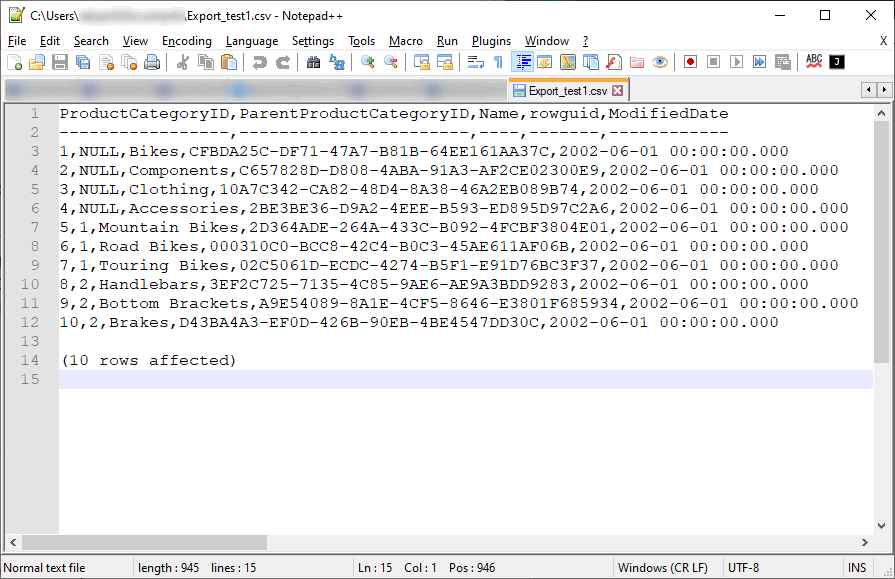
- Line 2 has unnecessary dashes
- At the end of the file there is an extra line (10 rows affected)
We can fix this with a different call:
sqlcmd -S \\.\pipe\MSSQL$SQLEXPRESS\sql\query ^
       -W ^
       -s "," ^
       -Q "set nocount on; select * from AdventureWorksLT2019.SalesLT.ProductCategory;" | findstr /v /c:"---" /b > "<YOUR PATH HERE>\Export_test2.csv"
Let’s take a closer look:
- Here we provided an extra option
set nocount on;in the -Q option - We didn’t specify the -o option. Instead, we dump the output right in the command line window and use the findstr tool to search for lines containing dashes. The
/voption ensures that this extra line will not be saved in the output file.
Congrats! You have successfully made an SQL export to CSV file with headers.
Export SQL query to CSV using n8n
The first two steps have a common downside – they take some manual effort. This can get tiresome when you regularly export lots of data. But with the n8n tool, you can output SQL query to CSV file automatically.
The best thing about this approach is how straightforward it is. You can carry out routine tasks without any manual effort or coding. With n8n's help, you can either save the CSV file or move data from SQL into various other systems.
In this section of the tutorial, we'll explore how to export data from SQL server to CSV automatically. We'll demonstrate how to create a simple automation that saves you from mundane work.
Step 1. Get data from SQL to n8n
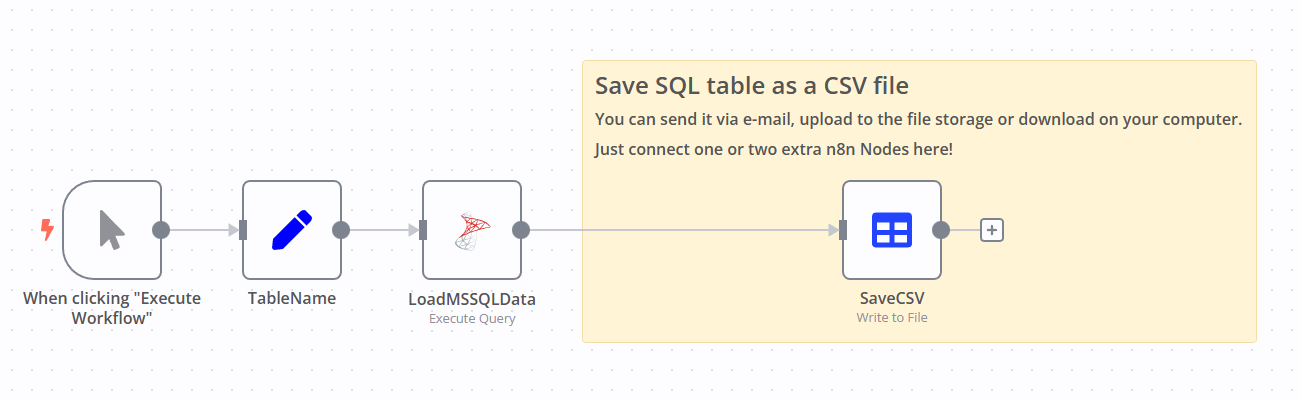
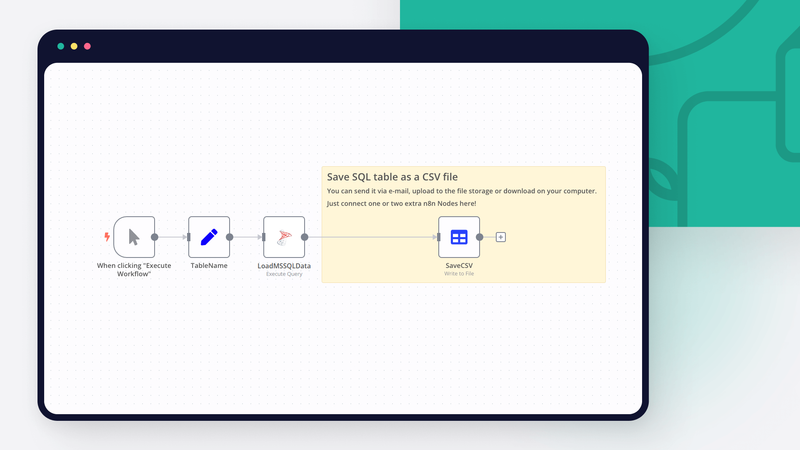
This example workflow shows how to convert SQL to CSV file. You can achieve the goal with just four nodes!
Starting node activates the process when you press Execute Workflow.
Next goes the Set node. String variable TableName is declared there and it´s equal to SalesLT.ProductCategory – same table as in previous example. Set node allows us to automatically create CSV file name.
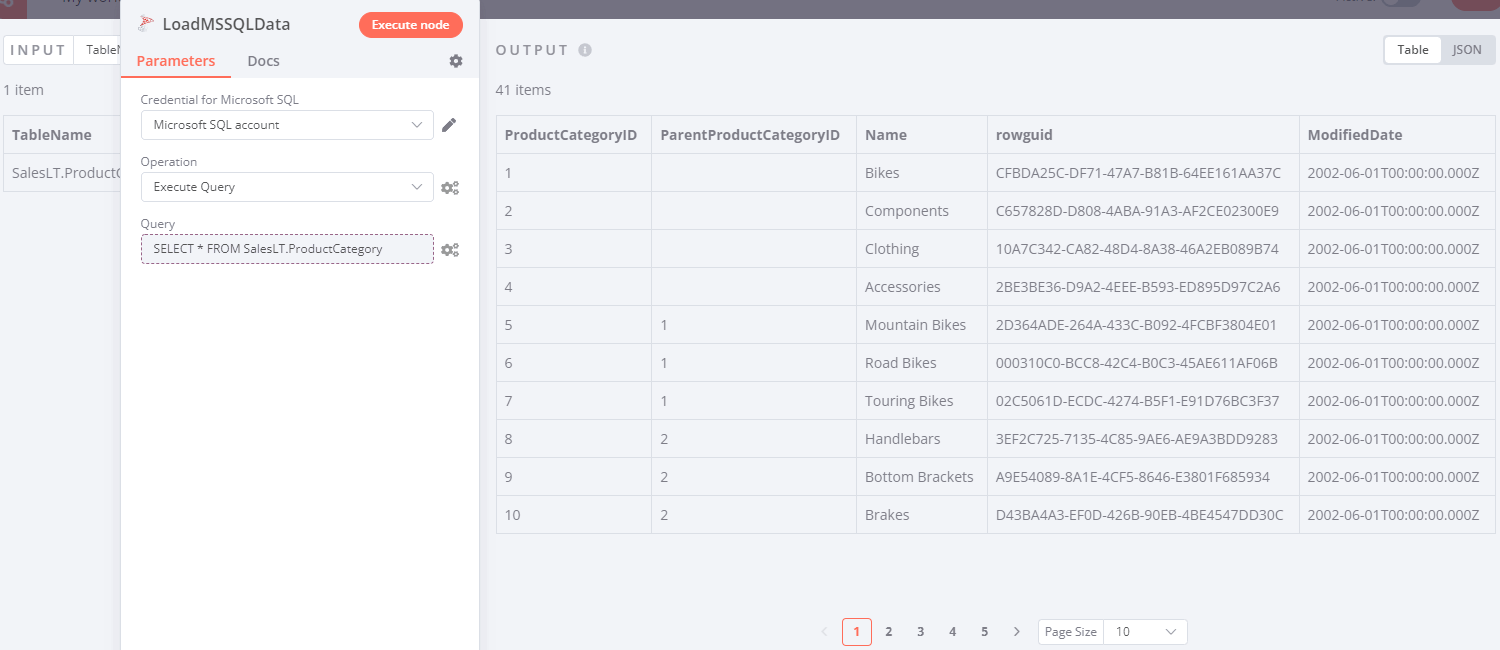
The third node is a MSSQL node that connects to a database. You´ll need to set up credentials first. If you are running a local installation, some additional tweaks are required, because LocadDB uses Windows user’s credentials by default to access the database.
After this, pick Execute Query operation and provide the following Query as an expression:
SELECT * FROM {{ $json["TableName"] }}As you can see, we pick all records from a table whose name we defined in a Set Node. If everything is right, you´ll see the imported data:
Step 2. Convert the table to a CSV format
Last node converts a JSON object into an CSV file. Please check the configuration of the Move Binary Data Node:
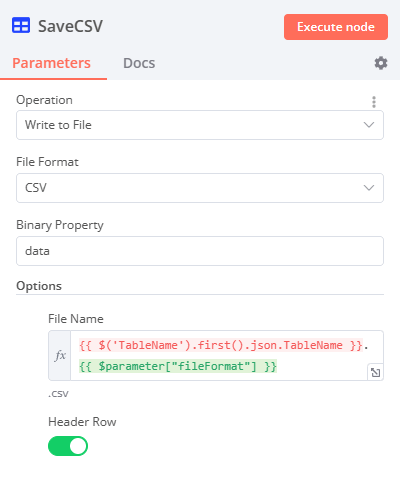
File Name option is an expression and it is set to:
{{ $node["TableName"].json["TableName"] }}.{{ $parameter["fileFormat"] }}Here we generate File Name automatically based on
- the table name that was provided in Set Node and
- a File Format parameter. If you change the format and pick XLS (old Excel format), the File Name will change automatically to SalesLT.ProductCategory.xls. This trick can be useful when you export SQL database to CSV programmatically.
Sheet Name option is also an expression:
{{ $node["TableName"].json["TableName"] }}We make sure that the CSV file name is equal to an SQL table name.
Now you can see how easy it is to export SQL query to CSV automatically!
Wrap Up
In this tutorial, we learned how to export SQL server data to CSV using three different techniques.
- We did it via Microsoft SQL Server Management Studio
- Another approach was to use the sqlcmd command line utility
- Finally, we exported the SQL database to CSV in n8n. It allowed us to achieve our goal without writing any code
What’s next?
So, you've spent a truckload of time gathering data in a centralized MySQL database. Here's what you can do next:
- Check out our recent tutorial on how to import CSV data into MySQL
- Read one more helpful guide if you want to export SQL to Excel
- Use other nodes and export SQL databases like Snowflake, MongoDB and PostgreSQL.
- Scale this workflow even further by providing multiple table names, different SQL Queries or setting up regular exports via Schedule Trigger Node.
Start automating today and register your n8n account in the cloud for free! You can run it on your own server.