The import of CSV to MySQL tables is a crucial piece of data management for any organization. It allows companies as well as data enthusiasts to better organize their data. As a result, they can best serve customers and drive rapid performance improvement.
This step-by-step tutorial focuses on four different import methods: with the help of a Graphical User Interface like MySQL Workbench, the SQL queries and no-code platforms. It will benefit both beginners and more experienced professionals.
In the end, you will learn the fastest way to import CSV into MySQL via the n8n tool without the need to write code.
How do I import CSV files to MySQL tables?
Different organizations can use many ways to import data. In this tutorial, we will cover four methods and three instruments:
- The first approach employs a graphical user interface built in MySQL. This tool, known as MySQL Workbench, helps to create, design and build databases.
- In the second more advanced approach we will use SQL commands. This method is perfect for users with some coding experience.
- In the third approach, we will import CSV files into MySQL with the help of an open-source no code tool known as NocoDB. With this method, you can also create a MySQL table from CSV.
- Finally, the last method is to use the n8n tool to create a workflow for automated CSV import to the MySQL server. After trying the n8n automation tool you will see how easy it can be to import CSVs into MySQL!
Import CSV into MySQL using Workbench
MySQL Workbench is a comprehensive tool for modeling, generating and managing databases. The Community Edition is a free version which you can download from the Oracle website.
This method demonstrates two ways to use the MySQL Workbench tool for data import. If you want to use a graphical user interface, you´d first need to remotely connect to the MySQL database.
Step 1. Install MySQL Workbench and connect to the database
When you open Workbench, click on the Database -> Manage connection and set up access to the MySQL database.

In this example, we're going to make a remote database connection.
Enter the Connection name of your choice, then the Hostname which is either an IP address or a server name. In most cases the Port should have a default value (3306). Then fill in the Username and Password and test the connection. If everything runs well, you will see a confirmation.

Now you can save the new connection by pressing the OK button.
Step 2. Create blank table
We need to create a table that matches the CSV file that you plan to import. Let’s take a look at one example. This is a simple CSV file that contains seven fields and four records:

Date,Band,ConcertName,Country,City,Location,LocationAddress,
2023-05-28,Ozzy Osbourne,No More Tours 2 - Special Guest: Judas Priest,Germany,Berlin,Mercedes-Benz Arena Berlin,"Mercedes-Platz 1, 10243 Berlin-Friedrichshain",
2023-05-08,Elton John,Farewell Yellow Brick Road Tour 2023,Germany,Berlin,Mercedes-Benz Arena Berlin,"Mercedes-Platz 1, 10243 Berlin-Friedrichshain",
2023-05-26,Hans Zimmer Live,Europe Tour 2023,Germany,Berlin,Mercedes-Benz Arena Berlin,"Mercedes-Platz 1, 10243 Berlin-Friedrichshain",
2023-07-07,Depeche Mode,Memento Mori World Tour 2023,Germany,Berlin,Olympiastadion Berlin,"Olympischer Platz 3, 14053 Berlin-Charlottenburg",After you connect to a new blank database, please select a default Schema. Then right-click on the Tables item, select Create Table and add the first table as shown on the screenshot.
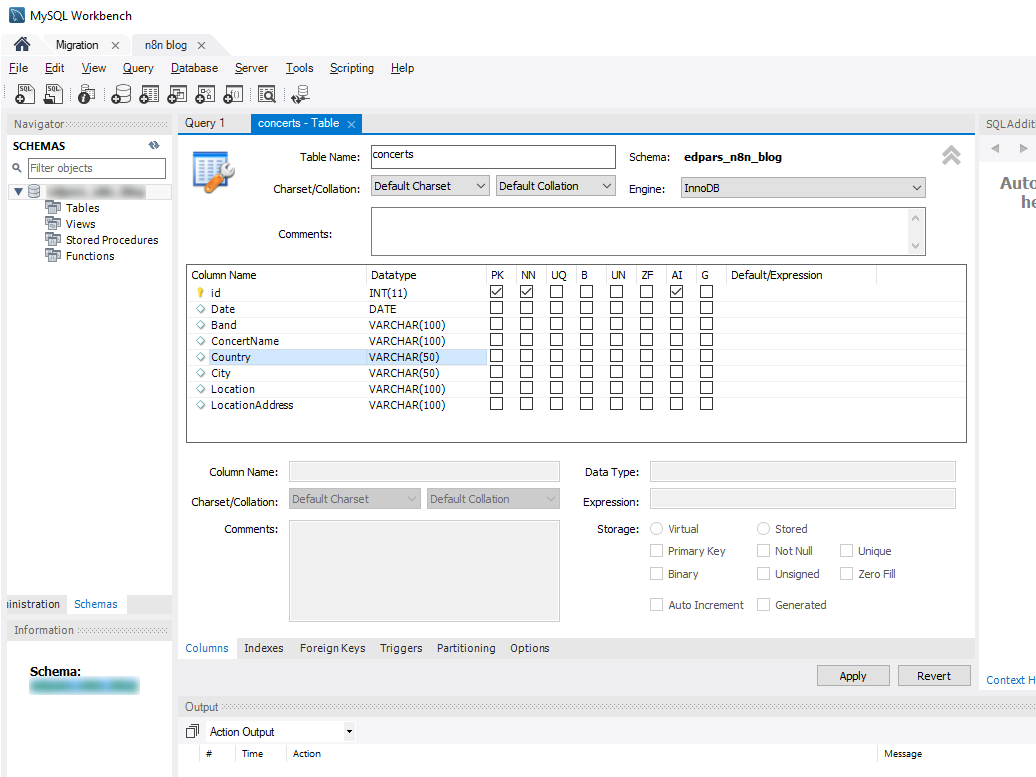
As you can see, MySQL Workbench still creates an SQL statement after you press the Apply button.
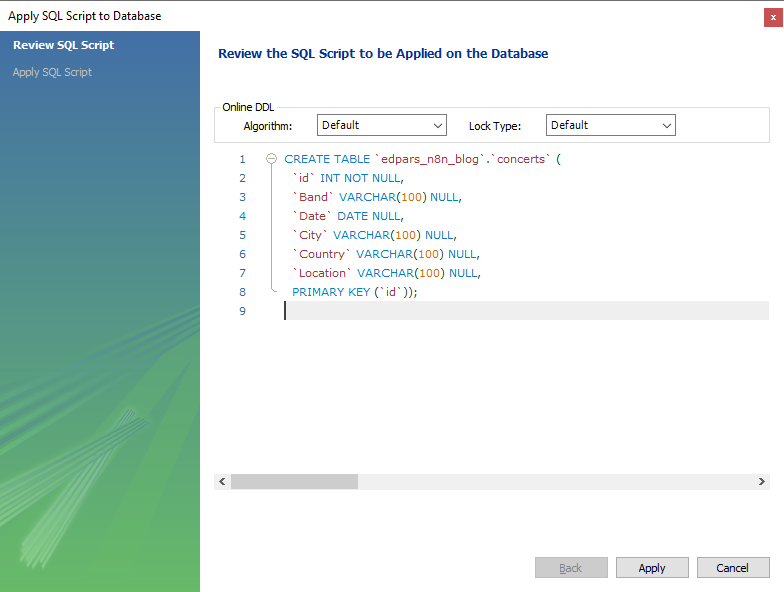
We will discuss these lines in the next section. If you want to change the existing table (i.e. add new variables), right-click Alter Table on the concerts table. You will see the same screen again with all variables and their properties.
Step 3. Import CSV file
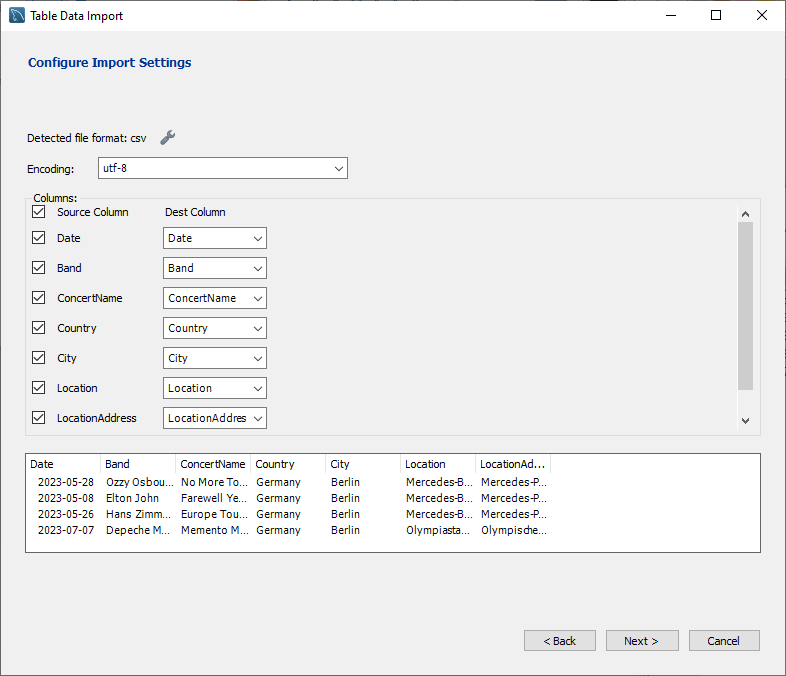
Finally, we are ready to import the CSV into MySQL Workbench. Right-click on the concerts table and pick Table Data Import Wizard. Then select your CSV file and follow the wizard.
At one point you'd need to check the mapping of the CSV columns to the MySQL variables. Then click Next once again and finally start the import process.
If everything runs well, you will see a confirmation. Otherwise, a log message with error explanations will appear.
Step 4. Check the import results
When you close the Import Wizard window, you´d need to check the table. Right-click on it and pick Select Rows this time.
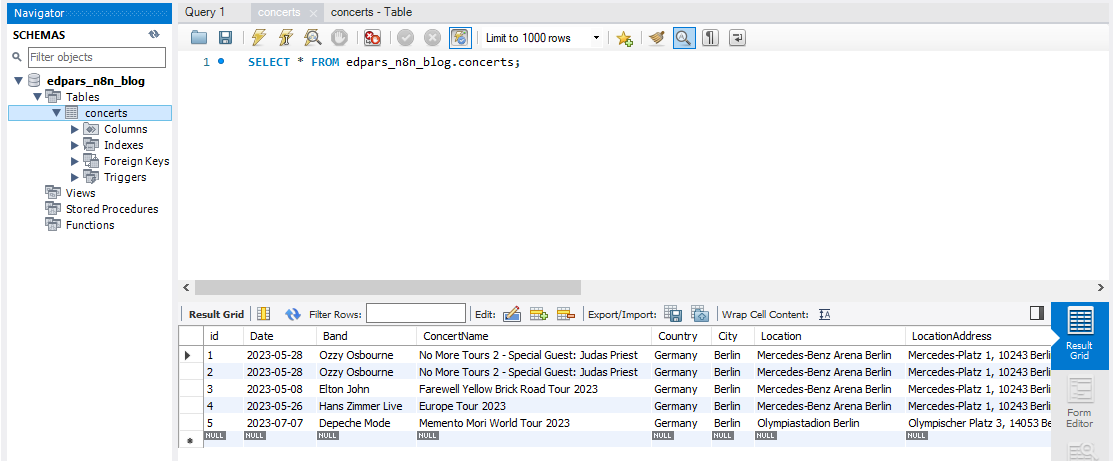
You will see that your table contains data from the CSV file. Great job! It isn't difficult, but a bit tedious.
Import CSV into MySQL using SQL commands
In this section, we will show you how to create a new table and import a CSV via MySQL commands in the Workbench program. This way you can remove the repetitive part a bit. But this method requires some knowledge of MySQL syntax. Don't worry, everything will be explained.
Step 1. Create new table
Let's use the existing database. In the top left corner press the +SQL icon and copy-paste the following SQL statement in a new tab.

CREATE TABLE `edpars_n8n_blog`.`concerts2` (
  `id` INT(11) NOT NULL AUTO_INCREMENT,
  `Date` DATE NULL,
  `Band` VARCHAR(100) NULL,
  `ConcertName` VARCHAR(100) NULL,
  `Country` VARCHAR(50) NULL,
  `City` VARCHAR(50) NULL,
  `Location` VARCHAR(100) NULL,
  `LocationAddress` VARCHAR(100) NULL,
PRIMARY KEY (`id`));We are going to create a concerts2 table in the same database using the CREATE TABLE statement. It provides a database schema and table name `edpars_n8n_blog`.`concerts2`. Let's check the content of the following lines. Each of them represents the settings for every table variable.
Each variable has a name and some properties. For example, line
`id` INT(11) NOT NULL AUTO_INCREMENT,
means that we want to add column `id`. It has a numeric integer type INT(11) and cannot be empty (NOT NULL). The value of this variable will be automatically populated (AUTO_INCREMENT). So we don't need to provide a record number in the CSV file. All other table variables are defined similarly. Finally, the last line
PRIMARY KEY (`id`));
indicates that variable `id` is a key variable. Semicolon sign closes this SQL statement.
Don't worry if you are not familiar with the concepts of key variables in MySQL. This is not needed in case of simple databases where tables are not connected with each other.
Now we are ready to press the Execute icon with a lightning bolt. After this, right-click on the schema and pick Refresh All. You will see a new empty table concerts2.
Step2. Import CSV to MySQL database using SQL commands
Create a new SQL tab and input the following command.
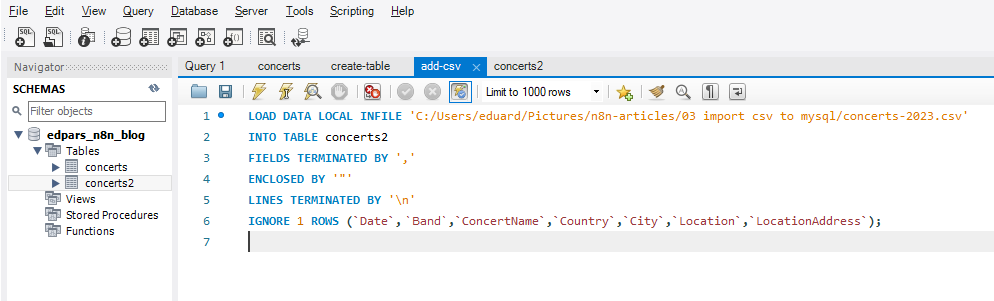
LOAD DATA LOCAL INFILE 'C:/<PATH TO YOUR FILE>/concerts-2023.csv'
INTO TABLE concerts2
FIELDS TERMINATED BY ','
ENCLOSED BY '"'
LINES TERMINATED BY '\n'
IGNORE 1 ROWS (`Date`,`Band`,`ConcertName`,`Country`,`City`,`Location`,`LocationAddress`);We use a LOAD DATA statement this time.
We are using an input file on a local machine (LOCAL INFILE).
Next line instructs the database to add the content of the CSV file into the concerts2 table.
FIELDS TERMINATED BY ',' means that we are using a comma-separated file.
ENCLOSED BY '"' means that values with a comma inside should be wrapped in the double quotation marks. This is to prevent separation. Take a look at the field "Mercedes-Platz 1, 10243 Berlin-Friedrichshain" as an example.

LINES TERMINATED BY '\n' mean that after a newline symbol \n the next line in our CSV file starts.
IGNORE 1 ROWS (`Date`,`Group`,`ConcertName`,`Country`,`City`,`Location`,`LocationAddress`). This is important because we don't want to import variable names into an existing table. Also, since we don't have an ID variable in our CSV file, we need to specify the variables in brackets. Finally, a semicolon finishes the SQL statement.
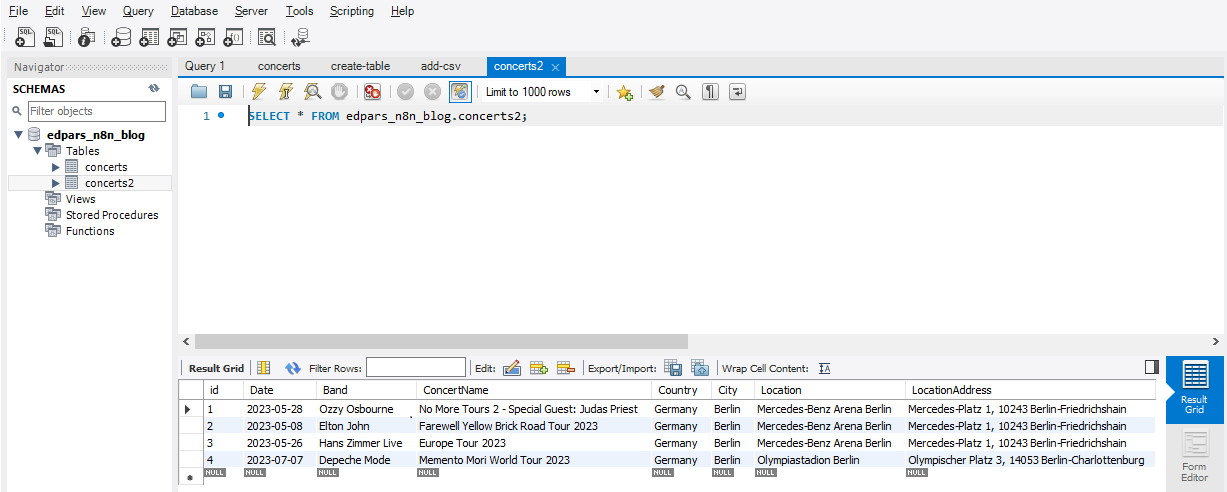
Press Execute and check an output panel in the lower part of the screen. Import can be successful or there could be some errors. Workbench will provide some diagnostic information for you to fix them. As you can see on the screenshot, the import was successful.
Import CSV into MySQL using NocoDB
Thanks to the open-source NocoDB tool, we can import CSV files to MySQL by only using a web browser. Unlike MySQL Workbench, which we need to install on the computer.
If you are already using n8n on your server, then NocoDB is definitely worth trying! These platforms work together very well.
Step 1. Install NocoDB and connect to the database
NocoDB is a free and open-source alternative to Airtable. You can do all manipulations with the database via the graphical user interface. Nocodb can be easily installed on the VPS server.
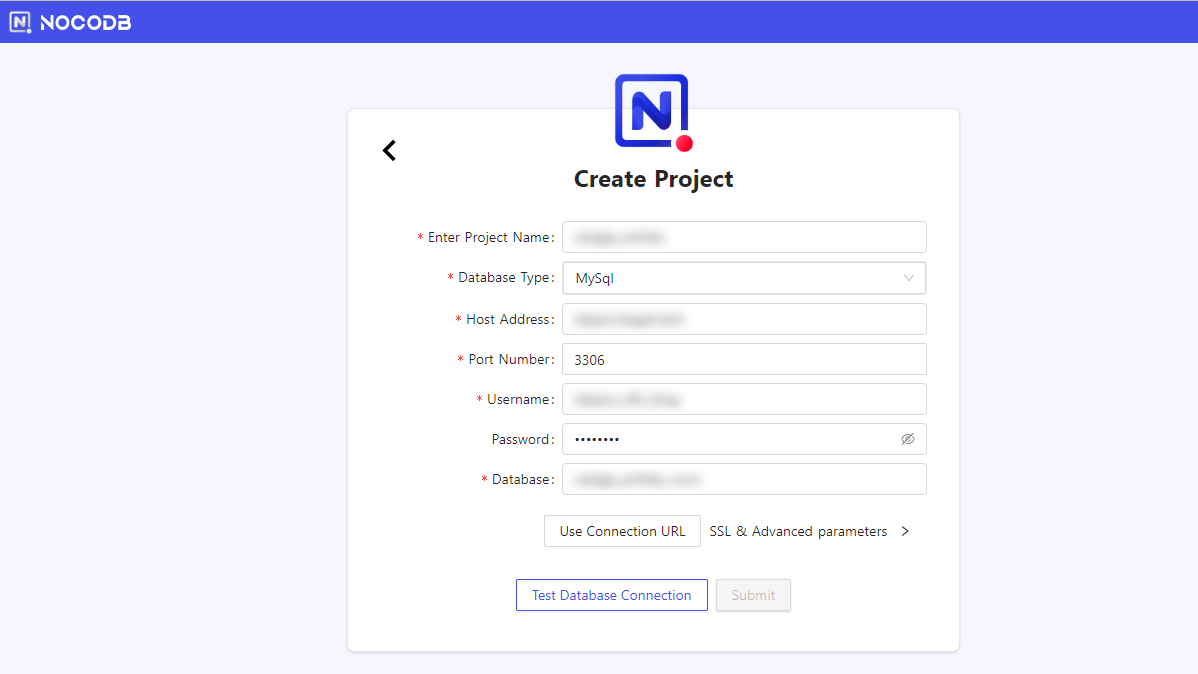
Let’s connect to our database that we used in the previous steps. In the dashboard, menu click New Project -> Create By Connecting To An External Database. Provide connection details in the same way as you'd do it for MySQL Workbench. Click Test Database Connection. If the connection was successful, save a new project.
Step 2. Create a new table from a CSV file
After you connect to the database, you will see concerts and concerts2 tables. We created these tables earlier. NocoDB supports two ways of importing CSV into a MySQL database.
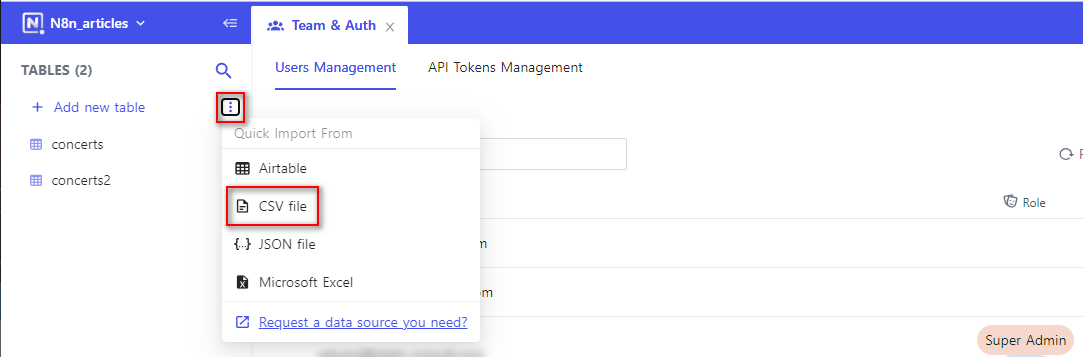
First, you can create a new table from the CSV file. Click on the three buttons next to the Add new table menu and select the CSV file item.
Upload a CSV file from your computer and click Import. Follow the wizard as shown on the screenshots. Once ready, you will see a new table with the content from the CSV file. You can also configure the visibility and order of the variables from the Fields top menu item.
Incredible, how easy was that!
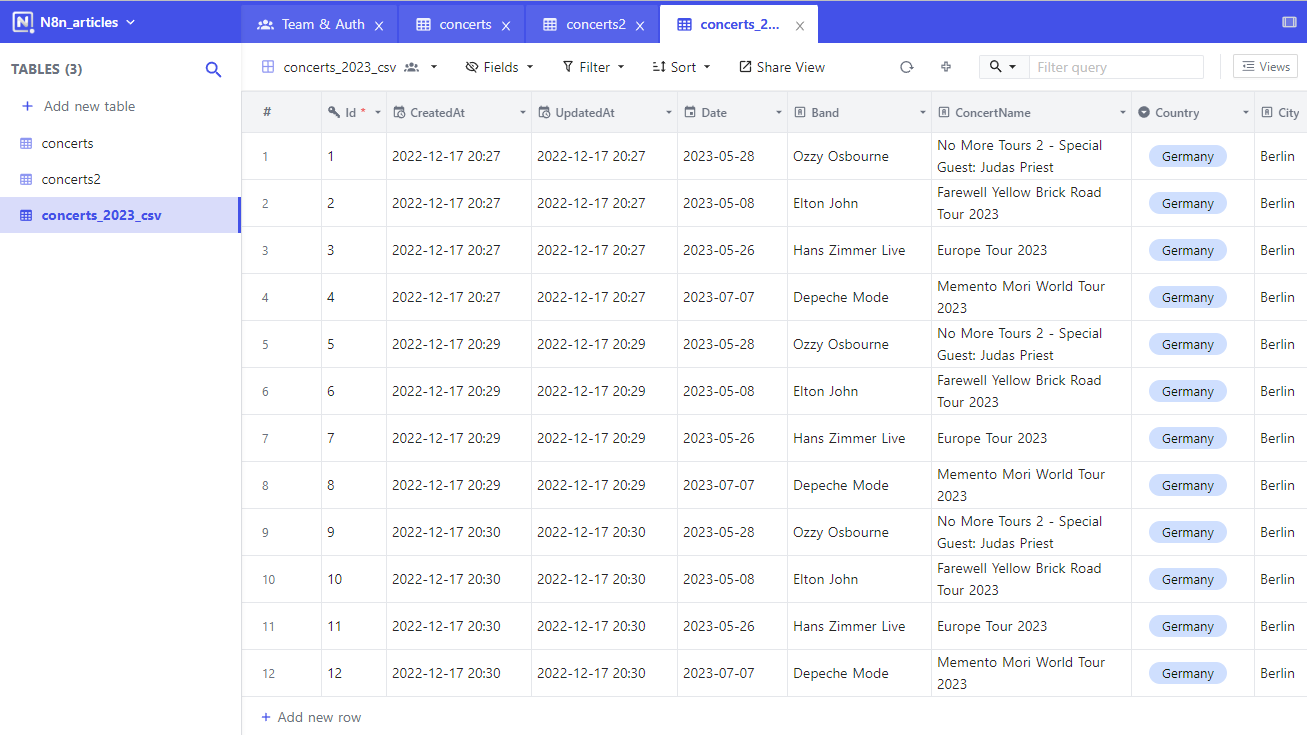
Second, you can use a MySQL CSV importer when the table already exists. Let’s Click on the concerts_2023_csv top menu item and then select Upload -> Upload CSV. Next, pick the same concerts CSV file and click Import.
The next menu is a bit different. Here you need to match columns from the CSV file to variables from your table. They are pre-populated automatically.
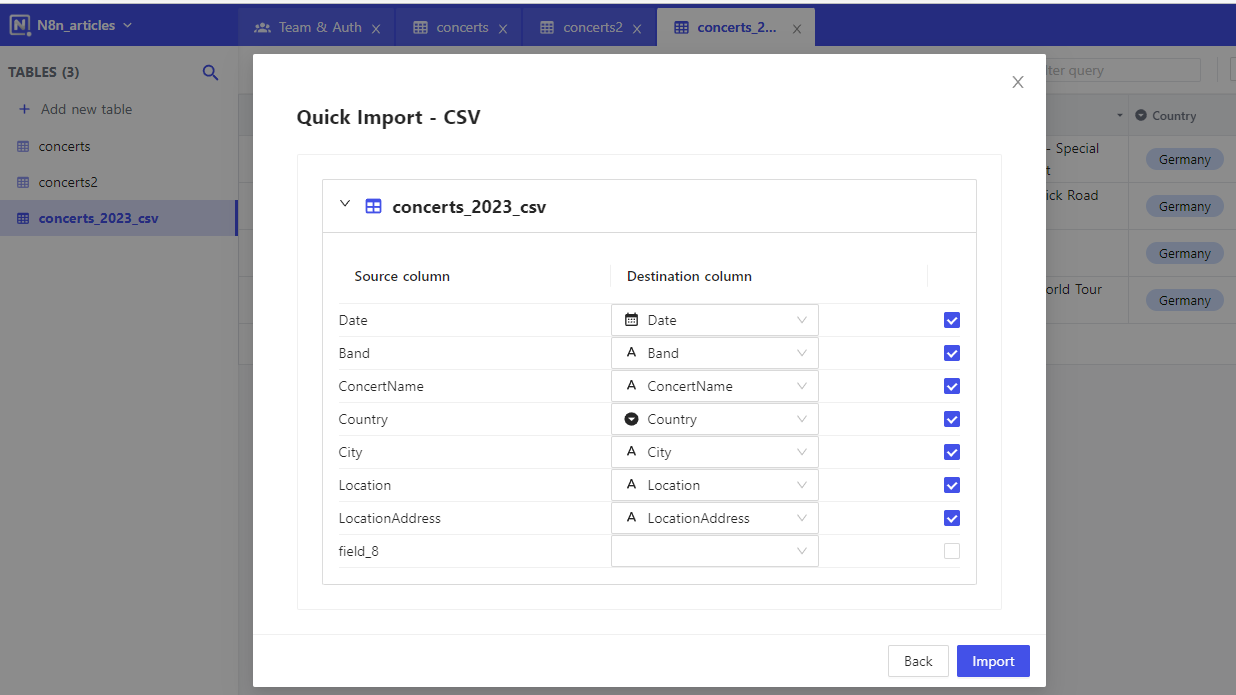
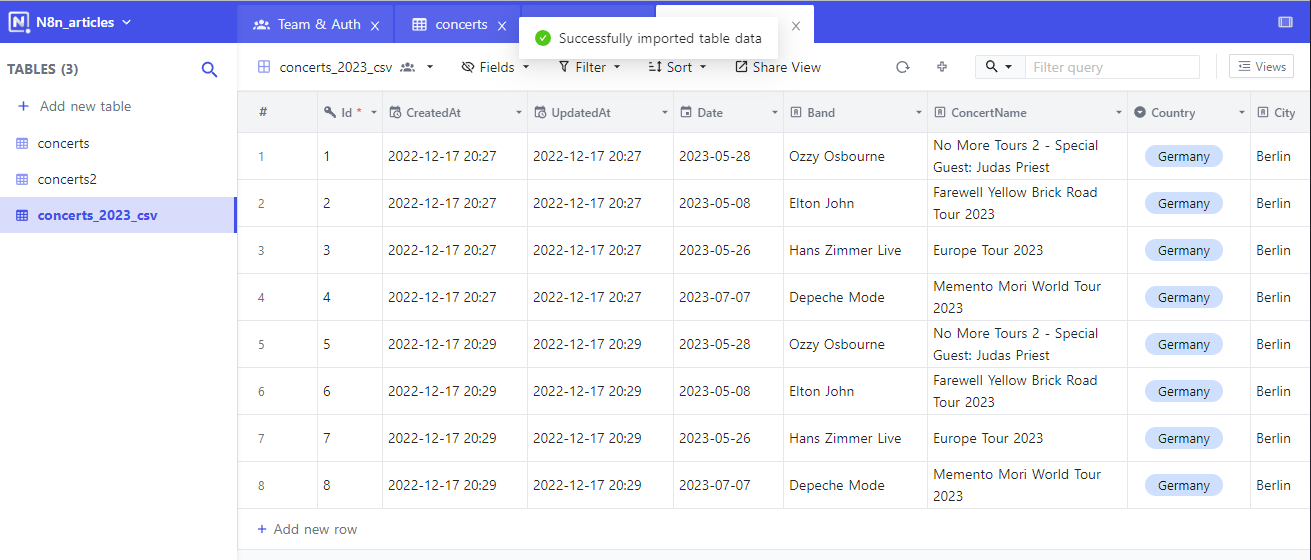
When ready, click Import once again. Now you can see that there are 8 records in your table.
As you can see, with NocoDB we can import the data from any computer that has an Internet connection!
Import CSV into MySQL automatically with n8n
Finally, let's take a look at the n8n automation tool.
The methods that we´ve already covered are very convenient for achieving our goal. But they have one huge drawback – we have to import CSV files manually. Imagine what it would be like if you had an automated CSV import to MySQL server? You would save plenty of your valuable time!
Step 1. Load the CSV file into n8n
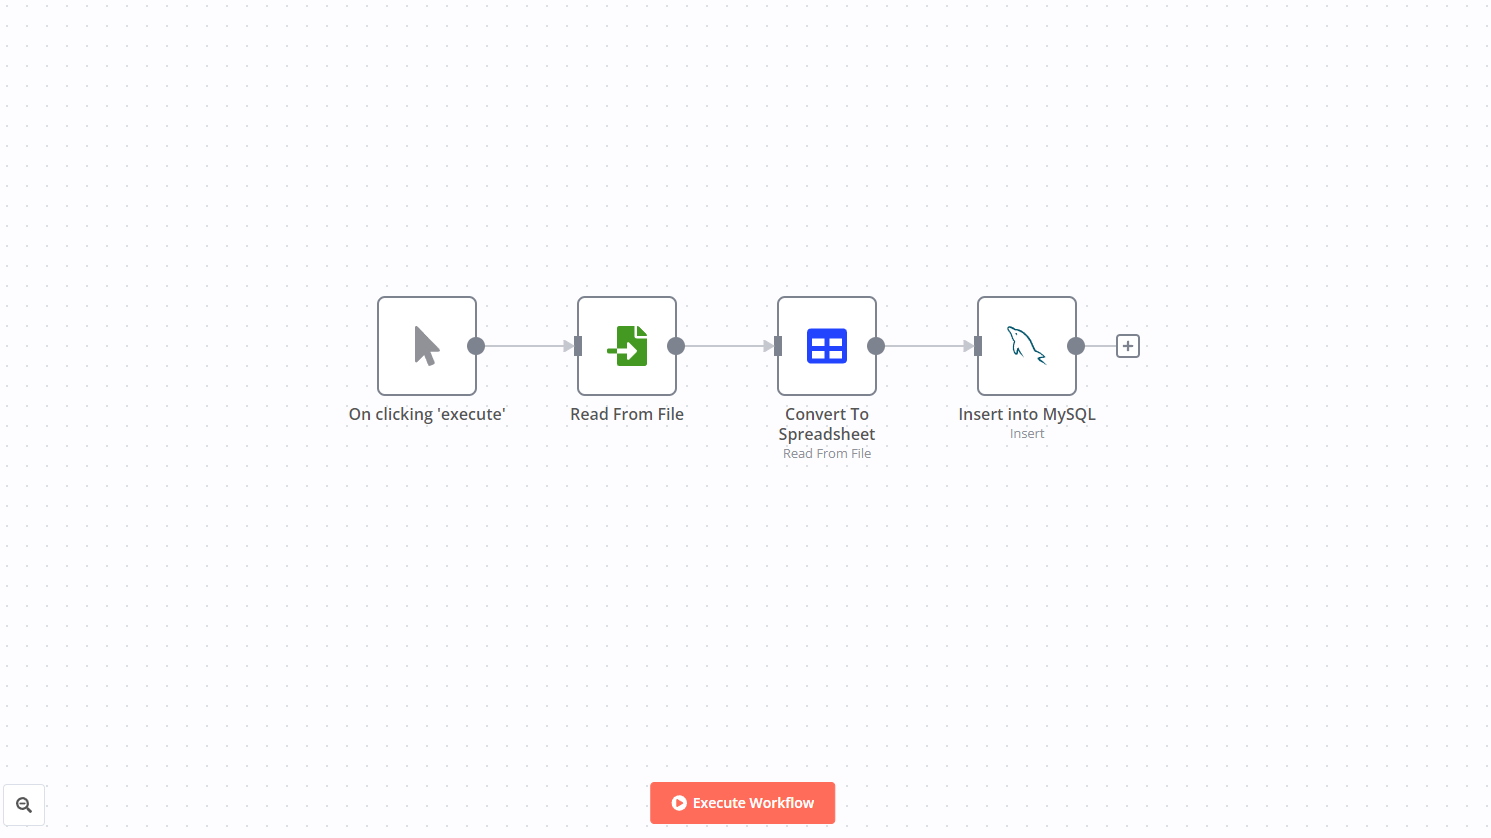
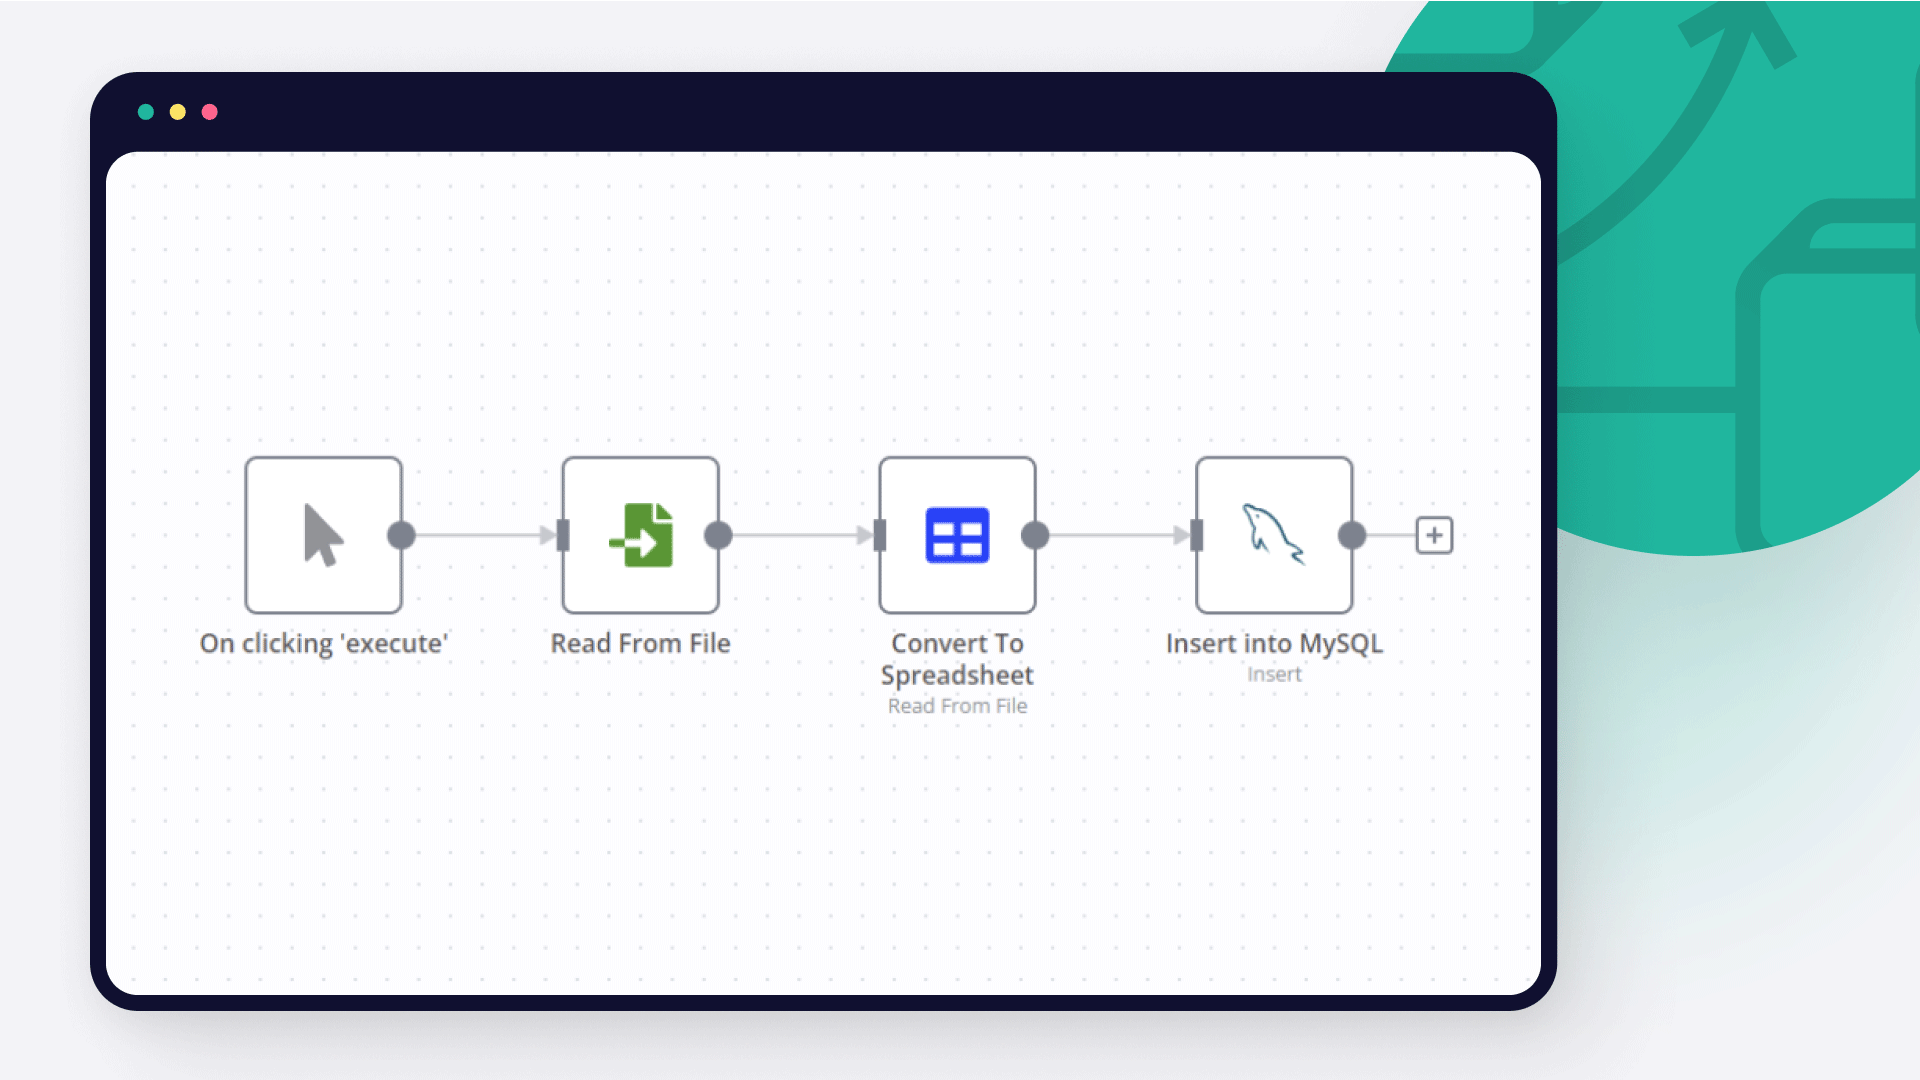
In the workflow template on how to import CSV into MySQL above you can see four nodes:
1. The first node is a starting node, it tells the workflow to run when we press Execute Workflow.
2. The second Node loads a CSV file from the local drive on the server. In real life you can import CSV to MySQL from different systems or receive CSV files via E-mail as an attachment.
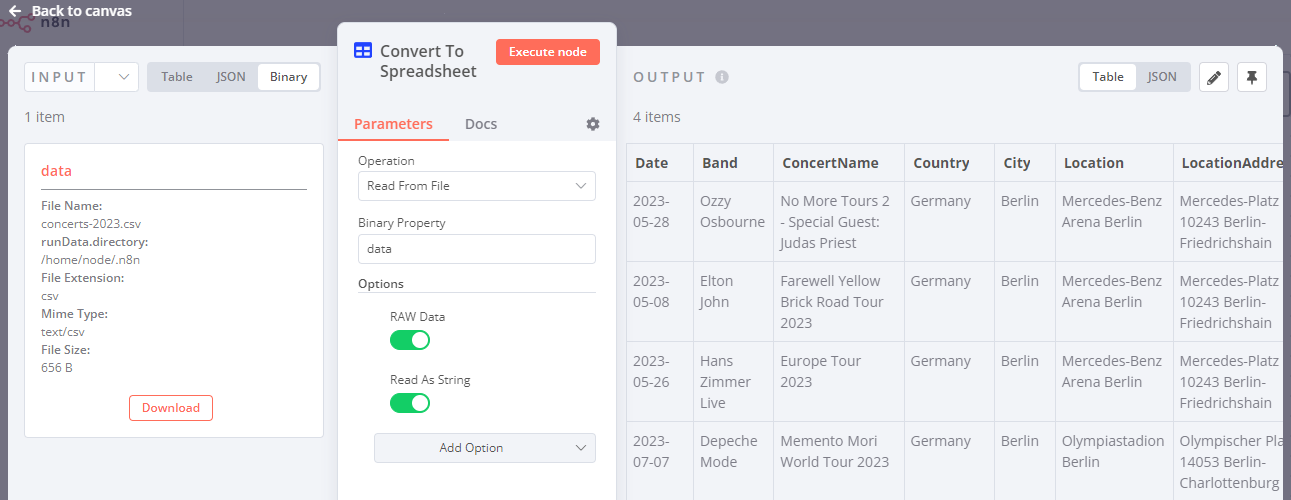
3. The third node transforms a CSV file into a JSON object. It is displayed in the form of a table, as seen from the screenshot.
4. The fourth node is MySQL integration where data gets inserted.
Step 2. MySQL imports CSV into the existing table
The MySQL node inserts new records in the MySQL database.
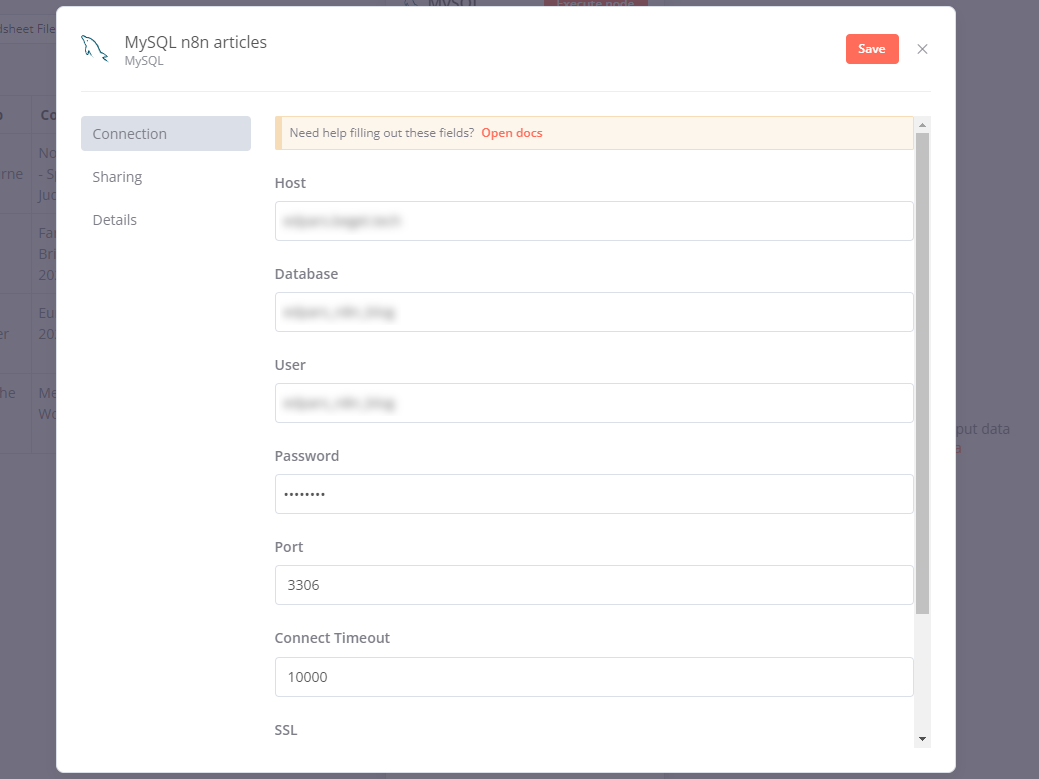
Earlier, we discussed how to create a database. If it provides remote access, a MySQL node can connect to the database and transfer the data. You will need to pick or set up new access in the Credential for MySQL menu.
After that provide a table name in the Table settings. And the last step is to define a list of variables from the CSV file (Columns input field). In our example provide the following value:
Date, Band, ConcertName, Country, City, Location, LocationAddress
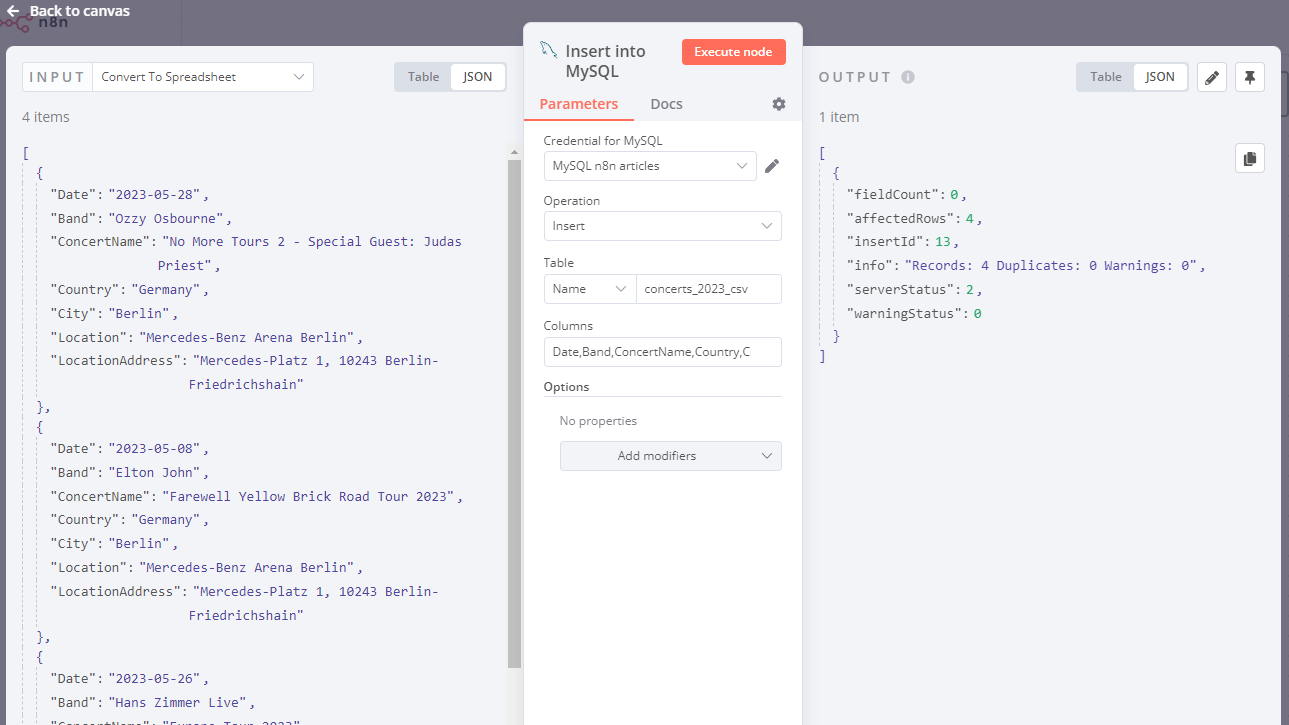
Now press Execute Workflow. As you can see, everything runs great! We can go back to the NocoDB, refresh the page and see the new lines in the table.
This way you can batch import CSV into MySQL database without much effort.
Wrap Up
In this tutorial, we have covered four techniques for importing CSV to MySQL database.
- This was done in MySQL Workbench via the graphical user interface.
- In the second approach we used the same tool and wrote a few SQL commands.
- Next, we introduced NocoDB – an open source no-code tool for working with MySQL databases.
- Finally, the importing process was done in n8n – this automation tool can simplify your life. It allows you to import CSV data to MySQL database without writing any code.
What’s next?
Here's what you can do next:
- Check out a workflow that imports MySQL data into Google Sheets and a workflow that joins Postgres and MySQL data.
- Use different nodes for working with the n8n and different databases like Snowflake, MongoDB and PostgreSQL.
- And why not go ahead and check how to upload CSV files transferred via E-mail as an attachment?
Register your n8n account in a cloud and start automating for free! You can also run n8n on your server or download it on your computer!