This post will cover three possible approaches to creating loops in n8n by building a web scraping workflow with paging support. With these three examples under your belt, you will better understand how looping can be used to our advantage when solving repetitive problems in n8n.
We will also cover a bit of n8n internals that can come in handy in any n8n workflow, looped or not.
If you are a developer and you already have a good handle on loops, this text will hopefully help you map your existing programming knowledge to n8n concepts.
What is looping, when and how to use it?
Before you jump on a chat with your favorite AI chatbot with the same question, let's clarify here what we consider looping in the context of n8n workflow and what are some use cases where we can take advantage of such a mechanism.
Looping in n8n is a way of creating workflows so data flow (embodied in n8n connection lines) goes through one or more nodes multiple times. Each loop execution is called an iteration or a step, so we'll use these terms interchangeably throughout this post.
At the start of your journey to becoming an n8n hero, it's easy to think of workflows as one-way streams which take our input data, manipulate it and spit out some results. But imagine a scenario where we must employ a set of nodes to do a particular task multiple times. If it's just a few nodes that need to be run a couple of times, our first hunch would be to copy them after the original set and be done with it. On the other hand, copying and pasting the same 15 nodes tens of times is probably not the most efficient way to build workflows (not to mention a case where you cannot know the number of iterations in advance).
That's where loops come in.
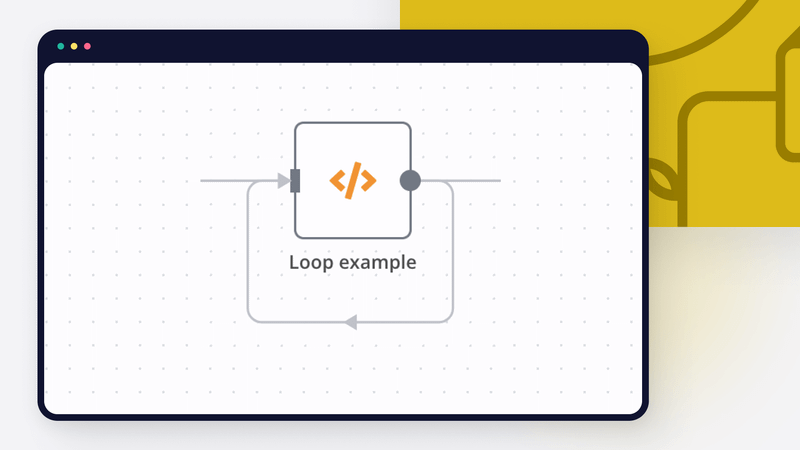
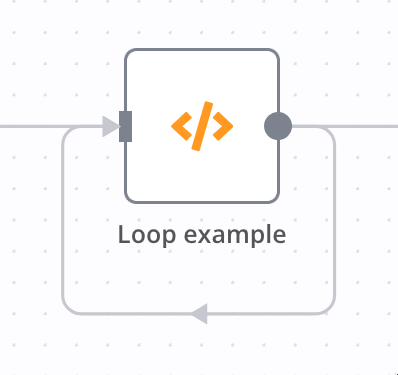
Creating loops in our workflow enables us to reuse a set of nodes multiple times with different input data each time they are executed. Before going any further with the theory, in case you still haven't got a clear picture in your head, this is what a simple (one-node) loop looks like in the n8n workflow:
Here are some examples of workflows where looping is the best tool for the given task:
- Scraping web pages that use pagination to display all items,
- Implementing process with a maximum number of retries (like user login or checking if an API server is online),
- Generating patterns or sequences (e.g., custom slack message for each user in a Google Sheet),
- Finding a particular element (like an email with a specific subject) of a list (the inbox).
As mentioned in the introduction, we will solve the problem of scraping a paginated web page in this post, but before we get our hands dirty, let's take a look at the anatomy of a loop:
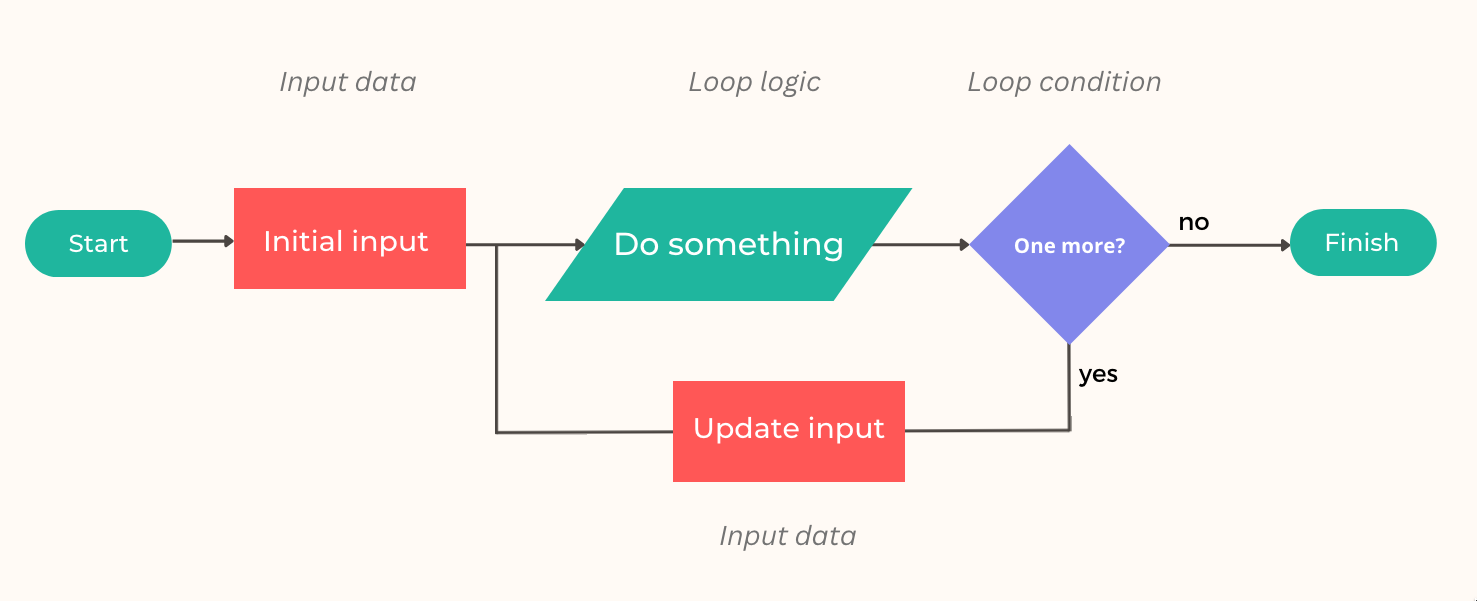
The image above shows the most critical steps in each loop, but as will be shown in scraping implementation, the order and performance of each of those steps can vary based on the use case.
Anyhow, here are the main elements of a loop:
- Input data: We can see each loop as a separate mini-workflow with inputs and outputs. The main difference here is that loops usually feed the modified information back to the start of the loop, making each iteration work with different data. This last part is where the magic of looping happens since going over the same set of nodes with the same input each time is rarely helpful.
- Loop logic: This is the set of nodes that performs tasks in each iteration.
- Loop condition: When creating a looping flow, we must decide which rules determine if our loop will start a new step or stop looping and continue with the rest of the workflow. We must check these conditions in each iteration to avoid endless loops, making our workflow run indefinitely and likely crash our n8n instance.
Task description: building a web scraping workflow with paging support
Our web scraping workflow will use an example page from www.webscraper.io as a safe playground for the demonstration.
By looking at the first page of this webshop, we can see that it shows only a portion of all products, so to get all of them, our workflow needs to scrape data from each page, one by one. Since all pages have the same structure, we can use the same set of n8n nodes to extract the data and create a loop to run that set for each product page.
Currently, there are only two pages in the shop, but since we cannot rely on that being always the case (products come and go in webshops constantly), our workflow will also need to detect if there are more pages to scrape before starting a new iteration. We will discuss each of those problems in greater detail as we build our workflows and move on to making stuff with n8n.
If you want to build upon this experience and start scraping data from a real-world website, please ensure that website authors enable scrapping and read web scrapping best practices post on our blog.
The Ugly: Using nodes to implement looping
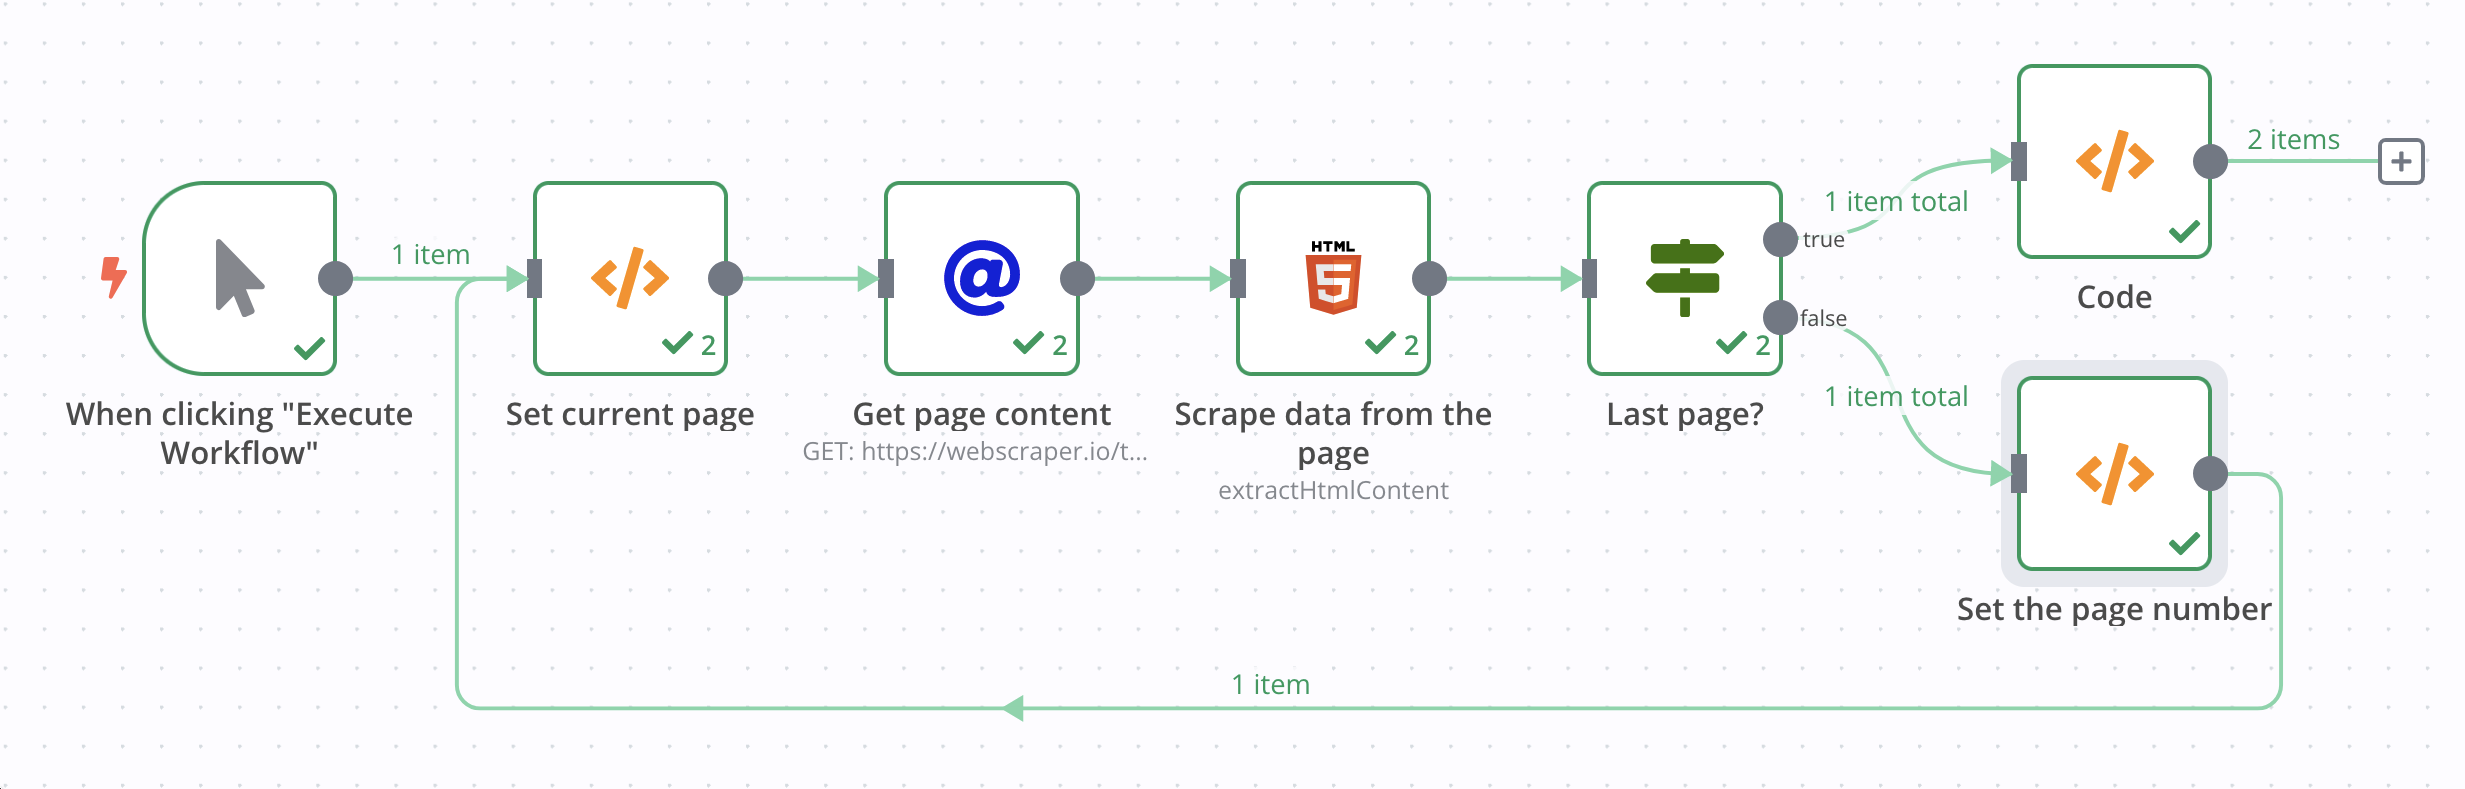
In the first approach to web scraping using n8n, we will manually build and maintain all our looping logic using Set nodes. Before we dissect each node individually, here's what the complete workflow looks like:
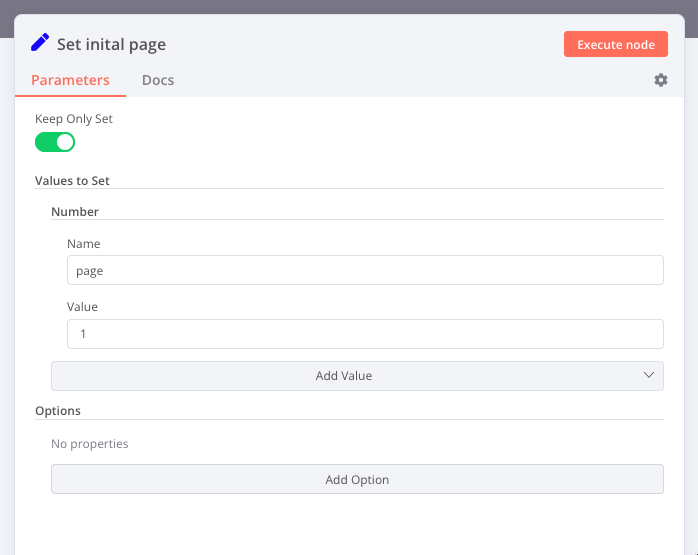
Our workflow starts with a Manual Trigger node followed by a Set node that sets the page number to 1. This number will be used as an input for the HTTP node and will change as we progress through subsequent pages.
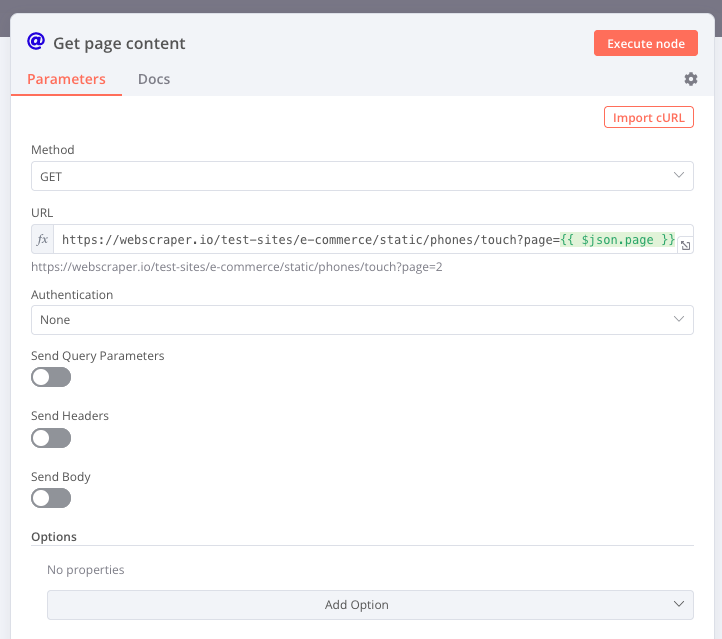
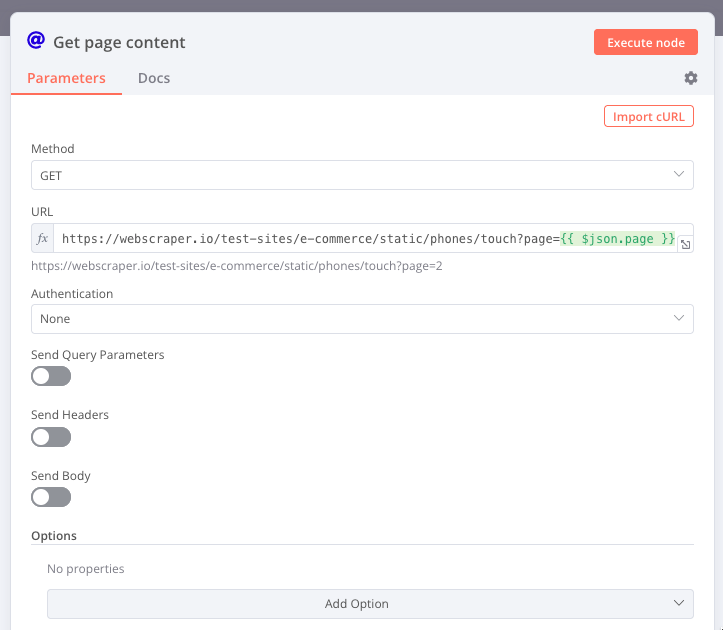
The meat of this process is fetching and processing (scraping) each page, which is implemented using the HTTP Request and the HTML nodes. To get the first product page, we need to add an HTTP Request node configured to send a GET request to the following URL (remember to use expression mode when specifying URL so the correct page number is used instead of a variable):
https://webscraper.io/test-sites/e-commerce/static/phones/touch?page={{ $json.page }}
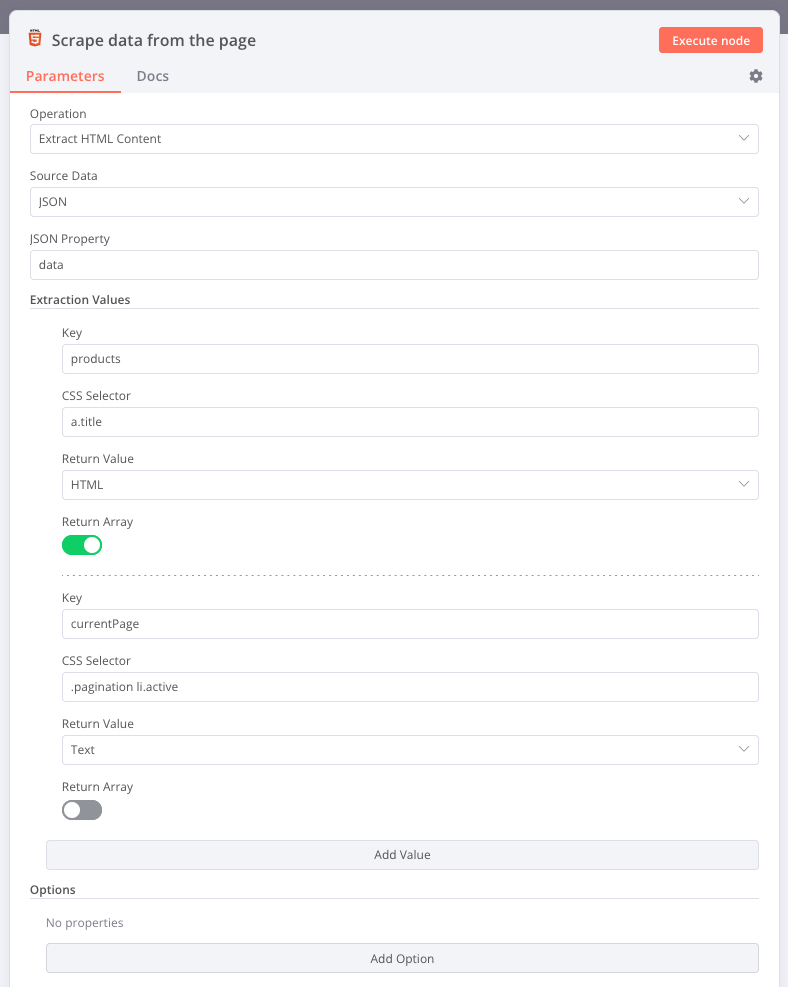
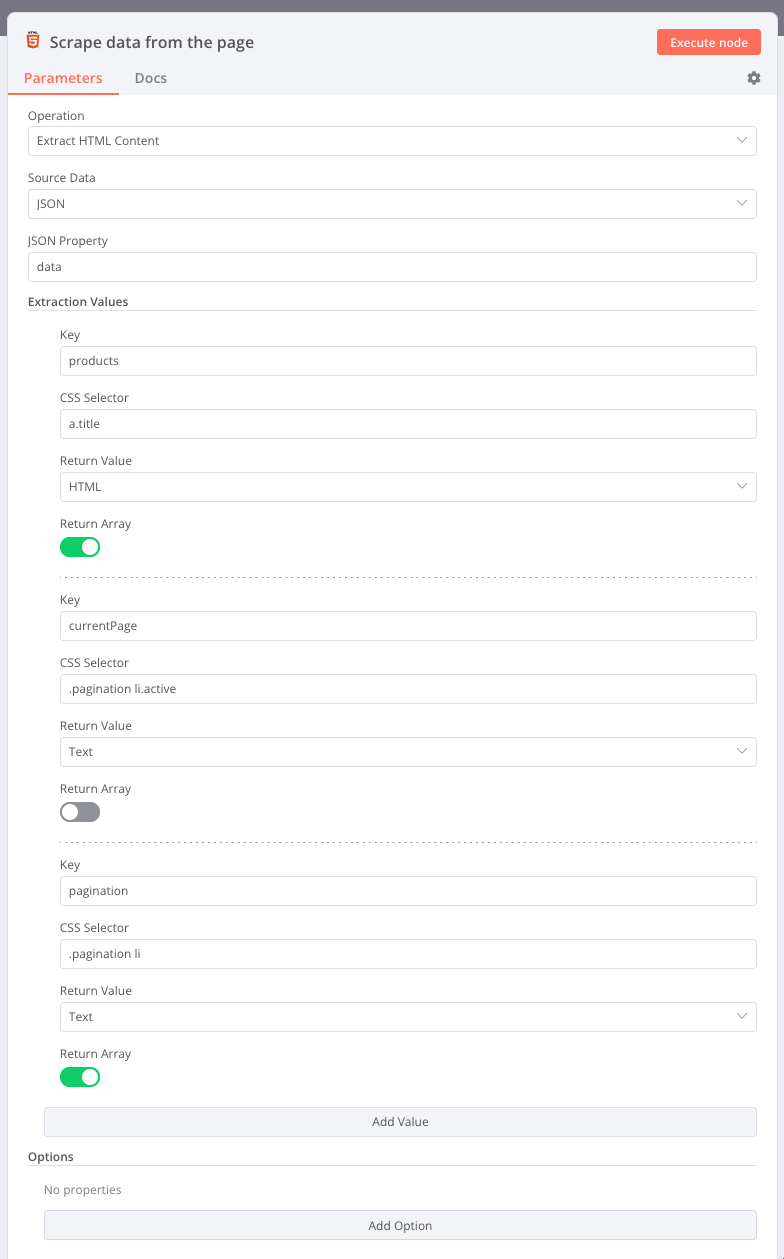
After that, we can add an HTML node and set it up to extract (so choose Extract HTML Content as an action when adding the node) the following data from the web page:
- Each product details. For simplicity's sake, we will only extract the product name,
- Current page. We will use this to move on to the current page in the shop.
We can set this node to return this data in products and currentPage properties, respectively, by configuring it the following way:
With this in place, we have our loop input data and logic, and it's time to add the condition before we create the actual looping connection.
Looking at each product page, we can see that the full list displays exactly six products while the last one contains fewer. We can use that knowledge to check if we are on the last page by testing the number of products scraped on each of them. We will assume that the first page with fewer than six products is the last in the shop. There are more robust ways of detecting the last page, but this method will enable us to implement our paging without juggling more data in additional nodes.
We will impose our loop condition by adding an IF node before our connection loops back to the input of the HTTP Request node. This IF node has one Number condition which checks if {{ $json.products.length }} is smaller than the number 6:
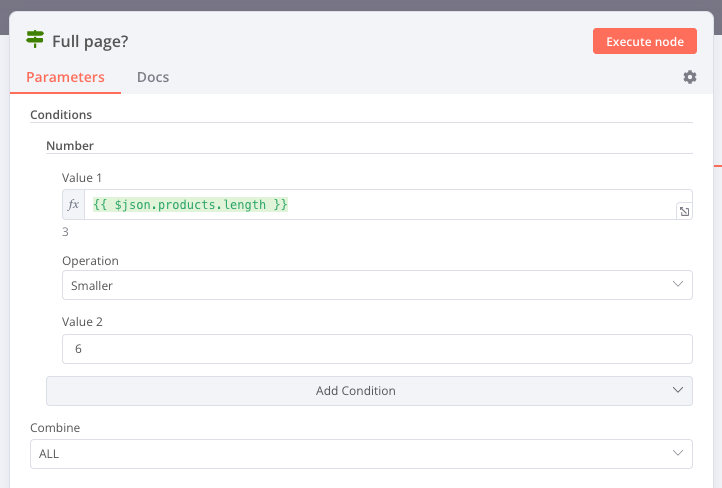
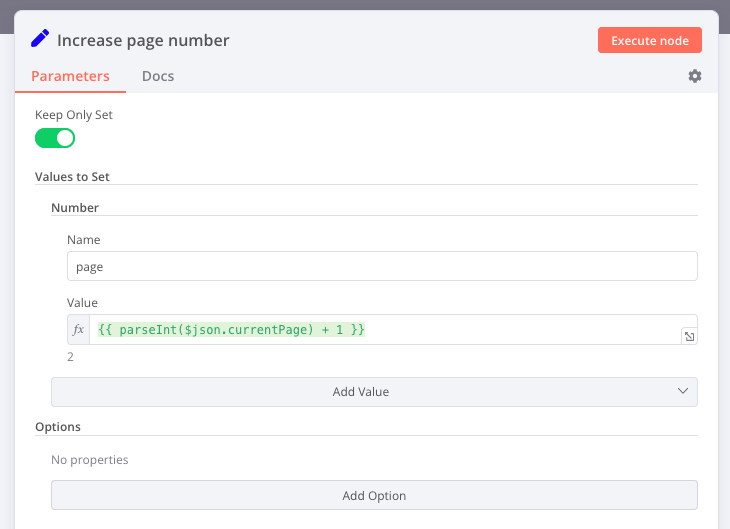
If this is not the case, we need to proceed with scraping the next page, which we will do by connecting a false output branch of the IF node to a new Set node, increasing the page number by one, and looping it back to our HTTP Request node.
The following image shows this new Set node and its parameter values:
Congrats! You just created a loop in n8n!
Now, this workflow's job is done when our condition from the IF node resolves as true. We won't go into details of what should happen then, but you'll notice that the complete workflow has a Code node at the end, which uses a bit of n8n trickery to get the list of all scrapped products (a bit more on that at the end of this post).
The Bad: Utilizing workflow static data
The loop implemented in this example is very similar to the previous one, with two significant differences:
- Instead of parsing the current page number from the scrapped web page, we will store it in our workflow static data. You can think about the workflow static data as a secret storage inside each workflow which can be accessed from within your Code nodes and expressions, and it enables us to store, read, and update values (numbers, strings, dates, etc.) that are of interest for the current workflow. This will provide access to the stored data directly in the nodes that need it instead of unnecessarily passing the values around the workflow.
- We will use pagination HTML elements to determine the number of pages that need to be scrapped and to check if we have reached the last page. This will ensure our scraping algorithm works in case the last page contains the same number of products as the rest.
Here's what this workflow looks like after everything is put together:
A possible downside is that it relies on coding more than the previous one, but, as will be shown, it requires only a few lines of JavaScript to get everything running. Most nodes are the same as in the first example, so we won't go into the weeds when going over this method.
We start our workflow with a Code node, set to run once for all items and containing the following piece of code (don't forget to add a trigger node as a first step!):
const workflowStaticData = $getWorkflowStaticData('global');
let currentPage = workflowStaticData.currentPage;

if (currentPage) {
  currentPage = currentPage + 1;
} else {
  currentPage = 1;
}
return {
 json: {
   page: currentPage,
 }
}
If you are not so fluent in JavaScript, here's the translation: it tries to get the pageNumber value from the global workflow static data store and, if it's found, increments it by one (which moves to scrape the following product page). If there is no such value, which is the case when the workflow runs for the first time, it will set it to 1.
The next step is to fetch the current product page using the HTTP Request node. We can accomplish this by setting this node up exactly as we did in the first example:
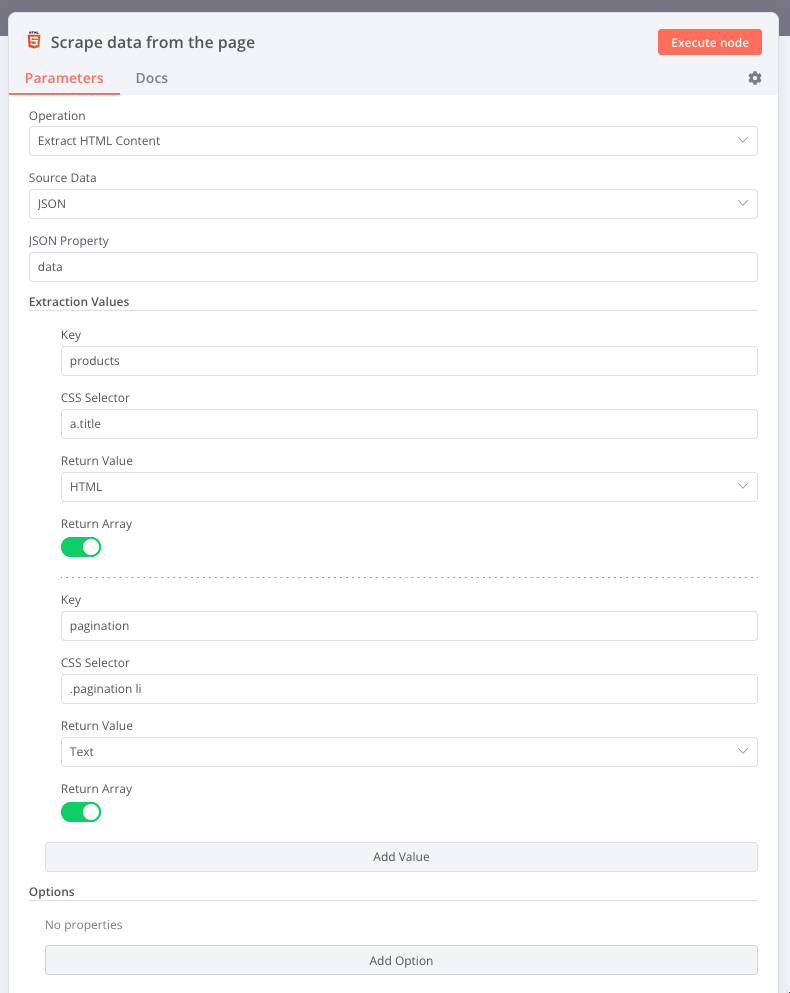
Moving on, we again need the HTML node to extract the data we need from each product page. As mentioned, we want to parse out our current page, the total number of pages, and each product's data. So, in this case, our HTML node is set up the following way:
Once we have processed the product page, it's time to decide if we need to repeat the process for the next page or if it reached the last page. This time, we have both the current page number and the total page count, so this boils down to adding an IF node that compares the two:
Notice that we are subtracting number 2 from the pagination element count since the first and last pagination elements are used to jump to the list's beginning and end and are not individual page links. After this, if we still are not on the last page, we store the current page number inside our workflow static data store using the new Code node:
const workflowStaticData = $getWorkflowStaticData('global');
workflowStaticData.currentPage = parseInt($input.first().json.currentPage);
return {}
And finally, it's time to connect this new Code node back to the first one we created earlier, which will increment the stored number and start the scrapping process for the next page.
The Good: Leveraging runtime data to keep track of iterations
Still around? Good.
It's time for the last and most streamlined approach to implement looping in n8n. Here, we will take advantage of a little n8n internal mechanism to keep track of the product page we are currently on.
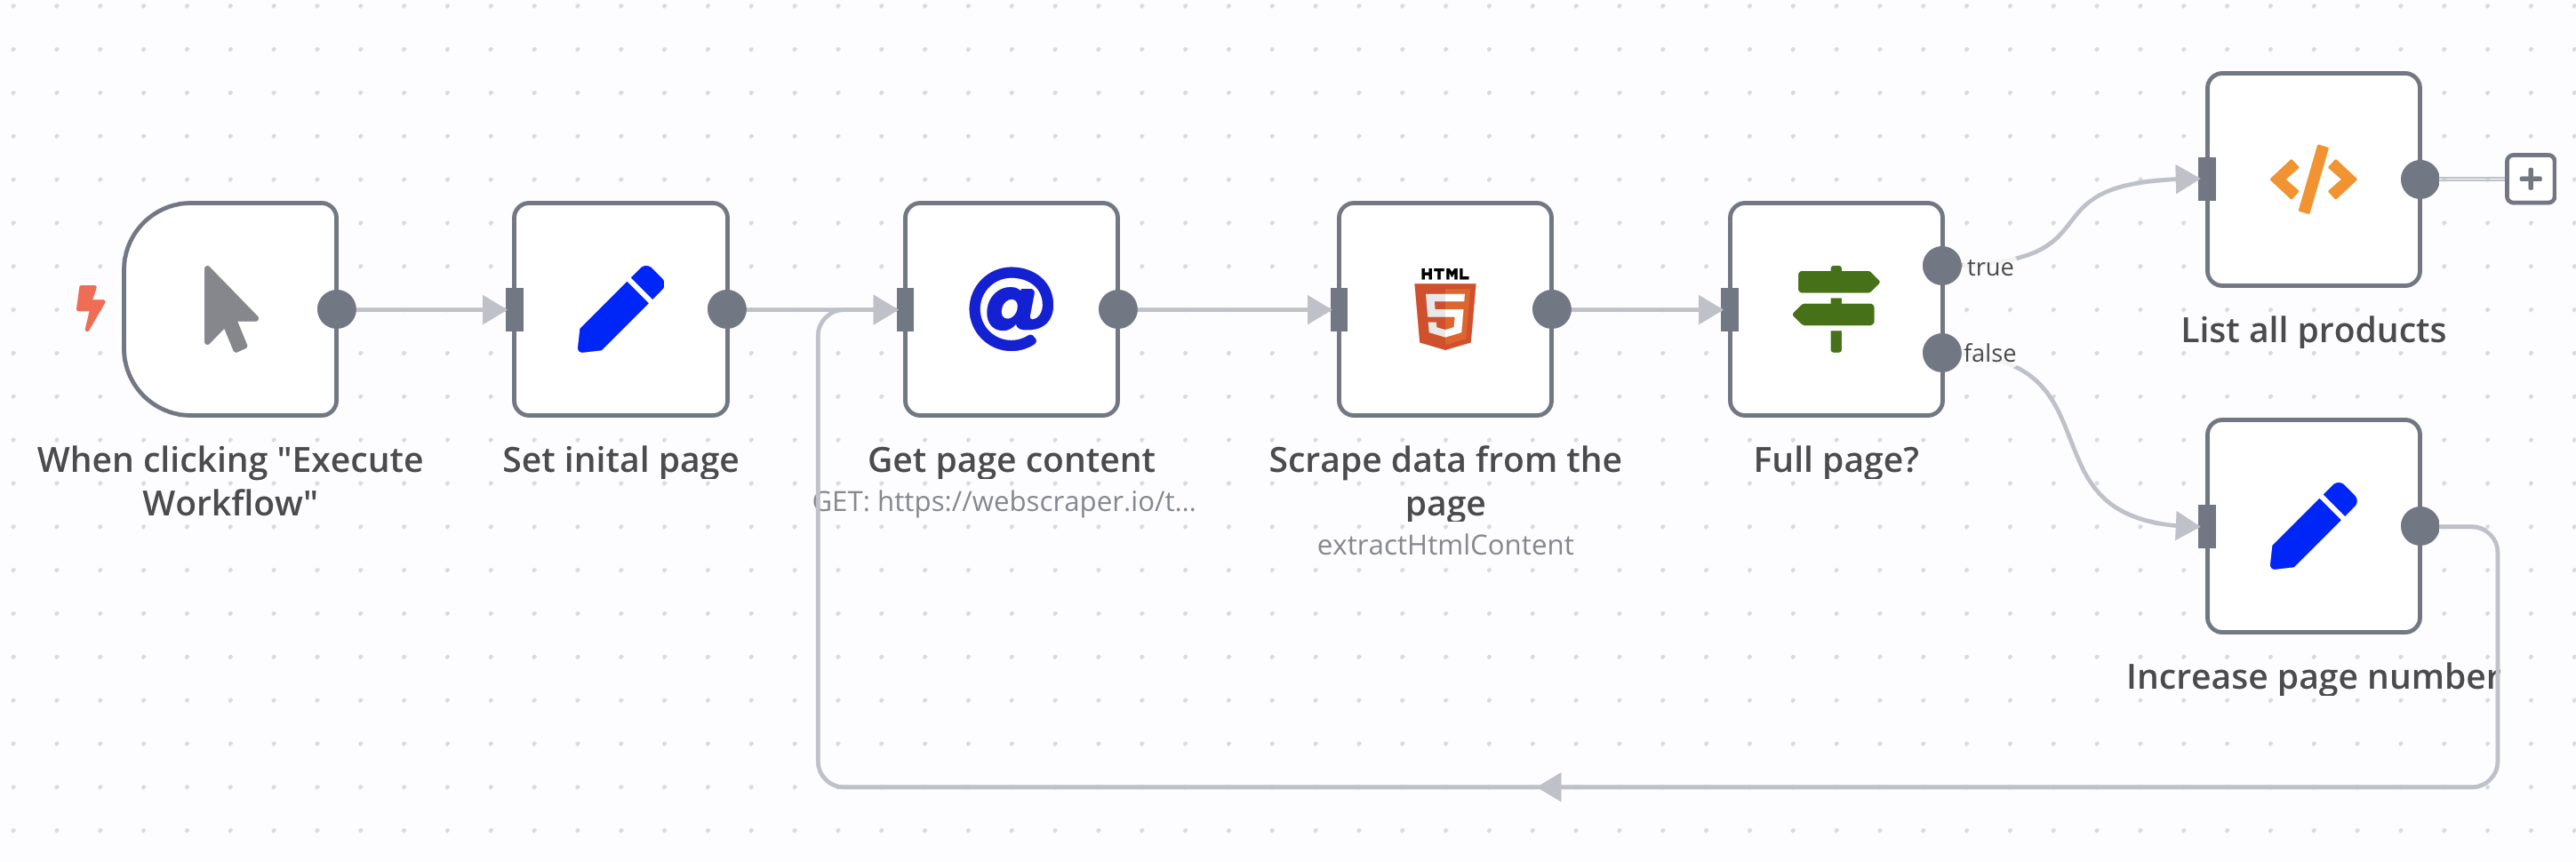
As usual, the entire workflow is shown below, where you can see the nice clean loop it makes:
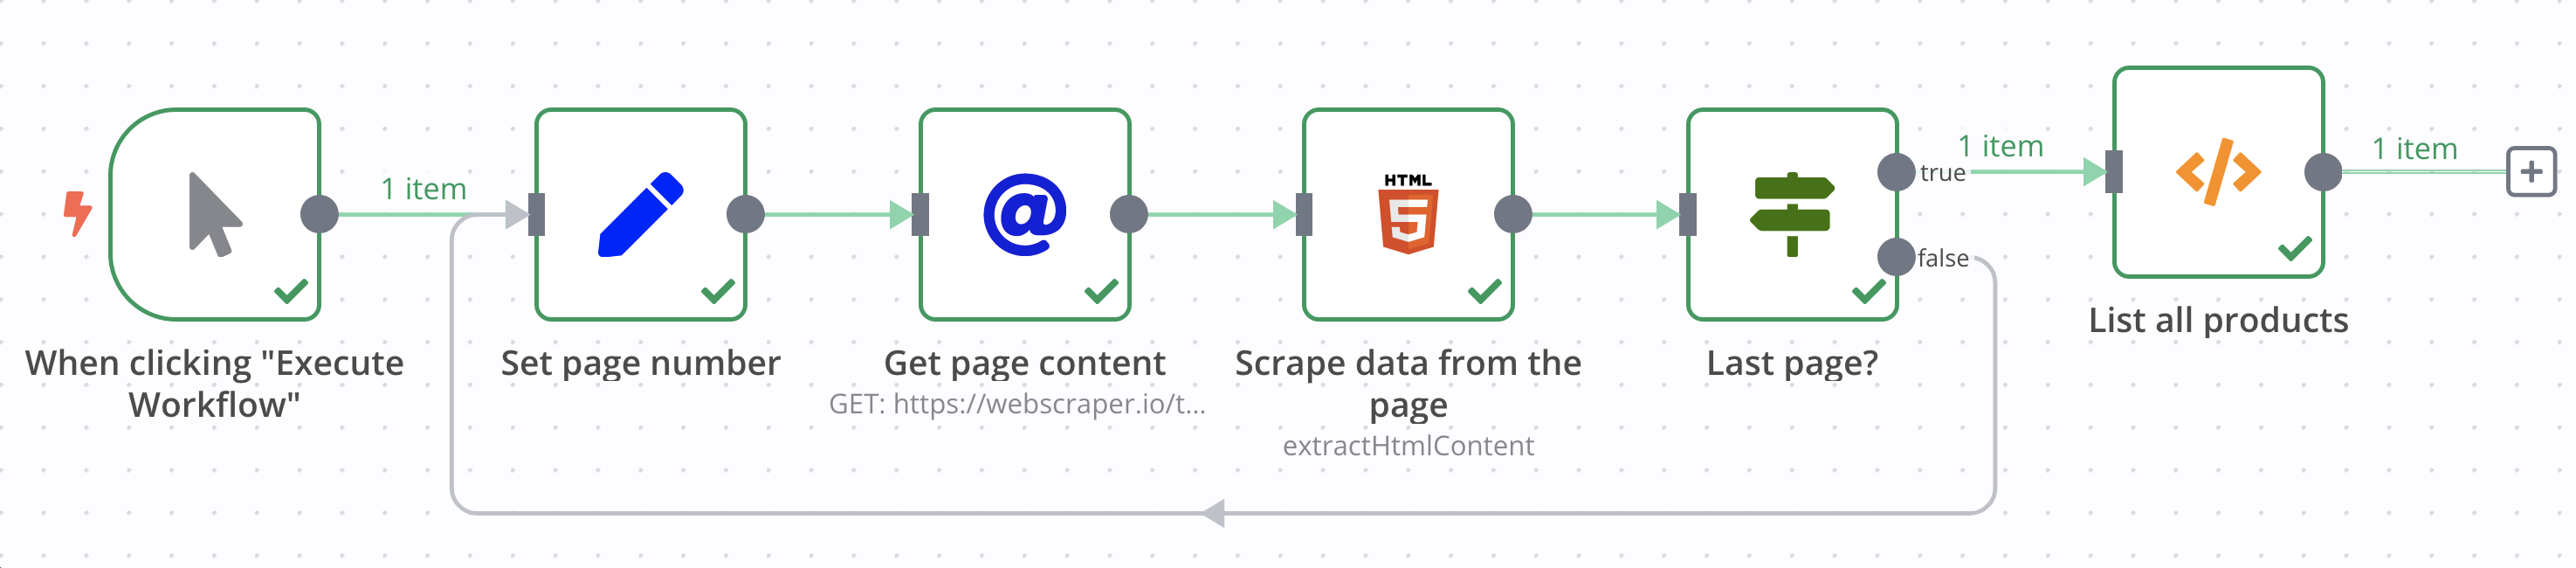
When observing workflows as they execute, you may have noticed a small number appearing in each node's bottom-right corner as they are run. That number is called the node's run index and counts the time the node executes within the current workflow execution. Exactly what we need for our page counting!
On top of that, run indexes are available to use in expressions with the special $runIndex keyword. With this in mind, we can construct a workflow very similar to the one from the previous example, but now we can use the run index as a current page number and get rid of both Code nodes.
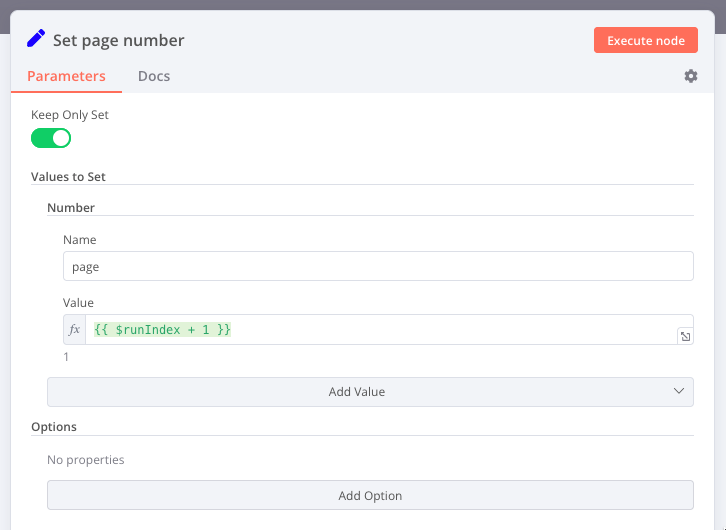
As the first step, we will use a Set node that outputs one value (called page) which is a run index incremented by one (this is needed since run indexes start with zero in n8n):
After this, HTTP Request and HTML Nodes are the same as in the example before, with the difference that we don't need to scrape the current page in the HTML node (just products and pagination elements):
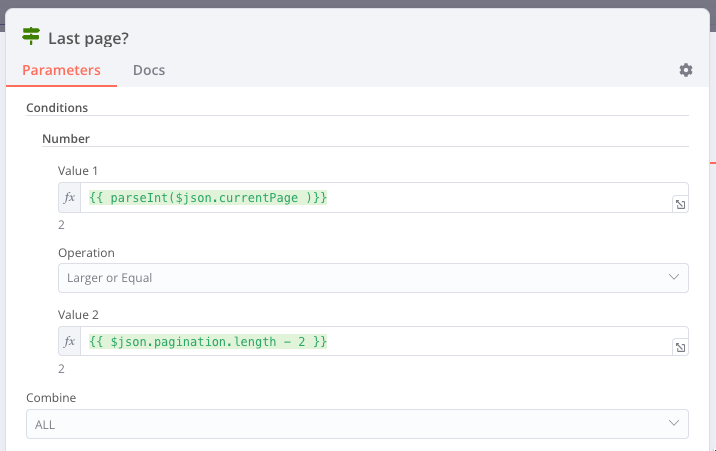
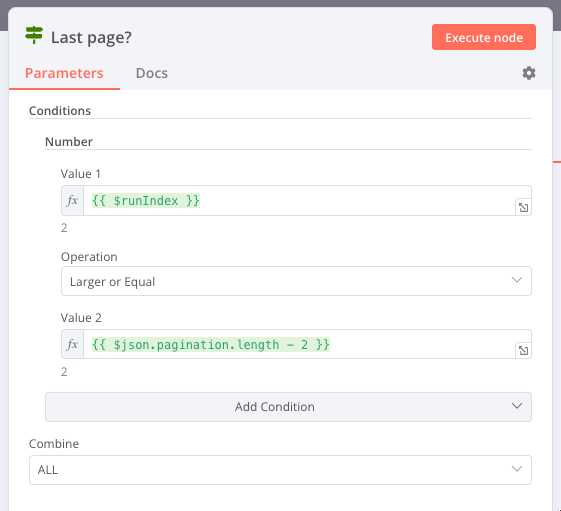
After the HTML node, we will add our trusty IF node to check if we are on the last page. We will test if the current page number ($runIndex) is smaller than the total product page count ($json.pagination.length - 2). If this is true, we will create our loop by connecting the true output branch from our IF node back to the input of the Set node. That's it. No nodes in between are needed!
And one last trick for the end. Now that you have processed all the pages, we can only see the data from the last page in our workflow input. But fear not; the cool thing about n8n is that we can access each node's data from every iteration it runs. This is exactly what the List all products node that you saw in complete workflows is doing. Here's the code it contains:
let pageCount = $node['Scrape data from the page'].runIndex;
let allProducts = [];

for (let index = 0; index <= pageCount; index++) {
  allProducts = allProducts.concat($items('Scrape data from the page', 0, index));
};

return allProducts;
Wrap up
In this post, we covered three ways of creating loops in n8n workflow to scrape data from a website:
- By creating and maintaining loop data using Set nodes,
- By making use of workflow static data and
- By utilizing the node's run index to keep track of loop iterations.
These are not the only approaches to creating loops in n8n but will serve as good guidelines for solving your future automation problems that require looping. Also, we looked at some advanced n8n techniques and internals that, we hope, will come in handy in your prospective n8n journey.
Register your n8n account in the cloud and start automating for free. You can also run n8n on your server or download it on your computer!