It's no secret (anymore) that data is precious.
Structured data is particularly valuable for companies and professionals in almost any industry, as it offers them the raw material for making predictions, identifying trends, and shaping their target audience.
One method for getting hold of structure data, that’s been growing in popularity in the past ten years, is web scraping.
In this article, we'll explore two distinct approaches to web scraping:
- First, we'll demonstrate how to extract specific data from a website using custom JavaScript code to directly interact with the HTML structure.
- Then, we'll dive into n8n, a powerful low-code tool that simplifies web scraping and offers seamless integration with other services like ChatGPT, Google Sheets, and Microsoft Excel.
By comparing these two methods, you'll better understand their strengths and weaknesses, enabling you to select the best tool for your specific scraping needs.
As a bonus, we'll also explore how to combine n8n with AI's power to extract data and gain deeper insights from it.
What is web scraping?
Web scraping (also called web harvesting) is the process of automatically extracting and collecting data from a website. This approach is useful if you need to get structured data from a website without an API or if the API offers limited access to the data.
In practical terms, let's say you want to have a spreadsheet with data about the top 50 best-selling products in an online store, including product name, price, and availability.
One option is to manually copy-paste the data from the website into the spreadsheet – but this would be incredibly time-consuming and error-prone. Alternatively, you can automatically collect this data using web scraping.
Is website scraping legal?
The legality of web scraping is nuanced. While the act itself isn't inherently illegal, some websites explicitly forbid it in their terms of service. Others may allow it but impose restrictions on the type and amount of data you can collect.
Before starting the scraping processes, it is recommended to check the terms and conditions and privacy policy of the website from where you wish to fetch the data. If there is no such mention, then it is advised to look for the robots.txt file on the given website. This file contains instructions about which areas of the website are allowed or disallowed for scraping and crawling. For example, to check the robots.txt file for IMDb, go to https://imdb.com/robots.txt.
It's crucial to prioritize the ToS over the robots.txt file when assessing the legality of scraping a particular website. The robots.txt file should be viewed as a courtesy guideline rather than a strict legal document. Scraping activities that violate a website's terms of service can lead to bans, or even legal action, especially if the scraped data is used for commercial purposes.
How does web scraping work?
Essentially, the process of scraping data from websites involves 5 steps:
- Select the URL (website) you want to scrape.
- Make a request to the URL. The server responds to the request and returns the data as HTML.
- Select the data you want to extract from the webpage.
- Run the code to extract the selected data.
- Export the data in a readable format (for example, as a CSV file).
How to do web scraping?
There are different options for web scraping, from browser extensions to no-code tools and custom code in different programming languages.
While browser extensions and other simpler tools offer a convenient entrypoint for basic web scraping tasks, they fall short when there is a need for extensive data manipulation or integration.
This section will focus on more advanced web scraping techniques that provide greater flexibility and control.
Web scraping with custom code
If you're comfortable with coding, you can leverage libraries specifically designed for web scraping across various programming languages. Popular choices include:
- Python: Beautiful Soup, Scrapy, Selenium
- R: rvest
- JavaScript: Puppeteer
These libraries offer a wealth of tools for fetching web pages, parsing HTML and XML, and extracting the precise data you need. JavaScript, being native to web browsers, can directly interact with web pages and HTML elements, making it a convenient choice for certain scraping tasks.
The main advantage of using custom code and libraries is the flexibility and control it gives developers. You can tailor your scraper to target specific data, handle complex website structures, and implement custom logic for data cleaning and transformation. Additionally, most web scraping libraries are open-source and free.
Web scraping with n8n workflows
While JavaScript provides a solid foundation for web scraping, managing larger projects, scheduling tasks, or integrating data into other systems can present challenges.
For a more streamlined and scalable approach, n8n offers a user-friendly, no-code alternative. Let's explore how n8n empowers you to automate and enhance your web scraping workflows through a visual interface, all while handling the underlying boilerplate code that would otherwise be required.
n8n combines the power of libraries with the ease of browser extensions – and it's free to use. You can build automated workflows using core nodes like HTTP Request and HTML Extract to scrape data from websites and save it in a spreadsheet.
Moreover, you can extend the workflow however you like, for example, by emailing the spreadsheet, inserting the data into a database, or analyzing and visualizing it on a dashboard.
Let’s take a closer look at both methods for web scraping!
How to scrape data from a website JavaScript?
Let's create a basic web scraper that monitors the price of an item on Amazon using NodeJS and Puppeteer.
Prerequisites
- Install NodeJS
- Initialize a NodeJS project with
npm init -y - Install Puppeteer with
npm install puppeteer
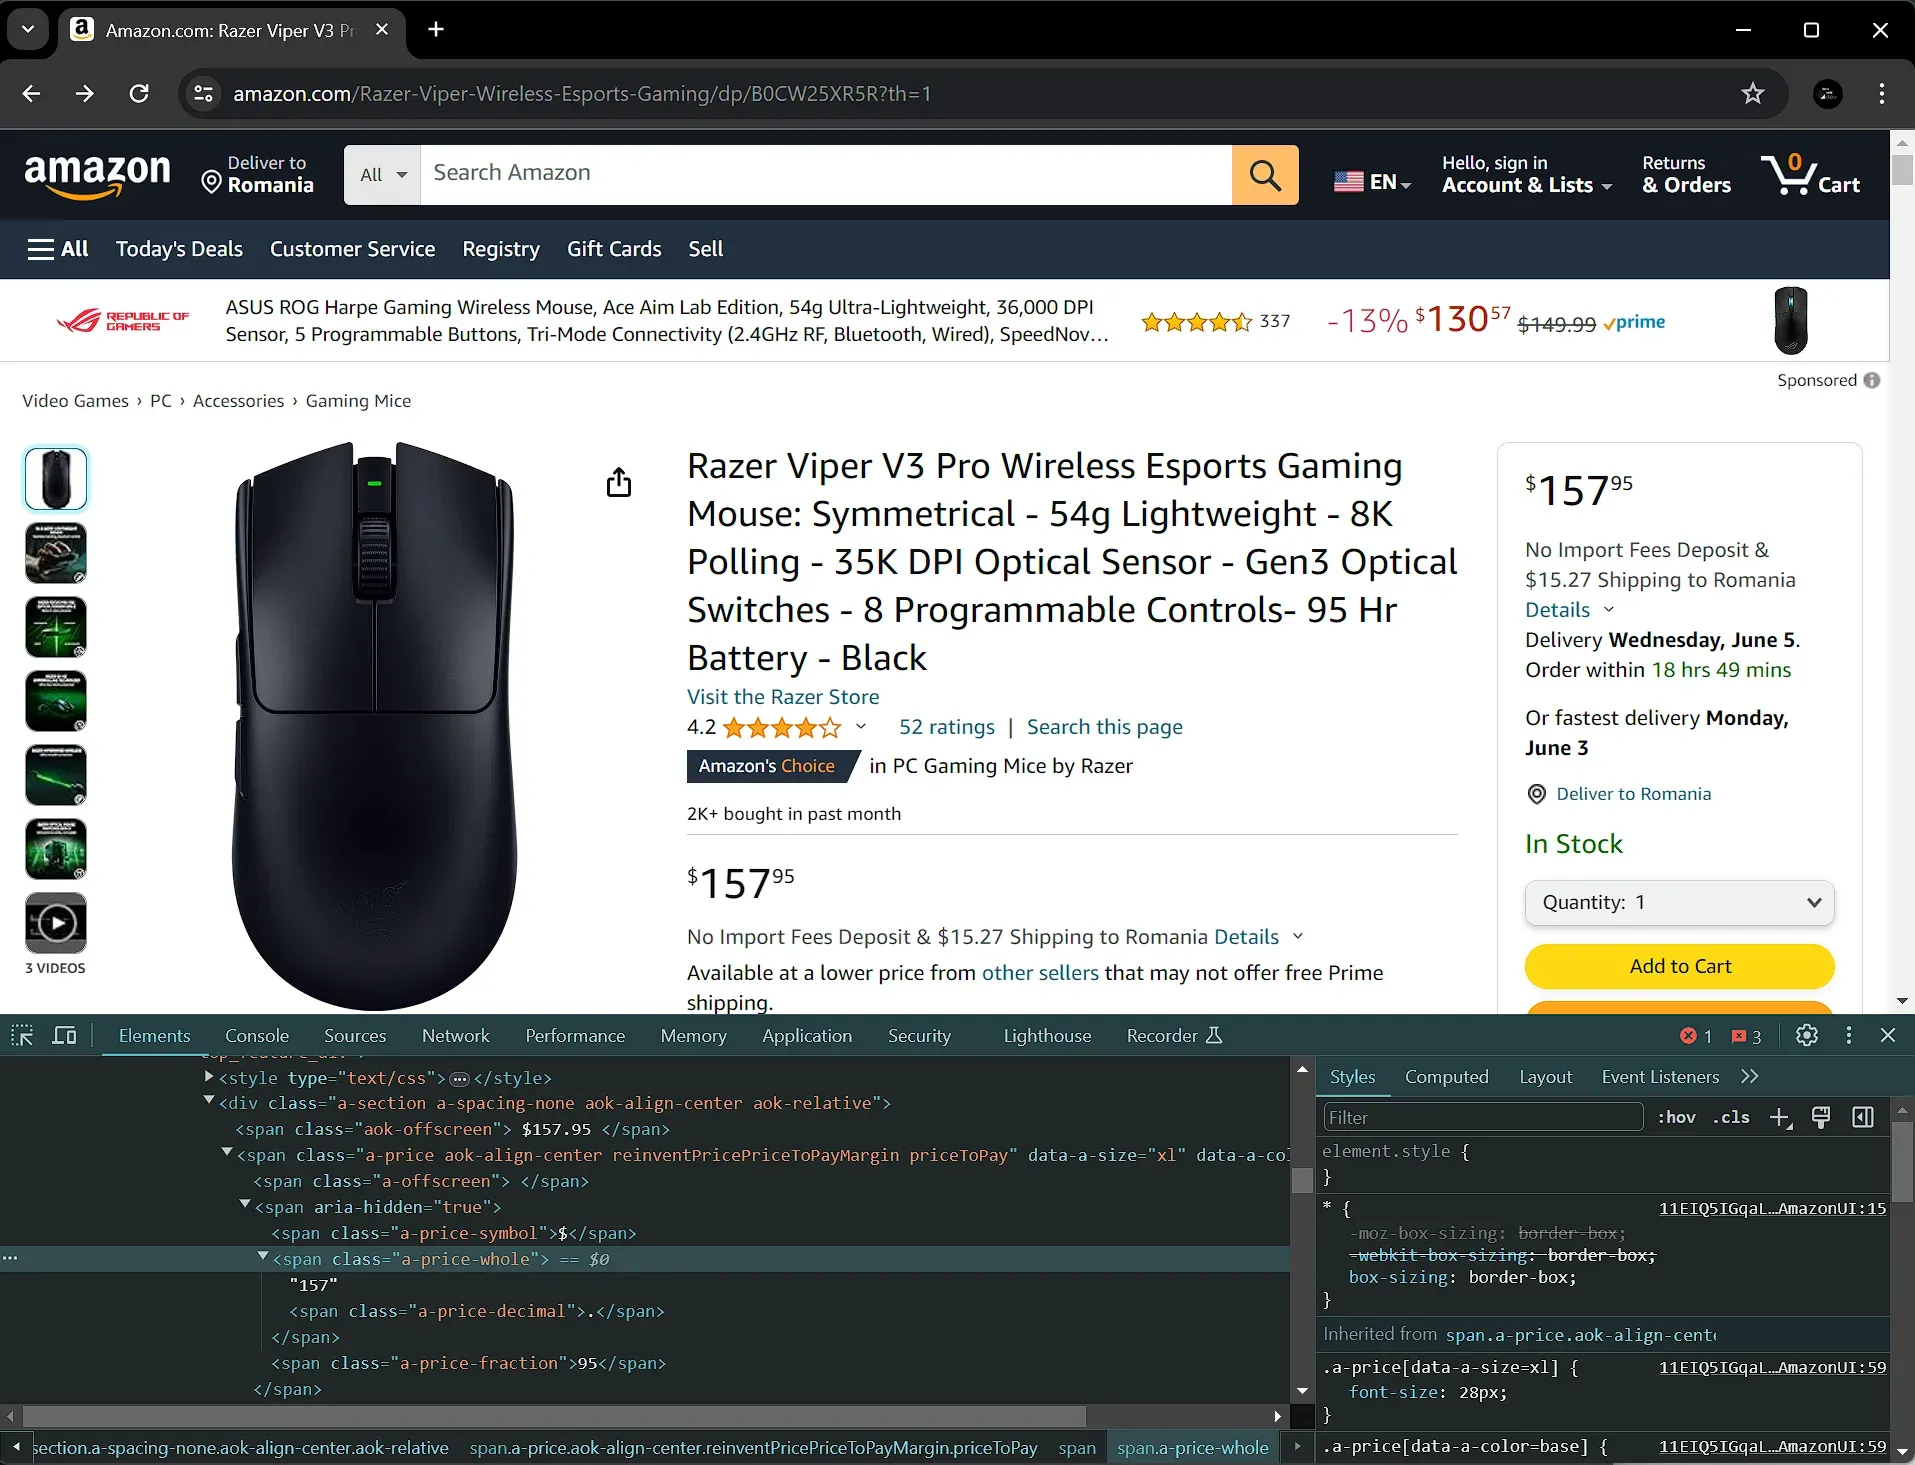
Step 1: Identify the target elements
Before writing code, let’s inspect the product page on Amazon. Right-click on the price element and select "Inspect" (or "Inspect Element") in your browser to view its HTML structure. Here, we need to pinpoint the unique class name or ID that identifies the price element. In this case, we are going to target the element with the class a-price-whole.
Step 2: Get the page content
First we import Puppeteer and define the page we want to scrape:
const puppeteer = require("puppeteer");
const { KnownDevices } = require("puppeteer");
const iPhone = KnownDevices['iPhone 13'];

const targetURL = 'https://www.amazon.com/your-product';
The KnownDevices will be used to emulate a certain device, in this case an iPhone.
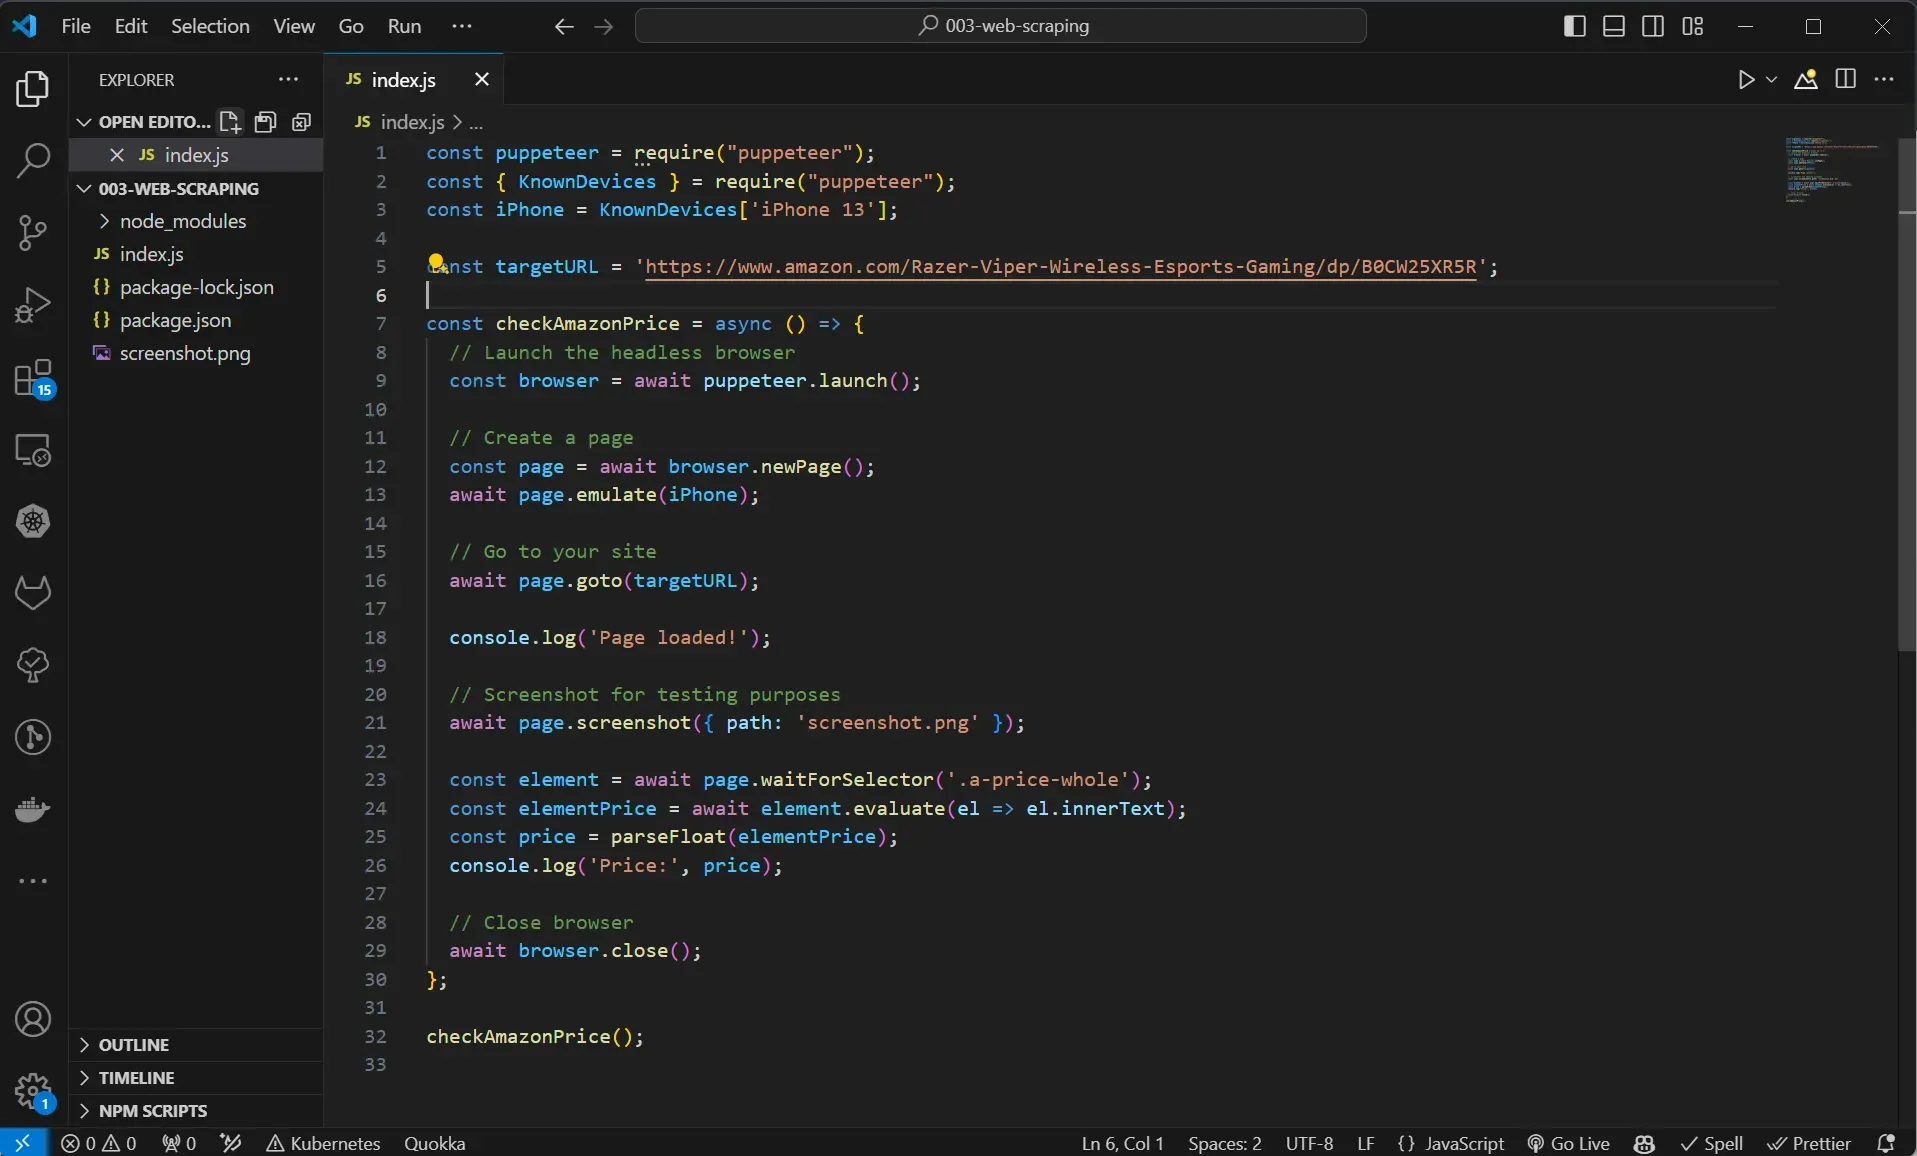
Step 3: Initialize Puppeteer and get the page content
For this we are creating a function called checkAmazonPrice, we then instruct Puppeteer to emulate an iPhone device, and then go to the URL of the product we want to monitor.
const checkAmazonPrice = async () => {
  // Launch the headless browser
  const browser = await puppeteer.launch();

  // Create a page
  const page = await browser.newPage();
  await page.emulate(iPhone);

  // Go to your site
  await page.goto(targetURL);

  console.log('Page loaded!');
};
Step 3: Identify the price element and get the price
In order to debug our scraper, we can take a screenshot of the page. We then wait for the element with the class a-price-whole to be loaded on the page, and after that we get the value (the innerText) of that element.
const checkAmazonPrice = async () => {
  // …
  // Screenshot for testing purposes
  await page.screenshot({ path: 'screenshot.png' });

  const element = await page.waitForSelector('.a-price-whole');
  const elementPrice = await element.evaluate(el => el.innerText);
  const price = parseFloat(elementPrice);
  console.log('Price:', price);

  // Close browser
  await browser.close();
};
We then cast it to a floating point number by using the parseFloat, and log the price to the console.
Finally we close the browser in order to avoid memory leaks.
We can then call the checkAmazonPrice function. The script should now look like this:
We can then execute this script by running node index.js and observe the price of the product logged to the console.

Step 4: Schedule the price check periodically
We can then modify the web scraping script to run periodically, in this case every hour:
// run immediately then once every hour

checkAmazonPrice();
setInterval(checkAmazonPrice, 1000 * 60 * 60);
Step 5: Monitor any structural changes
Amazon's website structure might change over time. These changes can affect the way your code interacts with the website, potentially causing it to break. Therefore, it's essential to stay updated with any structural changes to ensure your code continues to work as intended.
To avoid overloading Amazon's servers, it's crucial to be mindful of your requests and space them out appropriately. Rapidly sending a large number of requests can strain the servers. Typically, websites employ protective measures to prevent excessive requests. Sending numerous requests in a short period can result in your requests being blocked.
While JavaScript offers a direct way to scrape data from websites, handling tasks beyond basic extraction can quickly become complex and time-consuming.
But don't worry, if you're looking for a more streamlined and efficient approach, we'll introduce you to web scraping with n8n in the next section. This versatile tool simplifies web scraping through a visual interface, allowing you to build powerful workflows by connecting nodes and actions, all while handling the underlying boilerplate code that would otherwise be required.
How to automatically scrape data from a website with n8n?
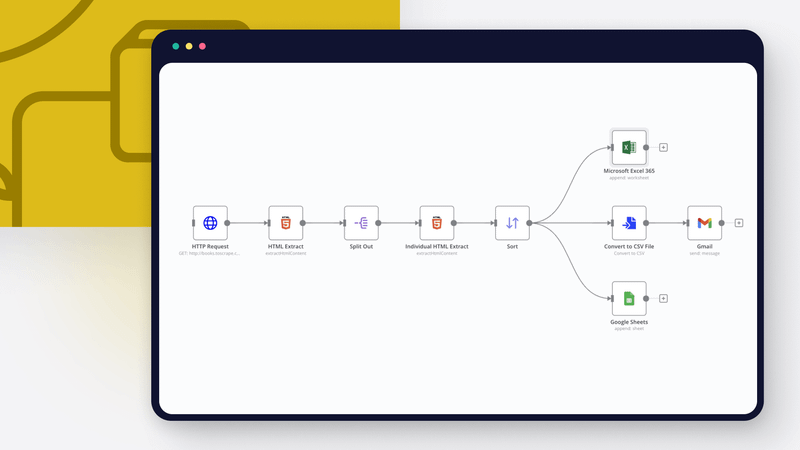
We'll demonstrate how to use n8n to scrape a website, trigger actions like sending notification emails, and store the extracted data in Google Sheets or Microsoft Excel.
Let's build a web scraper with low-code using n8n!
This workflow scrapes information about books from the fictive online book store http://books.toscrape.com, generates a CSV file, sends it as an attachment in an email and stores the data in Google Sheets and Microsoft Excel 365.
Prerequisites
- Sign up for n8n cloud or self-host n8n
- Basic knowledge of HTML and CSS. This is helpful for knowing how to navigate the web page and what elements to select for the data you want to extract
- Google Cloud account and credentials
- If using Microsoft Excel, you will need a Microsoft Azure account and credentials
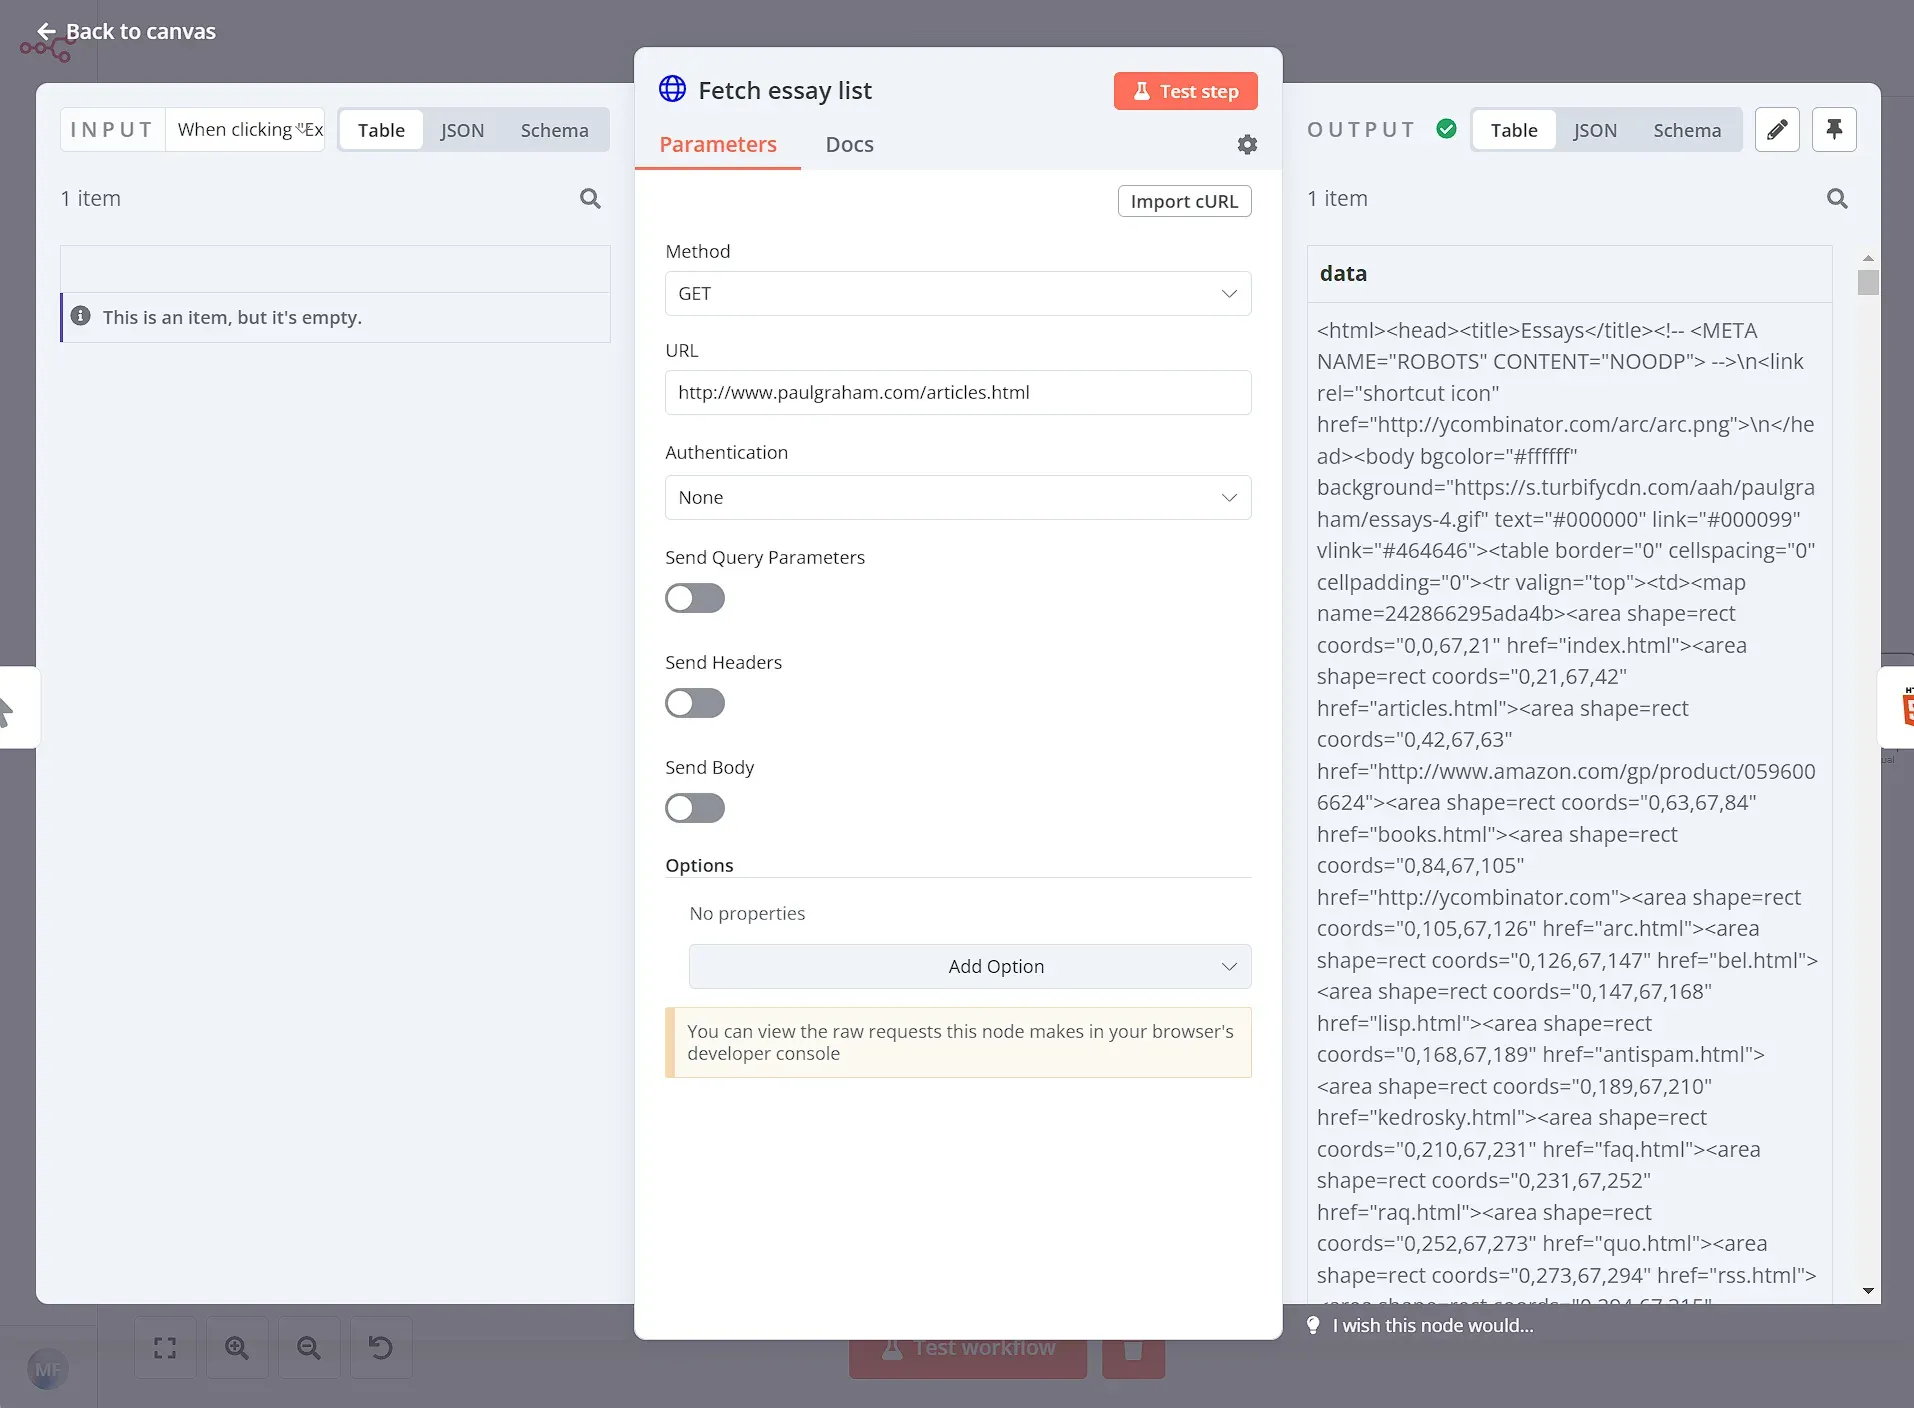
Step 1: Get the website data
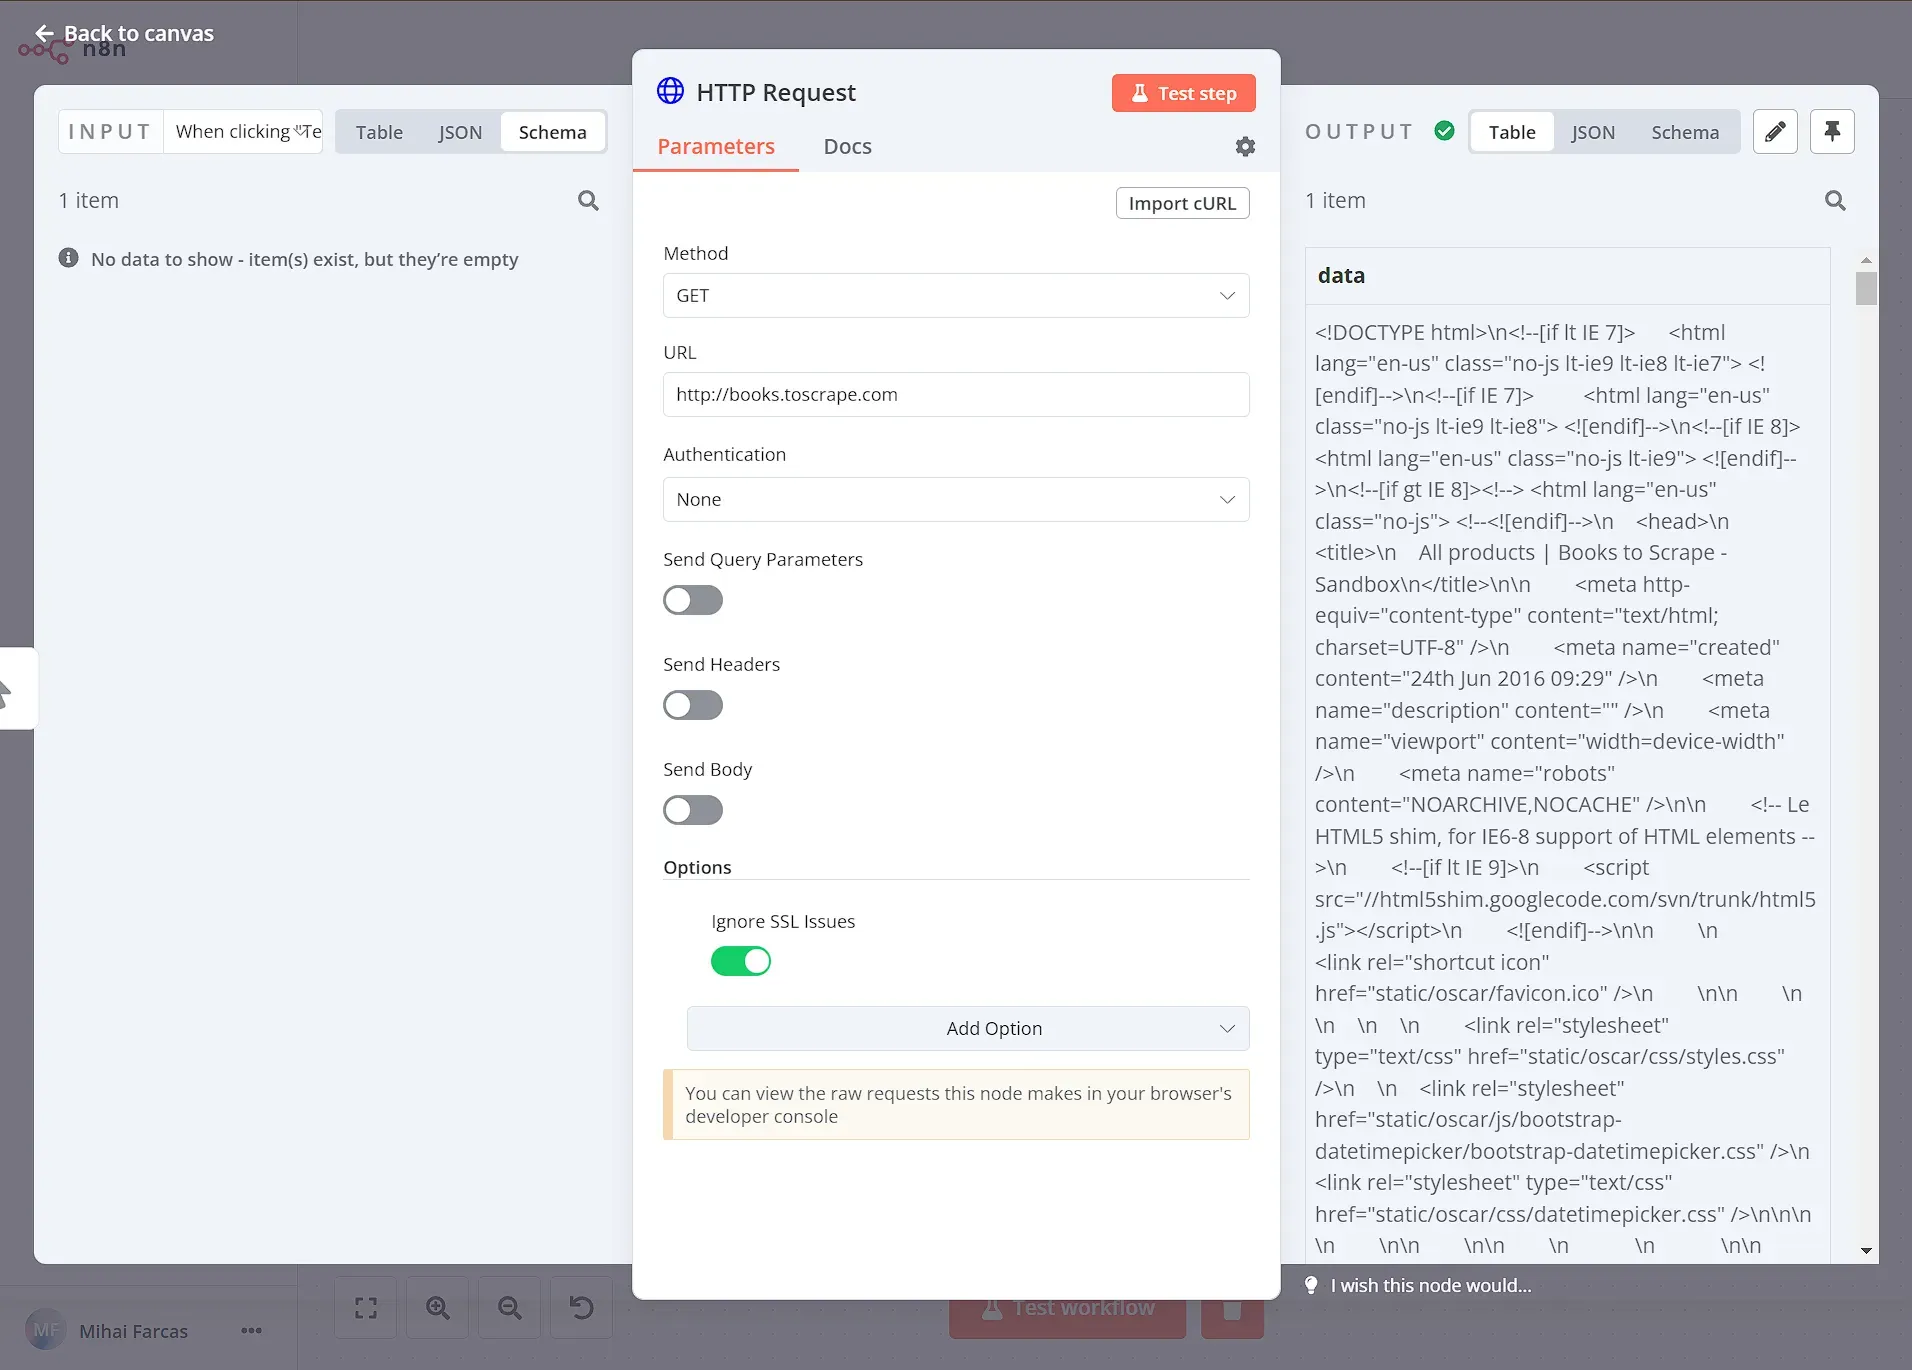
First, you need to get data from the website in HTML format. To do this, use the HTTP Request node setting GET as Request Method and http://books.toscrape.com as the URL. Next you can configure the response: select String from the Response Format dropdown, and set the Property Name to whatever you like. In this case I named it data.
You can then execute the node, and the result should look like this:
Step 2: Extract data from the website
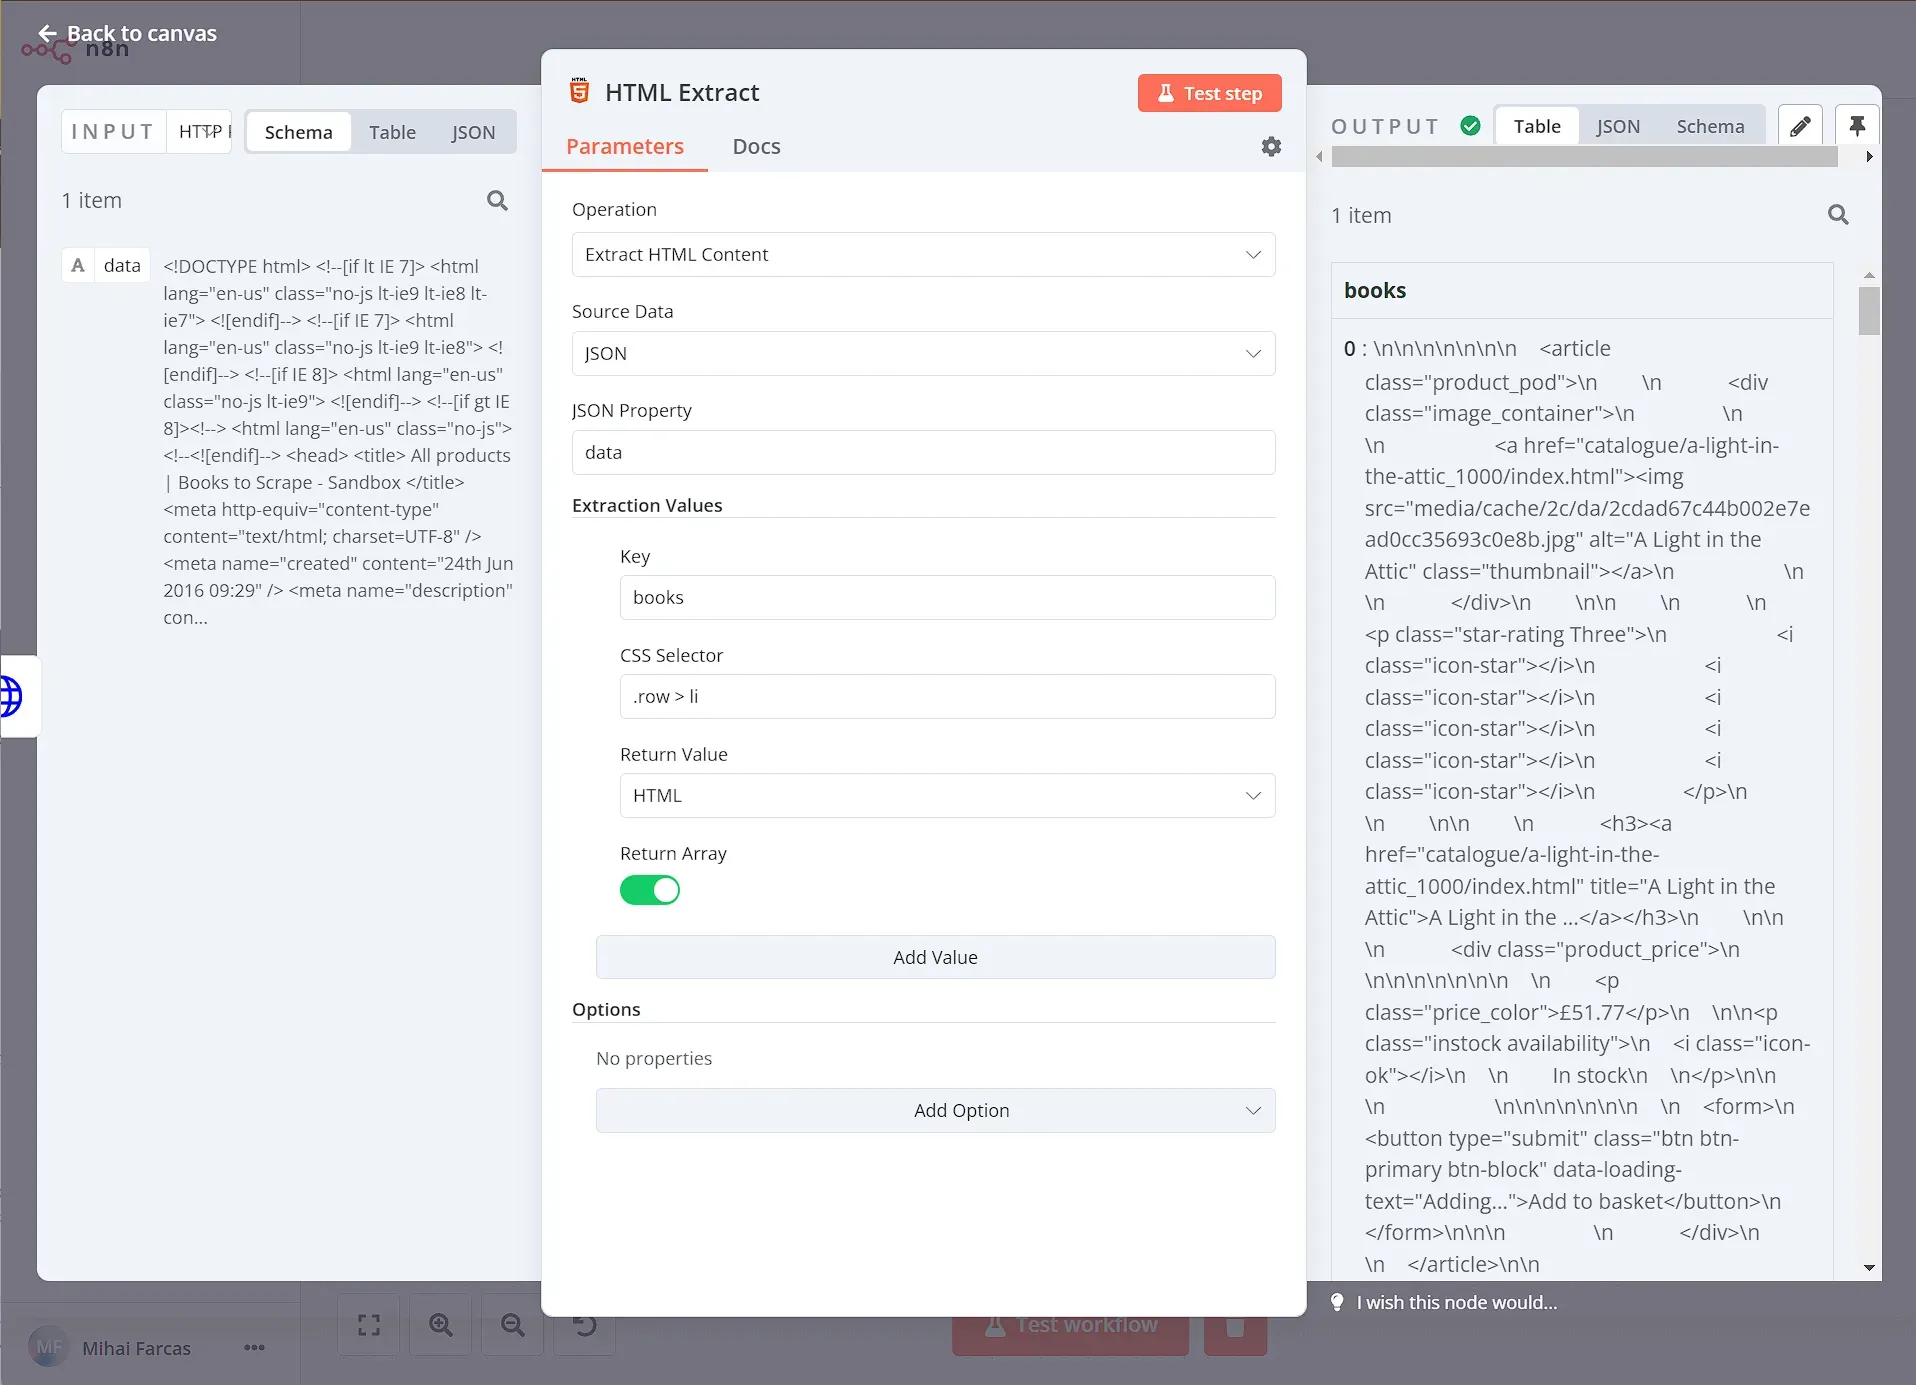
Now that you have the HTML code of the website, you need to extract the data you want (in this case, all the books on the page). To do this, we can add a HTML Extract node and configure it with the following:
- Source Data: JSON
- JSON Property: data (This is the property name set in the HTTP Request node)
Extraction Values:
- Key: books
- CSS Selector:
.row > li - Return Value: HTML
- Return Array enabled (since we will be getting multiple items)
You can obtain the CSS selector by inspecting the page, just like we did in the JavaScript section of this tutorial. n8n supports any CSS selectors and combinators, in this case .row > li selects all list element items that are inside an element with the class “row”.
When you execute the node, the result should look like this:
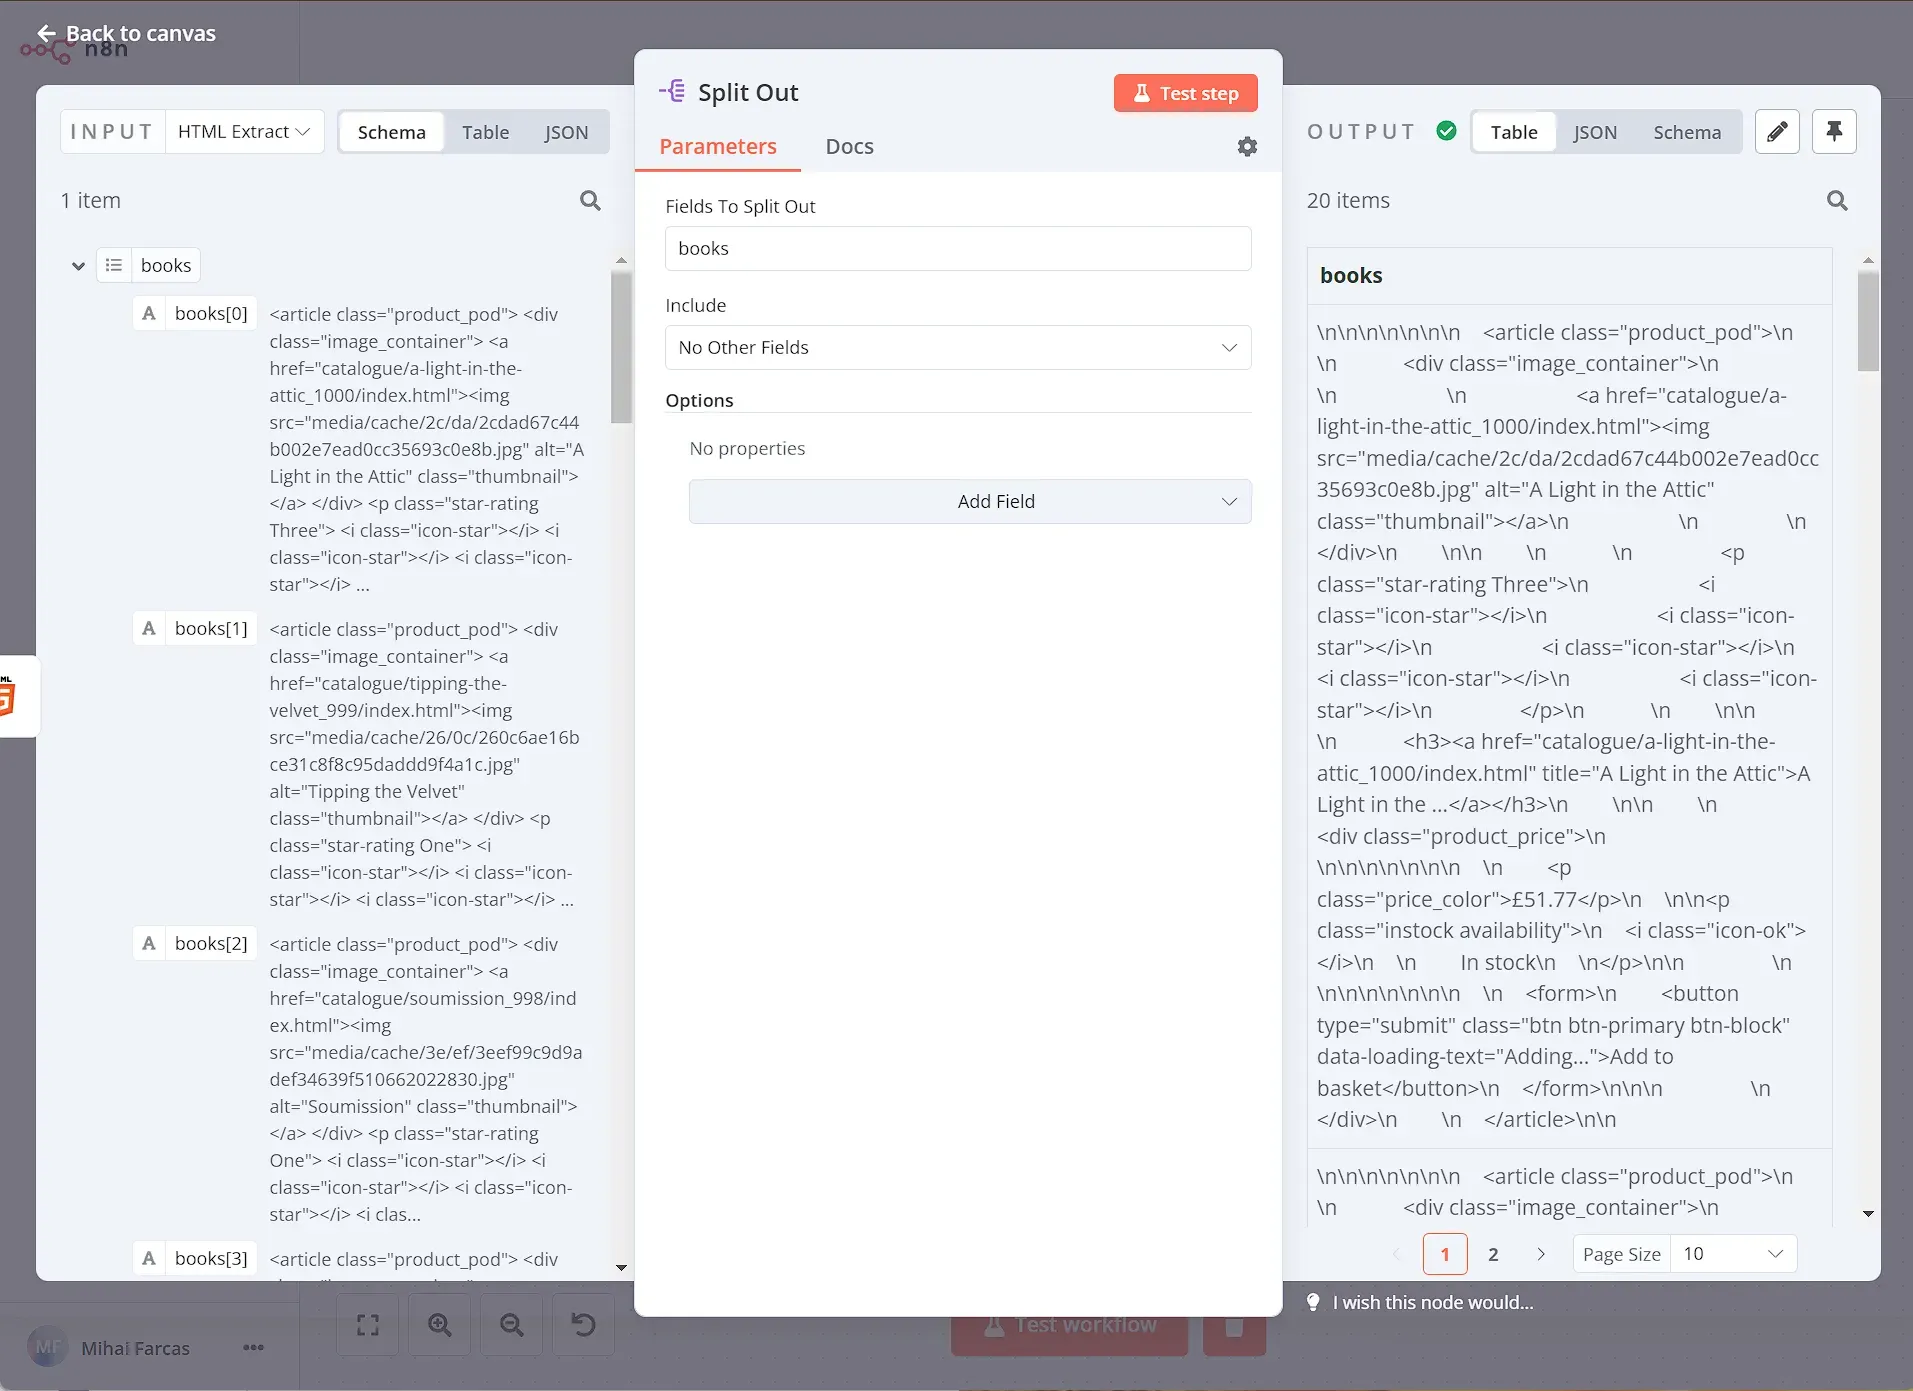
We then need to process each element returned by the previous steps. To do this one by one, we need to use the Split Out node. Set the Fields To Split Out to books and leave the rest as default.
When you execute the node, the result should look like this:
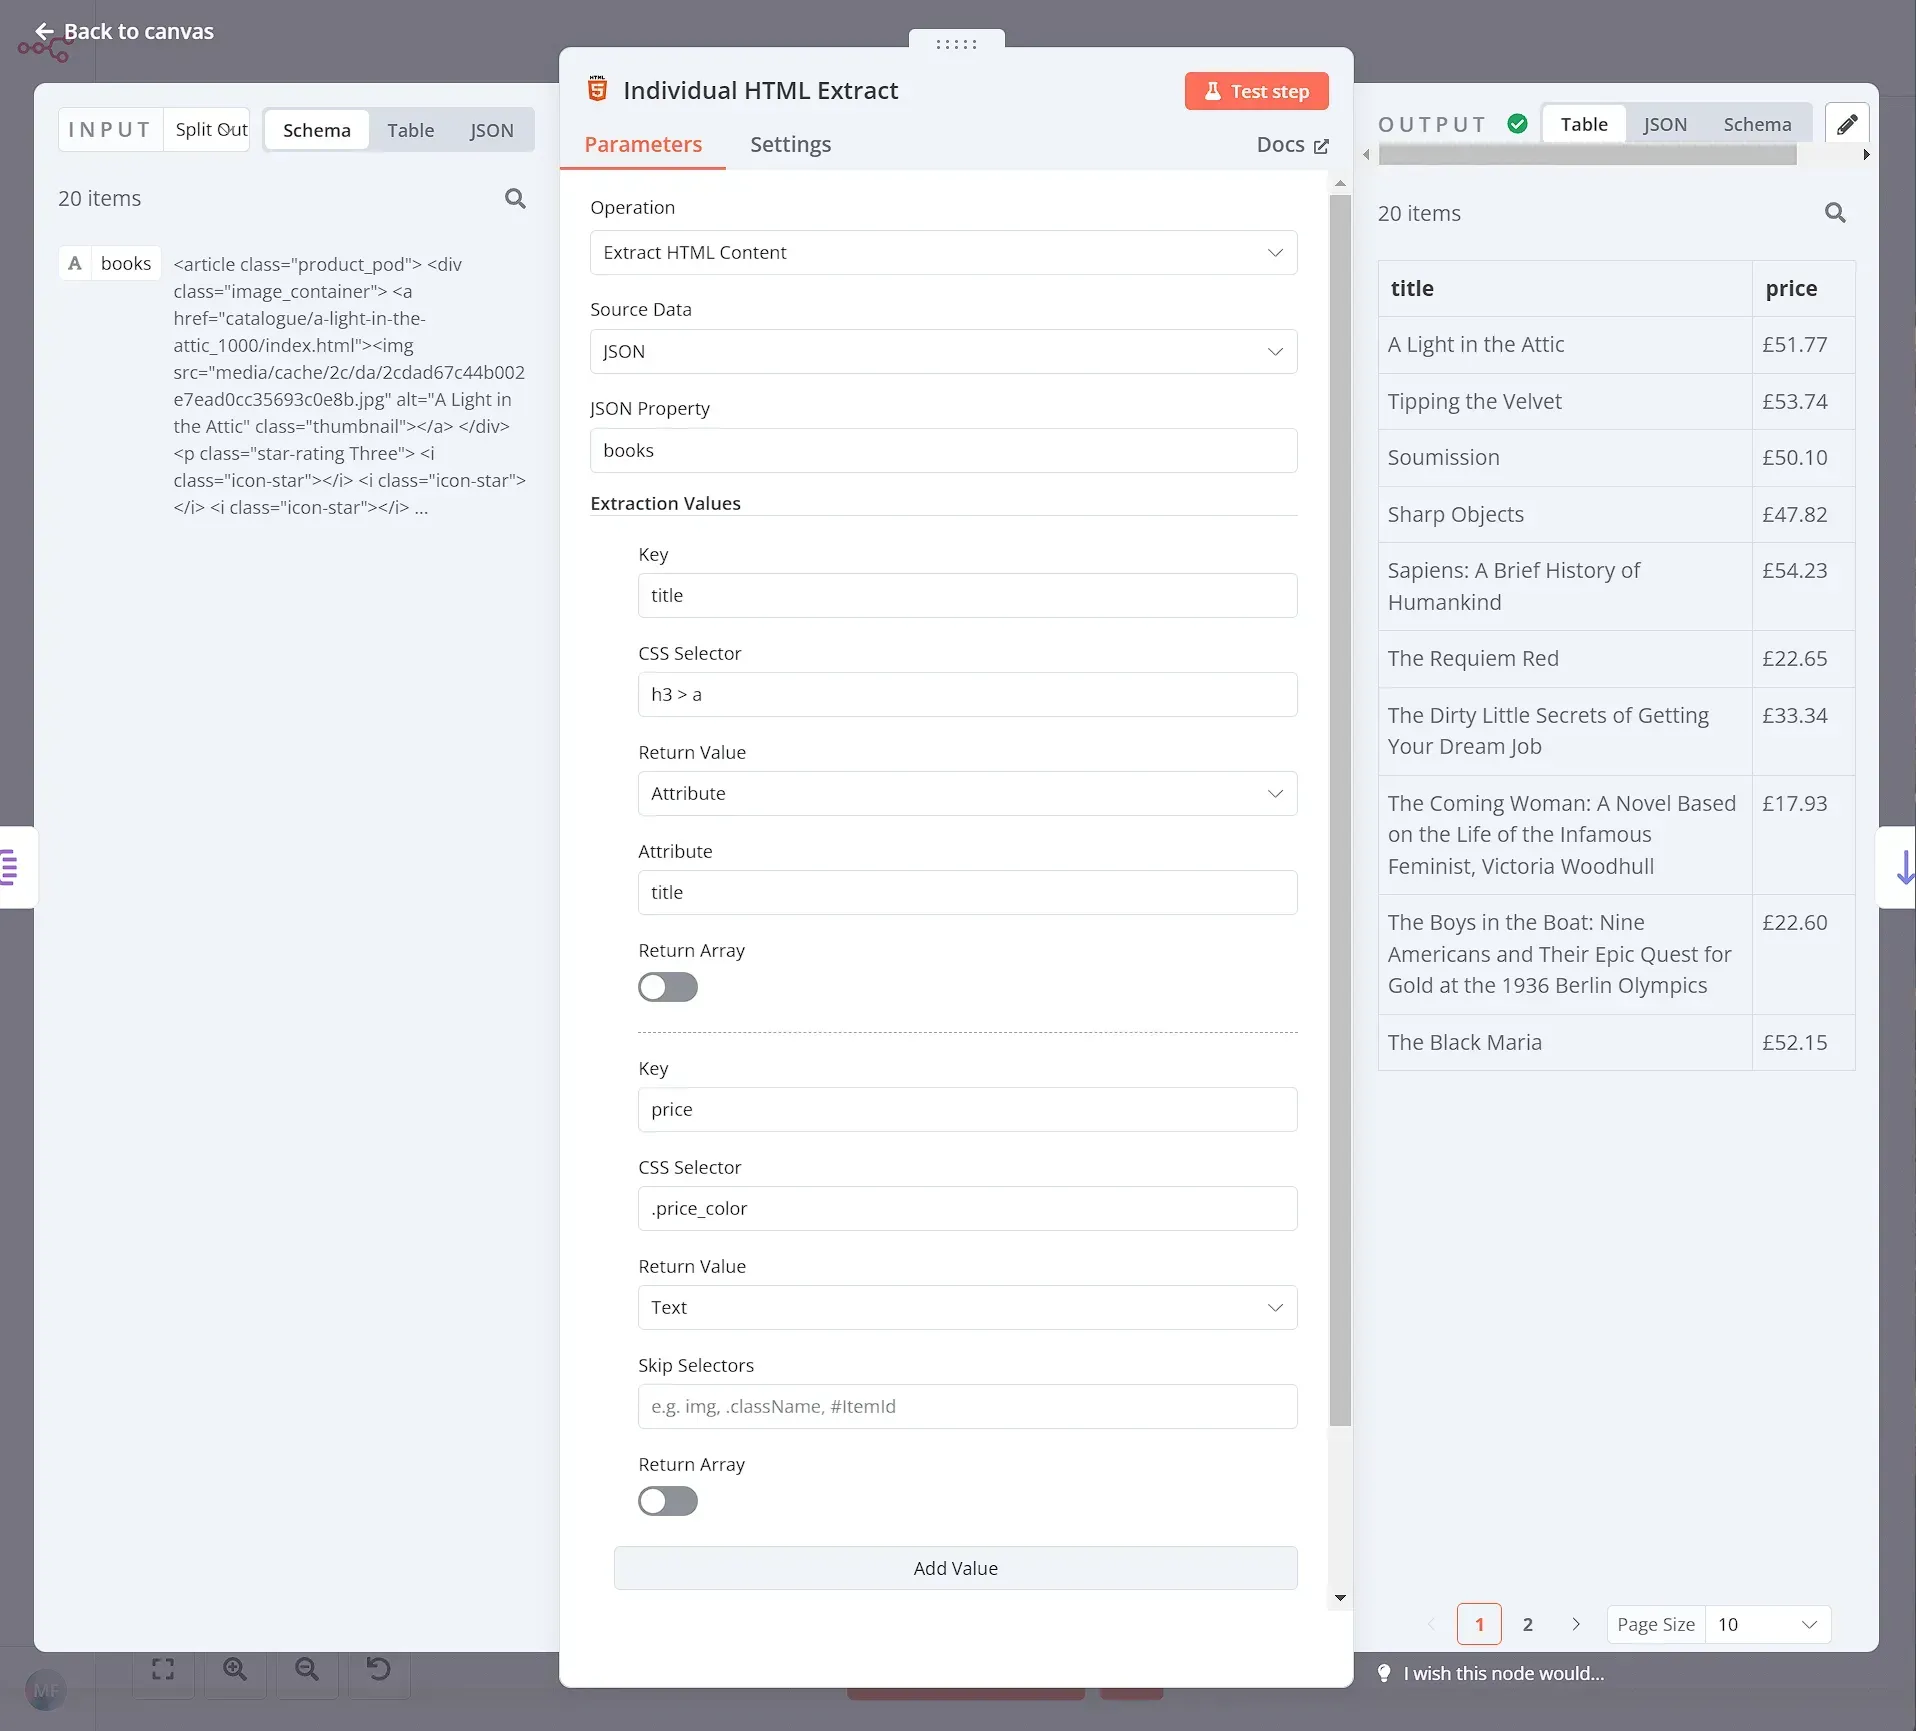
Now that you have a list of 20 items (books), you need to extract the title and price from their HTML. To do this, we will use another HTML node with the following parameters:
- Source Data: JSON
- JSON Property: books
Extraction Values:
- Key: title
- CSS Selector:
h3 - Return Value: Text
- Key: price
- CSS Selector:
article > div.product_price > p.price_color - Return Value: Text
When you execute the node, the result should look like this:
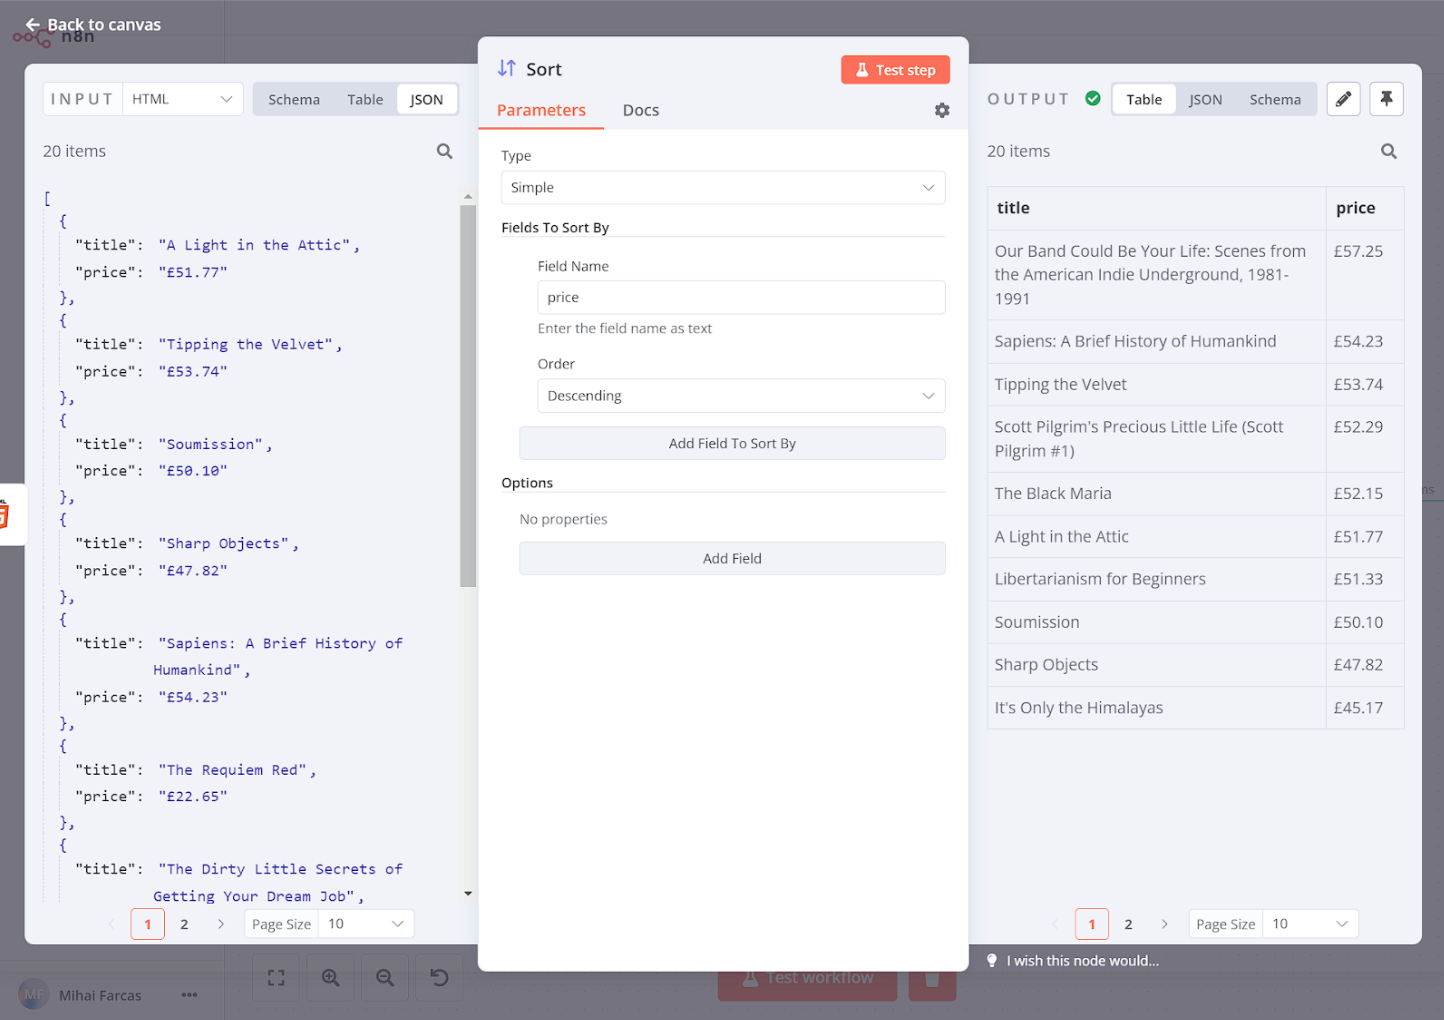
Step 3: Sort the data
Let’s sort the books by their price in descending order. To do this, we can use the Sort node. We leave the Type as Simple and under Fields To Sort By we set Field Name to price and Order Descending.
When you execute the node, the result should look like this:
Step 4: Write the scraped data to a spreadsheet
Now that you scraped the data in a structured way, you'll want to export it as a CSV file. To do this, use the Convert to File node. From the Operation dropdown select Convert to CSV, and set Put Output File in Field to data.
When you execute the node, the result should look like this:
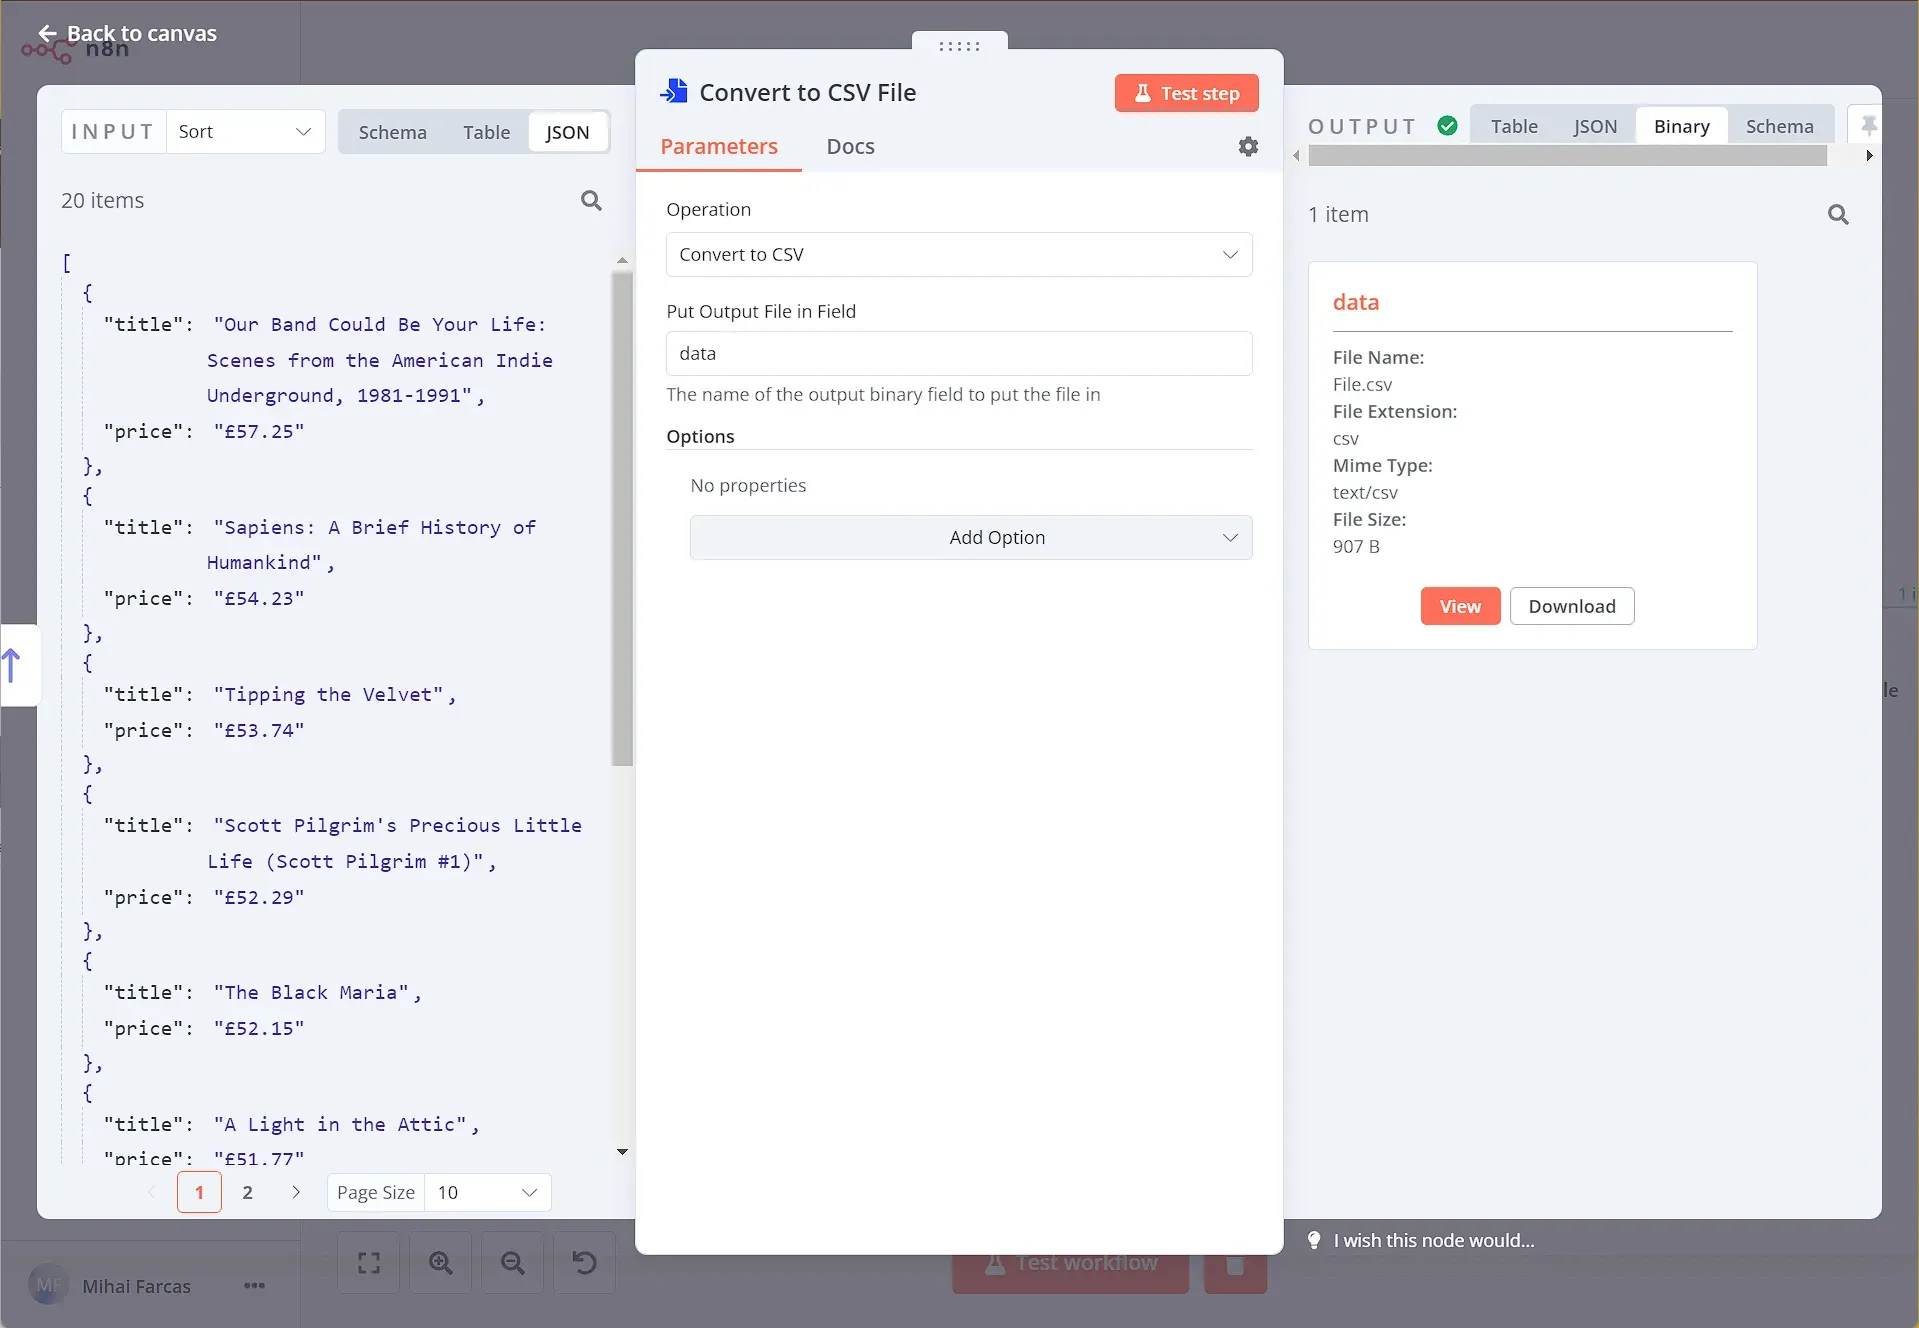
And it’s as simple as that! You now have a CSV file which you can download or even better, we can send it by email.
Step 5: Send the data set via email
To send the CSV file as an attachment via e-mail we can use the Gmail node with the following parameters:
- Resource: Message
- Operation: Send
- To: email address you want to send to
- Subject: bookstore csv (or any other subject line you'd like)
- Message: Hey, here's the scraped data from the online bookstore!
And for Options / Attachments set:
- Attached Field Name: data (this is the name of the binary property set in the Convert to File node)
Now make sure you have When you execute the node, the result should look like this:
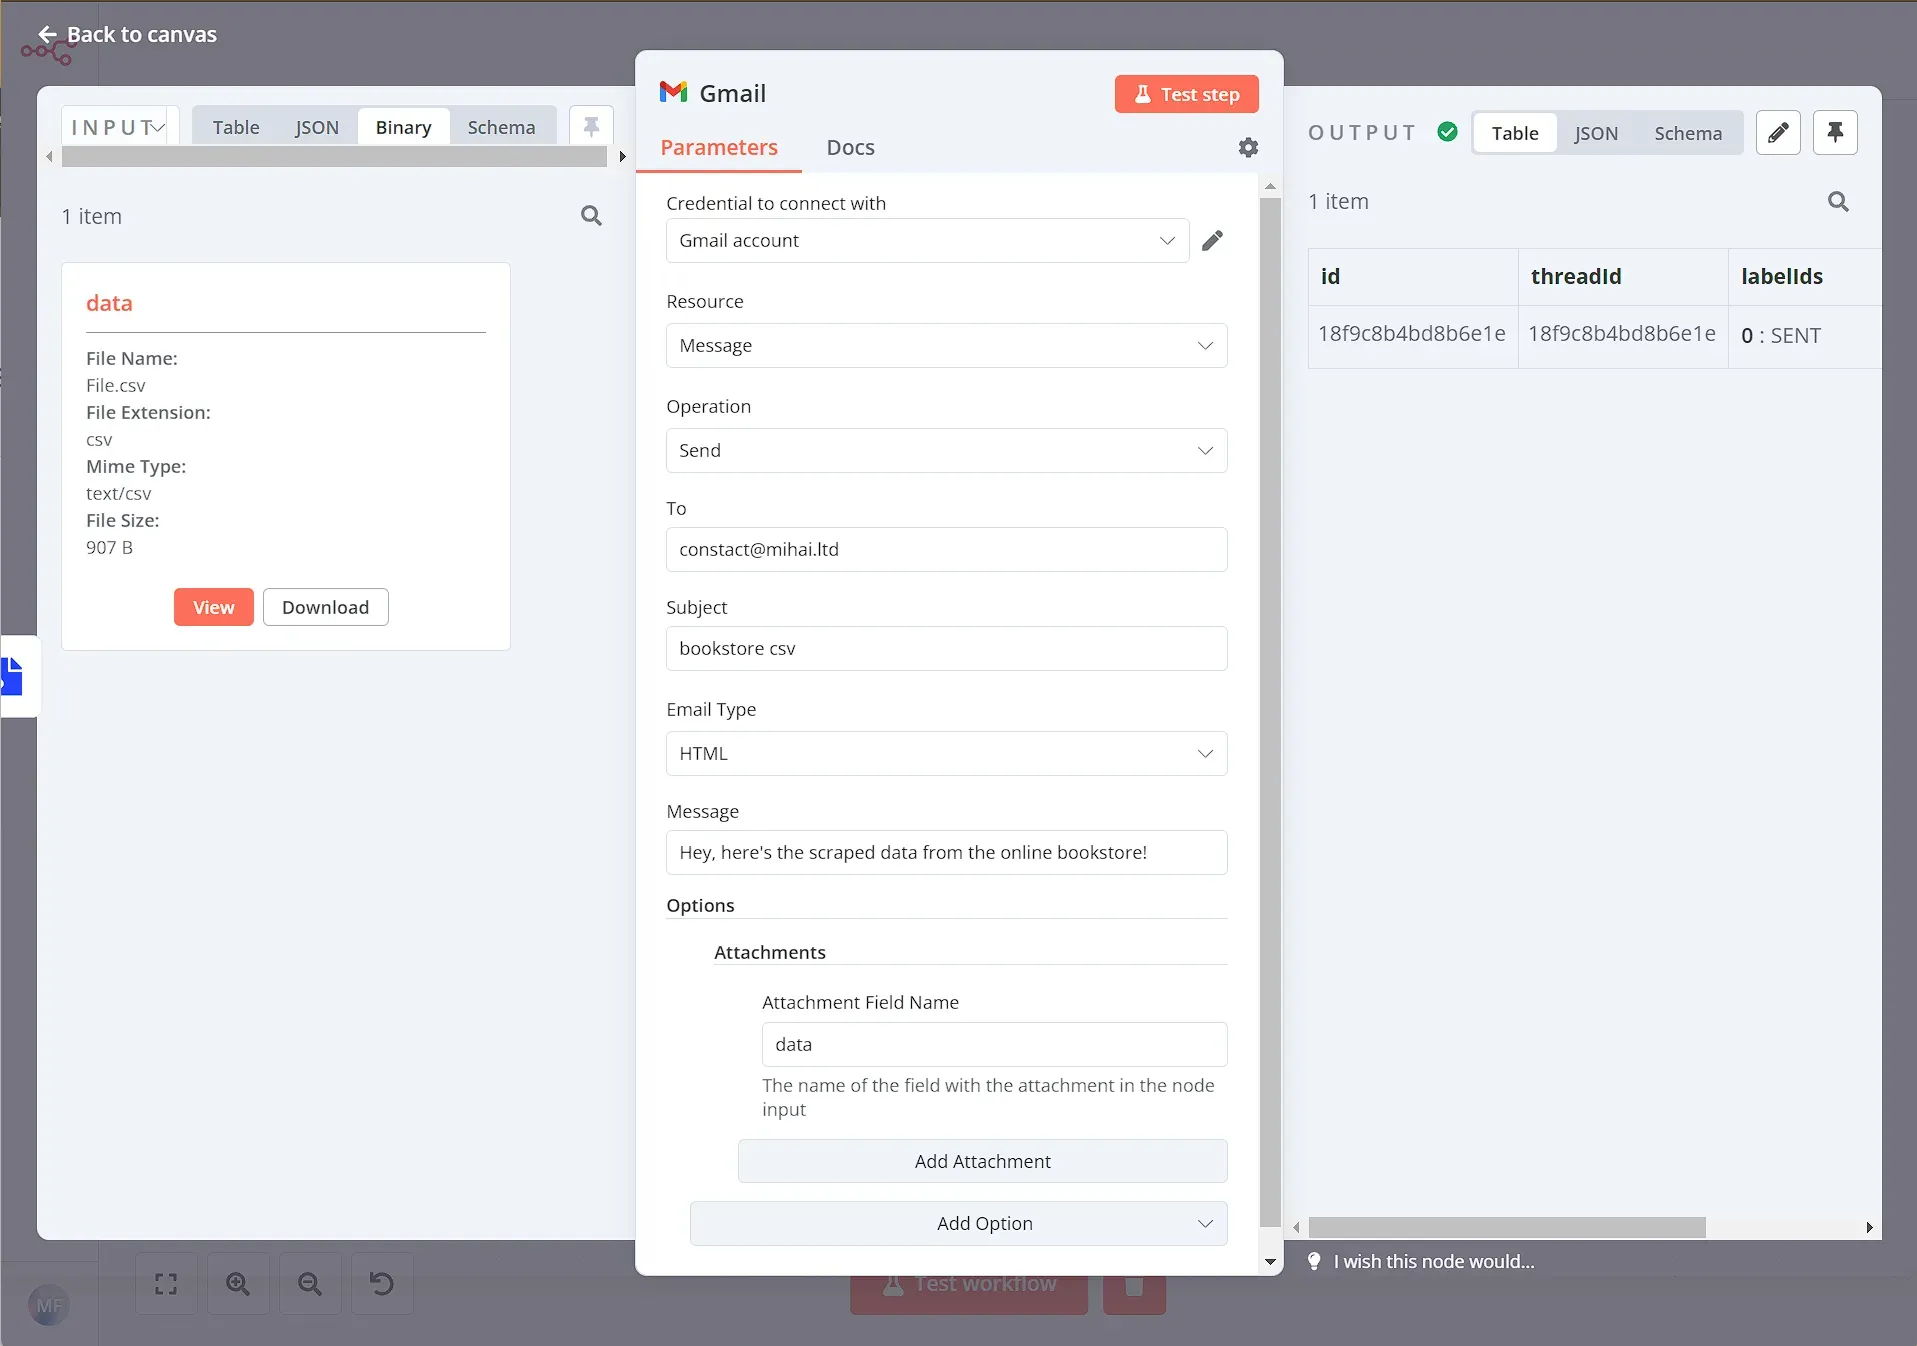
Now, just check your inbox – you should receive an email with the CSV file!
Step 6: Save the data to Google Sheets or Microsoft Excel
Another option is to store the scraped data in a Google Sheet. You can do this using the Google Sheets node setup like so:
- Credential to connect with: your Google Cloud account credentials.
- Resource: Sheet Within Document
- Operation: Append Row
- Document: pick a document from the dropdown list. Alternatively you can select a sheet by URL or ID.
- Sheet: pick the sheet from the dropdown list. Alternatively you can select a sheet by URL, by ID or by name.Mapping Column Mode: use Map Automatically for most cases.
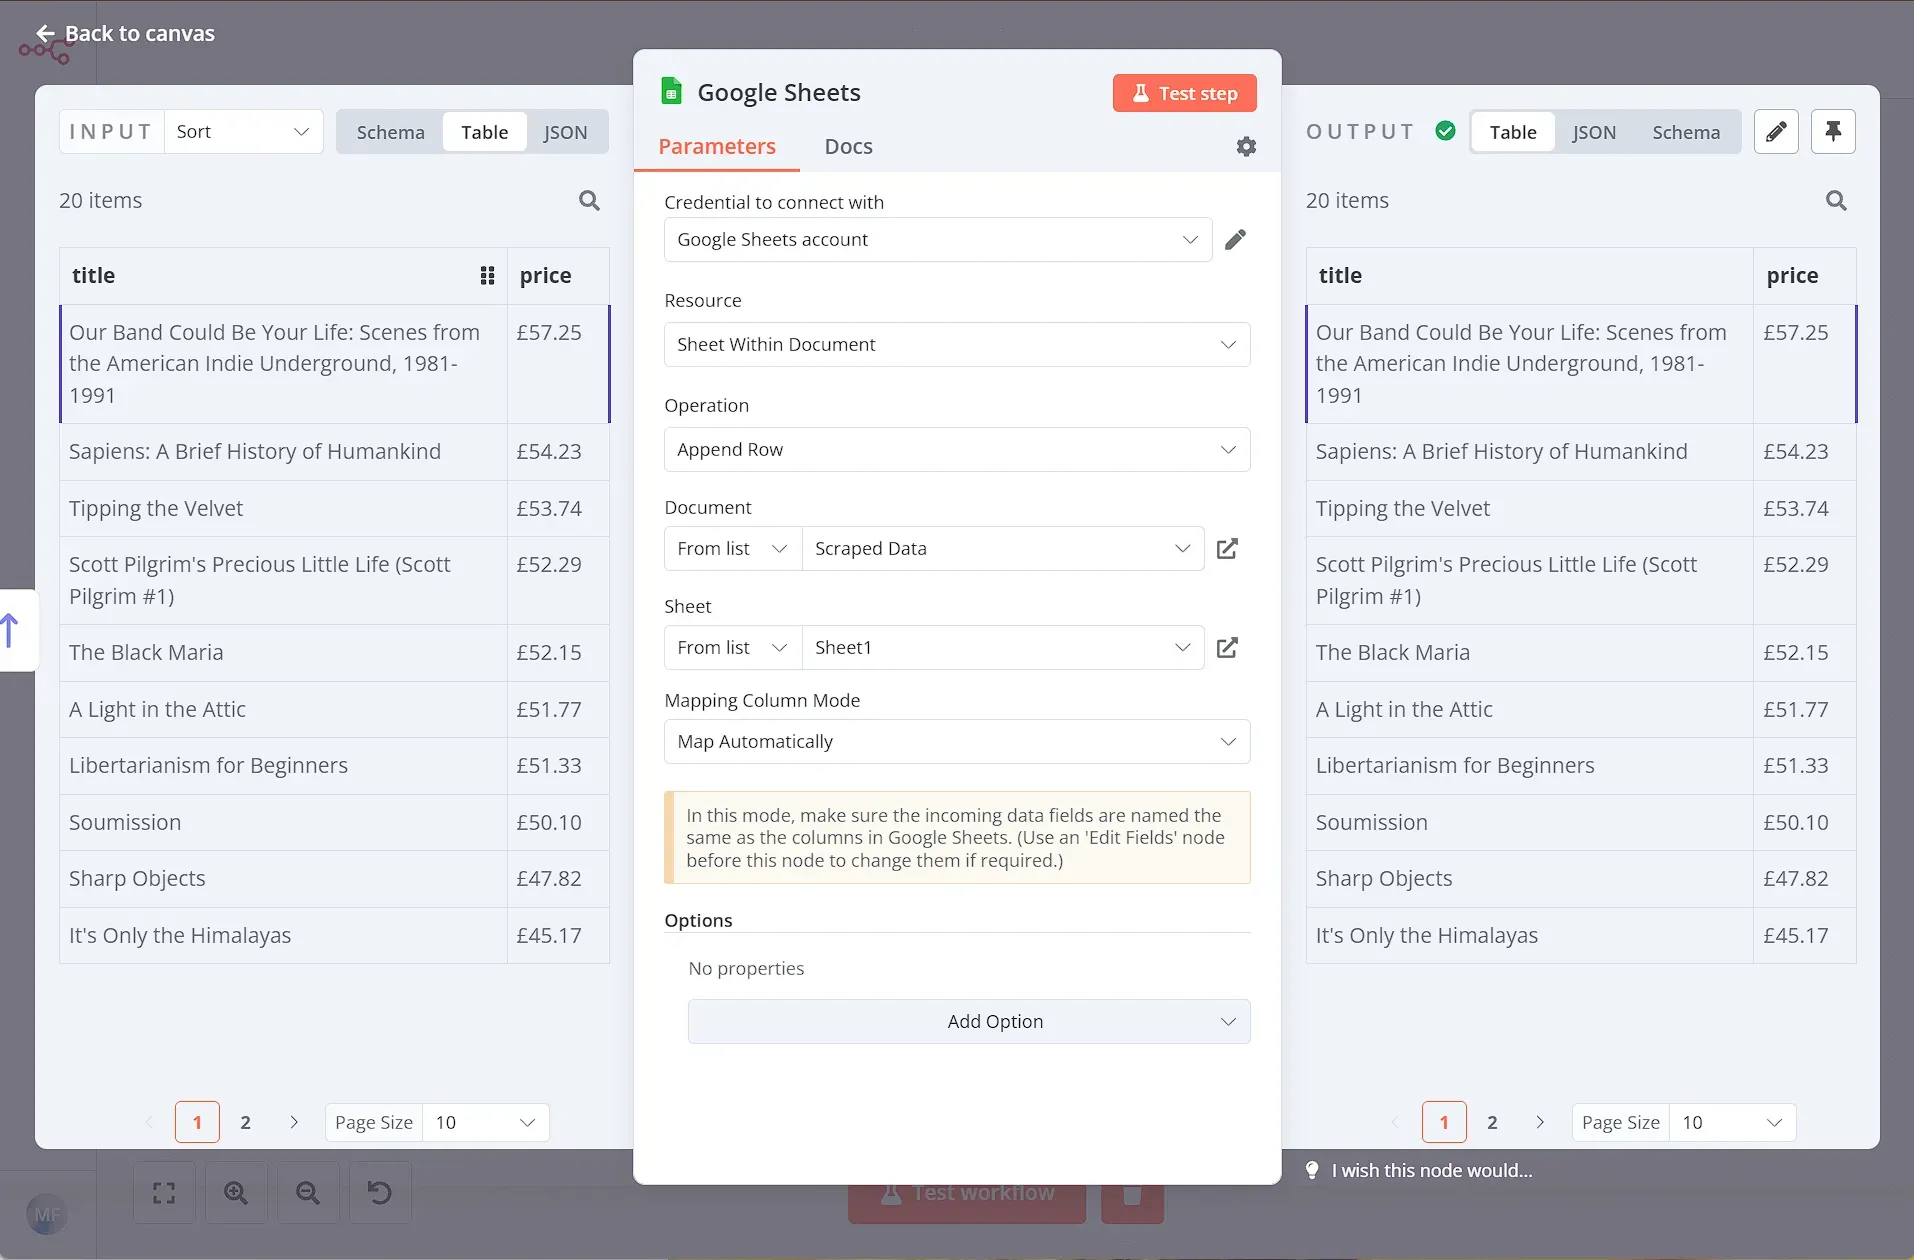
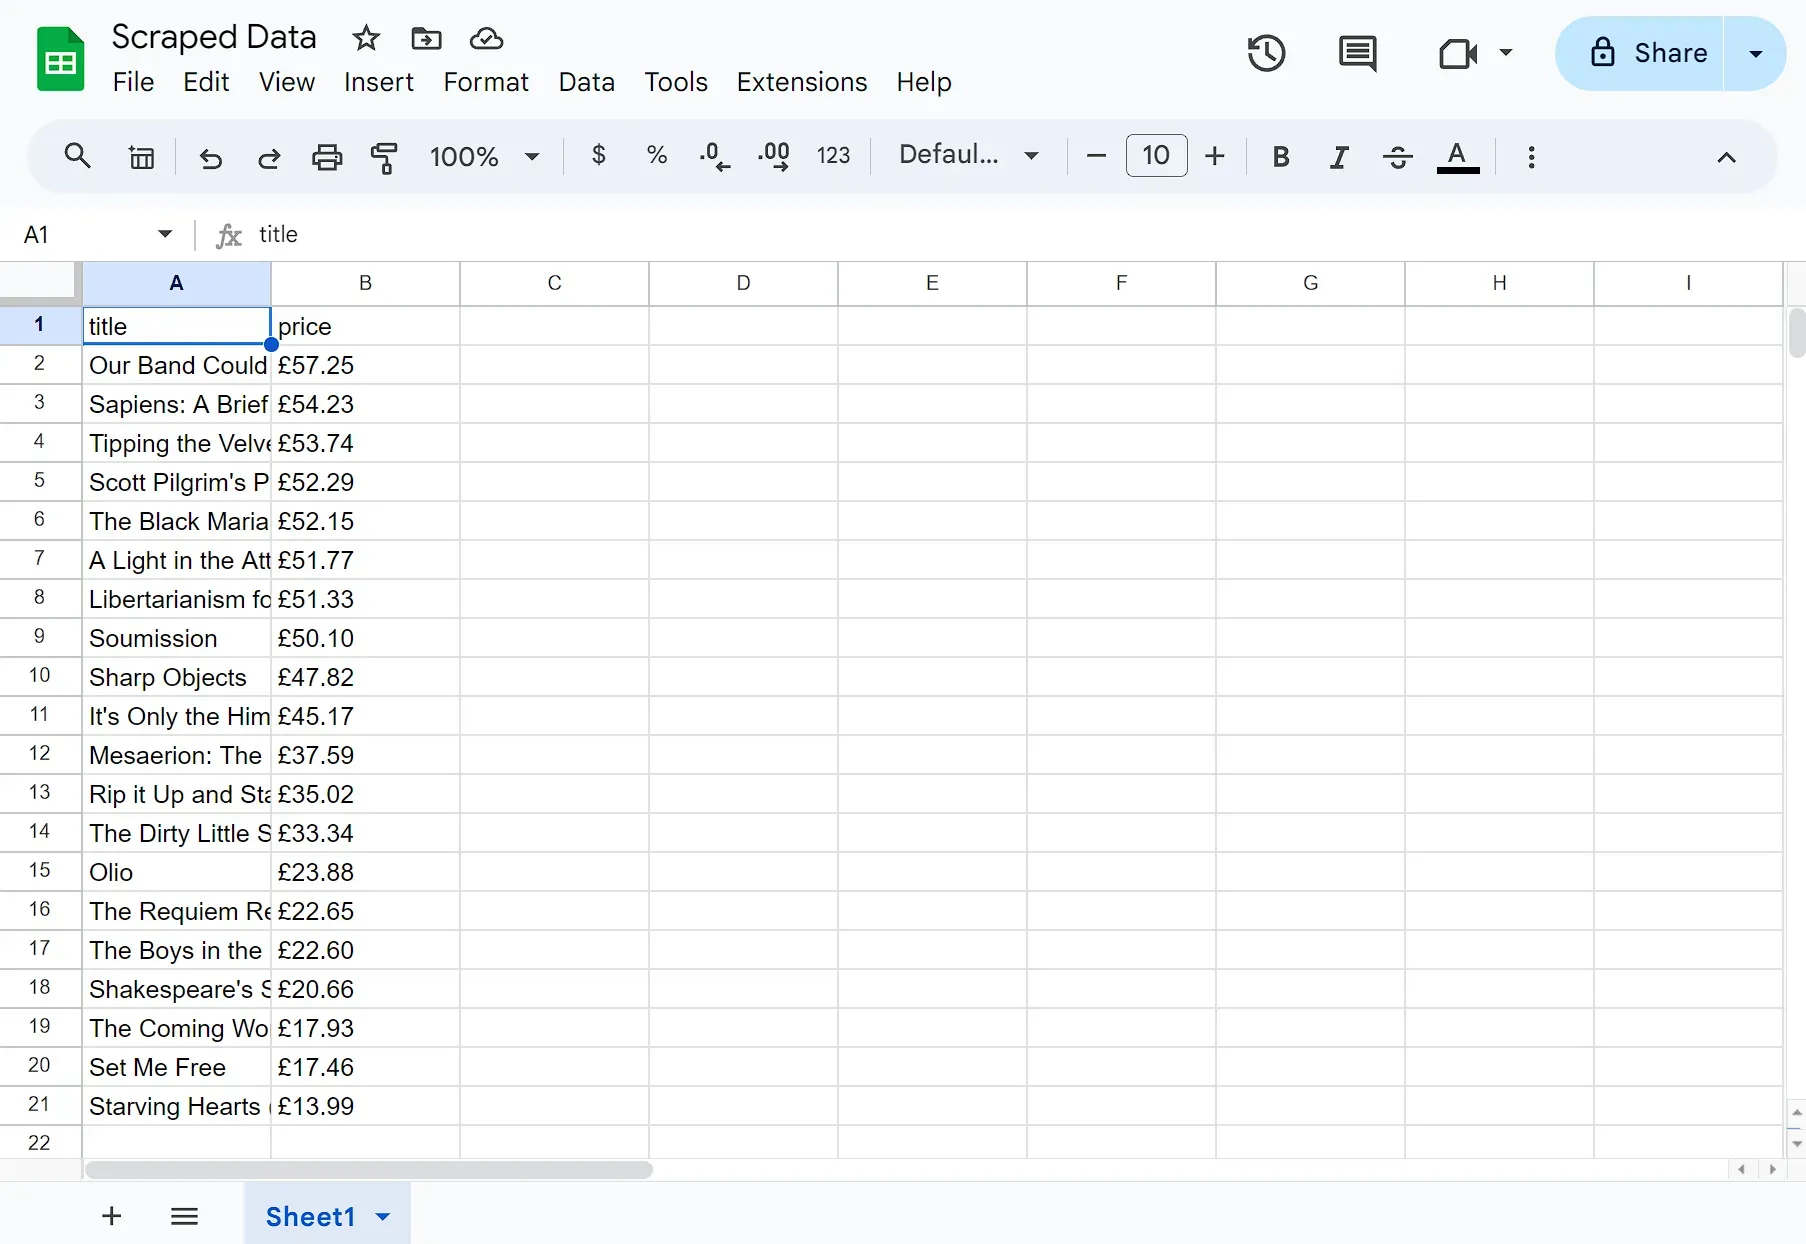
After executing the node, you should see all the books and their prices in the Google Sheet.
If you prefer working with Microsoft Excel, n8n seamlessly integrates with it as well. Instead of using the Google Sheets node, you would use the Microsoft Excel node instead.
This requires a bit of extra setup, first you need to setup Microsoft Azure credentials with Microsoft Graph permissions.
Next create an Excel workbook and grab its ID from the URL. The format of the URL should be something like https://onedrive.live.com/edit?id=XXXXXXXXXXXXXXXX&. The ID will be located between id= and &.
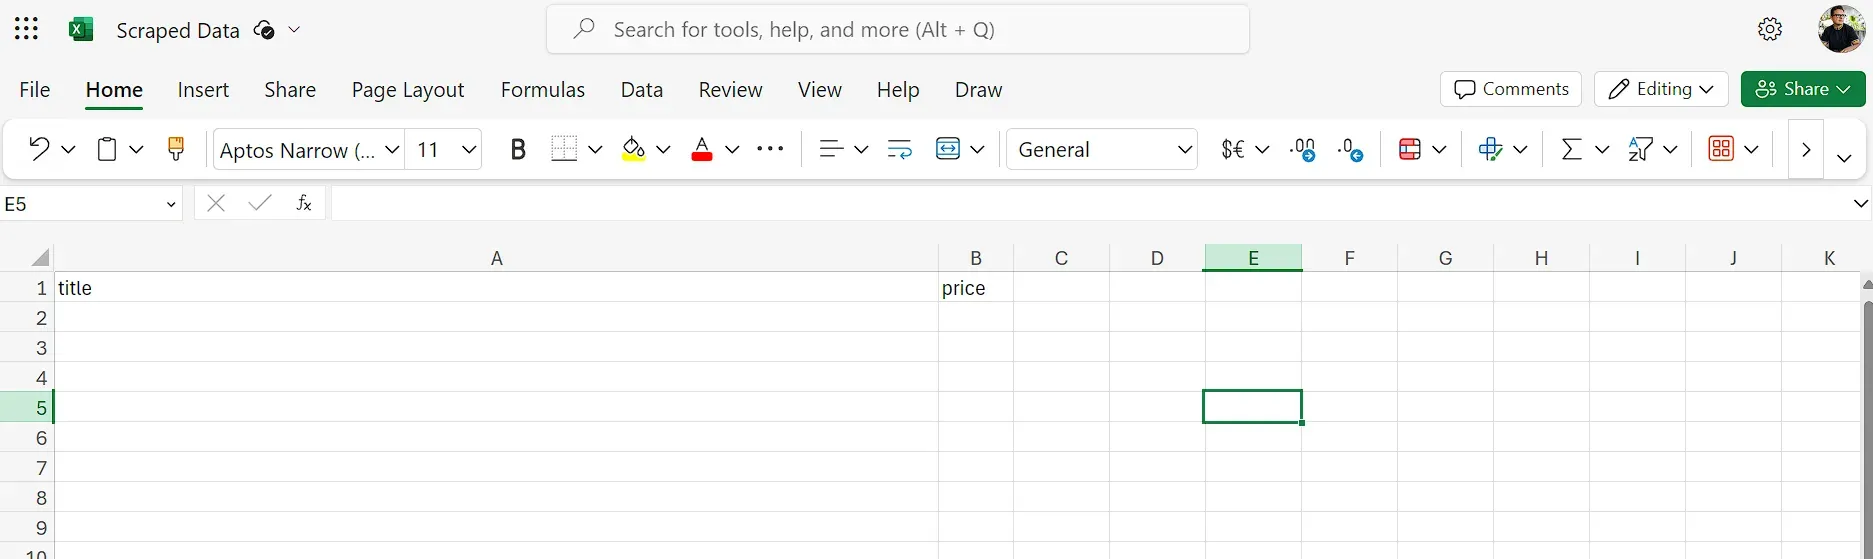
Unlike Google Sheets where we did not need to have a certain format, here we need to create the column headers, otherwise the appending to the sheet doesn’t work. In this case, we can add title and price as column headers. The empty workbook should look something like this:
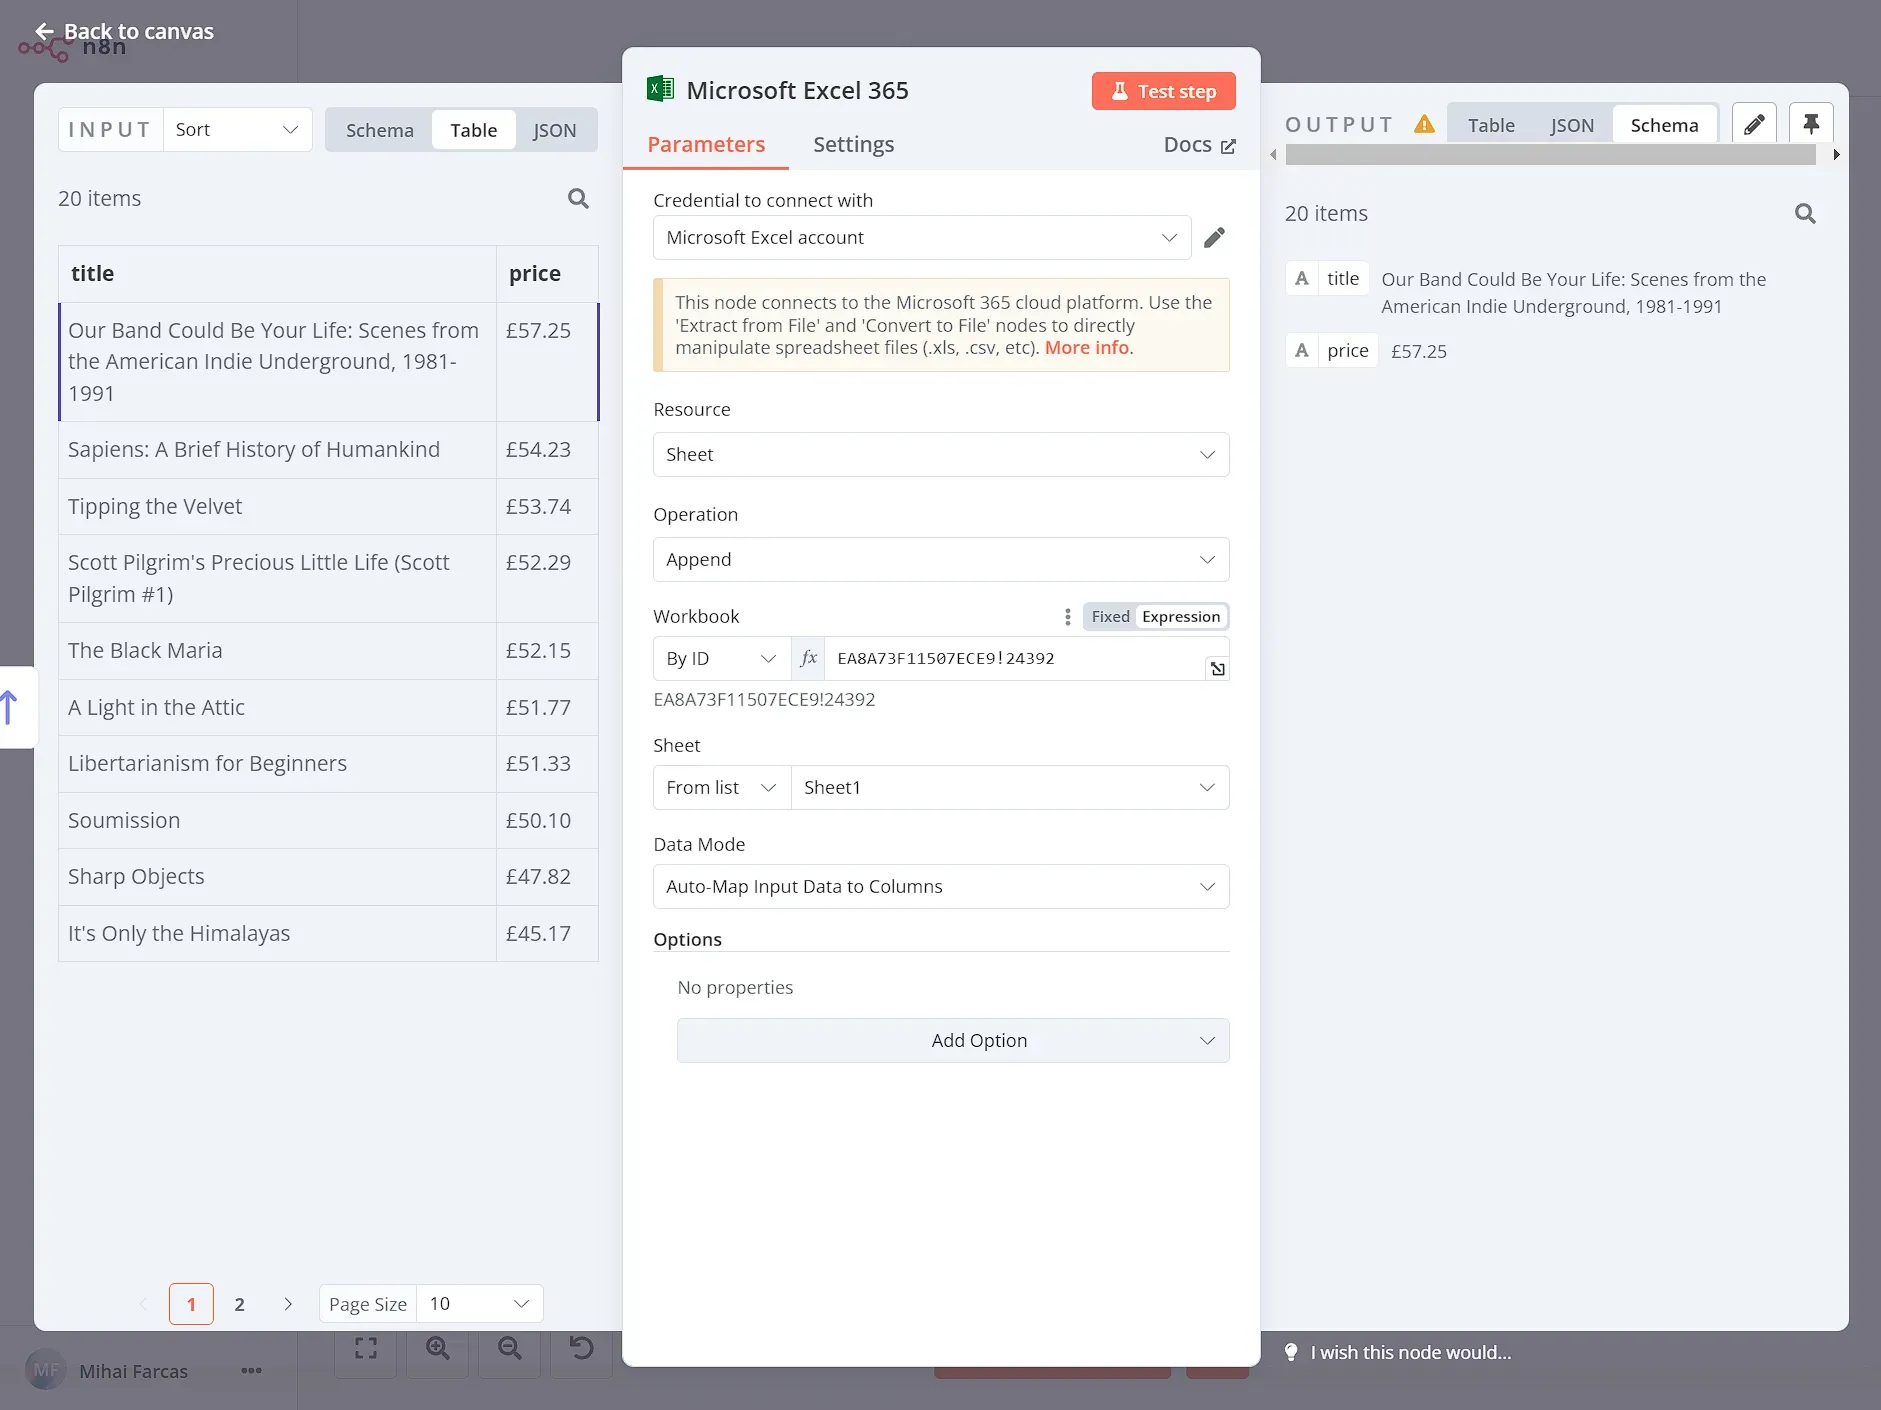
Next, we need to configure the Microsoft Excel node like so:
- Resource: Sheet
- Operation: Append
- Workbook (By ID): Workbook ID
- Sheet: select a sheet from the listData Mode: Auto-Map Input Data to Columns
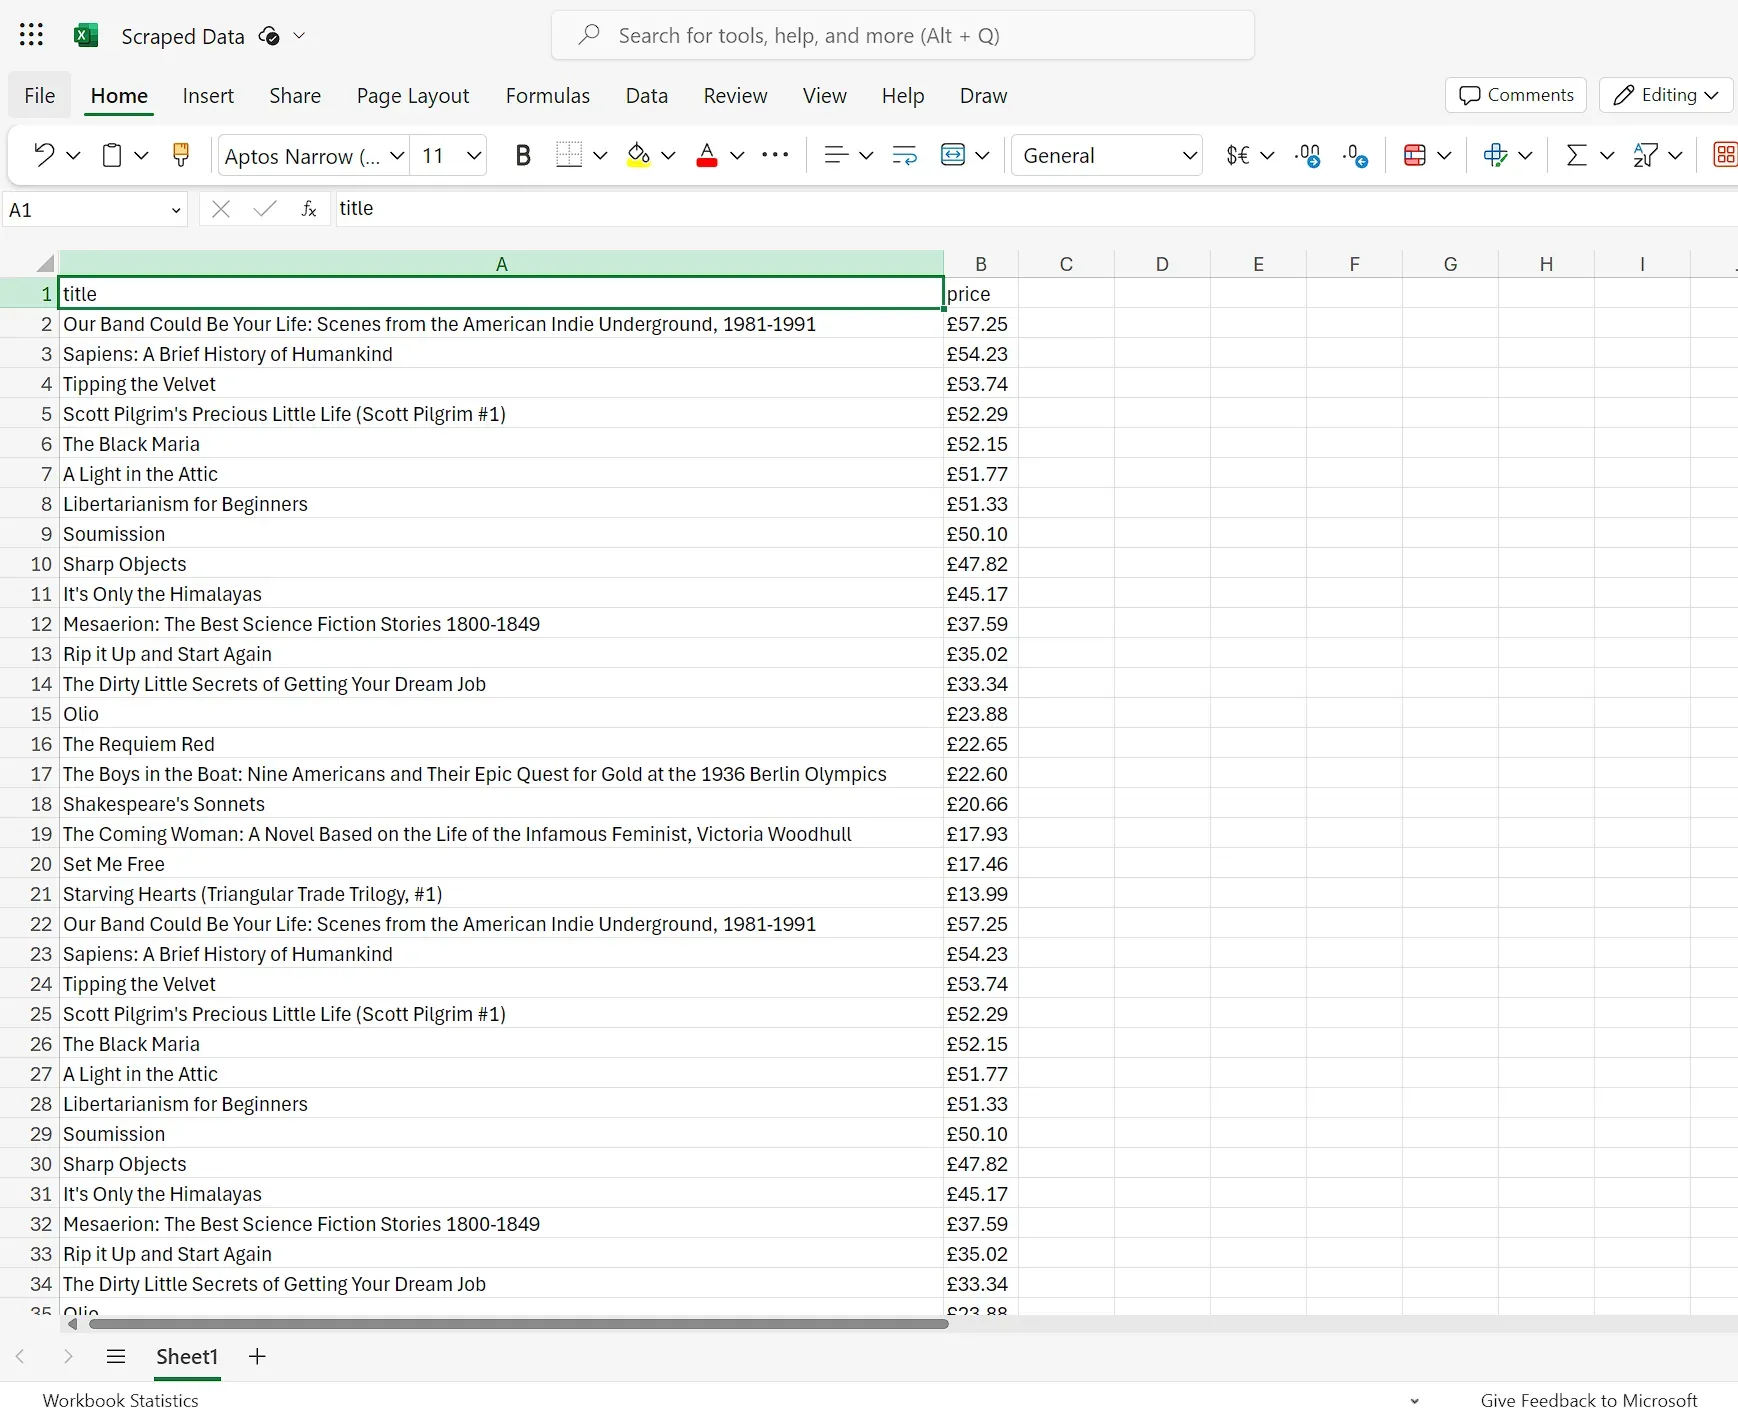
After running the node, you should see the data appended to the Excel sheet:
- Resource: Sheet
- Operation: Append
- Workbook (By ID): Workbook ID
- Sheet: select a sheet from the listData Mode: Auto-Map Input Data to Columns
After running the node, you should see the data appended to the Excel sheet:
Bonus: Can ChatGPT scrape the web?
While n8n's web scraping capabilities are impressive on their own, its integration with AI tools like ChatGPT opens up a world of possibilities.
In this section, we'll explore a workflow that scrapes data and leverages AI to summarize the content.
Here is an overview of a workflow that scrapes and summarizes web pages with AI:
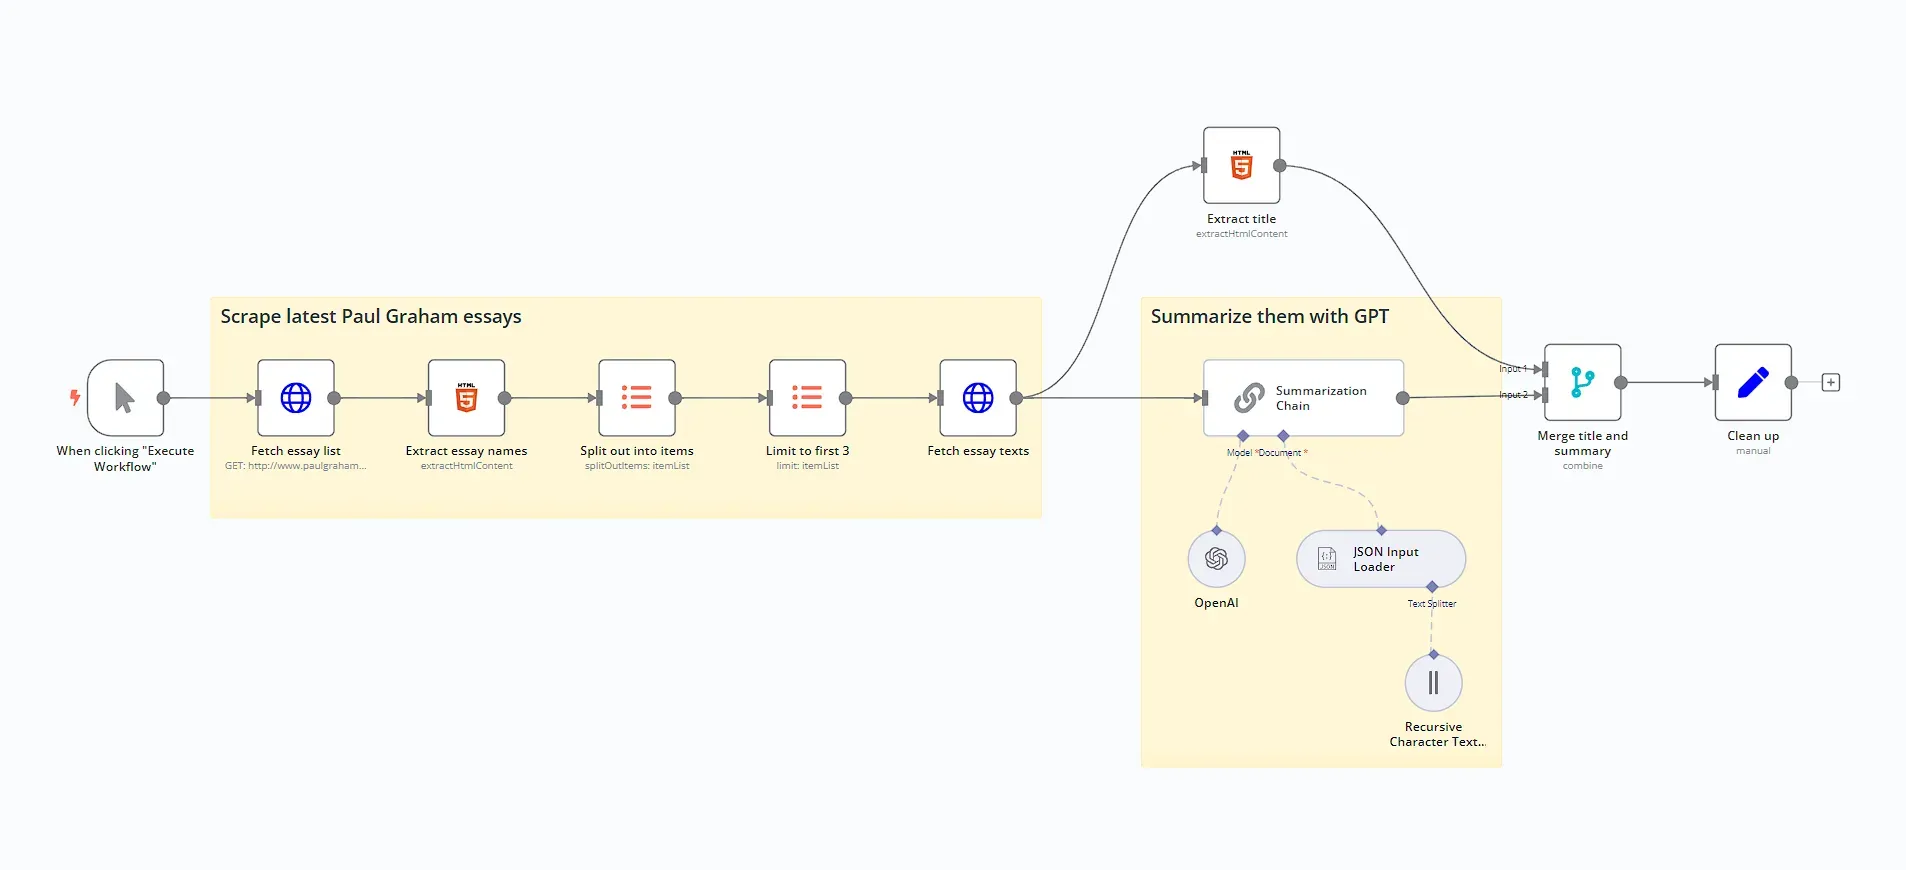
Step 1: Fetch the page content
Similarly to the previous example, we will scrape book data from the online store http://books.toscrape.com.First, we use the HTTP Request node to grab the contents of the page, like so:
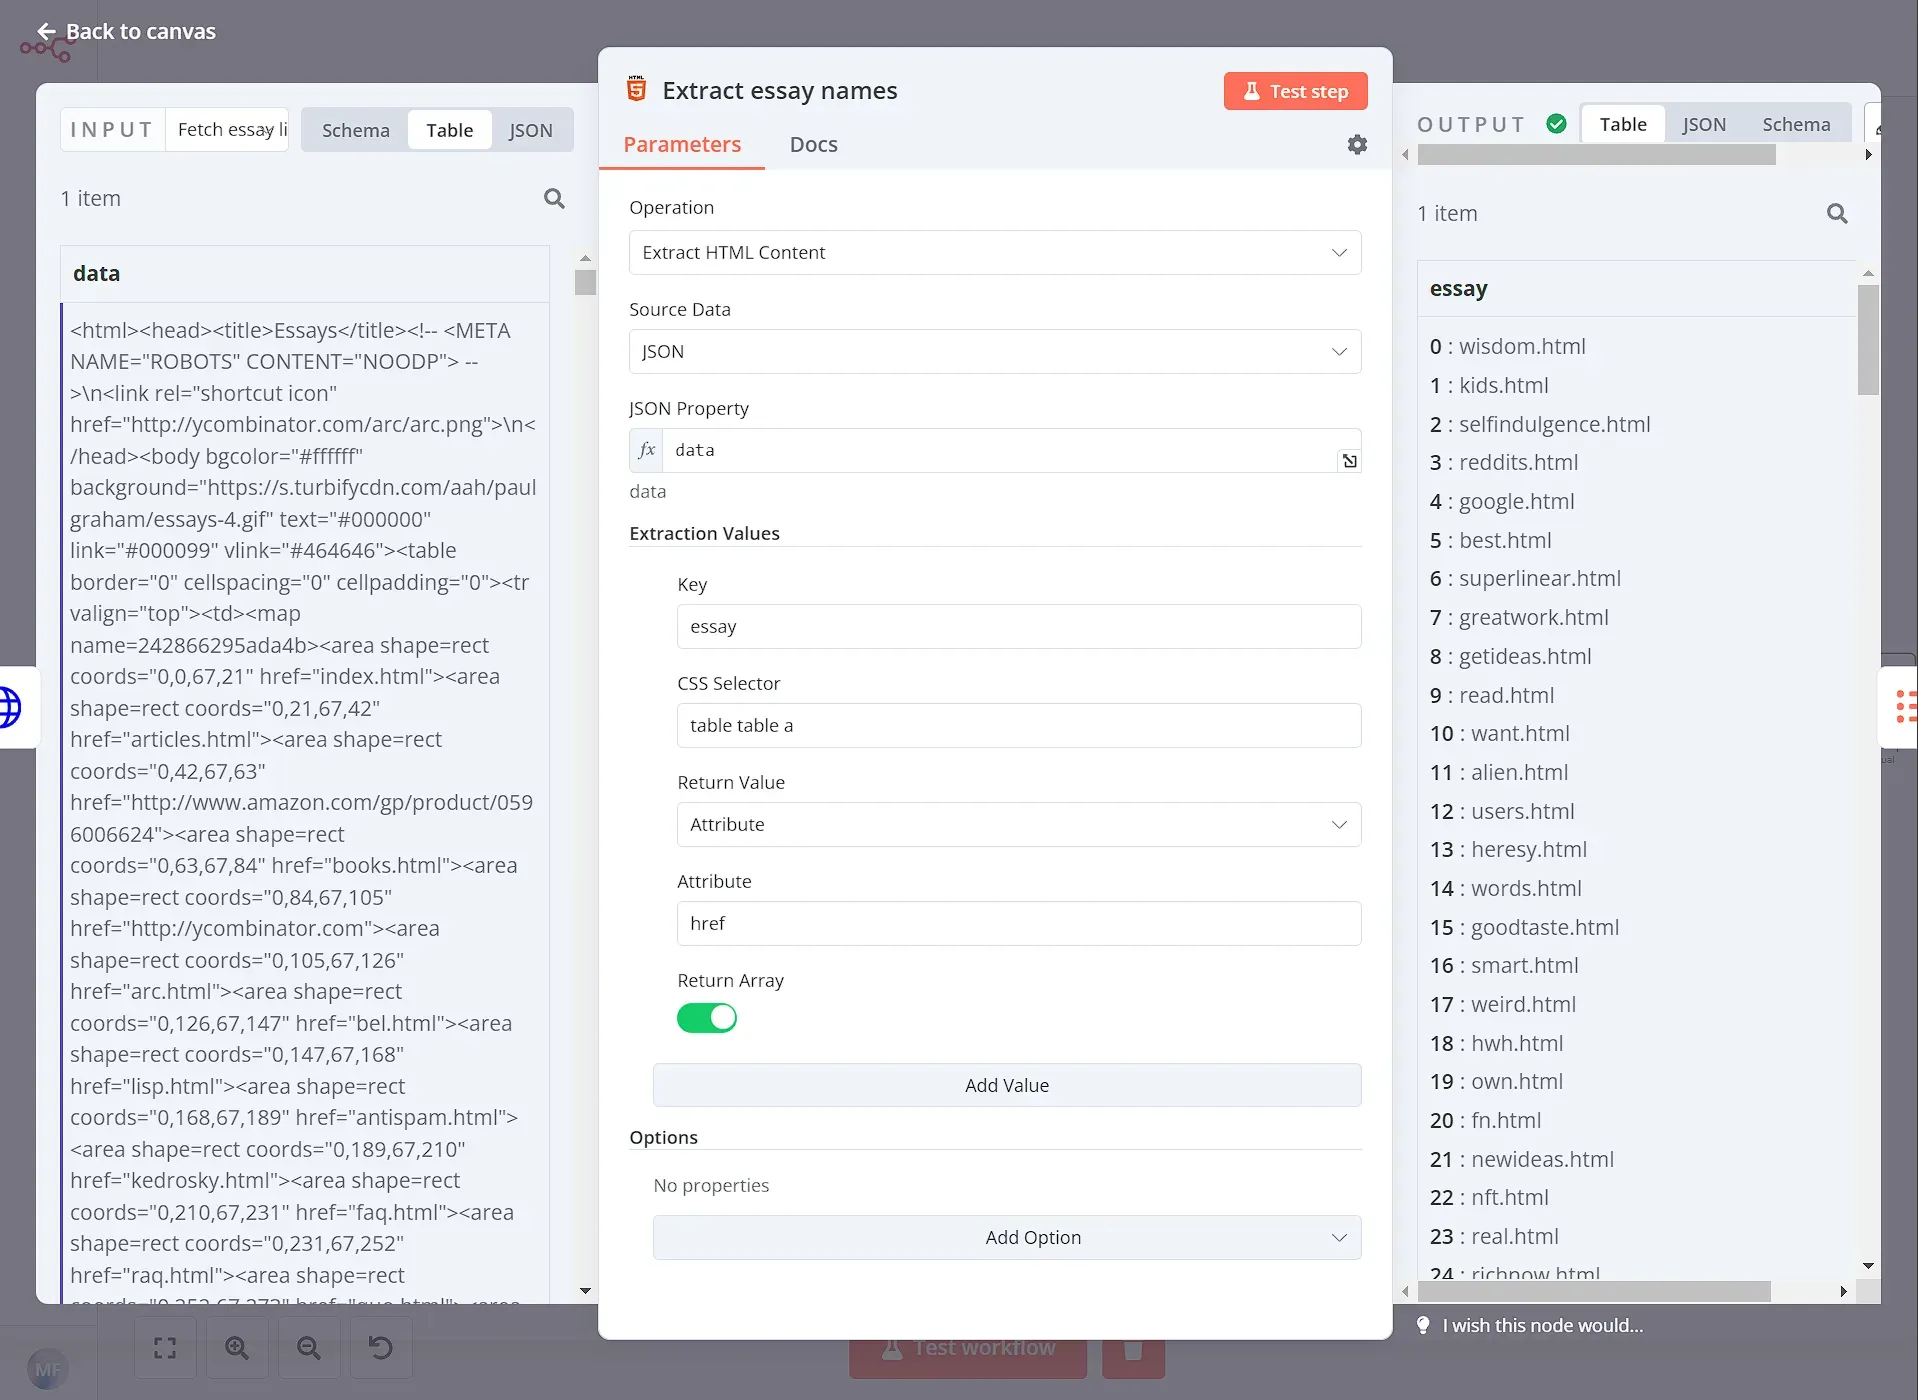
Step 2: Get the first 3 essays
Then we use the HTML Extract node to parse the resulting HTML, and grab the essay titles using the table table a CSS selector.
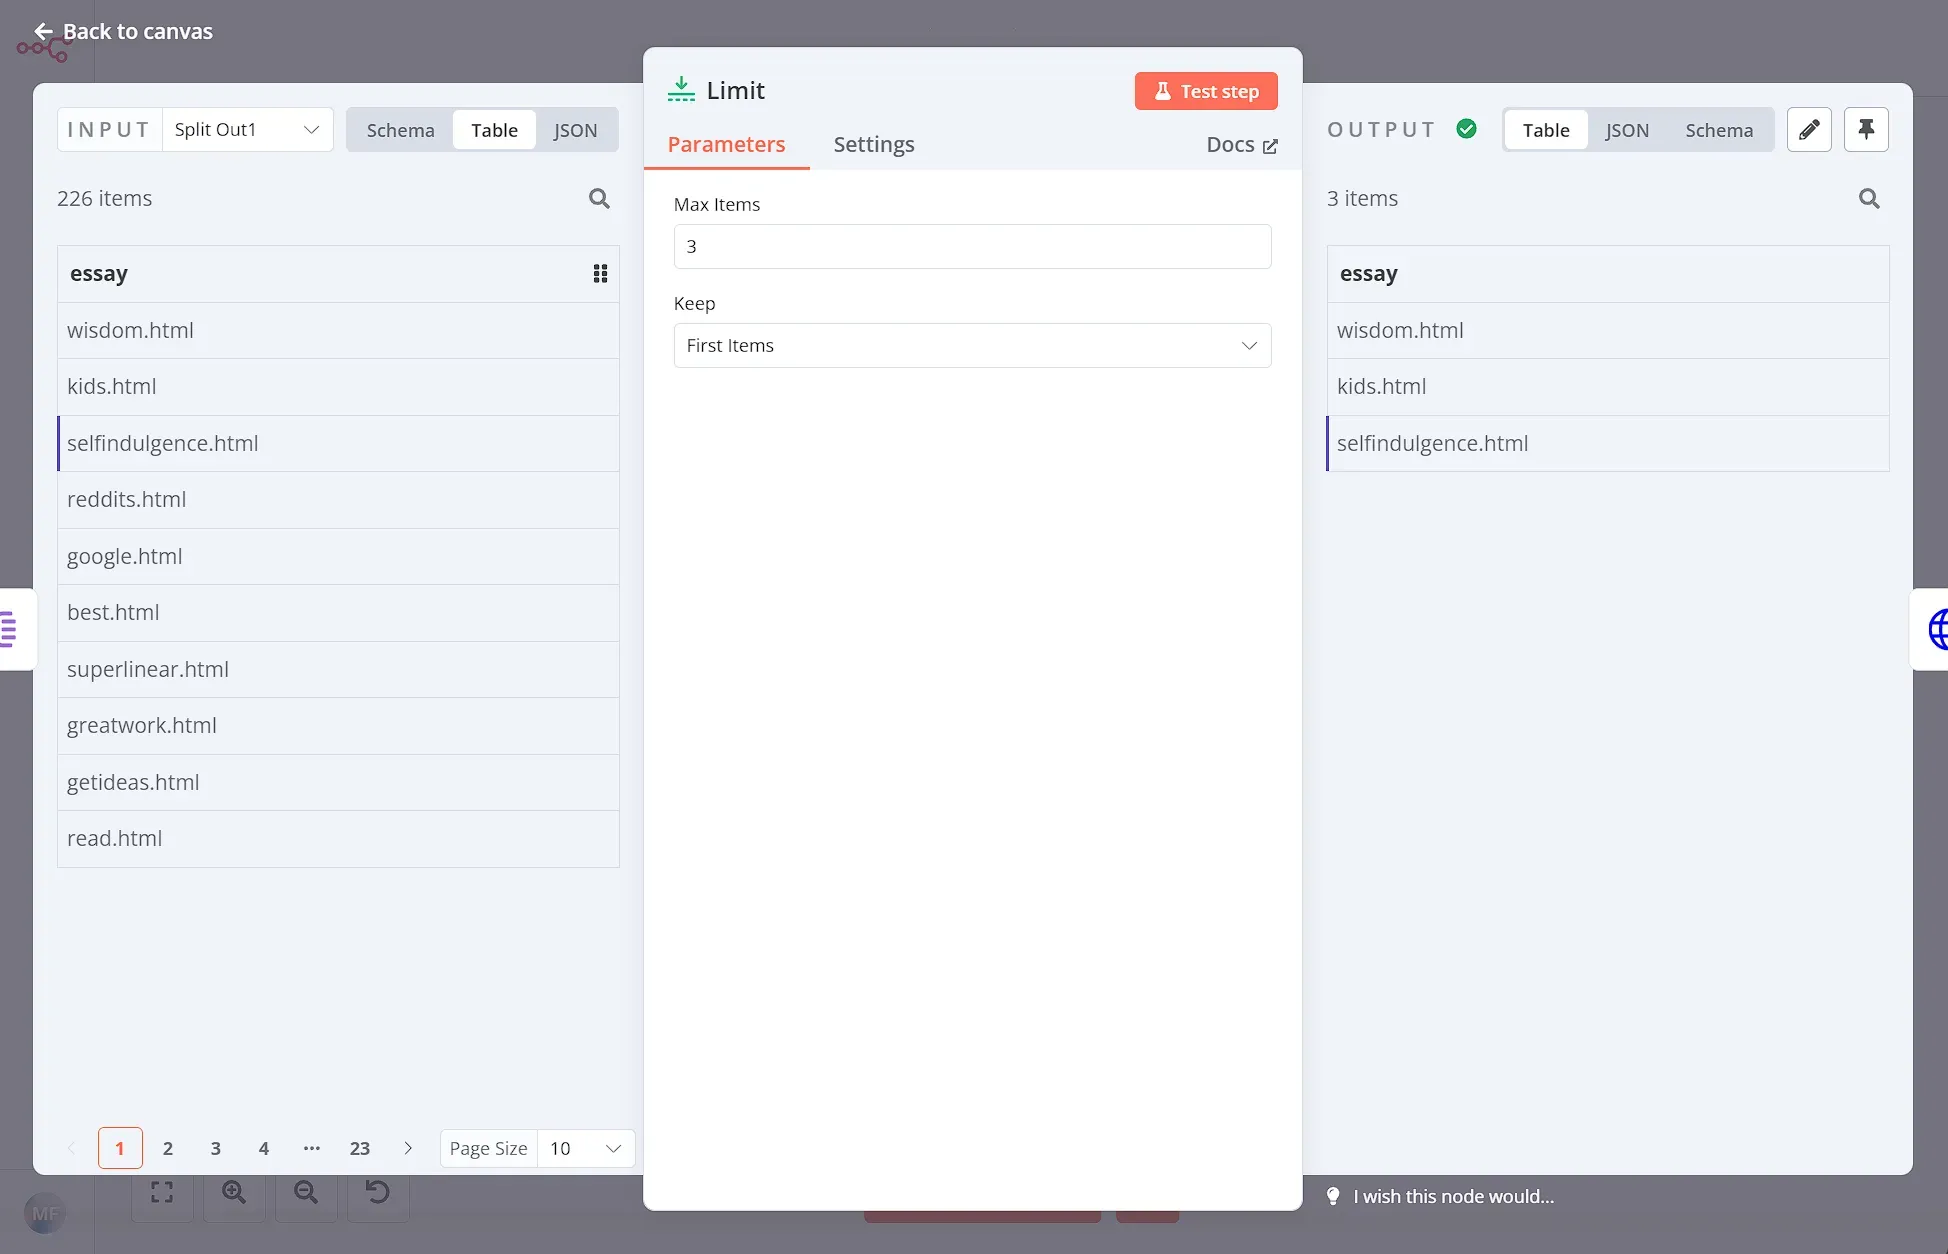
Similar to the previous workflow, we need to use the Split Out node in order to process the essays one by one. Set the Fields To Split Out to essay and leave the rest as default.

Then, using the Limit node, we can grab just the first 3 essays:
Step 3: Extract the essay text and title
The previous node gives us just the page URL of each essay. Using another HTTP Request node we can then access the page and extract the content there:
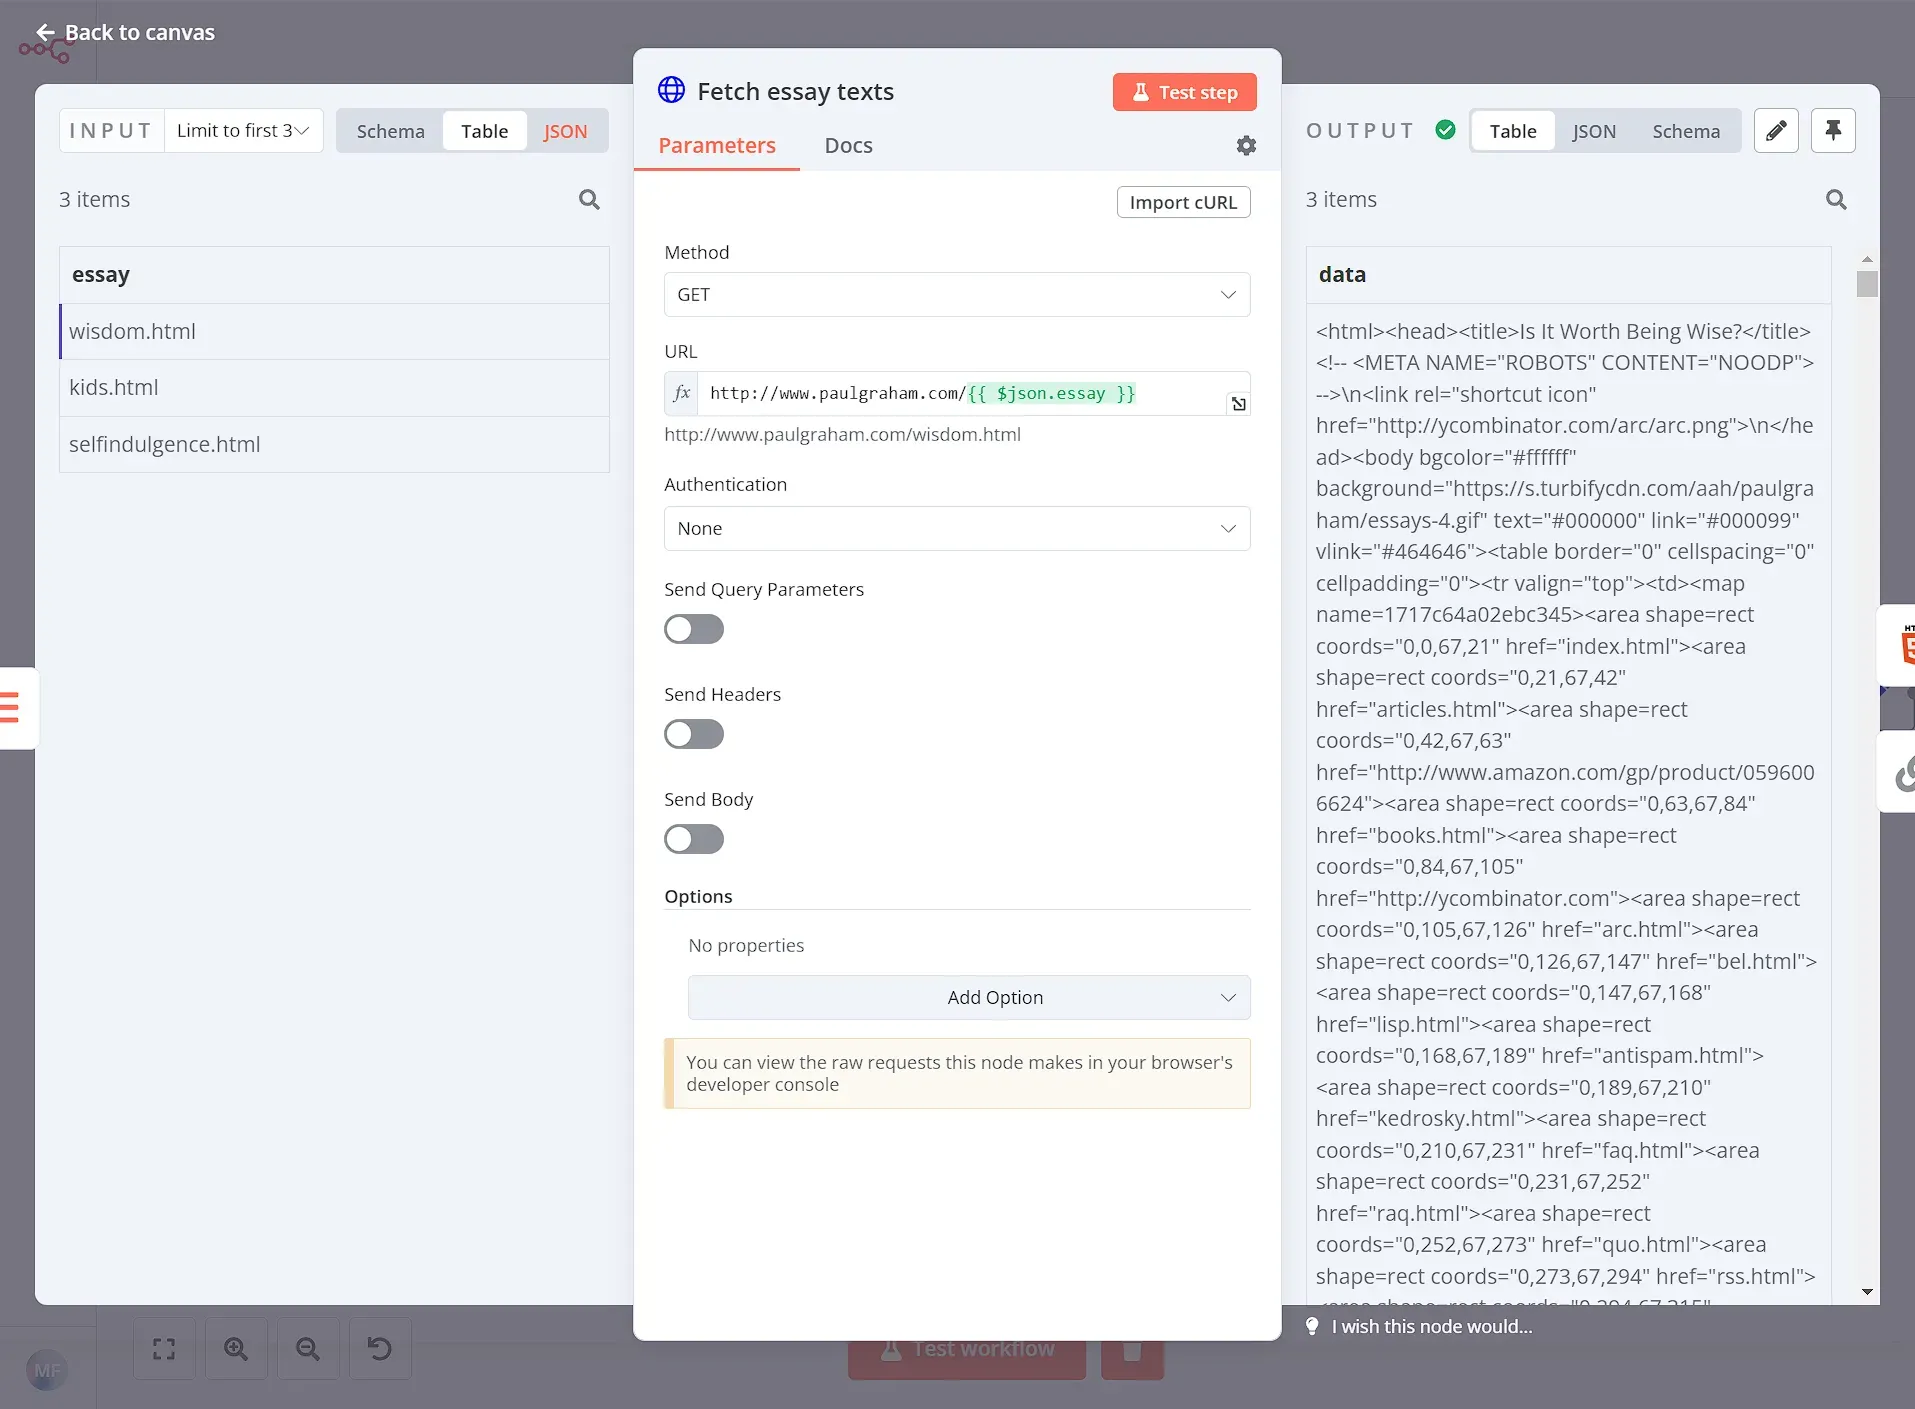
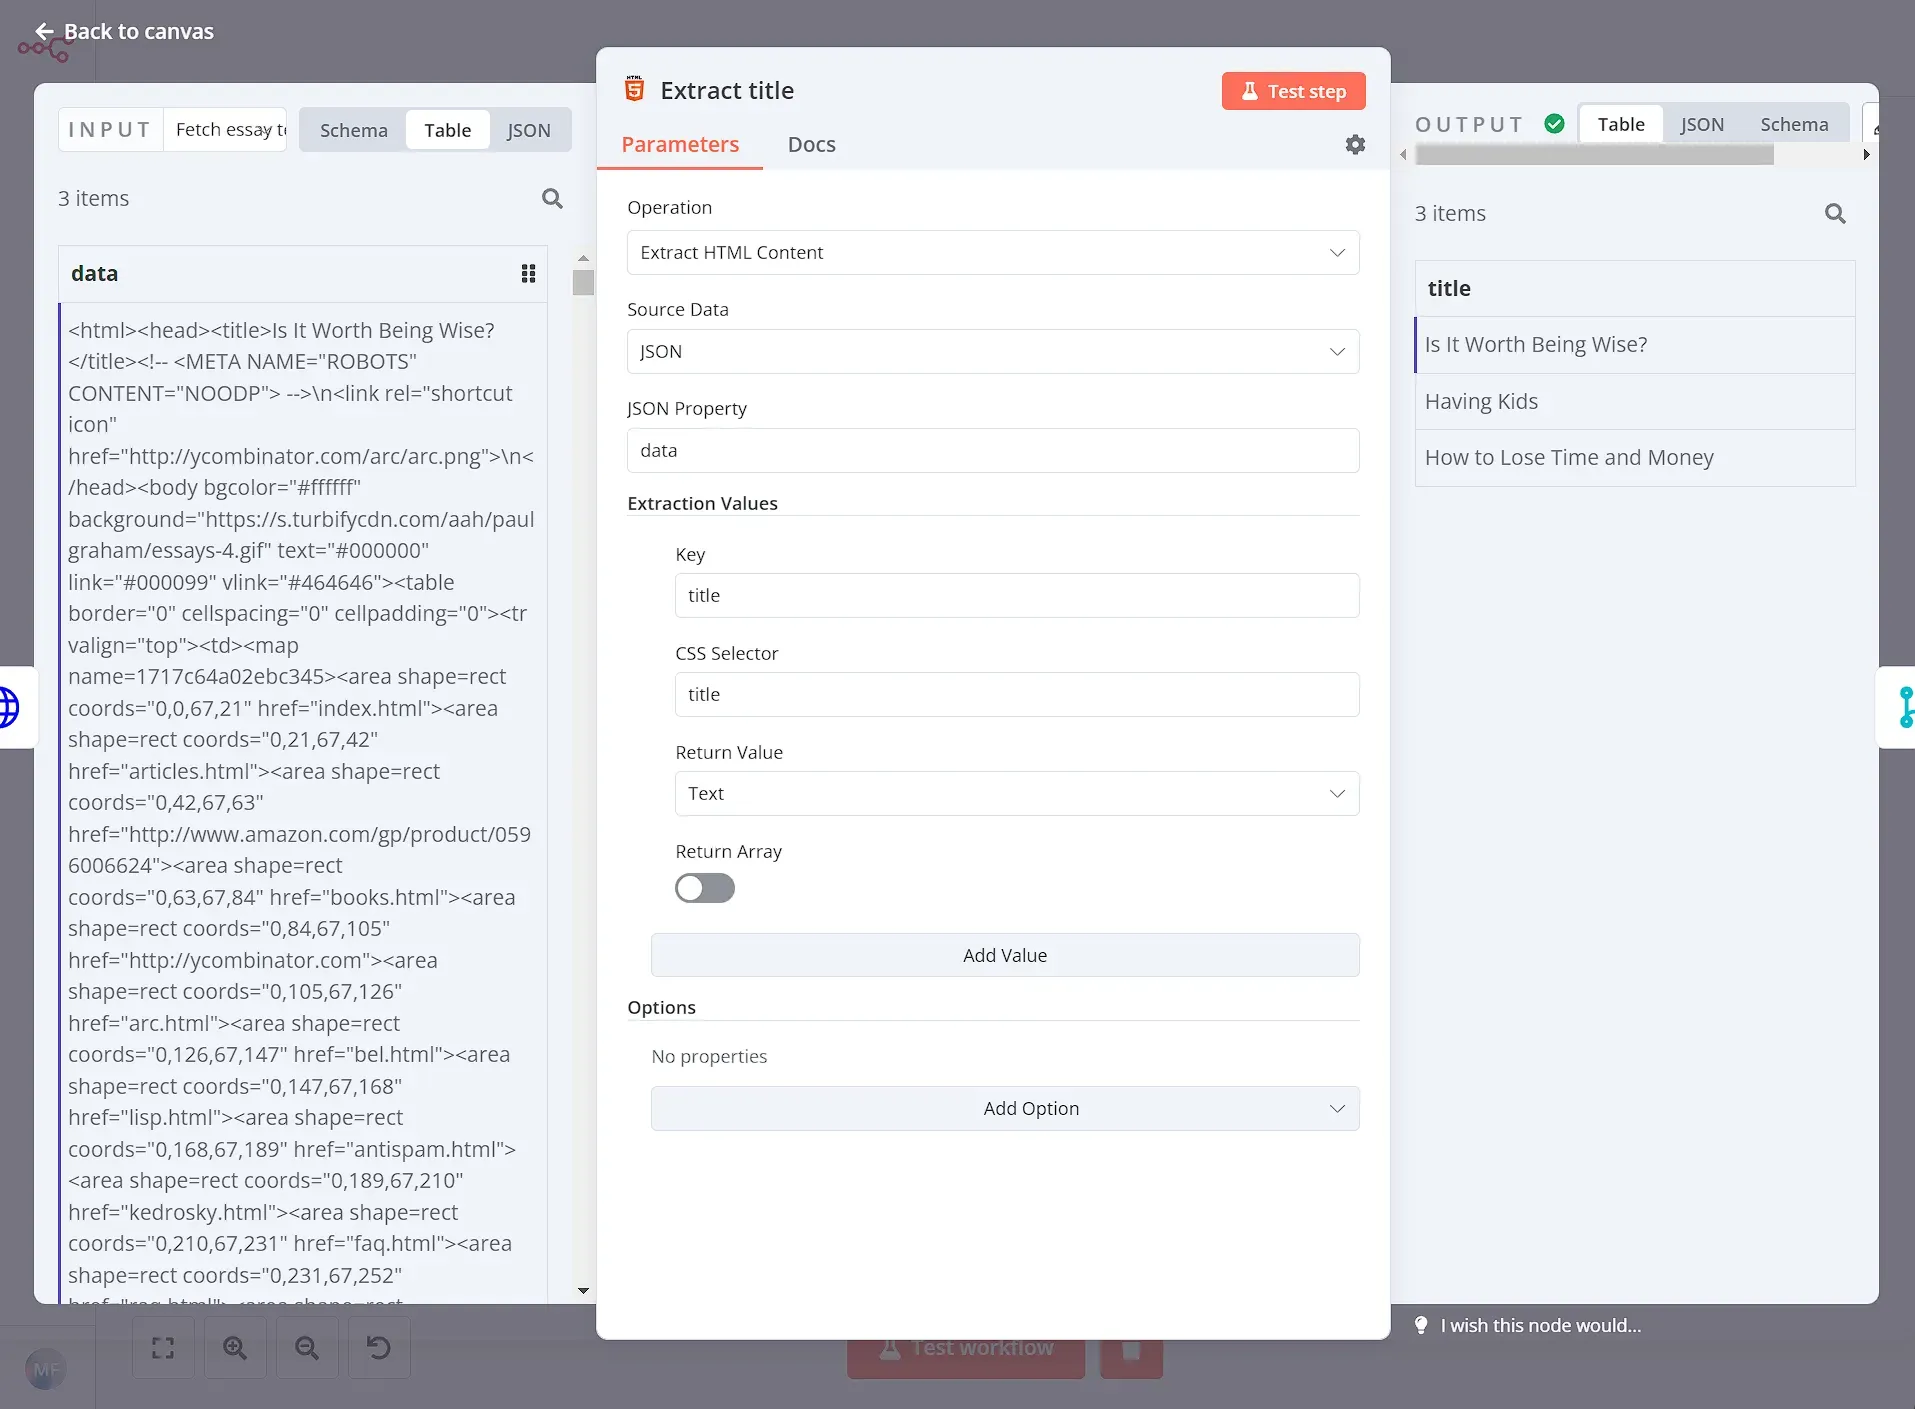
After we get the content from each of the 3 essays, we want to extract the title of each essay. This information will be useful when composing the final result. For this, we will use another HTML Extract node:
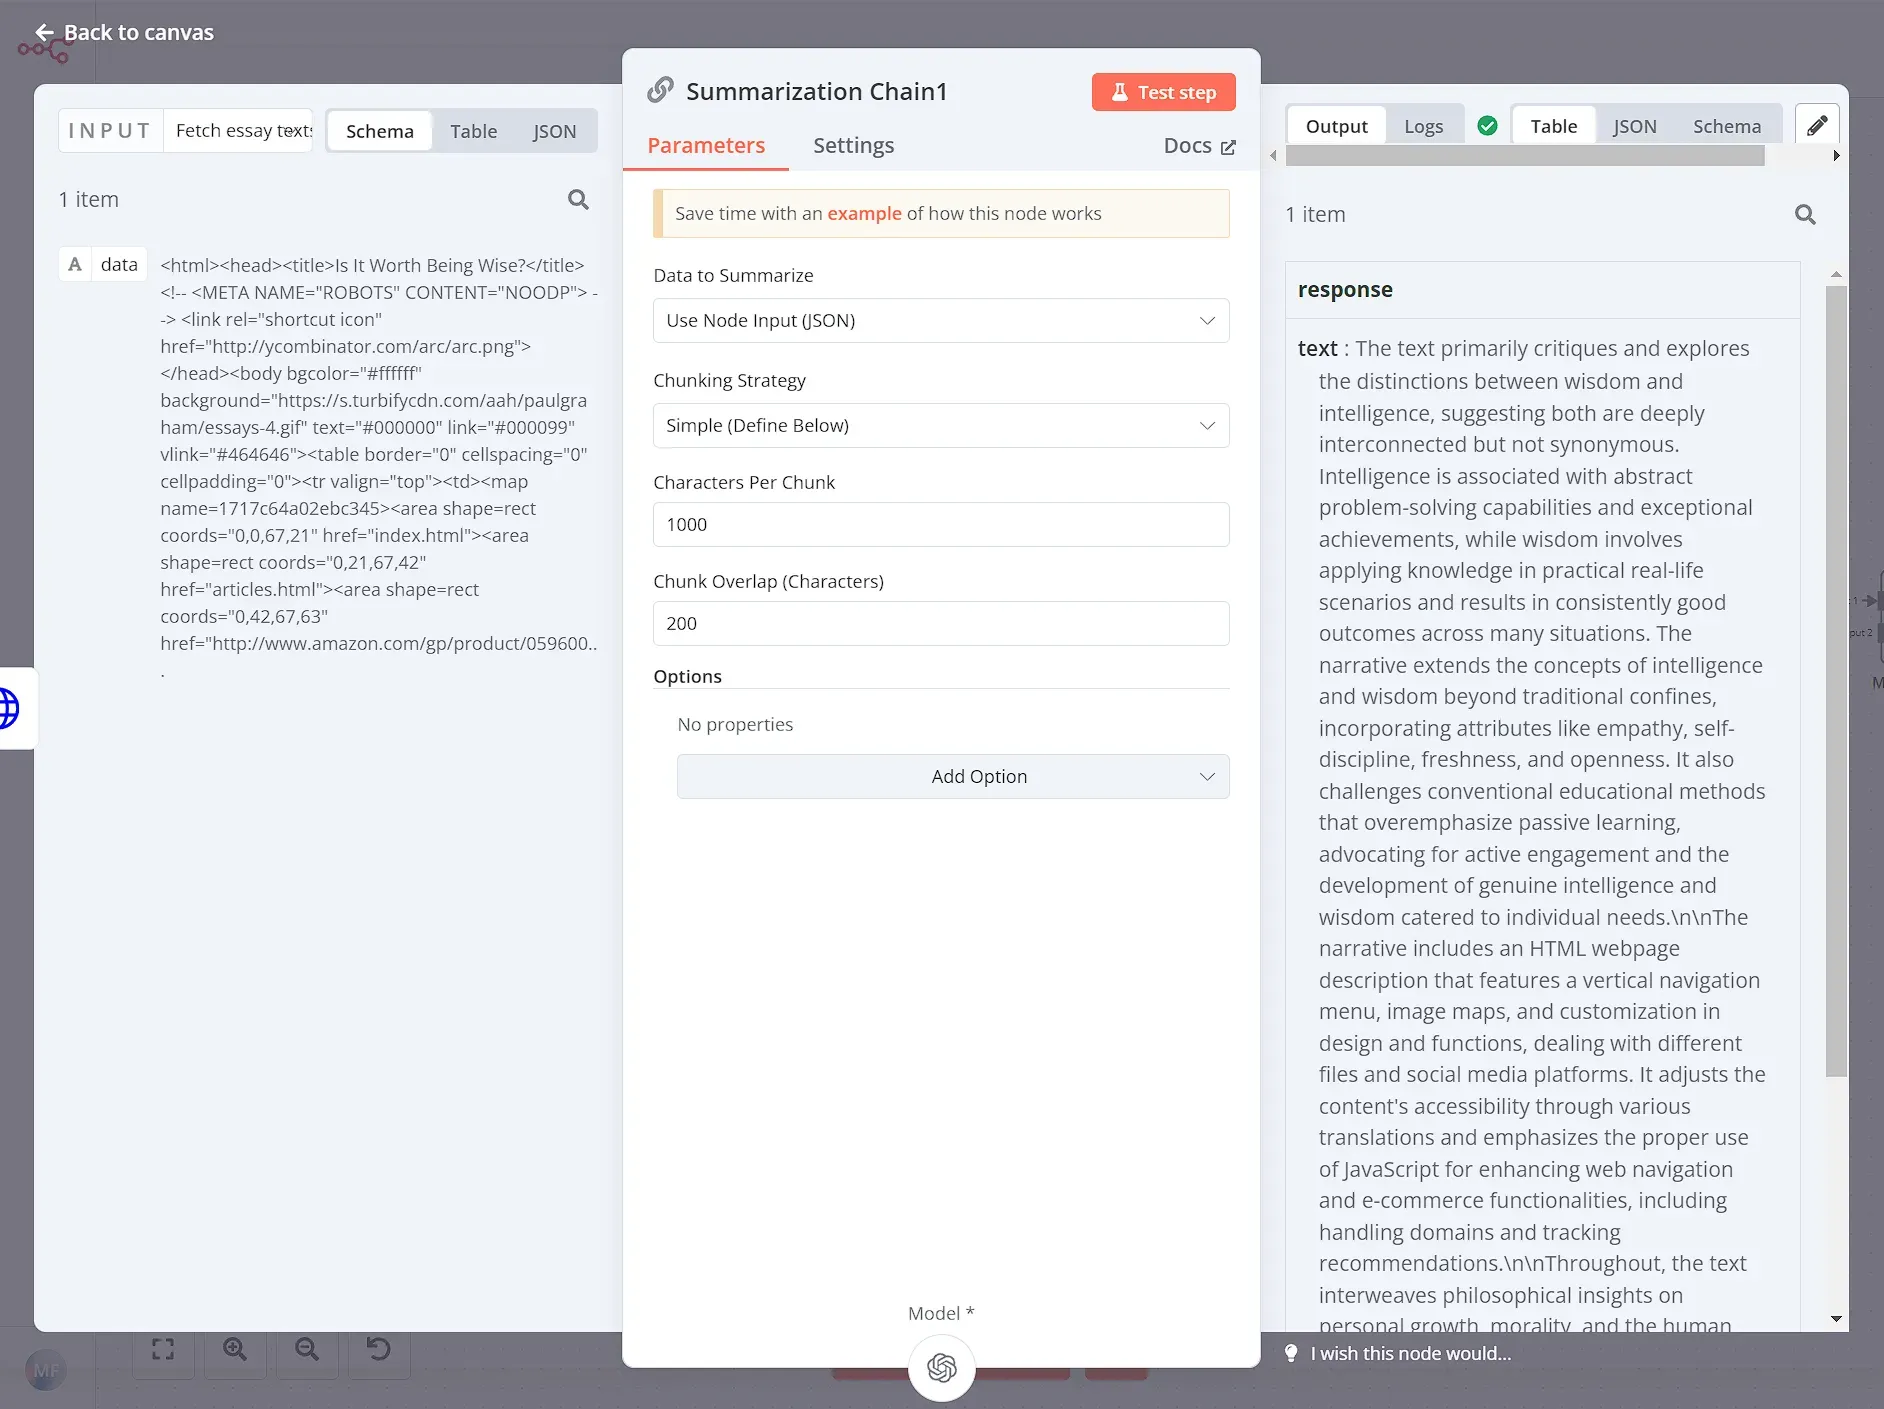
Step 4: Send the text to ChatGPT for summarization
This is where AI magic comes in. The Summarization Chain node, a specialized node in n8n, simplifies the process of using AI language models like ChatGPT to generate summaries. We'll connect this node to our workflow, feeding it the extracted essay text. The Summarization Chain node takes care of the complex communication with the AI model, returning a concise summary for each essay.
Here, we can leave everything as default:
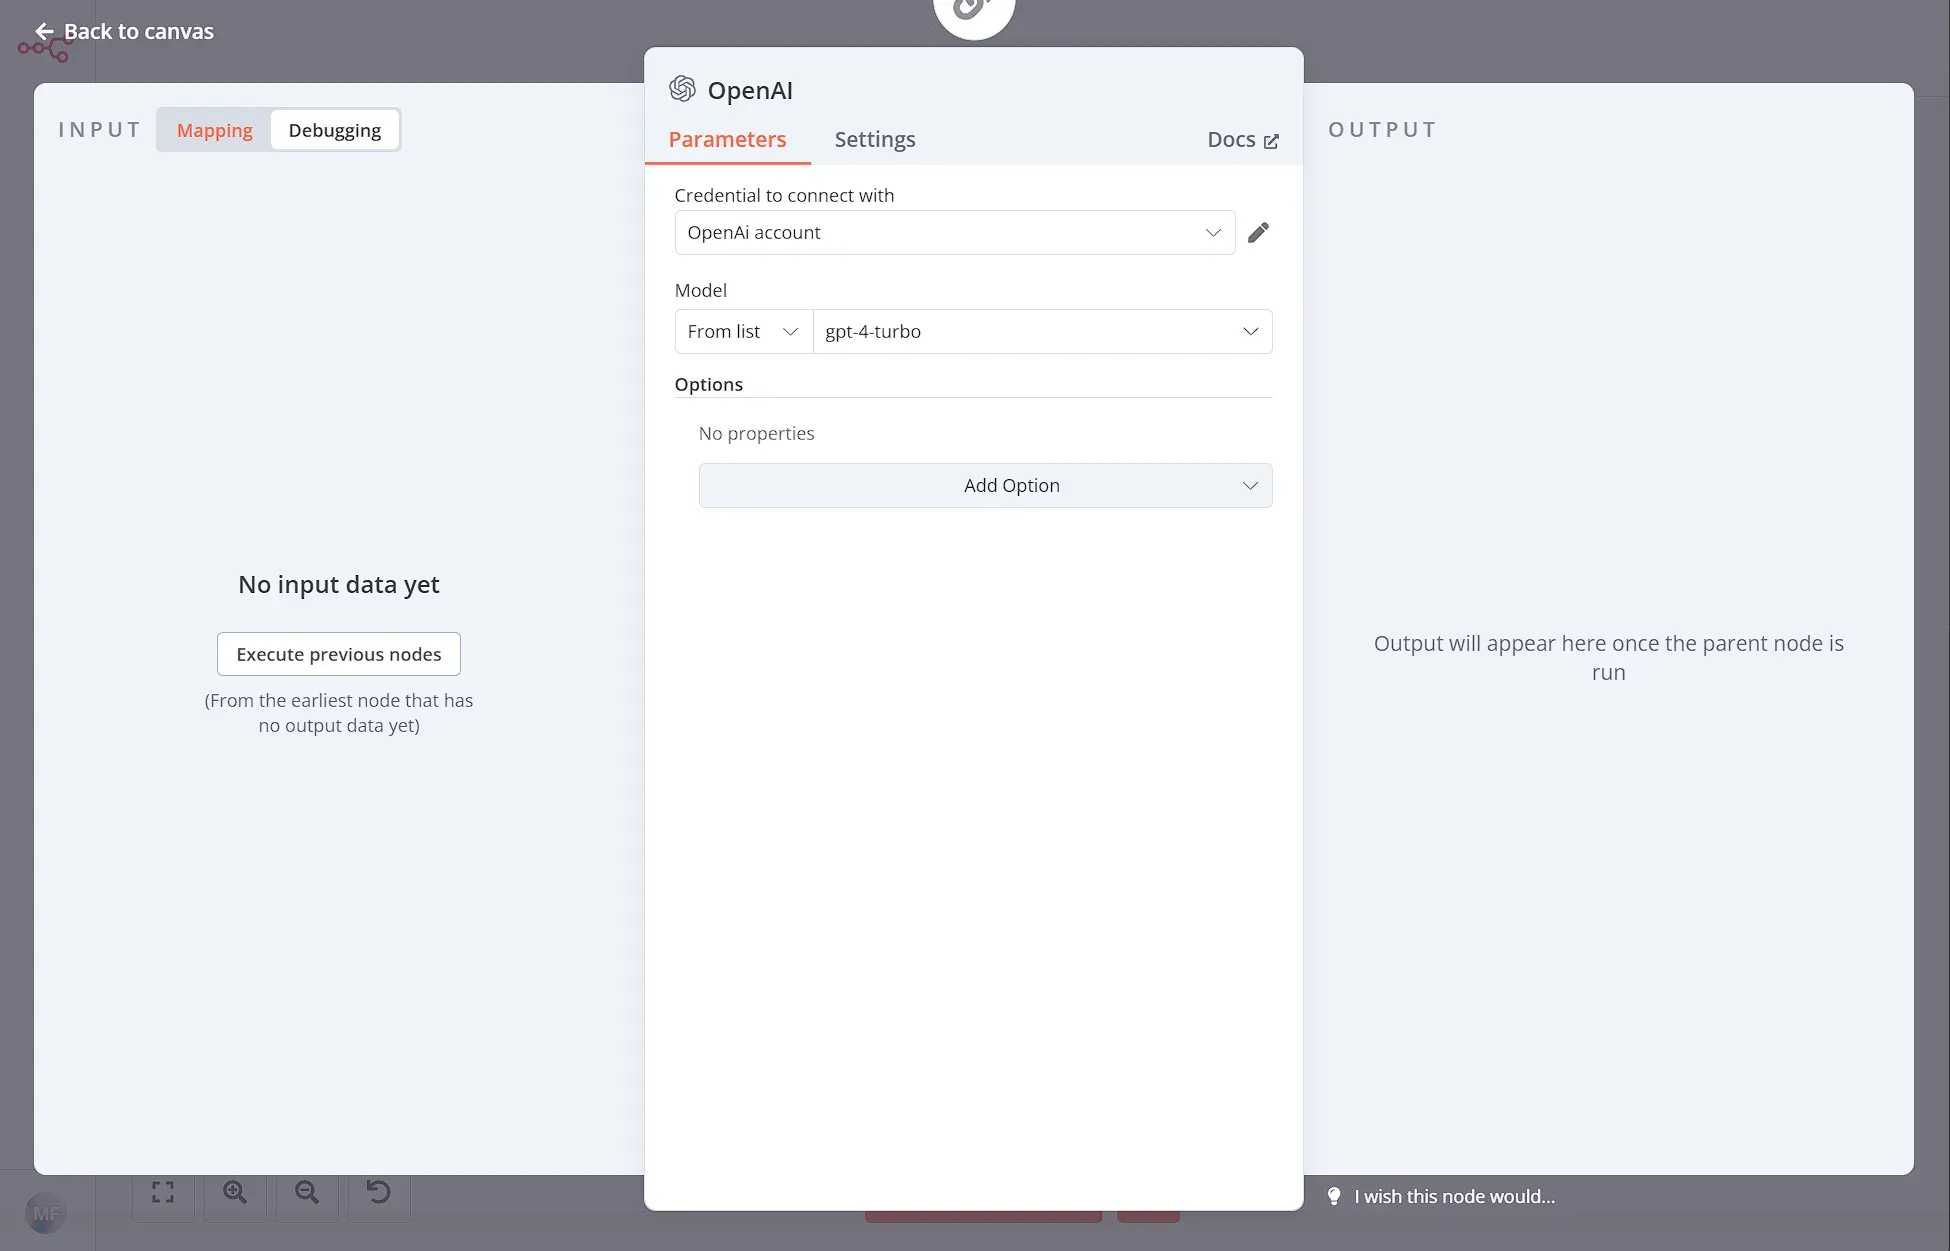
The Summarization Chain node requires an AI model. You can use the OpenAI integration by setting up the OpenAI credentials and then picking a Model from the list. In this case we opted for gpt-4-turbo:
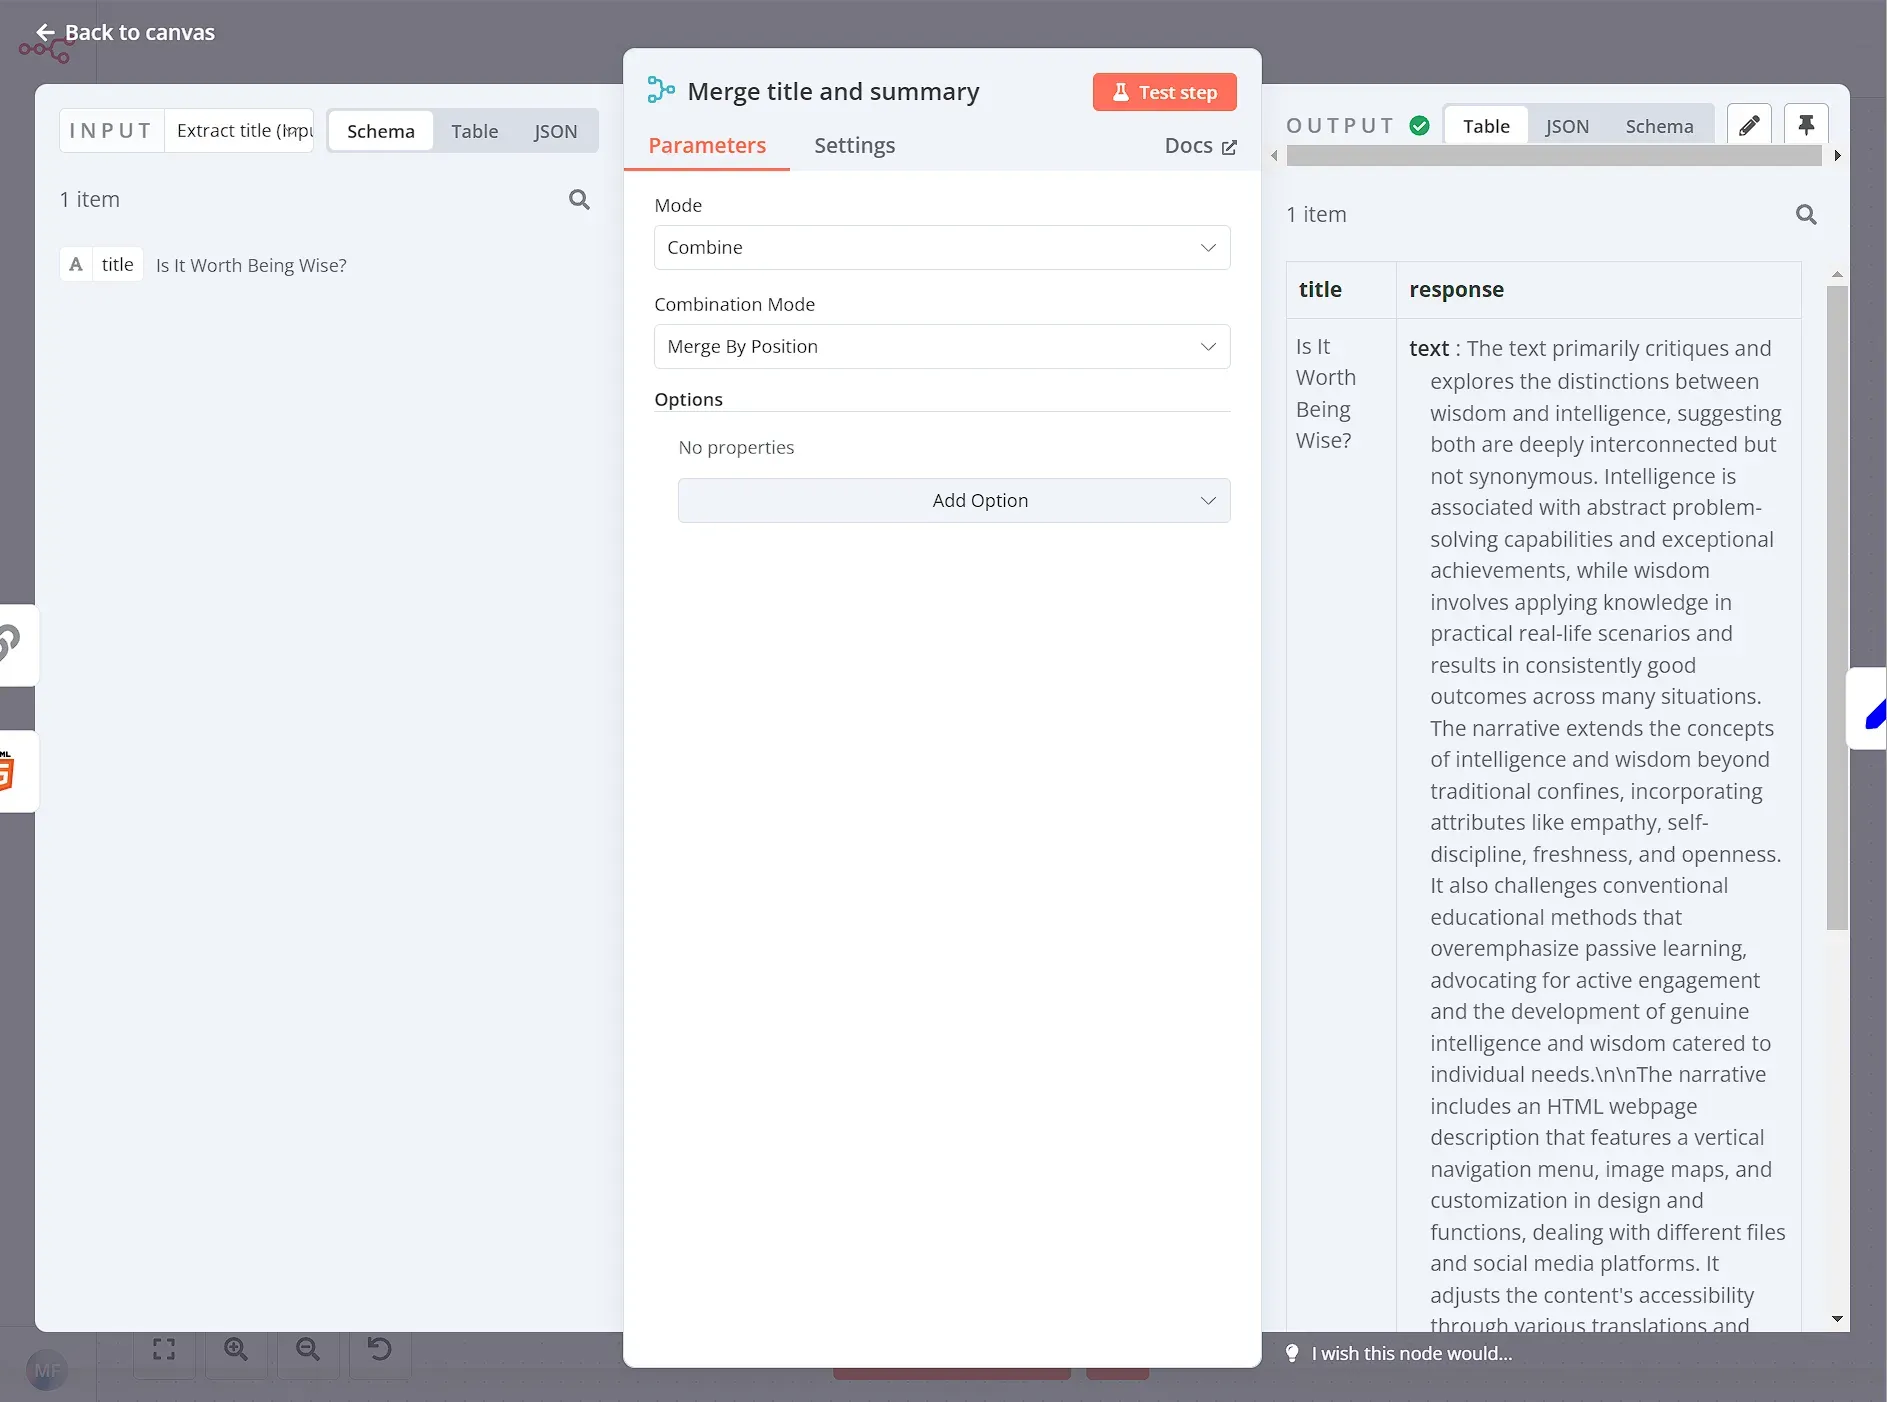
Step 5: Join the title and the summarization
Finally, we'll use the Merge node, to combine the original essay titles with their corresponding AI-generated summaries. The result is a neatly structured dataset, ready for further processing or export.
Wrap Up
Now you know the basics of web scraping: what it is, how it works, and what to remember when scraping websites. You also learned how to scrape data from a website using JavaScript and an n8n low-code workflow.
With n8n, there’s no need to write lines of code anymore to pull the data you need. You can use n8n to automate your HTML web scraping and send the data to the right places. Moreover, you can add conditional logic, custom code, and connect other integrations to set up workflows that boost your productivity.
What's next?
Ready to take your automation skills to the next level? Here's what you can do next:
- Check out a more complex workflow that scrapes data from a multi-page website, and read about the use case behind it.
- Check out the workflow page for more automation ideas.