This Verified Node Spotlight was written by Jenna Pederson, Staff Developer Advocate for Pinecone.
Imagine you manage multiple vacation rental properties. A guest at one of your properties texts asking how to turn on the heat, but you accidentally send them instructions for your other property's completely different thermostat. You look unprofessional, your guest is confused, and now they are cold.
This isn't just a customer service nightmare, but a knowledge management problem. When you shove all your property documentation into one knowledge base, you're asking your AI to search through everything every time to figure out what's relevant. It's like creating a spreadsheet with 10,000 rows and 30 columns and never separating your data into tabs. Our brains don't work that way, and neither does our business or AI.
The same principle that pushes us to separate spreadsheet tabs should inform our AI architecture. Different domains need different contexts.
In this article, we'll solve this problem by building a workflow that routes queries to multiple specialized knowledge bases based on context (i.e. which property the guest is staying at). You can adapt this pattern to franchise locations, agency clients, or customer support tiers—any scenario where different users or steps in a workflow need different context.
Let's break down the main components we'll need and then connect it all together.
Our solution
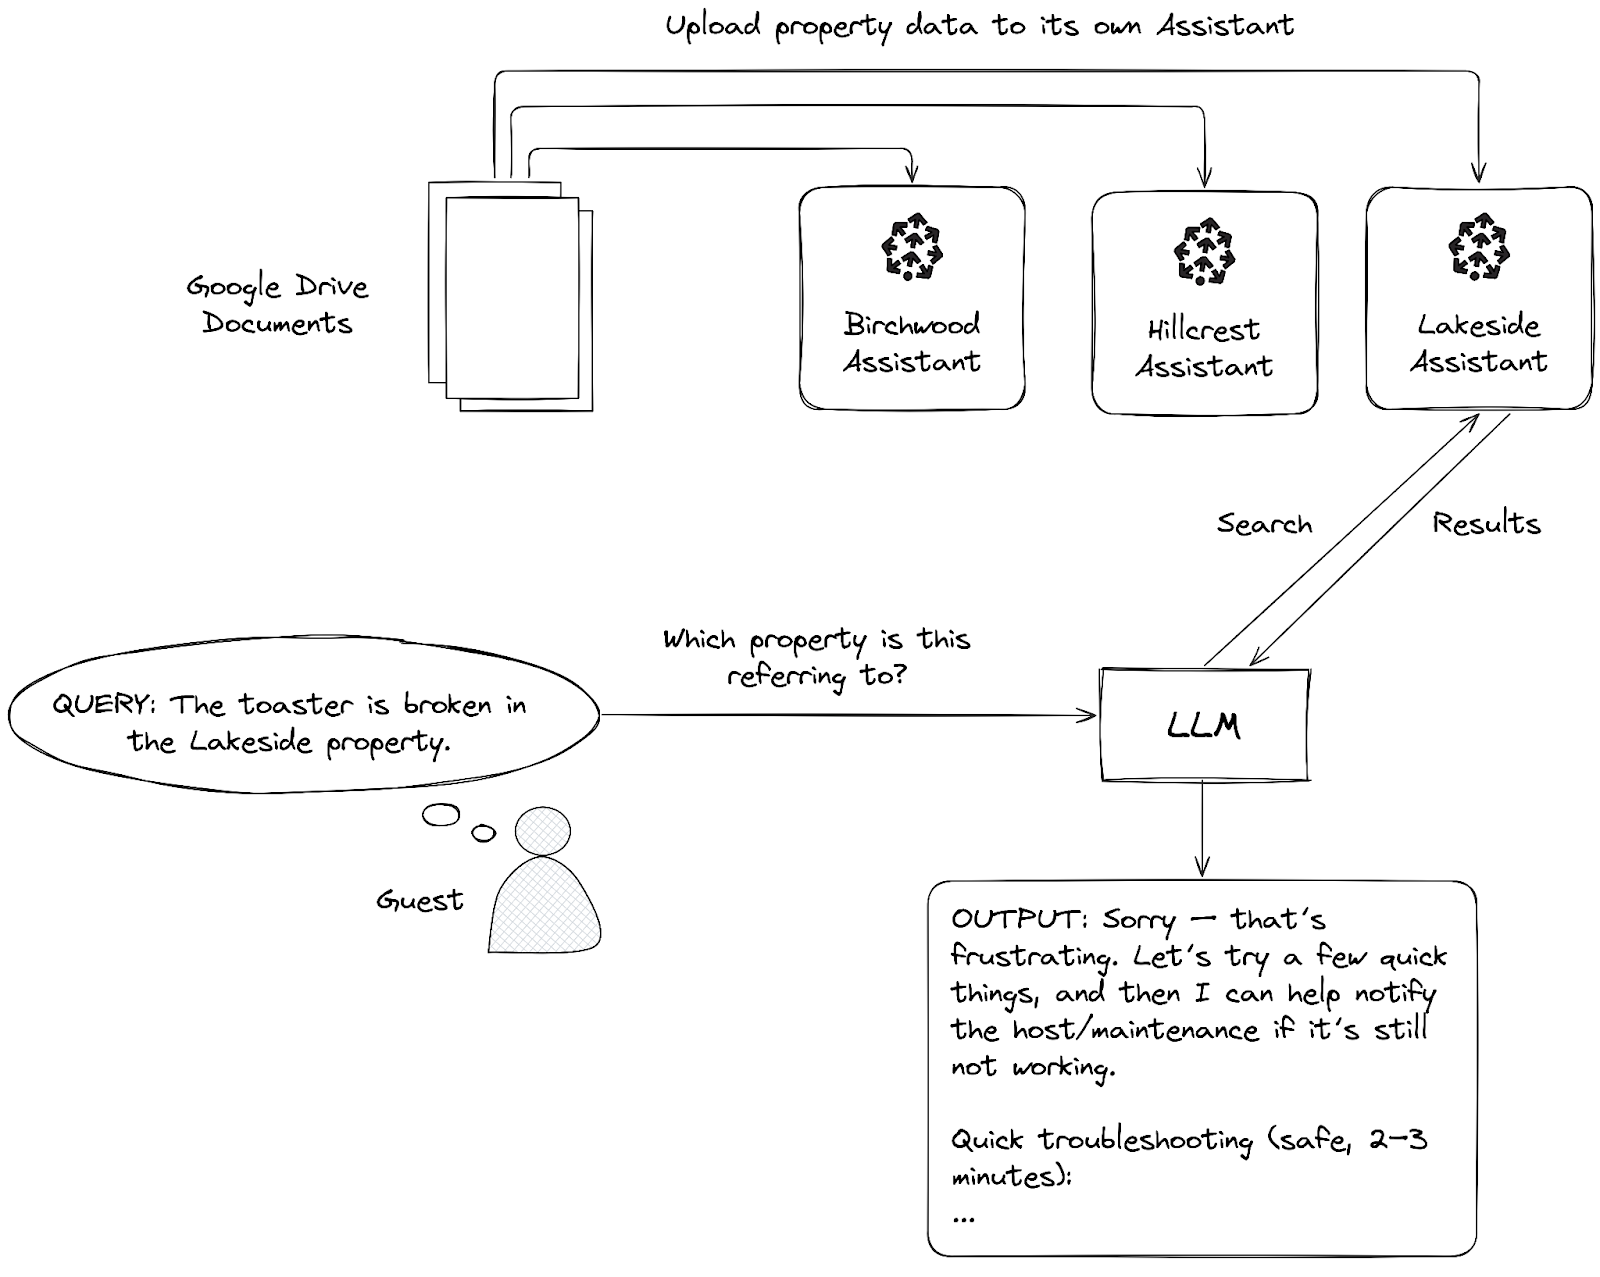
Google Drive
We'll store our source files in a Google Drive folder (or any other document storage provider). This will hold the raw documents about each of our properties, in our case, markdown format.
Chat interface
A chat interface will allow guests to ask questions about their property, request a service appointment, or get a call back from the property manager. For the purposes of this tutorial, we'll use n8n's built-in Chat trigger, but you could respond to a webhook, a Slack message, a What's App message, or Telegram message.
Search
Next, we'll need a way to search for answers in our data. Remember, our data is specialized and contains info (like the Wi-Fi password), so we can't just route all requests directly to a model like Claude or OpenAI.
We'll need something a little smarter than a simple keyword search. We'll be using natural language to ask questions, so we'll need to search by meaning. For instance, if a guest says "It's freezing in here," notice that there's no mention of thermostat, heat, HVAC, or temperature control in the message. A semantic search will search by meaning and find information for controlling the heating system. If we only had access to a simple keyword search, then we might get results about a freezer for storing food.
When we search by meaning using semantic search, we'll get results similar to "freezing" using the surrounding context of both the query and the data in our knowledge base. The results about a chest freezer might still be returned, but they would likely be ranked lower in semantic meaning than results about adjusting the thermostat.
This type of search is more sophisticated, but it's also more complex to implement. In our example, we'll use Pinecone Assistant to manage this complexity for us. The Assistant handles chunking our data with the right chunking strategy, converting our chunk data into vector embeddings to encode the meaning, query planning, executing the semantic search, and re-ranking the results.
Note: If you've used the Pinecone Vector Store node before, some of these steps may be familiar or have even tripped you up.
The results we get back from this search are chunks of our data, also known as context snippets.
Output generation
Finally, once we have our search results in chunks, we need to turn them back into something we can read and understand. We'll use a large language model to do that. We pass the context snippets to the model with instructions to transform our data back into a natural text response that the user can understand.
What is RAG?
This pattern of retrieving relevant context from your knowledge base and augmenting the model's response with that context is called Retrieval-Augmented Generation (RAG).
Let's build
Now that we understand these main components, let's build this workflow!
Just want the workflow template? Import it into your n8n instance and get started quickly. Or, follow the instructions in this post to learn how to build it step-by-step.
Prerequisites
You'll need the following to get started:
- A Pinecone account and API key
- A GCP project with Google Drive API enabled and configured
- An Open AI account and API key
- Three empty Google Drive folders named hillcrest, lakeside, birchwood
1. Create knowledge bases
First, we'll create three Pinecone Assistants in the Pinecone console.
- Point your browser here.
- Create a new Assistant named: n8n-vacation-rental-property-lakeside
- Repeat the same for Assistants named n8n-vacation-rental-property-birchwood and n8n-vacation-rental-property-hillcrest
There's no need to configure a Chat model, Assistant instructions, or upload files as we'll handle this in n8n.
2. Install the Pinecone Assistant community node
We'll need to create a workflow and install the Pinecone Assistant node. If you've already installed the node, create the workflow and move to the next step to setup your credentials.
- In your n8n workspace, start by creating a new, empty workflow
- Select the + icon to view the nodes panel and search for pinecone assistant
- Select the install button to install the community node
Get these special perks when you sign up for a Pinecone Standard free trial (3 weeks, $300 credits) before May 1st:
- $40/month in credits for 6 months (starting after your trial ends)
- Waived Assistant hourly fees
Offer details: Start using the n8n Pinecone Assistant node and claim this promotion before May 1, 2026. Upgrade to a paid Standard plan before July 1st, 2026 to activate your 6-month benefits.
3. Setup your credentials
Next, we'll need to set up credentials for each of the services we use.
Google Drive OAuth 2 credential
- In your n8n workspace, create a new credential for Google Drive OAuth 2 API
- Copy the OAuth Redirect URL. We'll come back to the Client ID and Client Secret shortly.
- In the GCP Console, select your project
- Go to the APIs & Services menu and select Credentials
- Select + Create credentials and select OAuth client ID
- Note: If you haven't used OAuth in this project yet, you'll also need to set up the OAuth consent screen.
- Select Web application for Application type
- Select Add URI in the Authorized redirect URIs section
- Paste in the redirect URL from step 2
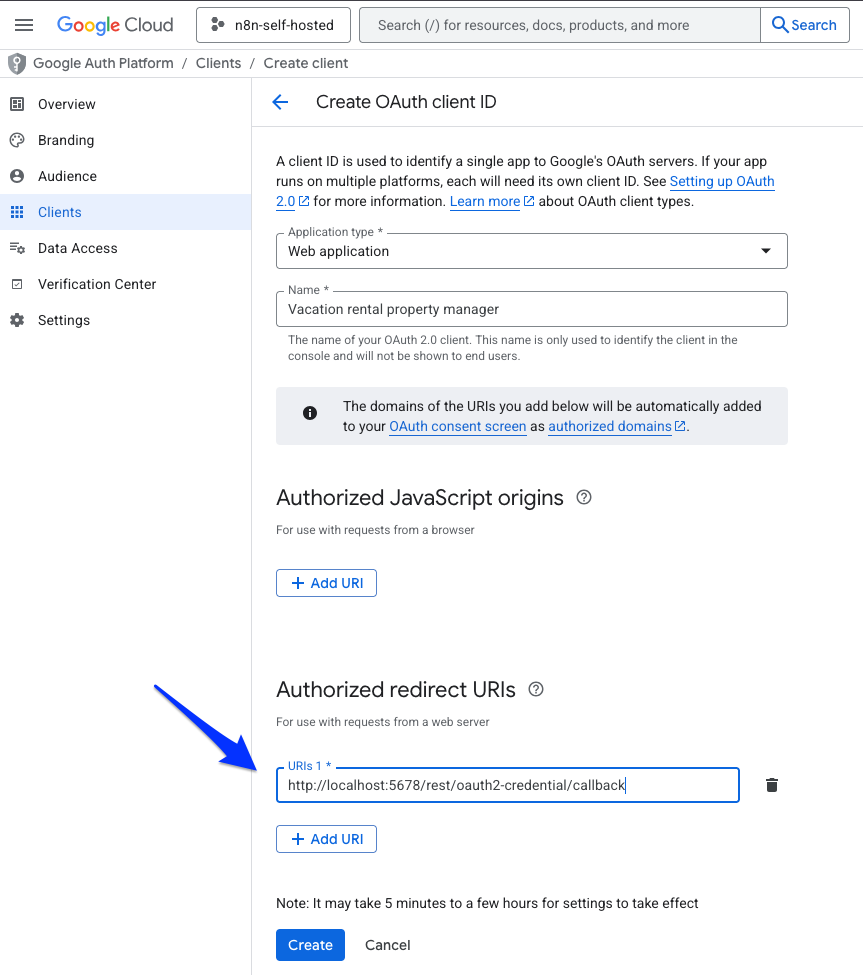
- Select Create
- Make a note of the Client ID and Client secret for your OAuth client
- Back in your n8n workspace, paste in the Client ID and Client secret from step 10
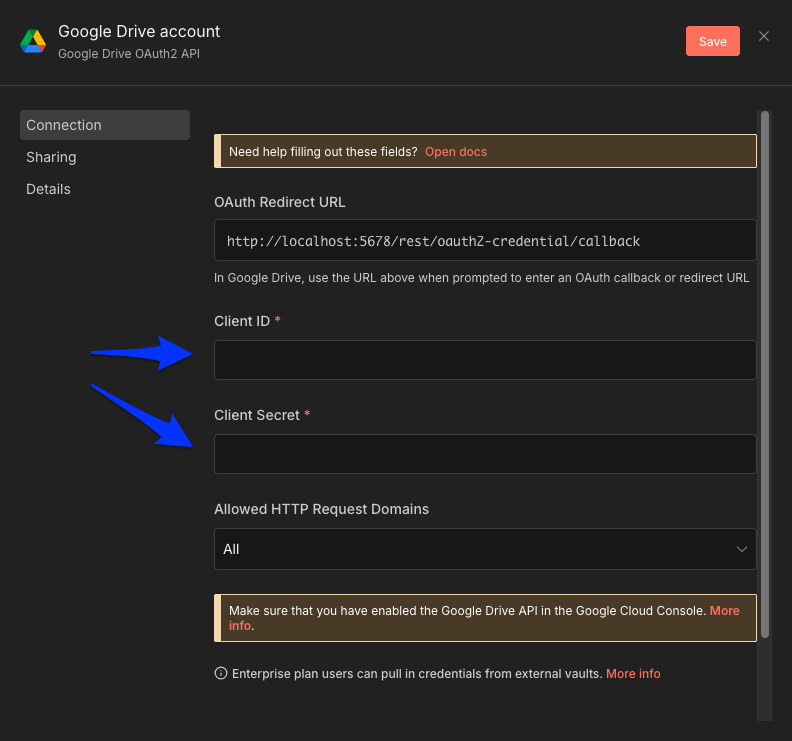
- Select the Sign in with Google button to authenticate
- Save your credential
You can find the full instructions for setting up your GCP project, APIs, OAuth consent screen, and OAuth client here.
OpenAI credential
- In your n8n workspace, create a new credential for OpenAI
- Paste in your OpenAI API key
- Save your credential
Pinecone credential
- In your n8n workspace, create a new credential for Pinecone Assistant API
- Paste in your Pinecone API key
- Save your credential
Now that your credentials are set up in n8n, let's build our workflow.
4. Build the workflow
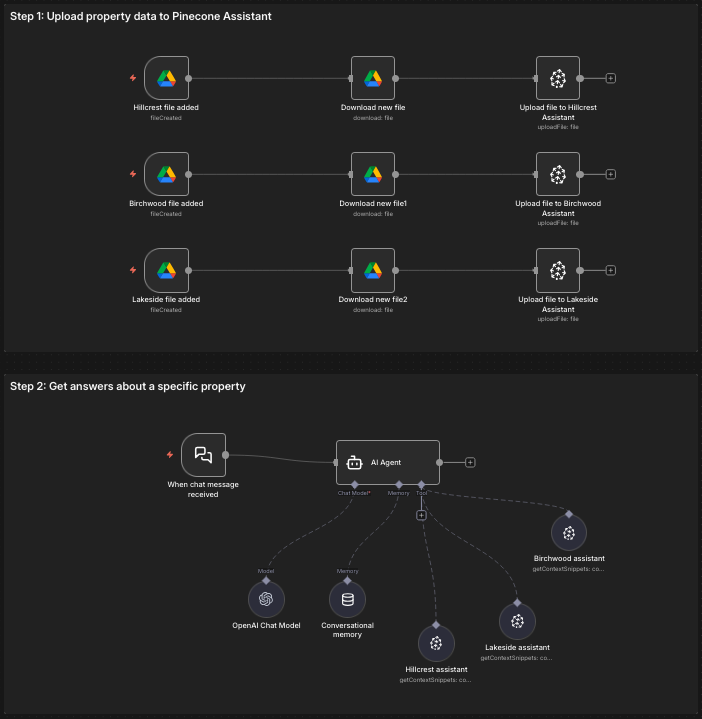
Setup the file upload path
Next, we'll set up the file upload path to get your data from Google Drive into your three Pinecone Assistants representing the three properties.
- For the first property, Hillcrest, setup a Google Drive Trigger for On changes involving a specific folder
- Select the hillcrest folder in the Folder list
- In Watch For, select File Created
- Connected to this node, add another Google Drive node for Download file action
- In the File name field, set it to {{ $json.name }}
- Then connect the Pinecone Assistant node for the Upload file action
- Select the hillcrest assistant in the Assistant Name field
- Set the External File ID field to {{ $json.id }}
Now, select all three of the nodes you just created, copy them, and paste them for the Lakeside and Birchwood assistant upload paths. You'll need to adjust both the Folder in the trigger and the Assistant Name in the Pinecone Assistant node.
Test the upload path
Before building the rest of the workflow, let's make sure this works. We'll work with some fictional data for this demo and get it into Assistant.
- Download the fictional data files from here
- Add the files to three separate Google Drive folders named lakeside, birchwood, and hillcrest
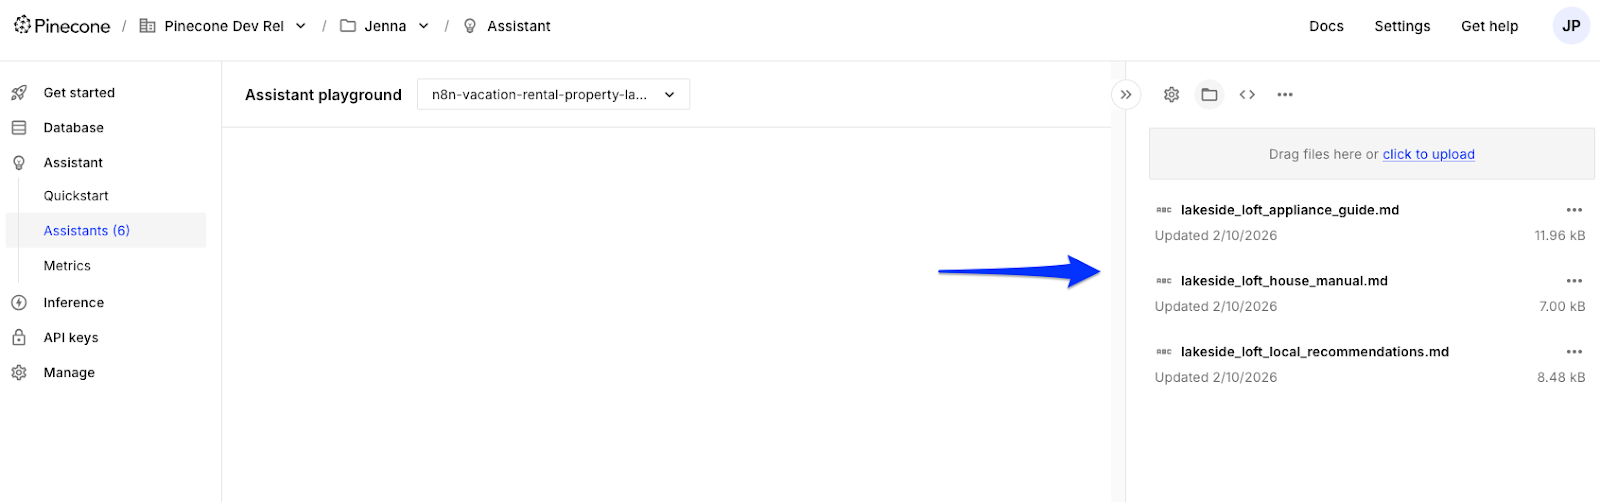
- Activate the workflow so the documents are uploaded to your assistants
- Go to the Pinecone Console and verify each assistant's files have been uploaded.
Setup the chat path
Now we need to give guests a way to ask their questions and request information about their property. We'll use n8n's built-in Chat trigger.
- Add the Chat Trigger node
- Connect an AI Agent node to the Chat Trigger
- Add an option for System Message and set it to:
You are a helpful assistant for a vacation rental property manager and their guests. Based on the user's message, decide if they are requesting information about the "hillcrest", "birchwood", "lakeside" property. You route requests based on property name to the appropriate pinecone assistant tool to fetch answers about the property.
If you cannot infer the property from the user's message, do not call any tools and instead ask for more information in the chat.
If the person requests to be contacted, do not call any tools and instead return a response indicating that someone will reach out to them.
Use a friendly, helpful tone.
This tells the model (which we'll add next) how to behave. It has instructions for what to do when it's not clear which property the guest is referring to and what to output when the property is known.
3. Add the OpenAI Chat Model node and set the Model to gpt-4.1-mini
4. Add the Simple Memory node to the AI Agent and set the Key to {{ $('When chat message received').item.json.sessionId }}
5. Add three Pinecone Assistant Tool nodes to the AI Agent tools, one for each property.
6. In each tool, set the Assistant Name to the corresponding property's assistant.
7. Update the name of the three Pinecone Assistant Tool nodes to reflect which property it's referring to. This will help the AI Agent know which tool to invoke based on the info collected from the guest.
Now you should have a full workflow that looks something like this, with two paths: an upload path and chat path.
Let's test it out!
Test the chat path
To test the chat path:
- Open the chat interface
- Start by asking this questions about a property: I need help with the coffee maker
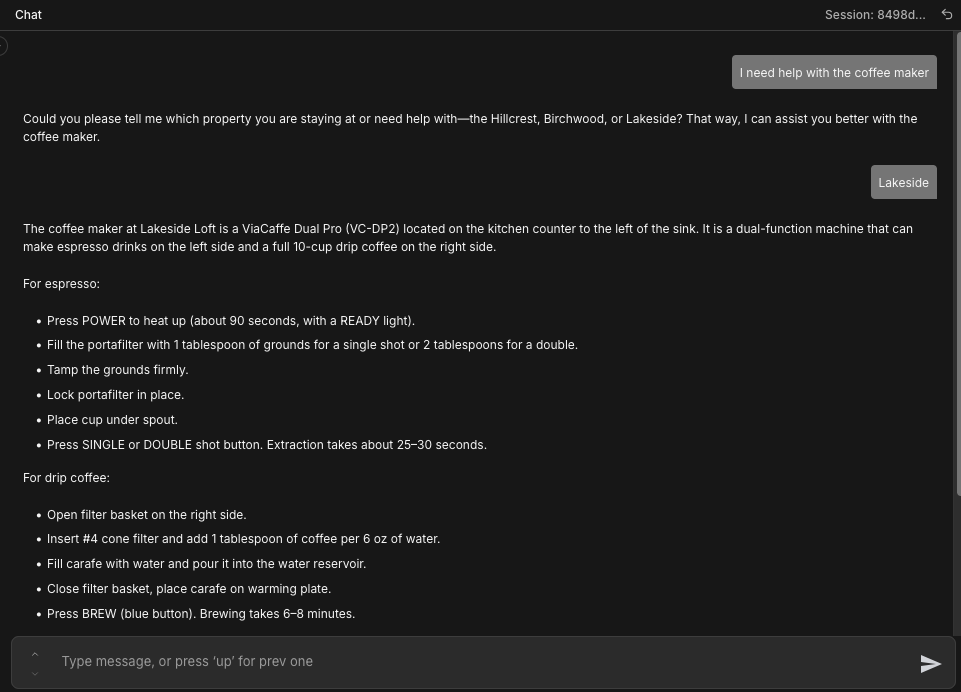
Notice how the response requests more information about which property the guest is referring to. This happens because in our System Message, we've instructed the model to ask for more information from the guest if it cannot infer the property from the original message.
If you changed properties and wanted to ask another question, include the property in the query: The air fryer isn't working at the Hillcrest property.
Why this works
By separating our knowledge bases by domain, we've fundamentally changed how our system retrieves information. Here are three reasons this works so well:
AccuracyJust like you wouldn't search across all spreadsheet tabs when you need data from the Sales tab, one domain per assistant eliminates context pollution. You'll get precise answers, not blended confusion. When you ask about Lakeside's hot tub, you get Lakeside's answer, not a blend of information about other properties.
Maintainability
You can now change, debug, or add domains independently without cascading effects. Change the wifi password for one property. Test and debug one property's assistant independently of others. Let one team member own a single assistant and the information about that property. This limits the blast radius to exactly what is being changed, making it safer to make changes and easier to reason about.
Scalability
The pattern that works for three domains works for thirty. The complexity grows linearly, not exponentially so you can add a fourth property without having to touch the other three. Create new documentation, spin up a new assistant, add one condition to your routing logic and you're done.
Wrap up
RAG isn't a monolithic system—it's a building block. The multi-assistant pattern we've built here gives you precise, maintainable retrieval by matching your AI architecture to how your business actually works.
Because Pinecone Assistant handles the complexity of chunking, embeddings, and re-ranking, you can focus on what matters: your business.
Ready to implement this pattern for your use case? Start with:
- Identify your distinct domains (e.g. franchise locations, client accounts, customer support workflows)
- Create one Pinecone Assistant per domain
- Build routing logic that maps context to the right assistant
The workflow template is available here. Adapt the routing logic to your domains, and you'll have specialized knowledge bases working in harmony.