AI-powered chatbots revolutionize how users interact with ERP systems.
Think of them as virtual colleagues who are always on call. ERP AI chatbots can answer questions about inventory levels, order statuses, or customer data in natural language. Need a quick sales report? Just ask the chatbot.
Integrating AI chatbots into your ERP system can transform how your team interacts with critical data. These intelligent assistants provide quick answers, automate routine tasks, and make your ERP system more user-friendly.
In this article, you will explore the benefits of AI in ERP, use case ideas, and how to use n8n, an AI-native workflow automation tool, to integrate AI models with a popular ERP called Odoo.
What is an ERP AI chatbot?
An ERP AI chatbot is a virtual assistant powered by artificial intelligence (AI) that integrates with your Enterprise Resource Planning (ERP) system. It leverages natural language processing (NLP) to understand and respond to user queries in an online chat interface.
ERP AI chatbots eliminate the need to dig through menus or run complex queries, saving employees valuable time and making the ERP system feel more approachable.
ERP developers can leverage AI to create a user-friendly interface that empowers even non-technical users to interact with the system effectively. For business users, AI chatbots offer a natural and intuitive way to access and manage ERP data, eliminating the need to navigate complex menus or write intricate queries.
How can AI be used in ERP?
AI is not just for chatbots. It's revolutionizing how businesses leverage their ERP AI systems across various functions:
Fraud detection and risk management
AI is adept at identifying patterns that may indicate fraudulent activity. In finance and banking, it can analyze transaction data to detect and prevent fraud. Similarly, AI can identify and respond to security threats more efficiently than traditional methods in cybersecurity.
Supply chain and operations optimization
AI helps optimize supply chains by predicting disruptions, optimizing delivery routes, and managing inventory levels. It can also improve operational efficiency in manufacturing through predictive maintenance and production planning.
Customer support automation
AI-powered chatbots and virtual assistants can handle routine customer inquiries, freeing up human agents for more complex issues. They can also analyze customer feedback and sentiment, helping businesses identify areas for improvement.
Process automation
AI can automate repetitive tasks across various ERP modules, such as data entry, invoice processing, and report generation. This not only saves time but also reduces the risk of human error.
Sales forecasting
AI analyzes historical sales data, market trends, and even social media sentiment to generate more accurate sales forecasts. This allows sales teams to allocate resources more effectively, anticipate demand fluctuations, and set realistic sales targets.
What are the benefits of AI in ERP?
AI integration in Enterprise Resource Planning (ERP) systems offers numerous benefits that can significantly enhance business operations. Here are some of the key advantages:
Enhanced user experience and productivity
AI chatbots make ERP systems more approachable and user-friendly. By providing a conversational interface, they empower employees to quickly access the information they need, boosting productivity and job satisfaction.
Data-driven decision-making
AI transforms raw ERP data into actionable insights. By analyzing vast datasets, AI algorithms uncover hidden patterns and trends, providing decision-makers with a clearer understanding of their operations and enabling more informed, strategic choices.
Improved accuracy and efficiency
AI automates repetitive tasks like data entry and validation, minimizing human error and ensuring data accuracy. This automation also streamlines workflows and accelerates processes, ultimately increasing operational efficiency and freeing up resources.
How to build an ERP AI chatbot with n8n?
Let’s build a couple of AI enhancements to our workflow with a popular open-source ERP called Odoo.
First we will build an automatic logging and summarization of new sales enquiry emails received. Based on incoming emails, we will create an “opportunity” in Odoo and add a summary of the email thread as internal notes. Then, we will build a chatbot to answer queries about our existing opportunities.
Workflow 1. ERP AI chatbot with n8n
Using n8n, we can build a workflow that checks your "Sales" label in Gmail or Outlook. We'll use OpenAI to summarize the email's key points and then create a new “opportunity” in Odoo. The email subject becomes the title, and the summary is added as a note for your sales team. This automation is a time-saver, ensuring no lead slips through the cracks.

Prerequisites
To follow along, you will need:
- An Odoo account or a self-hosted community edition of Odoo
- n8n cloud or a self-hosted instance of n8n
- An OpenAI account
- Google Cloud account (for integrating with Gmail)
Step 1: Configure the Gmail node
To kick off our workflow, we'll use the Gmail trigger node. You’ll need to connect to your Gmail account which requires a Google Cloud account with the Gmail API enabled. Head over to the documentation for a step-by-step guide on how to obtain and configure your Gmail credentials.
Then, we want to configure the workflow to check for new emails periodically by setting Poll Times to Every Hour, for example. You want to make sure to have Simplify set to off since we will need to use the entire email text. The Event we want to check for is Message Received.

Optionally we can use Gmail labels to organize the sales emails and have the Gmail trigger node only look for emails with the “Sales” label. We can achieve this by adding a Filter using Label Names or IDs and setting the value for the label we’ve created in Gmail.
Here is an example sales email we can test the workflow with:

Step 2: Summarize the email using OpenAI
In order to integrate with OpenAI and summarize an incoming email, we will use the Summarization Chain node.
Here, we want to compose a prompt that also includes the email text and sends it to OpenAI for summarization. The prompt we are using is this:
Write a concise summary of the following sales inquiry:
"{{ $json.text }}"
Extract information such as project budget, timelines and a general summary.
Configuring the summarization chain node is pretty straightforward, it should look like this:

To get the Summarization Chain node working, you'll need to plug in an AI model. Luckily, n8n has got you covered with a bunch of options – everything from Google Gemini to OpenAI models, even self-hosted Ollama models. For this tutorial, we're going with OpenAI's GPT 3.5 turbo model:

Step 3: Create an opportunity in Odoo
Finally, we want to add a new “opportunity” to our sales pipeline in Odoo. We will use the native Odoo node. Before we dive in, you'll need to connect your Odoo account. No worries—it's a breeze—you can either use your Odoo username and password or an API key. If you need a hand, the Odoo credential documentation has all the details.

Then we want to pick Opportunity from the Resource dropdown and Create as the Operation. We want to set the subject of the received email as the name of the opportunity. We can do this by accessing the information from a couple of nodes behind. We also want to save the contact email address.
Lastly we add the OpenAI response as Internal Nodes for this opportunity. Hit the test step, and you should see a new opportunity added in Odoo:

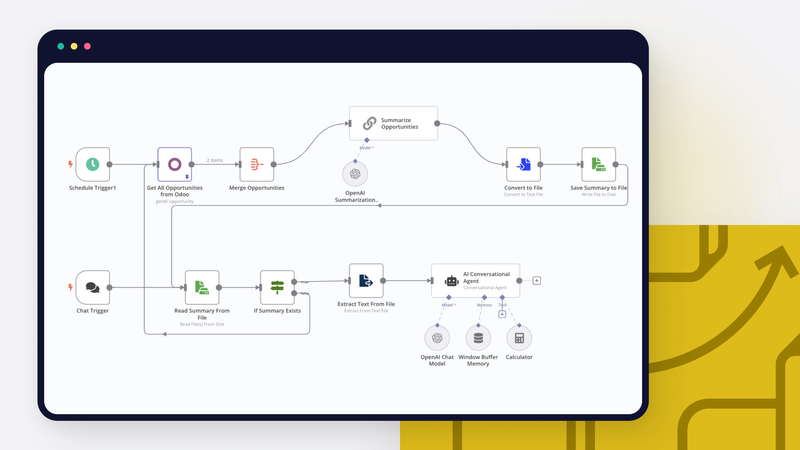
Workflow 2. Advanced ERP AI chatbot with n8n
This section will guide you through the step-by-step process of building an even more powerful ERP AI chatbot using n8n.
This chatbot will intelligently answer questions about your sales pipeline by pulling information directly from your Odoo database. By the end, you'll have a streamlined system that saves time and empowers your team with quick access to crucial data.

Step 1: Extract context from Odoo
Similar to the previous example, we can use the Odoo node provided by n8n. We want to retrieve all the opportunities from our sales pipeline. For that we select Opportunity in the Resource dropdown, Get Many from the Operation dropdown and toggle Return All.

To simplify matters, we will only choose the relevant fields by making our selections in the Fields to Include field.
Step 2: Summarize content from Odoo for use as context
To avoid sending excessive data to OpenAI (which can get pricey!), we'll first summarize the Odoo output using AI. This summary will serve as the context for future queries.
The Odoo node gives us an array of objects, but we need a single object for our summarization chain. That's where the Aggregation node comes in. It merges everything into one for us. For this step, you only need to select All Fields from the Include dropdown, leave other settings at their default values.

Similarly to the previous example, we can then send this aggregated information to OpenAI for summarization.

In the Individual Summary Prompt field we modified the prompt by adding the following:
Include important information such as won status and expected revenue for each opportunity. Also include a short description of each opportunity and keep opportunities separate.
Feel free to adjust the prompt to fit your specific scenario.
Step 3: Save context to a file
Then, we can save that summary to a file, caching it for further queries. We do this by first converting the OpenAI response to a file, using the Convert to File node.

Once we have the binary data, we can save it as a file called `cache.txt` using the Read/Write Files from Disk node:

This essentially acts like a database or cache. For more robust production-ready systems, feel free to use a different method, such as Redis.
In order to keep the information up to date, we can trigger the summarization on a schedule by using the Schedule trigger node. For example, you can trigger the data extraction and summarization each hour:

Step 4: Implement chatbot
The Chat Trigger node is a convenient way to initiate a chatbot workflow. This node will start the workflow whenever a user sends a message in the chat.

After receiving a chat message, we can try to read the `cache.txt` file we saved in the previous step by using the same Read/Write Files from Disk node with Operation set as Read File(s) From Disk. We can then change the settings of this node and enable Always Output Data and select Continue from the On Error dropdown.

When the chatbot first receives a message, the cache.txt file won't exist yet. That's why we use the IF node to check for the file. If it's missing, we trigger the Odoo data summarization process immediately. This ensures that the chatbot is ready to provide a contextually relevant response as soon as possible. Once the summary is generated, it's saved in the cache.txt file for future interactions.

Extracting the text from a file is a breeze by using the Extract From File node.

Now for the brains of the operation: the AI Agent node. It works similarly to the summarization node, however it has a few more options. In addition to choosing the AI model to use, you can also set up how the chatbot remembers past interactions (chat history persistence). Plus, you can give your AI tools to work with, making it even smarter.
In our example, we'll keep it simple and use the Window Buffer Memory node to handle chat history. We'll also give our AI the Calculator tool, so it can crunch numbers like a pro.
We can send the extracted text as context to the AI model by adding the following in the Human Message field (which is basically the prompt for the AI model):
Answer questions using only the following context: {{ $json.data }}.

The workflow is started by a `Chat Trigger` and ends by responding to the user with the output of the last node that ran. In this regard, we don’t have to do anything else after the AI agent node.
Step 5: Test and publish the chatbot
To test the workflow, you can press the Chat button at the bottom of the page, which will open a modal where you can test out the chatbot before it is published.
We have a couple of opportunities in Odoo for testing purposes, so let’s ask the chatbot a couple of questions about them:


This is awesome! As you can see, the chatbot interaction feels seamless. It responds accurately to our prompts and understands natural language input very well.
Now it’s time to go live! On the Chat Trigger node, toggle Make Chat Publicly Available, you will have a few more options available. First you need to pick a Mode for the chatbot, which can either be a Hosted Chat, which means that the chatbot will be hosted by n8n, or an Embedded Chat, which means you can embed in another page, either by using the n8n embeddable chat widget (which has VueJS and React examples) or a Webhook for a completely custom solution!
Keeping AI costs under control
One of the challenges of creating a chatbot with OpenAI is managing the costs associated with using the AI model. Depending on the size and complexity of your chatbot, the number of requests and responses, and the mode of deployment, you may incur significant expenses for using OpenAI. Therefore, it is important to optimize your chatbot design and implementation to keep the AI costs under control.
Here are some suggestions:
- Make your chatbot focused and specific. Don’t let it handle queries that are outside of its domain or purpose. This will save tokens and costs.
- Set a limit on the number of requests or responses. Don’t let your chatbot get overloaded or spammed by too many users or queries. This will prevent API errors and high costs.
- Choose the right OpenAI model for your chatbot. Don’t use a bigger or more expensive model than you need. This will optimize your chatbot's performance and quality.
Wrap up
And there you have it! We've just built two AI-powered chatbots that transform how you interact with your Odoo ERP. It's like having a personal assistant who's an expert on your sales pipeline, ready to answer questions and surface critical information in seconds.
With n8n's drag-and-drop interface and OpenAI's language processing capabilities, we've shown how easy it is to add a layer of intelligence to your business operations.
If you're looking for more inspiration, check out these other chatbot tutorials on the n8n blog:
What’s next?
Ready to level up your chatbot game? Here are a few ideas to explore:
- Integrate with other data sources: Don't stop with Odoo! Connect your chatbot to other systems like CRM platforms or marketing tools for even more powerful insights.
- Add more AI tools: Explore the wide range of AI tools available, like sentiment analysis or language translation, to unlock even more possibilities.
- Experiment with prompts: Play around with different ways of asking questions and providing context to your chatbot. See how adjusting the wording or adding more information affects the responses' quality.