
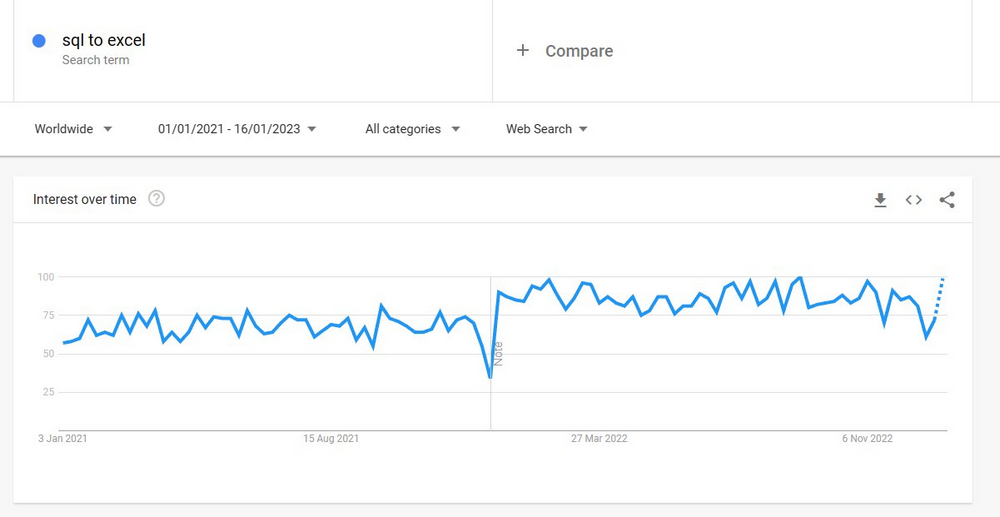
SQL Server Management Studio (SSMS) remains an ultimate management tool for many experts. Yet, as Google trends show, users constantly wonder how they can load SQL data to an Excel spreadsheet.
It's of little surprise, as data is often stored centrally in a database, and more and more users need to export SQL tables into Excel for further analysis.
This easy-to-follow tutorial covers three different ways to export SQL data to Excel: using Excel itself, SQL Server Management Studio, and an automation n8n tool.
You’ll also learn the key pros and cons of each method which will save you a great deal of effort in choosing the best tool. At the end of the article, we will present a workflow template to export SQL queries to Excel automatically.
How do I transfer data from SQL to Excel?
You might want to help your company boost efficiency or automate your own workload. Depending on your needs you might apply one of the following methods:
- Using MS Excel itself via the Power Query functionality,
- Export SQL data into Excel file using SQL Server Management Studio,
- Harnessing the power of n8n, a low-code automation tool.
Let's get started and find out how you can get more in less time with creative automation techniques!
Import SQL data directly into Excel
The first approach is to use Excel functionality to set up the import of SQL into Excel. MS Excel allows importing data from various sources using Power Query functionality.
As a data engineer specialist, you might set up an SQL extract process for your fellow colleagues. This will allow them to download new data on a regular basis using MS Excel themselves. This method is convenient for relatively small teams, but in big companies setting up and adjusting Excel connections for many people can quickly become tedious.
Step 1. Install ODBC driver
Before exporting SQL results into Excel, we need some system configuration. Windows users first have to install an Open Database Connectivity (ODBC) driver. You can get the connector for MySQL databases from the official website. The next step would be to install the connector.
Step 2. Add a new data source
Once you install the ODBC driver, press the Windows Start button and search for ODBC Data Sources.
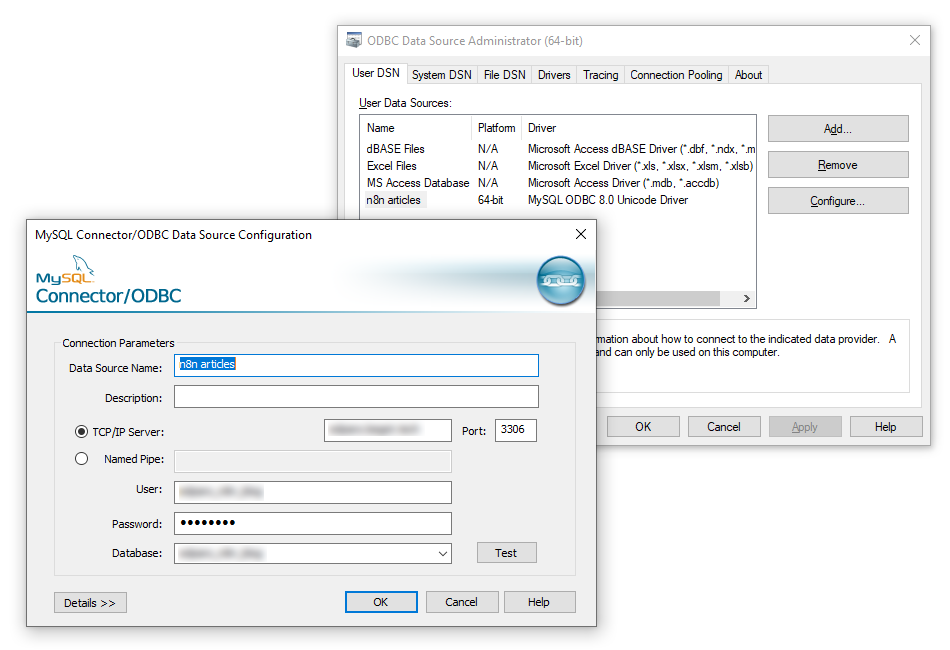
Here you can create a new Data Source Name (DSN) for a current user or the whole system. We will import the data from SQL to Excel using the example from our previous tutorial - importing CSV into MySQL. Press Add, provide the DSN name, server IP or hostname and database credentials. Then test the connection and finally press OK.
Step 3. Import data using Power Query
After adding the data source, we can open Excel, go to Data - Get & Transform Data pane and start the import process. Press Get Data - From Other Sources - From ODBC, then pick a created data source. Press OK and move forward to the Navigator, where you can select which SQL table to import.
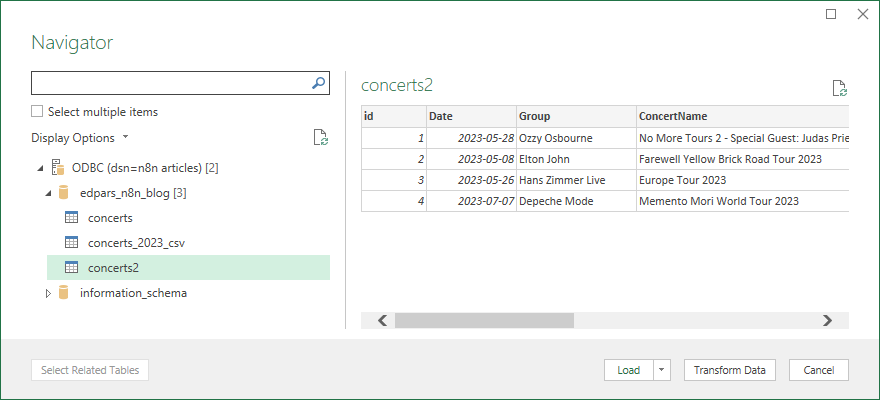
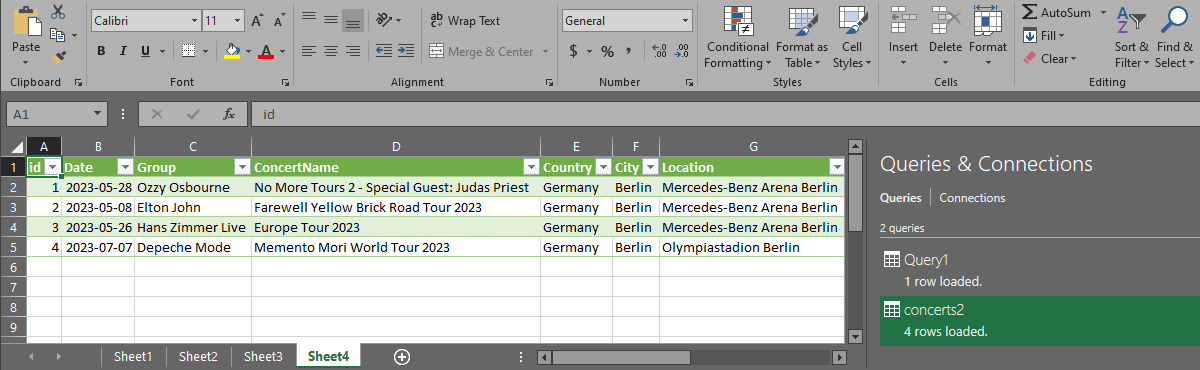
Press Load to import the table into a new Excel sheet. And you’re done!
This method might look a bit simplistic. But there are several places where you can provide custom SQL requests:
- Once you start the import process, you can press “Advanced” and provide your SQL statement. That statement will be used for import instead of reading the whole table.
- In the Navigator window press Transform Data. A new Power Query Editor window will open. There you can perform further steps. You might want to add or delete columns, sort rows, transpose the table and much more.
Export SQL query to Excel via SQL Server Management Studio (SSMS)
Another way to export SQL tables to Excel is available in the SSMS. The built-in SQL Server Import and Export Wizard is a popular tool among engineers. It allows for both manual data transfer as well as writing SQL queries.
In this section, we’ll show how to transfer data without running SQL statements. This method is useful if users in your company lack direct access to a database server. Alternatively, you might need to share the fragment of the data with external users. In such scenarios it is possible to export MS SQL to Excel using SQL Server Management Studio.
Step 1. Install SSMS and configure the local SQL Server
You can download SSMS from the Microsoft website for free. The installation process is also straightforward.
If you don’t have a working SQL Server, you you need to perform a few extra steps before reproducing the next steps:
- Install SQL Server Express LocalDB from the Microsoft website.
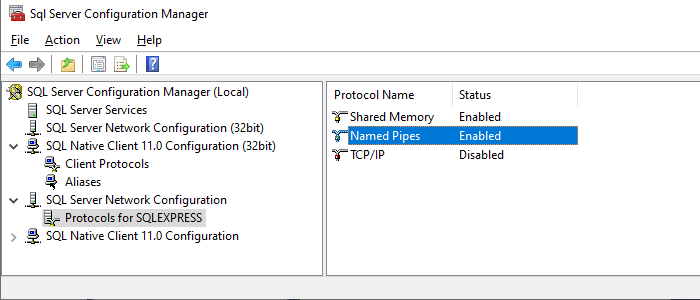
- Download and the sample SQL database (for example AdventureWorks) as described in the tutorial.Finally, open the SQL Server Configuration Manager and check the Named Pipes. The string will look something like
\\.\pipe\MSSQL$SQLEXPRESS\sql\query - You need this information if you have a local installation of the SQL Server.
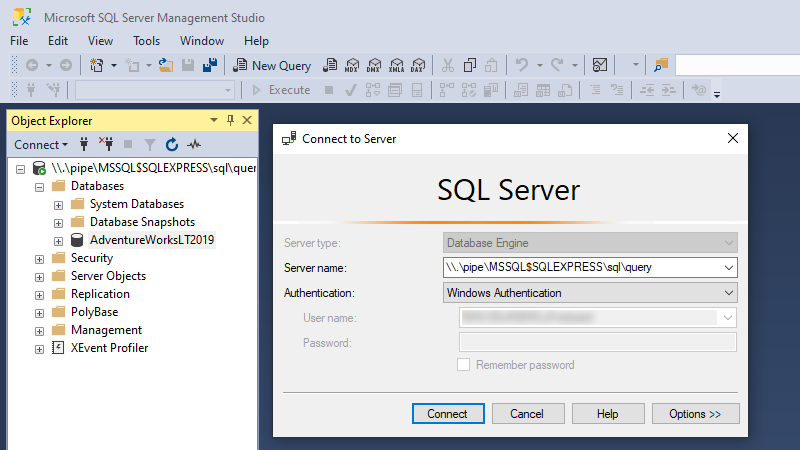
Step 2. Connect to the SQL Server and export SQL data to Excel
Once you created LocalDB server and restored the sample database, you can open the SQL Server Management Studio. Then connect to the database from the Object Explorer pane.
Once connected, perform the following steps:
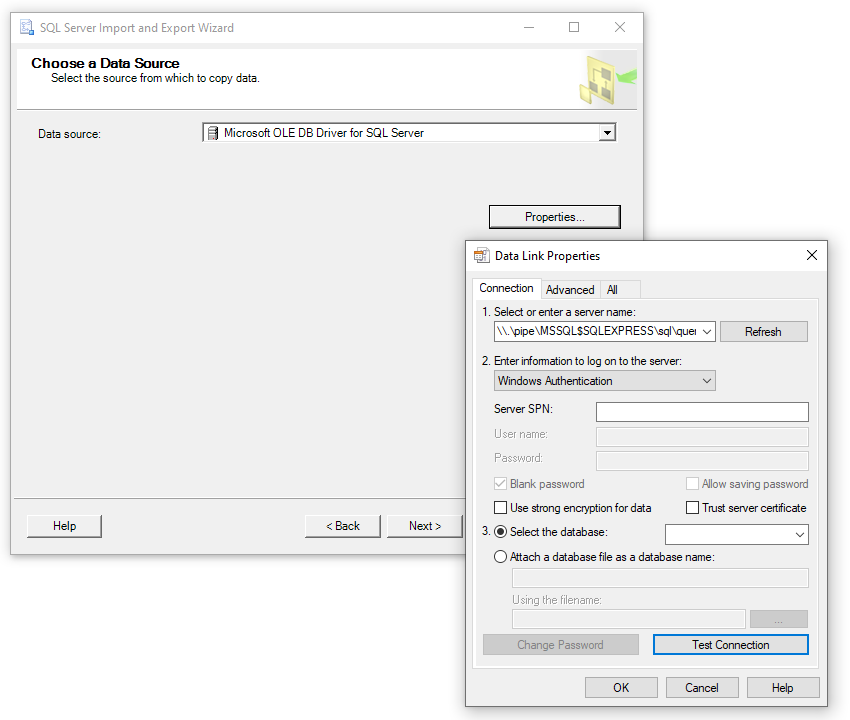
- Right-click on the database name and select Tasks - Export Data. An Import and Export Wizard will open;
- Configure the Data source first. Select “Microsoft OLE DB Driver for SQL Server”, then press Properties and configure the connection. Here you need to provide a named pipe as a server name and select Windows Authentication. Don’t forget to Select the database!
- Finally, press Test Connection and OK once finished.
Next, we need to pick Microsoft Excel as a Destination. Select an Excel file path on your local drive and pick the Excel version. Press next and select whether you want to:
- copy data from one or more tables or views; or
- write an SQL query to specify the data to transfer.
Let’s pick the first option now.
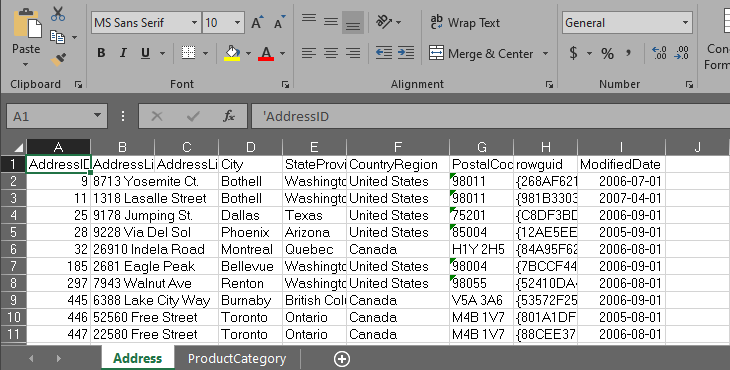
In the next window pick one or several source tables and export two tables: Address and ProductCategory. Follow the wizard until the end and open the created Excel file.
Export SQL query to Excel using n8n
The first two steps share one common drawback - they take some manual effort. This can become tedious once you begin exporting large amounts of data on a regular basis. But with the use of the n8n tool you can automate these mundane tasks.
In this part of the tutorial we will discover how to export data from SQL server to Excel automatically.
This exemplary workflow shows how to convert SQL to Excel file (which you can further automatically deliver to end users in multiple different ways). You can achieve the goal with just four nodes!
Step 1. Get data from SQL to n8n
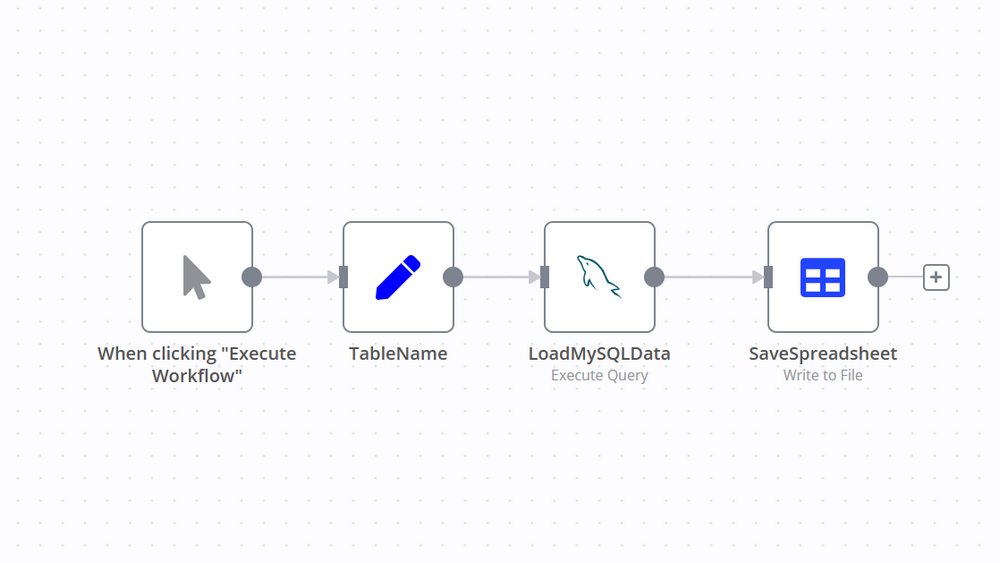
To create this workflow you will need a few built-in Core nodes. They control how the workflow is activated and transform the data along the way. You will also need at least one App node to connect n8n with an external system (MySQL server in this tutorial).
- Starting node activates the process when you press Execute Workflow.
- Next goes the Set node. String variable TableName is declared there and it is equal to concerts2. Set node allows us to automatically create Excel file and sheet names.
- The third node is a MySQL node which connects to a remote database. You will need to set up credentials first, please refer to a tutorial on how to import CSV into MySQL. If you have MS SQL server, then you need to use Microsoft SQL node instead.
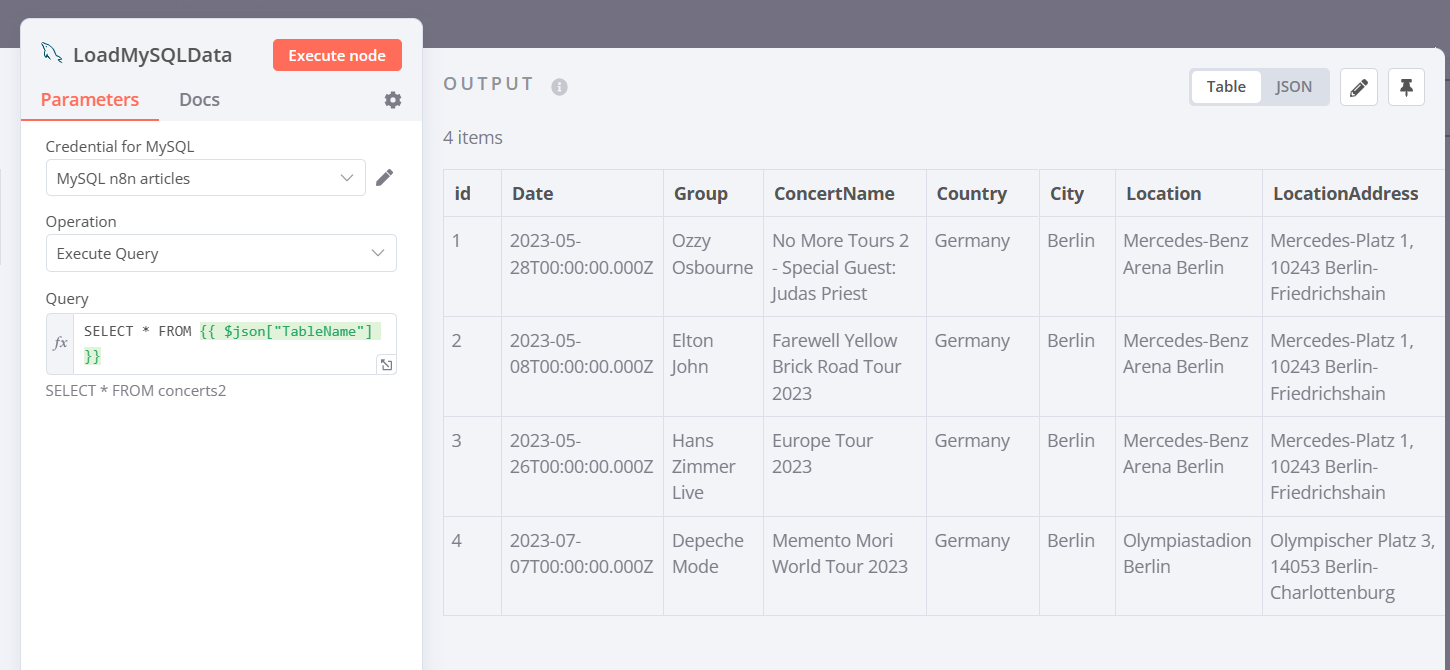
- After this, pick Execute Query operation and provide the following Query as an expression:
SELECT * FROM {{ $json["TableName"] }}As you can see, we pick all records from a table, which name we defined in a Set Node. If everything is right, you will see the imported data:
Step 2. Convert the table to Excel format
Finally, the Move Binary Data node converts a JSON object into an XLSX file. Please check the configuration of the Move Binary Data Node:
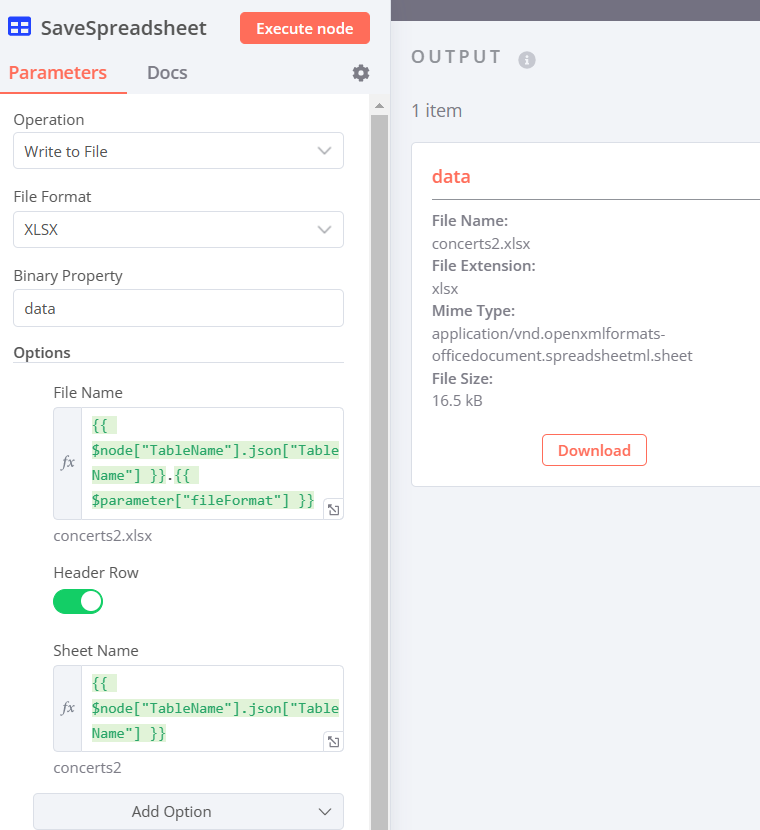
File Name option is an expression and it is set to:
{{ $node["TableName"].json["TableName"] }}.{{ $parameter["fileFormat"] }}Here we generate File Name automatically based on:
- the table name that was provided in Set Node and
- a File Format parameter. If you change the format and pick XLS (old Excel format), the File Name will change automatically to concerts2.xls. This trick can be useful when you export SQL database to Excel programmatically.
Sheet Name option is also an expression:
{{ $node["TableName"].json["TableName"] }}We make sure that both Excel filename and sheet name are equal to an SQL table name.
Now you can see how easy it is to export SQL query to Excel automatically!
Wrap Up
In this tutorial we learned how to convert SQL to Excel using three different techniques:
- We did it directly in Excel via the built-in Connections tool,
- Another approach was to use Microsoft SQL Server Management Studio,
- Finally, we exported SQL database to Excel in n8n. It allowed us to achieve our goal in an automated fashion and without coding.
What’s next?
Here's what you can do next:
- Use other databases and build workflows using Snowflake integrations, MongoDB integrations, and PostgreSQL integrations.
- Scale this workflow even further by providing multiple table names, different SQL Queries, or setting up regular exports via Schedule Trigger Node.
- Synchronize or back up Google Sheets tables in the MySQL database.
Start automating today and register your n8n account in the cloud for free! You can also run it on your own server.