There’s one specific topic in SQL, which plagues many data analysts: how do you compare data between two databases? On the surface, this question seems to require a straightforward answer, but in reality, no simple or universal solution exists:
- You might opt to create a fancy SQL script that compares two tables, but it’s not universal and has to be re-written for each new use case;
- Table and database schema comparison is available in tools such as Azure Data Studio or SQL Server Data Tools. However, these are not universally used;
- And while there are less popular tools that generate diff reports between tables, many are constrained to a single database type.
The task can easily become even more complex if the datasets come from different SQL engines and unrelated systems like Google Sheets and cloud CRM.
Today we're here to solve this!
We'll introduce a universal approach that allows you to compare two databases for differences, regardless of their origin. This solution employs n8n – a source-available workflow automation tool. It will save you from bespoke SQL script crafting for each new use case, and bypass the limitations of using specific tools tied to a single database type.
Prepare the testing environment
We’ll create a free MySQL server and import the example database. If you already have a SQL database, you can skip this step and go directly to the Workflow 1 example.
Step 1. Get access to a free MySQL server
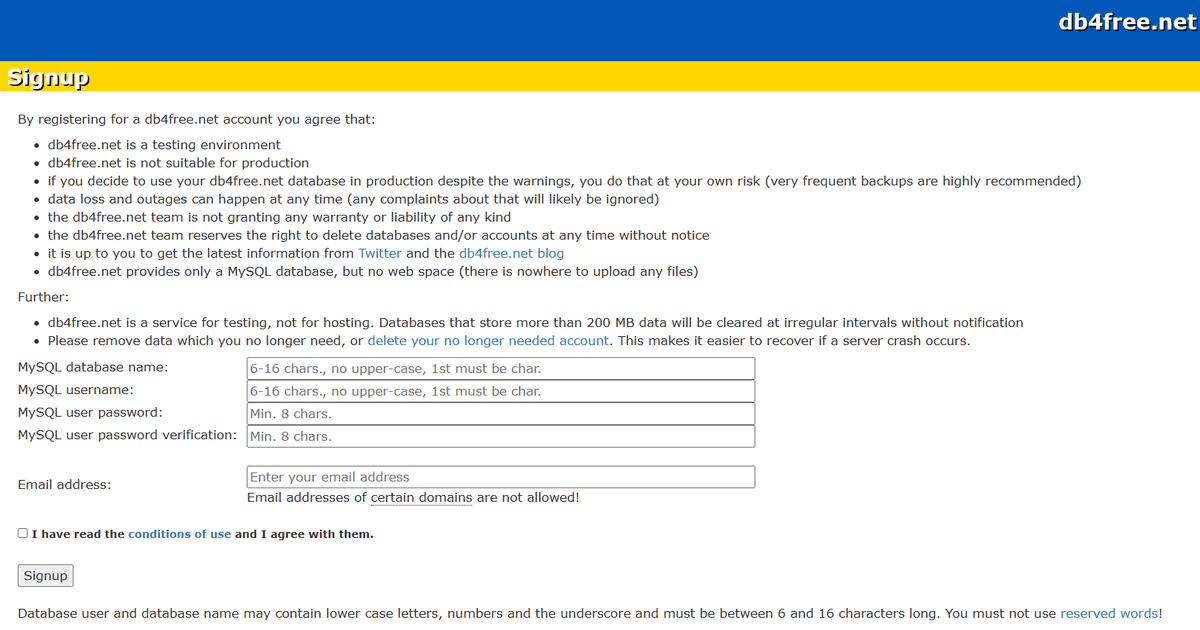
There are several free SQL playgrounds such as DB fiddle or SQLZoo that offer a testing environment. Although they have an easy-to-use browser UI, we need a platform with remote connection capabilities to import data into n8n. Hence, we suggest setting up a free account on the db4free website. Simply enter your desired database name, user, password, and email address.
After registration, you’ll receive an email with an activation link. Click on it before trying to connect to your new account. You can now log in via phpMyAdmin, a handy tool for managing remote SQL databases.
Step 2. Import a ready-made database
Now that you have a free account with remote access to the MySQL server, let's populate the database. You can either create all the tables from scratch or import a small piece of your existing data for testing.
We’ll use the model database from the MySQL Tutorial website. Download classicmodels database, extract the archive and open mysqlsampledatabase.sql file in a text editor:
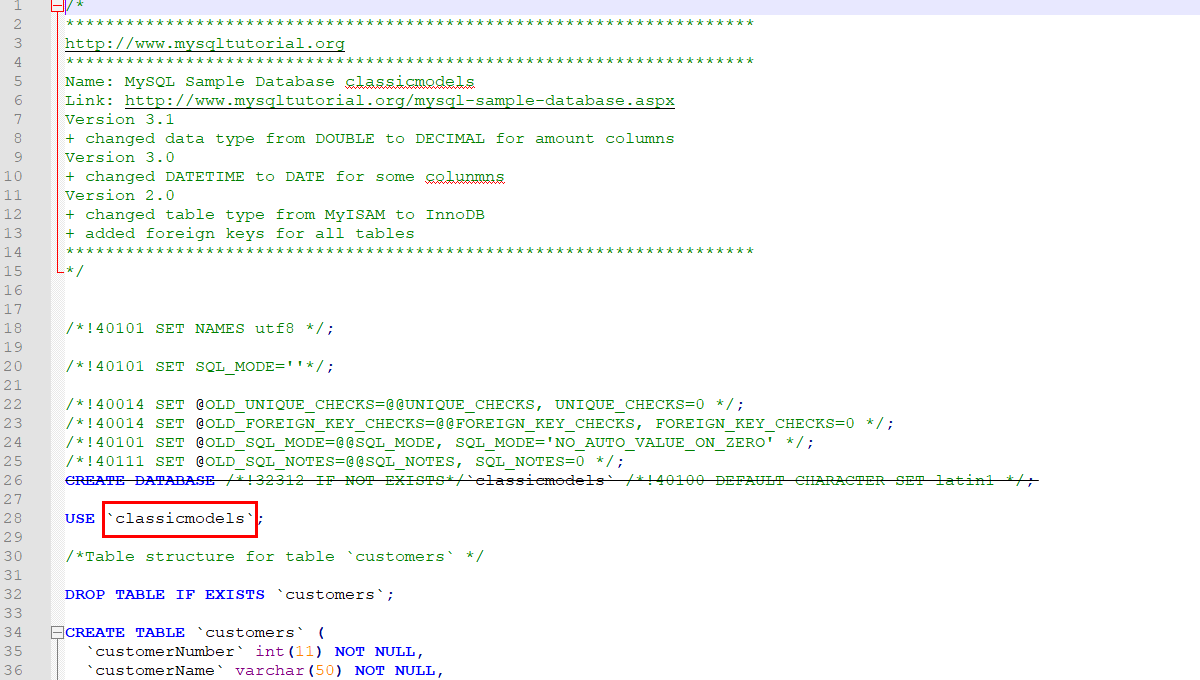
Since the db4free service doesn’t allow creating new databases with arbitrary names, you’ll need to remove the CREATE DATABASE statement and specify the name of your database in the USE statement. After making these changes, save the mysqlsampledatabase.sql file.
Next, import this sample database into phpMyAdmin by following the steps below:
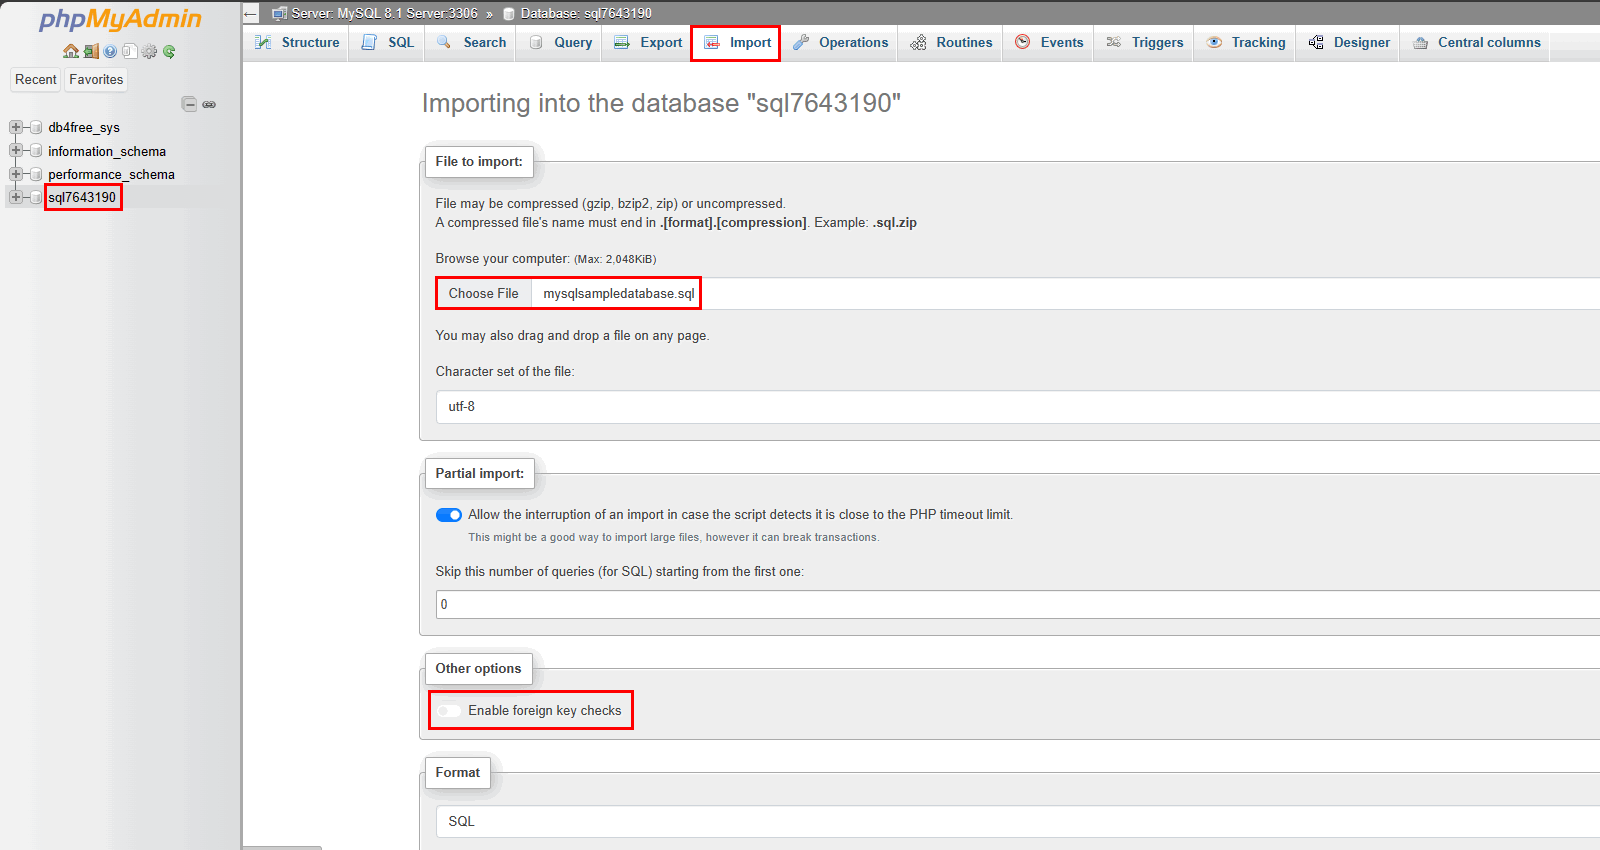
- Click on your database name on the left,
- Click the Import tab,
- Select the
mysqlsampledatabase.sqlfile, - Deactivate the “Enable foreign key checks” option – this step is crucial for a successful import,
- Finally, scroll down the page and click the “Import” button.
Once the import is completed, you'll see the new tables under your database name.
Great, on to the next step!
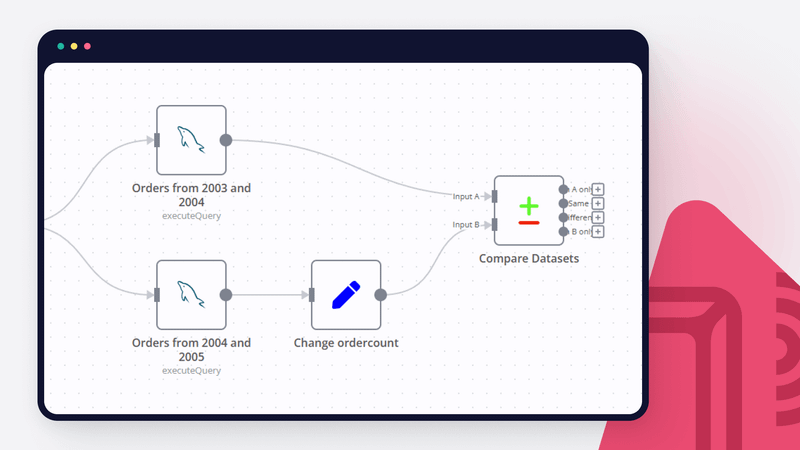
Workflow 1: Compare SQL datasets
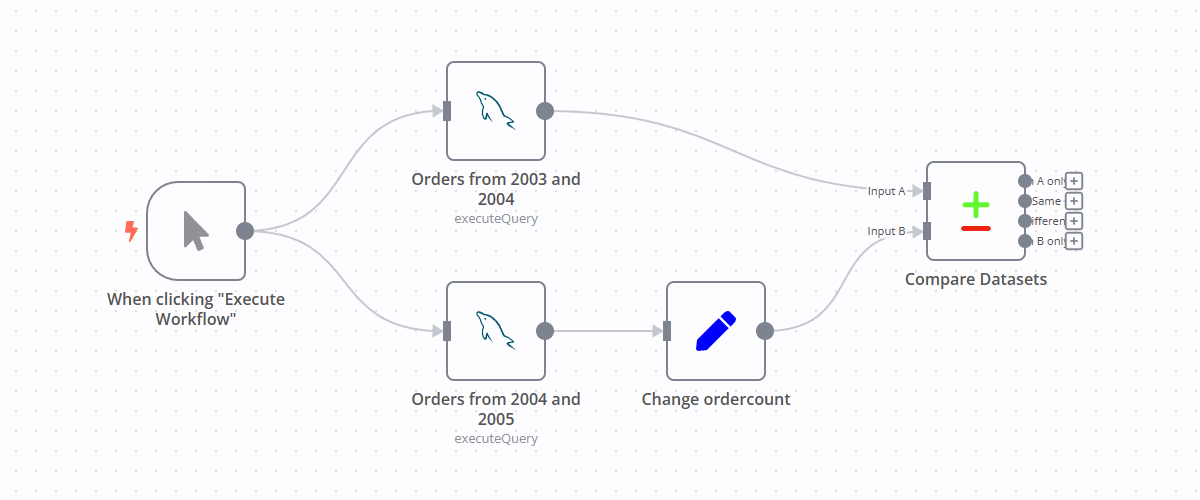
This section guides you on how to compare two tables in SQL using n8n. Here's a basic workflow:
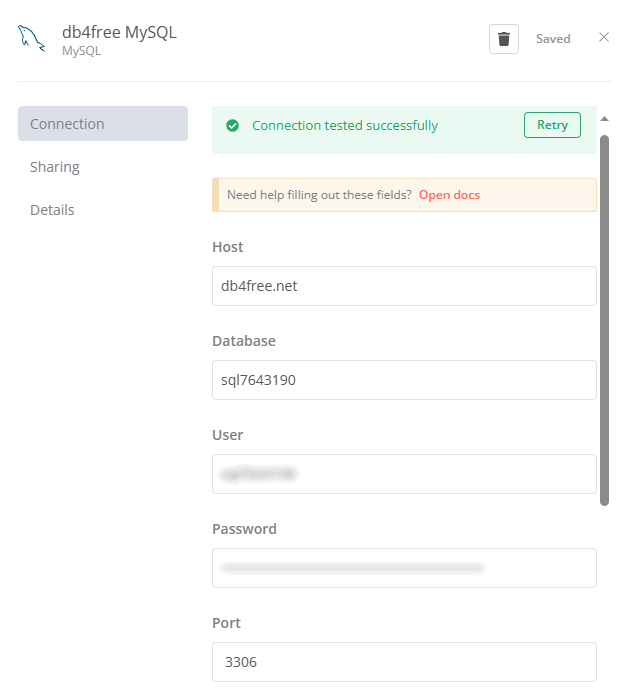
Step 1. Add a new MySQL node
First, add a new MySQL node and provide the credentials for the db4free database:
In this tutorial, we're comparing two slightly different extracts from the same table coming from a single database. In real life, you may want to compare two versions of the same table stored in two different copies of the database. Or you can compare two data extracts from entirely different databases (in this case you need to re-name variables before comparison, so they match in both sources). Compare Datasets node can handle all of these cases for you.
Step 2. Load MySQL data into n8n
Next, let's import some data. In this tutorial, we can simulate loading two slightly different summary reports from MySQL.
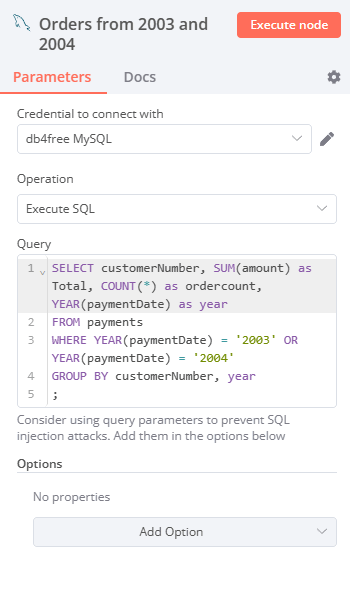
Select the "Execute SQL" operation in the first MySQL node and enter the following statement:
SELECT customerNumber, SUM(amount) as Total, COUNT(*) as ordercount, YEAR(paymentDate) as year
FROM payments
WHERE YEAR(paymentDate) = '2003' OR YEAR(paymentDate) = '2004'
GROUP BY customerNumber, year;
This SQL query generates a summary report for the payments table, calculating the total amount and number of transactions per customer for two consecutive years. You can learn some basic SQL commands on the MySQL Tutorial website.
Step 3. Add second MySQL node
Now we need to get a slightly different dataset by adding a second MySQL node:
- Copy the first MySQL node, and rename it to “Orders from 2004 and 2005”;
- Use the same settings as the first node, but change the years in the query;
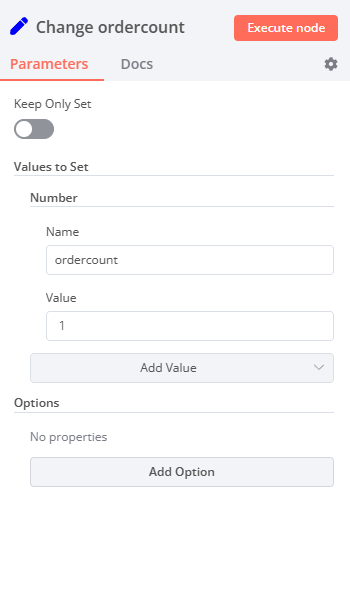
- Then add a "Set" node to override the number of payments (ordercount) by setting it to a fixed value of 1. This way we'll slightly change some data coming from the second MySQL node.
Step 4. Use the Compare Datasets node
Now that you have two different datasets ready, it's time to compare them.
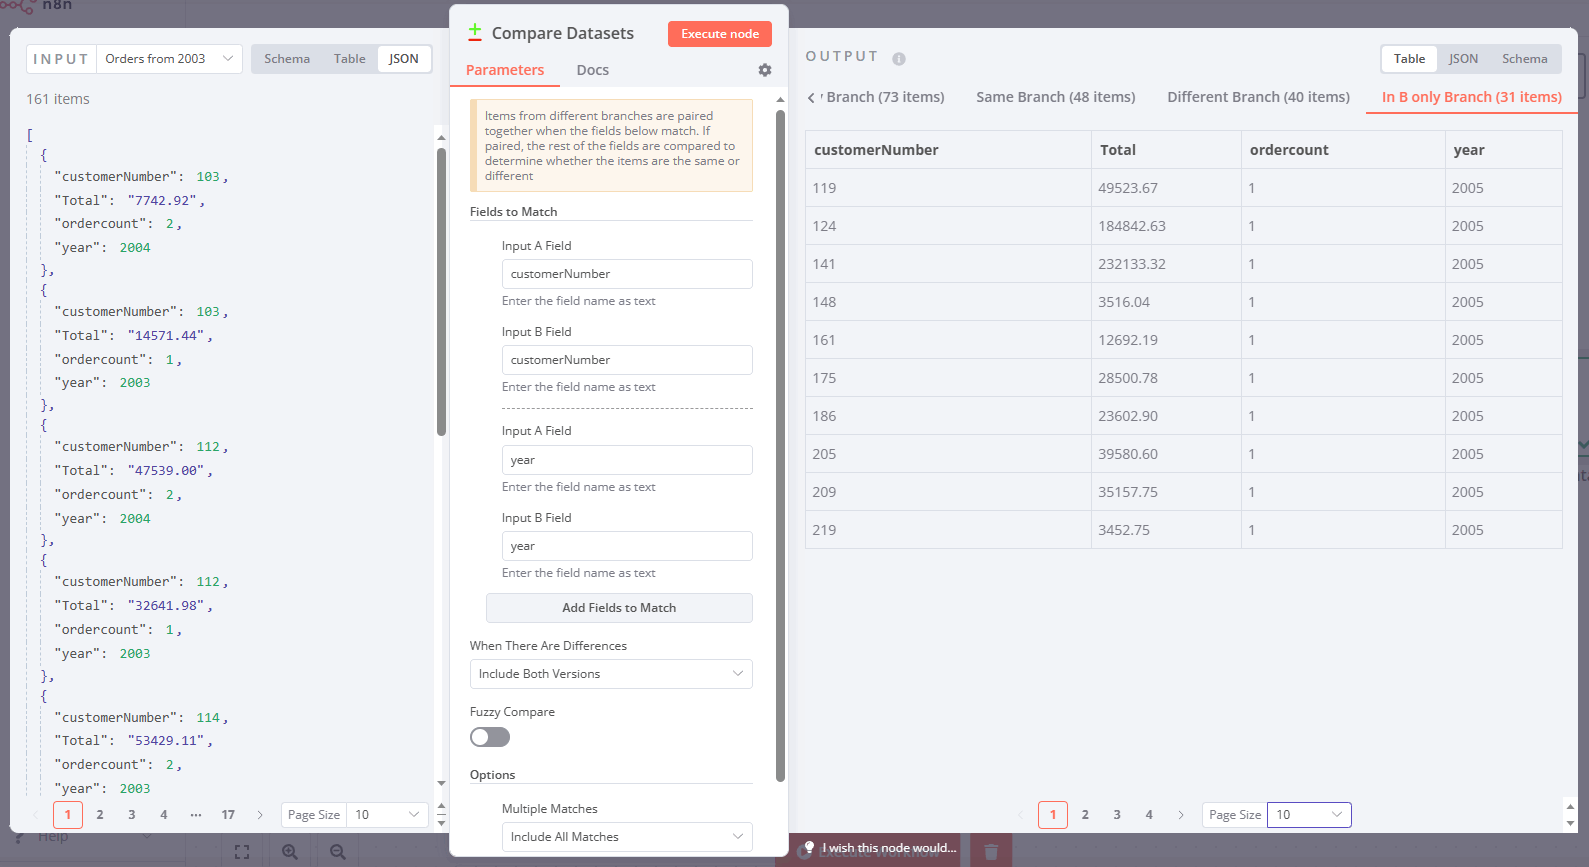
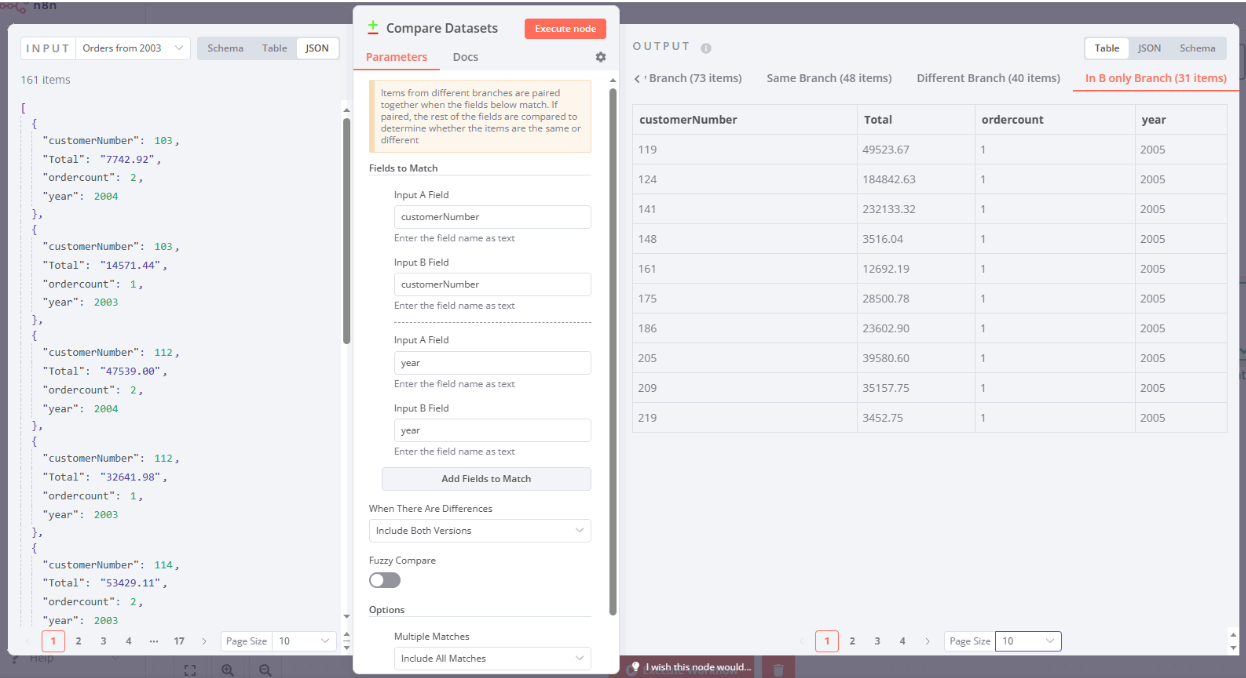
Add a new "Compare Datasets" node and configure it by inputting customerNumber and year into the Input A and Input B fields.
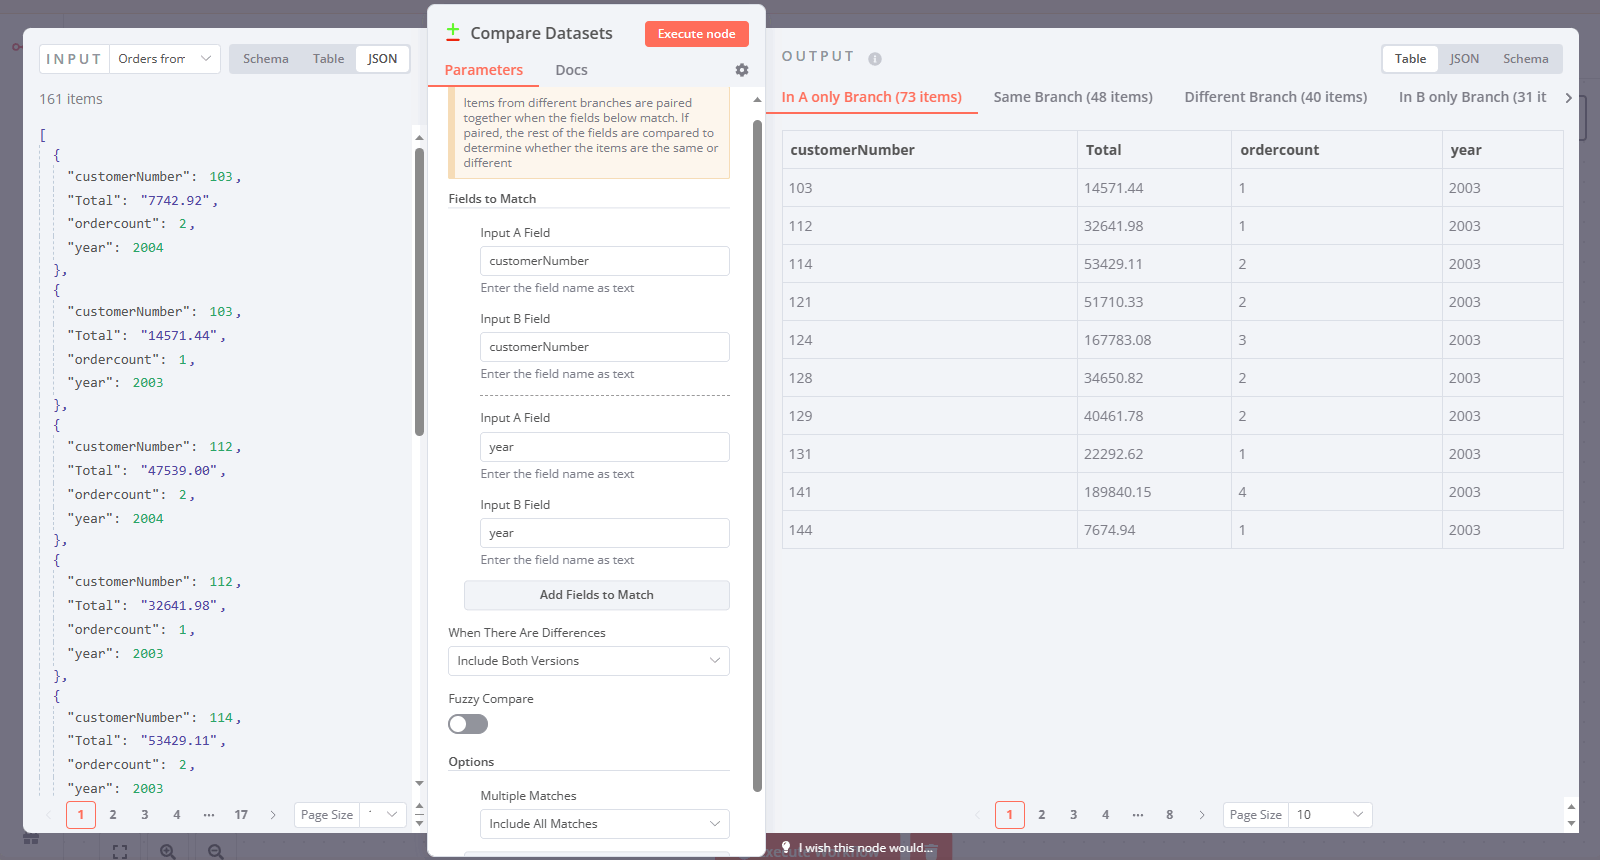
Let’s take a closer look at the right part of the screenshot. In A only Branch shows data present only in the first input (e.g., records from 2003). Similarly, In B only Branch contains data only from the second input (e.g., records from 2005):
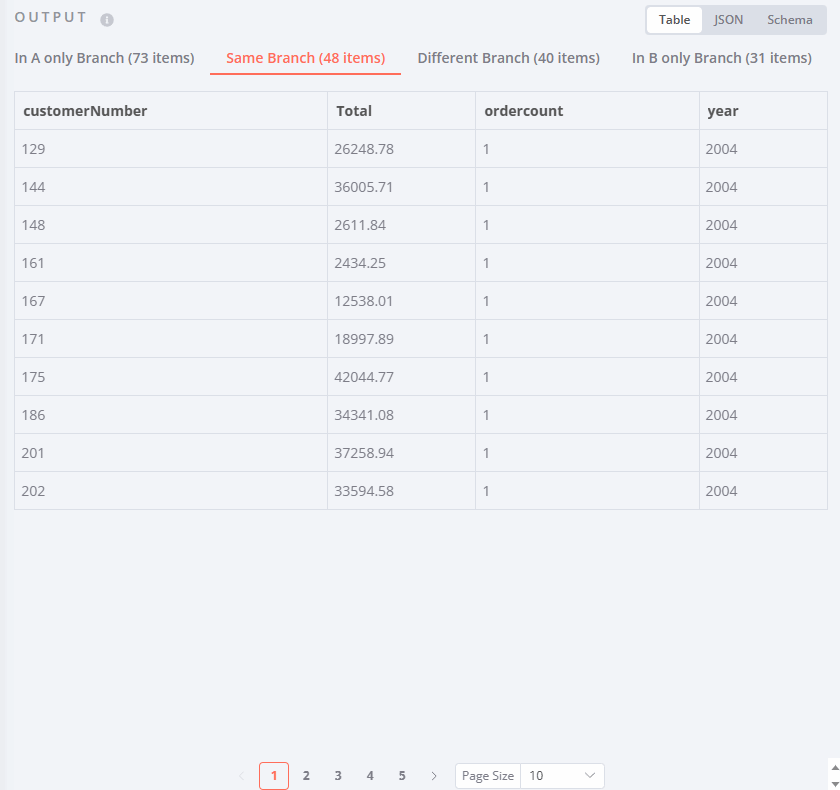
The other two outputs are somewhat more interesting.
Same Branch contains elements that are present in both inputs and are exactly the same.
Different Branch displays items with the same match fields but with differences in other variables.
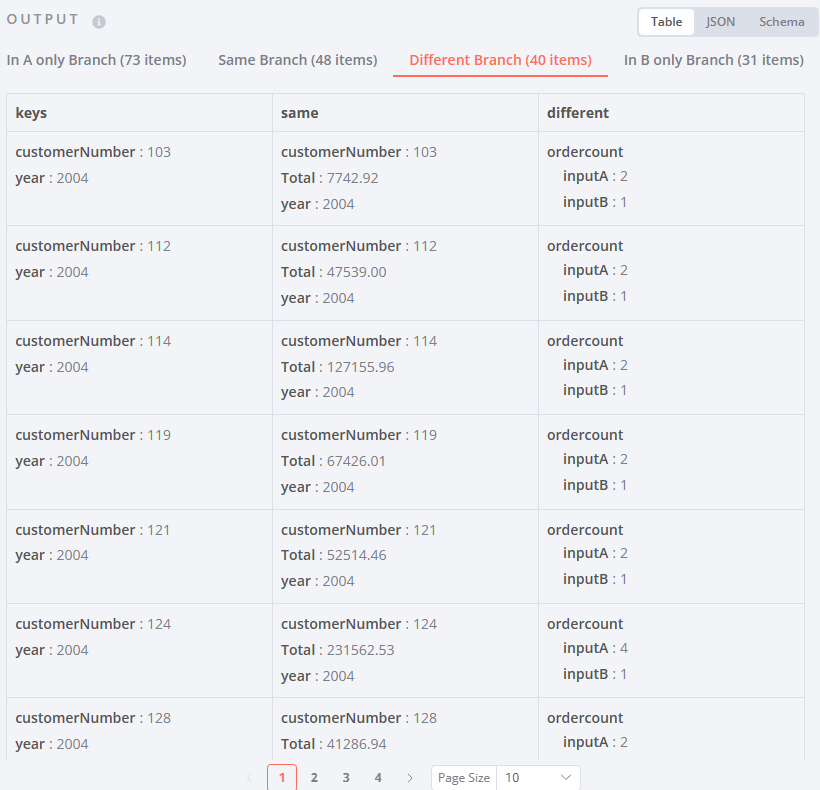
- In this output you can see which fields were used for matching (keys), which ones are the same and which ones are different;
- Note that the Total variable remains the same (since we didn’t change it);
- However, the ordercount variable is listed as different. This is expected, as we have changed it previously.
By following the above steps, you can successfully compare data between two databases using n8n. This powerful feature allows you to perform detailed data review and evaluation in a simplified manner, saving you time and ensuring accuracy in your data handling processes.
Workflow 2: Sync SQL and Pipedrive data
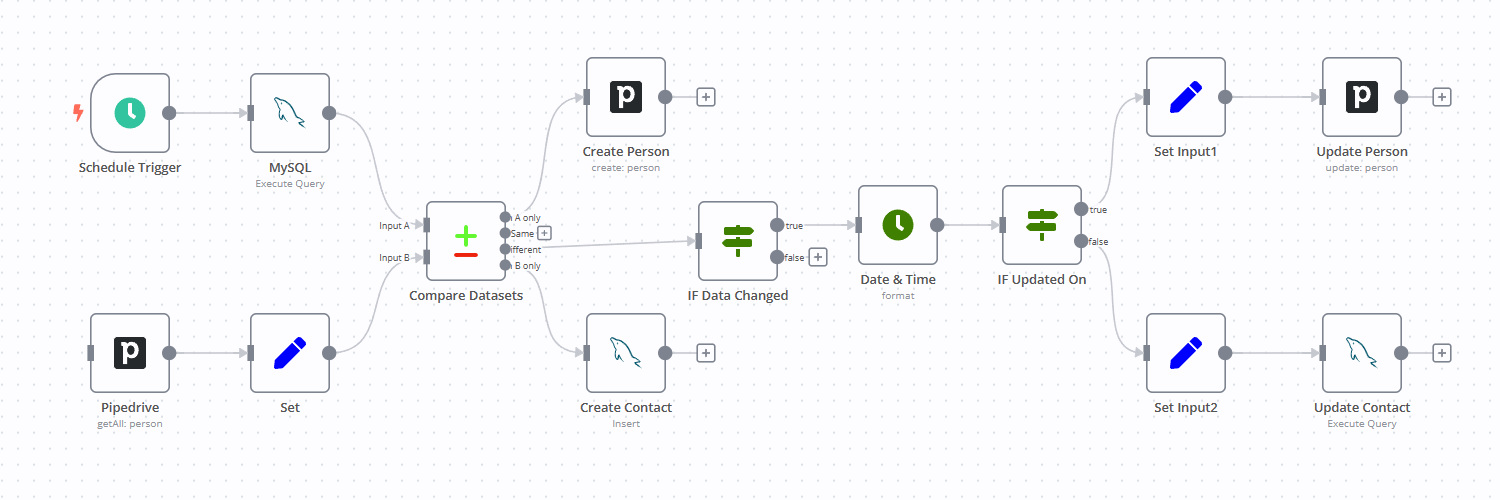
Now that you’ve learned how the Compare Datasets node works, let’s consider a more advanced scenario. The second example shows a workflow that synchronizes two separate sources by adding missing records and updating the changed values for existing records.
Grab this free n8n workflow and adjust it to your needs:
Step 1. Prepare accounts
In the previous section, we've already described how to create a free MySQL server and connect to it. You can add a new persons table with several variables (id, name, primary_email, phone, and update_time).
For Pipedrive, refer to the node documentation and create new credentials. Remember that it's not necessary to use Pipedrive specifically. The workflow can be adapted to connect to your CRM if it supports the API.
Step 2. Load MySQL and Pipedrive data into n8n
Once you have data from both sources, connect the nodes to the Compare Datasets node. Add a Set node right after the Pipedrive one, define a few variables (id, name, primary_email, phone, update_time), and activate the Keep Only Set switch. This ensures that all excess variables are dropped before comparing datasets.
Step 3. Compare SQL and Pipedrive data
Execute the Compare Datasets node, and notice the items are in four different outputs, similar to what we've demonstrated in the Workflow 1 section.
To add missing records, connect the MySQL and Pipedrive nodes as shown in the screenshot and configure them to add new records.
Note that the In A only Branch items contain records from the MySQL source, which means that the Pipedrive node must be attached to this output.
The same logic applies to the In B only Branch records; those items that are in Pipedrive only must be added to the MySQL database.
Step 4. Update changed data
Records from the Same Branch output don’t require any further actions.
However, records from the Different Branch need to be synchronized. This is achieved in three short steps:
- Add an IF node and configure a new Boolean condition
{{ !!$json["different"]["name"] || !!$json["different"]["phone"] }}. This allows us to catch changes in the name and phone variables only. - Next, let's add a Date & Time node and convert the update_time variable from MySQL. This variable, which is originally in character format, needs to be converted to allow for date comparisons.
- In another IF node add a Date & Time condition. Enter the dates from both sources as an expression and check which one is later.
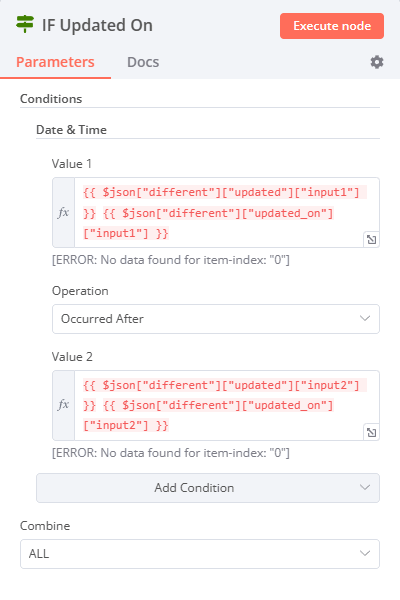
Finally, connect the MySQL and Pipedrive nodes to their respective outputs and configure them to update existing records. Set nodes before the Update Person and Update Contact are optional. They just provide short variable names for the values of the record ID, name and phone values. This way, if a username or phone number changes in one system, the updates are reflected in the second.
Wrap Up
In this tutorial, we've covered the important topic of how to compare two databases using the built-in Compare Datasets node in n8n.
In the first workflow, we used a MySQL test database and detailed the result of the Compare Datasets output. The second workflow showcased another scenario for syncing data sources from two independent systems.
What’s next?
n8n supports multiple SQL engines thanks to built-in nodes for MySQL, PostgreSQL, MongoDB and MS SQL. Choose the one that's most relevant for your project and start synchronizing data with hundreds of other tools using the Compare Datasets node.
Grab the free n8n workflow from this tutorial and customize it to suit your needs.
With n8n, whether you're working alone, part of a small team, or in a large enterprise, we got you covered. Choose from our cloud plans to get started now, or explore the powerful features of the Enterprise edition, trusted by many large corporations.
Share your ideas and tell us about your next integration project in our community forum!