We live in an API economy. What does this mean for developers?
Well, skills like API design and documentation are hot right now. Also, engineers find themselves spending more and more time on API development and integrations.
A recent study by Postman reveals that some companies take over half a year just to build API into production. This data should be taken with a grain of salt, as various types of API have drastically different requirements.
But the general idea is clear: creating APIs can be quite a time-consuming task.

In this step-by-step tutorial, we'll walk you through the ins and outs of how to build an API and give you some practical examples using the n8n automation tool.
Let's get started!
Can I create my own API?
Definitely! If you're a skilled developer who knows how to code an API with your favorite language, then you're off to a great start 🙂
But hey, sometimes we all need a little help! That's where the right API tools come in handy. Enterprise users have a variety of API integration platforms to choose from. There are also several tools that can lend a hand in creating an API for small teams or even solo devs. No matter which tool you pick, there are crucial principles for building a successful API. We'll explore those in the first part of the tutorial.
Alternatively, you can use the n8n automation tool. Though it may sound counterintuitive, n8n allows you to create your own API product and expose it to the users in your company or to external clients. The best aspect of using n8n for API building is its perfect balance between simplicity and flexibility. Discover this functionality in the second half of this article.
Before we start, it’s worth telling that there are different types of APIs. In this tutorial, we're putting the spotlight on the REST API.
How to build an API?
Nowadays it is easy to create API endpoints. However, API developers have to consider many things to build a good product.
1. Define your goals and customers
First of all, figure out who your main API “clients” are and what they need from your product. If you are building internal APIs within your company, things are a bit easier. For external clients, you might need to do extra steps.
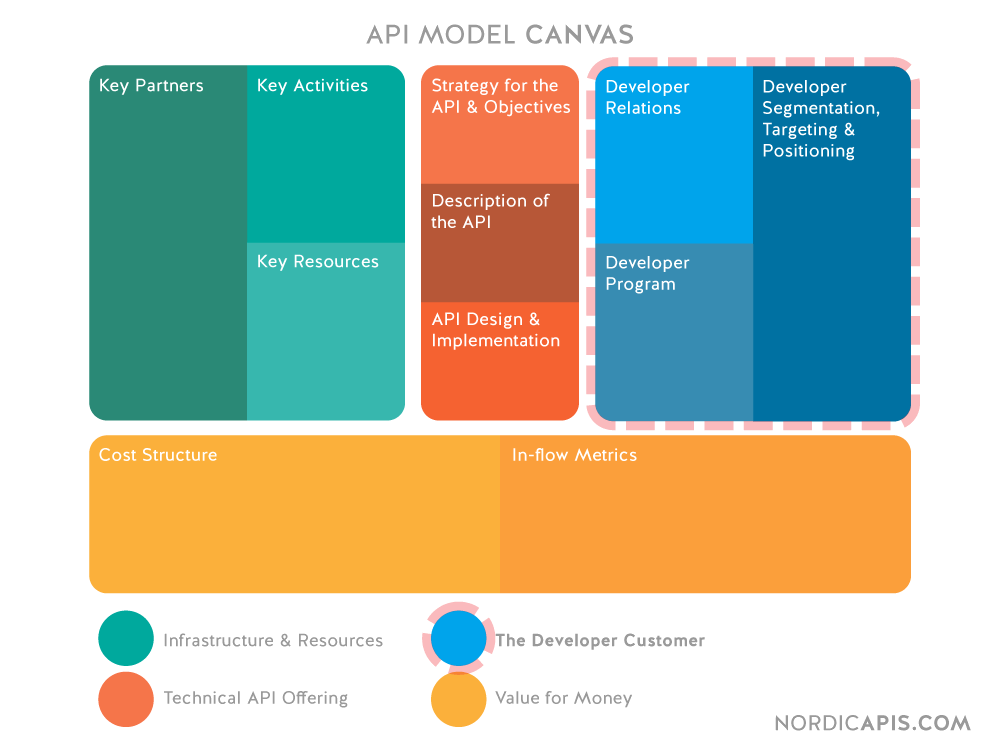
API Model Canvas is a useful framework for planning your new API product. As you can see, there are several aspects to consider:
- Infrastructure and resources
- Technical API offering
- Developer relations
- Value for money
We specifically put emphasis on developer relations here because devs are the main clients of the API products. However, in this tutorial, we will be focusing more on the technical aspects of developing an API.
2. Design API
Users of every REST API service configure several key elements to make a request:
- HTTP verbs (i.e. GET, POST, PUT, DELETE requests)
- URL endpoints. It is usually a noun word
- HTTP query or body parameters that are passed to the API endpoints
It’s important to plan a coherent and logical structure for your API product. Repeat the same concepts in various API endpoints, so that users can quickly learn and guess how to use them even without looking into the documentation.
| Operation | HTTP verb | URL: /users | URL: /users/U123 |
|---|---|---|---|
| Create | POST | Create a new user | Not applicable |
| Read | GET | List all users | Retrieve user U123 |
| Update | PUT or PATCH | Batch update users | Update user U123 |
| Delete | DELETE | Delete all users | Delete user U123 |
An example of API endpoints and HTTP request methods. Adapted from: Designing Web APIs: Building APIs That Developers Love. Book by A. Shevat, B. Jin, and S. Sahni
Next, what users receive is mainly up to the API developer. The expected reply is usually documented, but what about error codes?
It’s important to plan ahead for possible errors and report them consistently. A good approach is to combine machine-readable error codes with actionable human-readable messages.
| Error category | HTTP status | HTTP headers | Error code (machine-readable) | Error code (human-readable) |
|---|---|---|---|---|
| System-level error | 500 | -- | -- | -- |
| Business logic error | 429 | Retry-After | rate_limit_exceeded | "You have been rate-limited. See Retry-After and try again." |
| API request formatting error | 400 | -- | missing_required_parameter | "Your request was missing a {user} parameter" |
| Auth error | 401 | -- | invalid_request | "Your ClientId is invalid" |
An example of API error codes. Source: same as above
3. Document & specify your API
Some commercial API platforms provide out-of-the-box API documentation. If you prefer to use open-source alternatives, check out the OpenAPI standard and Swagger Editor for making the documentation. Using JSON schema is another approach, however, it has a steeper learning curve for beginners.
Leading API-first companies tend to begin API documentation early on. This is an extremely useful approach, as the costs of early changes in the API product are much lower.
4. Develop your API
What’s more, API-first companies focus on building APIs even before the underlying applications or integrations.
There are many ways of how to create API, but the main two ways are the following:
- Starting from scratch with some programming language
- Using a third-party tool
We think using a tool for building an API is a better approach because there are several typical tasks that are handled by an API platform. It’s a separate challenge to pick the right tool and when done correctly, this significantly speeds up the process.
5. Secure your API
With the modern-day abundance of APIs, they often become a target of malicious actors. Even if you create an API that will never be exposed to the outside, it’s still important to think about API security. Imagine a situation, when some other part fails and an internal API suddenly becomes available for everyone. Sounds scary, right?
There are two topics in API security to highlight among others:
- Authentication. This is a process of verifying a user's identity. It answers the question, "Who are you?" 🕵️♀️ For example, when you log in to a website with your username and password, the system checks if the credentials match a valid user. If they do, you're authenticated.
- Authorization, on the other hand, is about determining what a user is allowed to do once their identity is confirmed. It answers the question, "What can you do?" 🚦 For example, after logging in, a user might have permission to read certain documents but not edit them. That's their level of authorization.
6. Test your API
Testing API is a crucial part of API building. Postman, Insomnia, and ReadyAPI are popular tools for that. When doing simple testing, you can use ReqBin – a web service that allows making requests to your API endpoint.
If you work on a bigger project, implementing automated API testing is necessary, especially when the time comes for upgrading your API. These automated test cases help you ensure that new features don’t break the existing functionality.
API versioning is another approach. Using v1/ or v2/ as part of the API endpoint URL helps to keep the backward compatibility of the API.
7. Deploy your API
Once finished with making an API, you’d like users to begin interacting with it. Over time, the user base can grow or your API can experience periodic peak loads.
To successfully manage this, you will need the right infrastructure. Will your API run in the cloud or on-prem?
On top of that, get a set of software tools around your API to ensure that the project is secure, works correctly, scales well, and so on. Making these tools is an extremely complex task. You can pick one of the many API management platforms.
Cloud providers like AWS, Google, or Azure offer a holistic solution for both hosting and managing your APIs, however, this comes with a price tag.
8. Integrate your APIs
APIs don’t exist in a vacuum. Chances are, your new API won't be the first one introduced either.
So, even before deploying it is important to consider how an additional API integrates with other apps, tools, and APIs. Both technical and organizational aspects determine the success of integration.
From a technical standpoint, numerous API integration platforms can assist in this area. As we mentioned already, you can choose your preferred tool from a range of enterprise or open-source solutions.
9. Monitor your API
API management platforms often provide real-time monitoring tools. They visualize a stream of log records, the current server load and demonstrate the short-term information.
In addition to that, you can use a log archive and scrutinize it in one of the analytics platforms or dashboard builders. We wrote about 8 best open-source low-code platforms, several of which are suitable for this purpose. Low-code dashboard builders are also useful for non-technical users to make business decisions about the API product.
How to build an API with n8n?
Now that you're familiar with the crucial steps in making an API, it's time to craft your own!
We'll be using n8n to demonstrate how to create and expose a simple API endpoint in just a matter of minutes. Beyond the simplicity of the process, n8n is an incredibly versatile tool that works seamlessly whether you're an indie developer, part of a small team, or a member of an enterprise.
So, let’s dive in!
Step 1. Prepare your n8n instance
You can use n8n in several ways: in the cloud, install it on your VPS, or even run it on the local machine. We suggest using either cloud or VPS version for this tutorial. Desktop version also works, but with some nuances.
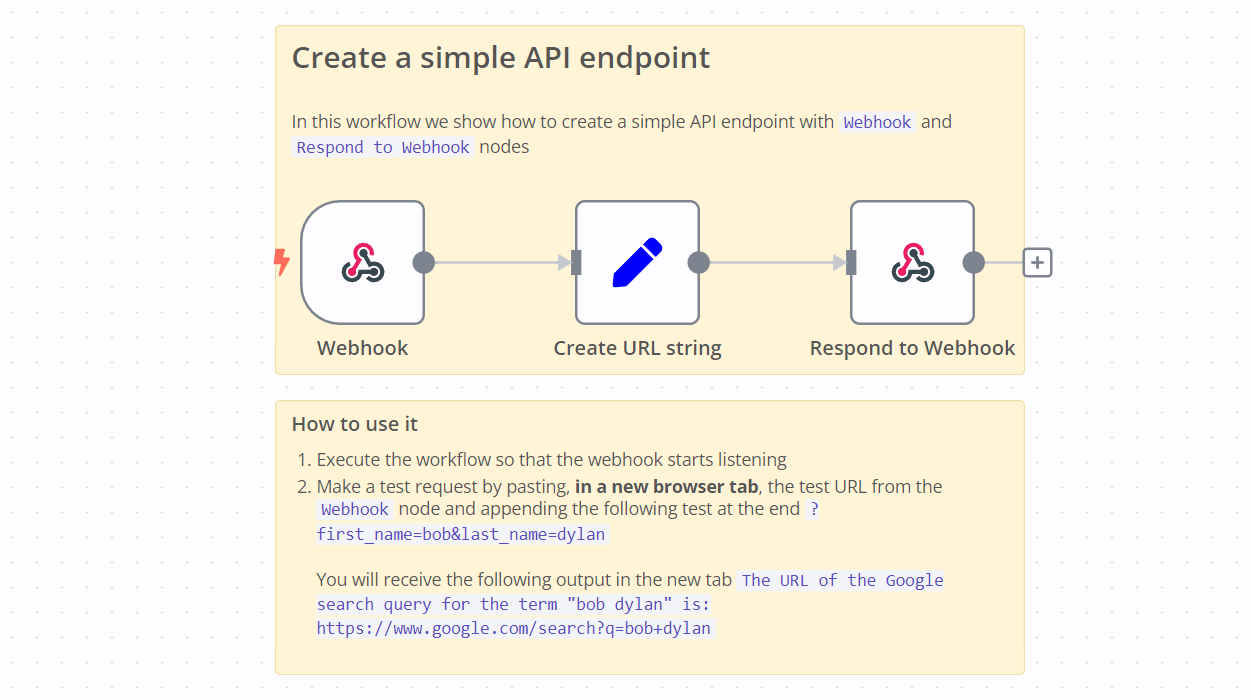
Step 2. Import example workflow
Jump-start with the example API endpoint n8n workflow. After importing this example, you’ll see three connected nodes:
- Webhook node. Once activated, it listens for incoming requests and passes the incoming data to the next node.
- Set node generates a reply string.
- Respond to Webhook node sends back the response to the user.
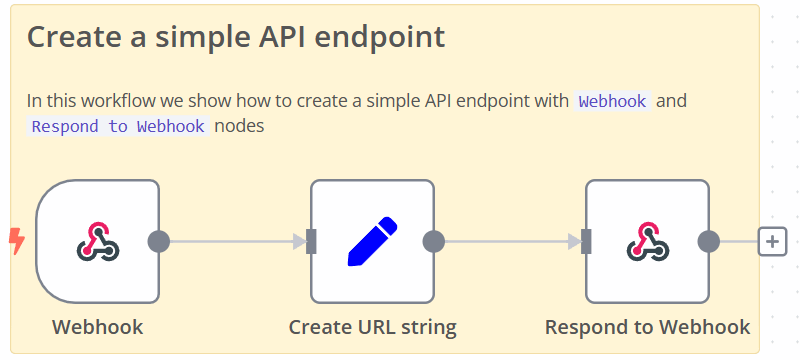
Let’s dig into details and see how each node works.
Step 3. Configure Webhook
When you double-click on the Webhook node, a configuration pane opens:
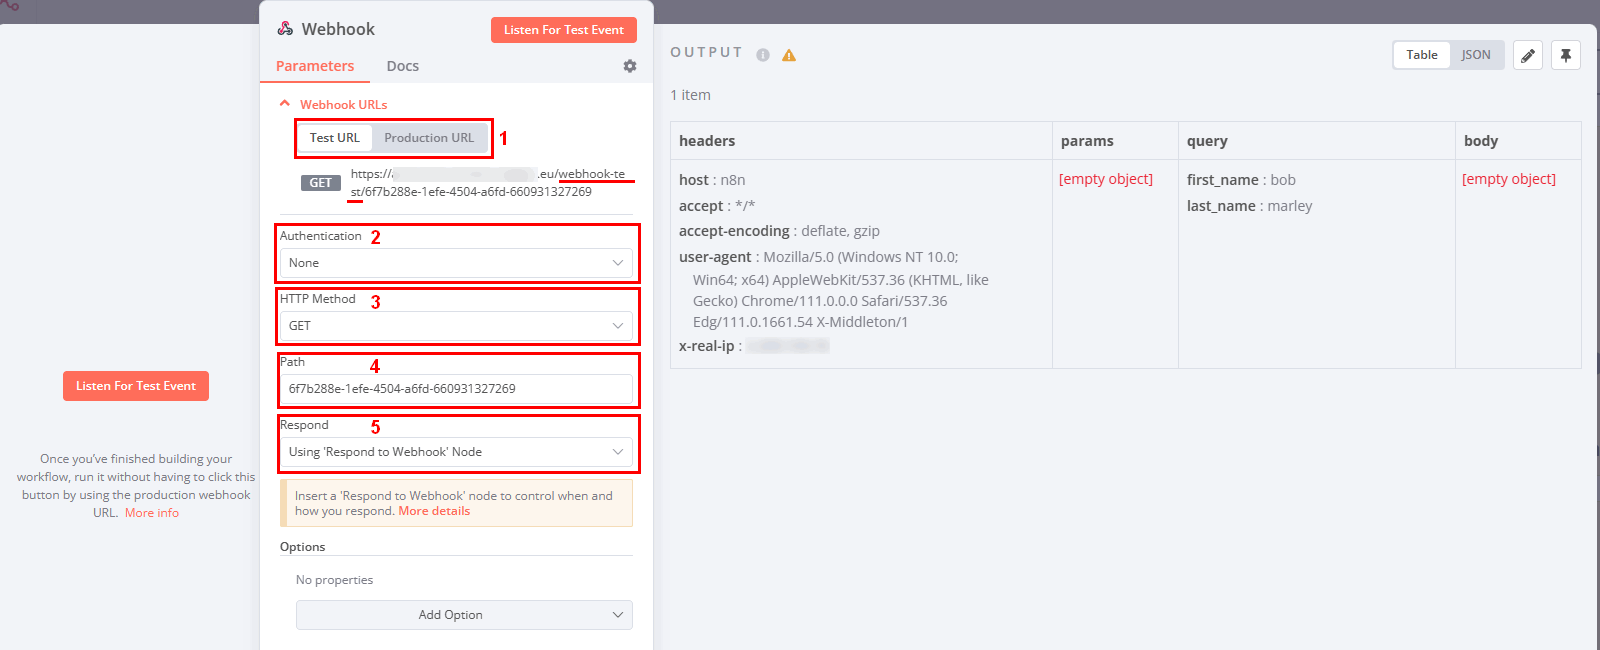
You can see five key elements of the webhook:
- Test / Production mode. This switch controls the webhook URL, take a look at the webhook-test part. Please remember in which mode your webhook operates to avoid errors.
- Authentication. n8n supports simple and header auth out of the box. For this example, we’ll continue without authentication at all.
- HTTP Method is also an important option and a common source of confusion. We can recommend renaming Webhook to make the method clearly visible.
- Path option. This is basically an API endpoint, a part of the URL that goes after the hostname and a
webhook/orwebhook-test/. - Respond option controls how the webhook should respond. If your workflow executes a request for a long time or when the user doesn’t need to wait for a reply, you can set it for immediate response.
In addition to these five fields, users can add further options, such as response headers or ignore bots.
Step 4. Add main API functionality
In this simple example, API endpoint sends back a short text string. But you change this behavior and implement whatever is possible with n8n! Thanks to its extensible nature, n8n can handle really complex tasks going far beyond common API integrations.
Step 5. Configure response webhook
Respond to the webhook node allows you to customize the response.
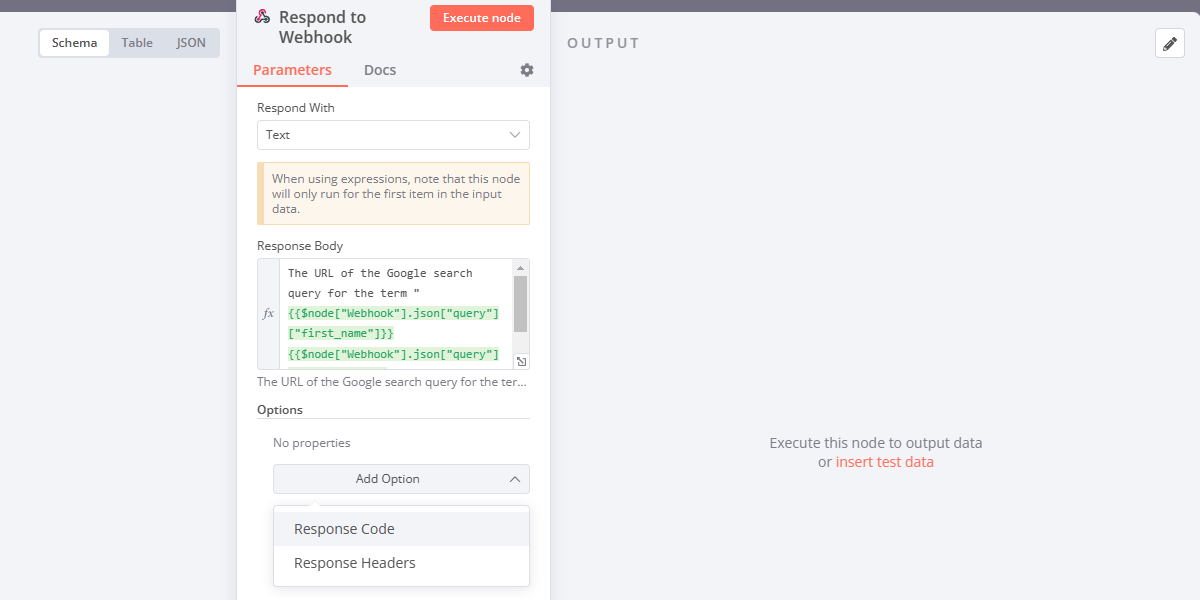
First, you can select Respond With and pick a Text, JSON, binary or no data.
In our example, we are using plain text reply and creating a response string expression in the Response Body input field.
You can also provide additional fields such as Response Code or Headers.
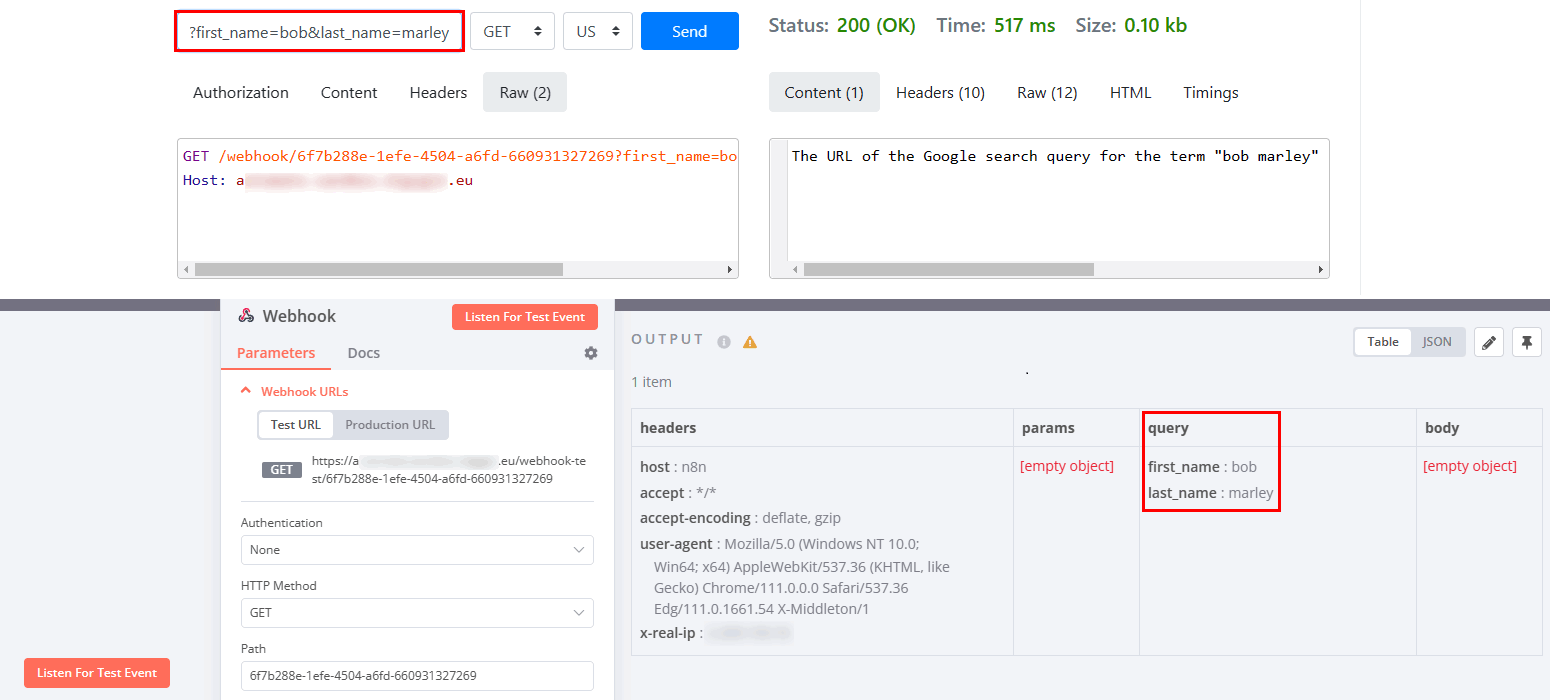
Step 6. Test the webhook
Once an API endpoint is ready, you can (and should!) test it. Let’s use ReqBin for this purpose.
In the upper left part of the screenshot, you can see the ReqBin interface. Here you can enter the API endpoint URL, select the HTTP method (GET in our case), provide authorization info, request body content and some optional headers. In our example, we are passing just query parameters, so they are already entered into the input field.
The upper right part shows the API response. You can see that the request worked (Status: 200) and the plain text content is available.
On the lower part of the screenshot you see how things work on the n8n side. The output side of the pane shows request headers, API path parameters, URL query parameters and body content.
You may have already noticed that URL query parameters ?first_name=bob&last_name=marley are stored under the query JSON key.
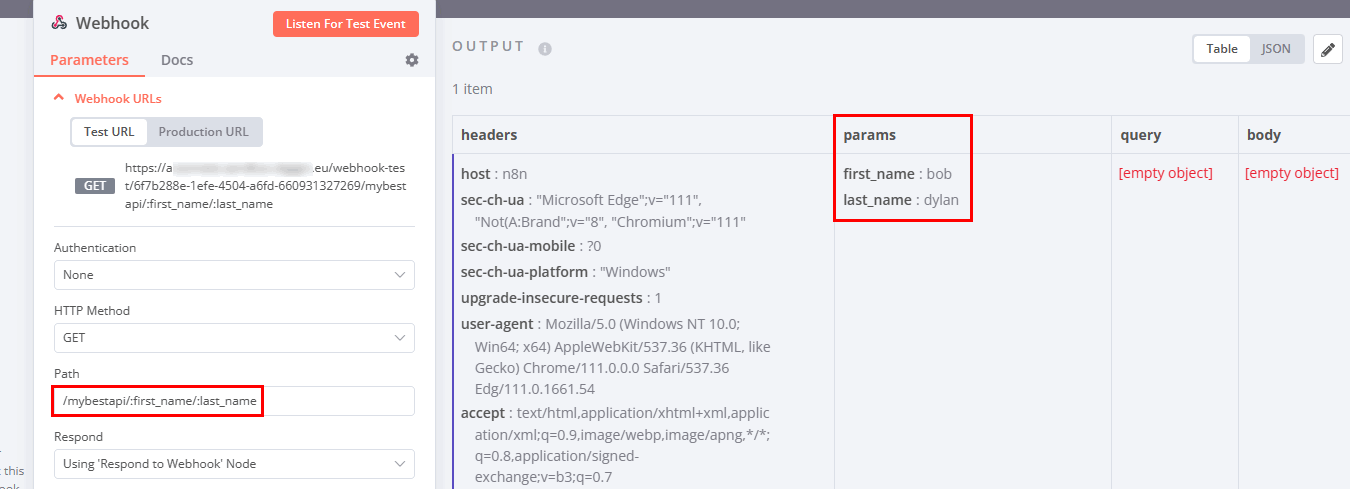
Alternatively, you can use parameters in the Path setting of the Webhook node. Check out how they are received in this case:
Finally, if you make an incorrect request (invalid URL or an unsupported HTTP method), you will see an error message from n8n. Several error codes are built-in into the Webhook node. However, you may need to define more cases and make an API that handles various error codes.
Wrap up
In this tutorial, we’ve covered several major steps for creating API and provided a primer example in n8n. We’d like to mention once again that making an API is easy, but it’s still a long way towards a real-life API product.
What’s next
In this tutorial, we could only mention the most common and obvious topics. If you’re interested to learn more about how to make an API, we can highly recommend the book “Designing Web APIs: Building APIs That Developers Love”. It’s relatively new, written by software engineers from Slack and it provides a concise overview of the subject with a good balance of theory and practical advice.
Also, don’t forget to:
- Import another example with API queries to a GraphQL. This is a different type of API not covered in this tutorial.
- Check out a guide on API integration for engineers.
- Discuss the topic of API creation on our community forum.
Set up your own n8n instance: in the cloud, on-premises or directly on your desktop. Cloud version starts just from 20€ per month, self-hosted Community and desktop versions are completely free.